- Use Snipping Tool to capture screenshots
- Open Snipping Tool
- Work with your screenshots
- Использование приложения «Ножницы» для захвата снимков экрана
- Открытие приложения «Ножницы»
- Работа со снимками экранов
- Open Snipping Tool and take a screenshot
- Snipping Tool in Windows PC: Tips & Tricks to capture screenshots
- Snipping Tool for Windows PC
- Capture screenshots in Windows
- Open Snipping Tool using Hotkey
- Win+PrntScr in Windows
- Snipping Tool Keyboard shortcuts
- Disable white overlay
- Capture Context Menu using Snipping Tool
- Set Time delays for screen captures using Snipping Tool
- Capture part of screen using Hotkey
- Capture parts of Windows 8 Start Screen
- How To Use Windows Snipping Tool Shortcuts In Windows 10
- What Is The Windows Snipping Tool?
- What Is Windows Snip and Sketch?
- Windows Snipping Tools Shortcuts
- Snip and Sketch Keyboard Shortcuts
- Putting It All Together
Use Snipping Tool to capture screenshots
Take a snapshot to copy words or images from all or part of your PC screen. Use Snipping Tool to make changes or notes, then save, and share.
Windows 10 has another screenshot app you might also like to try. When you open Snipping Tool, you’ll see an invitation and keyboard shortcut to Snip & Sketch. For more info on this app, see How to take and annotate screenshots on Windows 10.
Capture any of the following types of snips:
Draw a free-form shape around an object.
Drag the cursor around an object to form a rectangle.
Select a window, such as a dialog box, that you want to capture.
Capture the entire screen.
When you capture a snip, it’s automatically copied to the Snipping Tool window where you make changes, save, and share.
Open Snipping Tool
Select the Start button, type snipping tool in the search box on the taskbar, and then select Snipping Tool from the list of results.
For Windows 8.1 / Windows RT 8.1
Swipe in from the right edge of the screen, tap Search (or if you’re using a mouse, point to the lower-right corner of the screen, move the mouse pointer up, and then select Search), type snipping tool in the search box, and then select Snipping Tool from the list of results.
Select the Start button, then type snipping tool in the search box, and then select Snipping Tool from the list of results.
Work with your screenshots
With your Snipping Tool open, select one of the following to create and work with your screenshots.
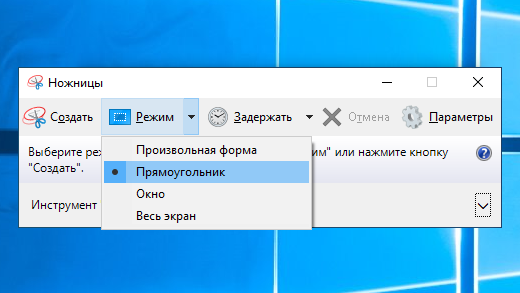
In Snipping Tool, select Mode. In earlier versions of Windows, select the arrow next to the New button. Next, when you choose the kind of snip you want, you’ll see the whole screen change slightly to gray. Then, choosing from anything currently displayed on the screen, select the area of your screen that you want to capture.

After you open Snipping Tool, open the menu that you want to capture. For Windows 7, press the Esc key before opening the menu.
Press Ctrl + PrtScn keys. The entire screen changes to gray including the open menu.
Select Mode, or in earlier versions of Windows, select the arrow next to the New button. Select the kind of snip you want, and then select the area of the screen capture that you want to capture.
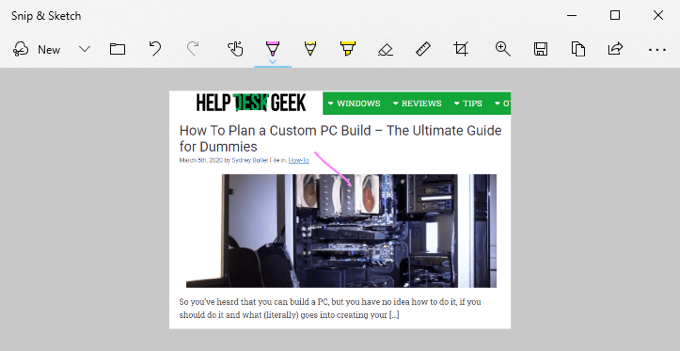
After you capture a snip, you can write or draw on or around it by selecting the Pen or Highlighter buttons. Select Eraser to remove the lines you’ve drawn.
After you capture a snip, select the Save Snip button.
In the Save As box, type a file name, location, and type, and then select Save.
When you capture a snip from a browser window and save it as an HTML file, the URL appears below the snip. To prevent the URL from appearing:
In the Snipping Tool, select the Options button.
In the Snipping Tools Options box, clear the Include URL below snips (HTML only) check box, then select OK.
After you capture a snip, select the arrow next to the Send Snip button, and then select an option from the list.
Использование приложения «Ножницы» для захвата снимков экрана
С помощью снимков можно копировать слова или изображения со всего экрана ПК или его части. Используйте приложение «Ножницы», чтобы вносить изменения, добавлять заметки, а также сохранять и отправлять снимки.
В Windows 10 есть еще одно приложение для снимка экрана, которое вы также можете попробовать. При открытии инструмента «Ножницы» вы увидите приглашение и сочетание клавиш для приложения «Набросок на фрагменте экрана». Подробнее об этом приложении вы узнаете, как делать снимки экрана и добавлять их в Windows 10.
Поддерживаются следующие типы фрагментов:
Свободный вид фрагмента
Нарисуйте любую фигуру вокруг объекта пальцем, мышью или пером планшета.
Обведите указатель вокруг объекта, чтобы образовать прямоугольник.
Выберите окно, которое требуется захватить, например диалоговое окно.
Выделение всего экрана
Захват всего экрана.
После того как снимок экрана сделан, он автоматически копируется в окно приложения «Ножницы», где его можно изменить, сохранить и отправить.
Открытие приложения «Ножницы»
Нажмите кнопку Пуск , затем в поле поиска рядом с панелью задач введите ножницы и выберите Ножницы из списка результатов.
В Windows 8.1 и Windows RT 8.1
Проведите пальцем от правого края экрана и нажмите Поиск (если используется мышь, поместите указатель в правый нижний угол экрана, переместите его вверх и выберите Поиск), в поле поиска введите ножницы, а затем в списке результатов выберите приложение Ножницы.
Нажмите кнопку » Пуск «, а затем в поле поиска введите ножницы , а затем в списке результатов выберите инструмент «ножницы «.
Работа со снимками экранов
После запуска приложения «Ножницы» выберите одну из указанных ниже функций для создания и обработки снимков экрана.
В инструменте «ножницы» выберите режим. В более ранних версиях Windows щелкните стрелку рядом с кнопкой «создать». Затем, когда вы выберете нужный вид фрагмента, вы увидите, что все экранные изменения слегка видны серым цветом. После выбора любого элемента на экране выберите область экрана, которую требуется захватить.
После запуска приложения «Ножницы» откройте меню, снимок которого вам нужен. В Windows 7 нажмите клавишу ESC, прежде чем открывать меню.
Нажмите клавиши CTRL + PRTSCN. После этого весь экран становится серым.
Выбор режимаили в более ранних версиях Windows щелкните стрелку рядом с кнопкой создать . Выберите нужный фрагмент, а затем выберите область захвата экрана, которую вы хотите захватить.
После захвата фрагмента можно делать подписи или рисовать на нем или вокруг него, нажав на кнопку Перо или Маркер. Выберите Ластик, чтобы удалить нарисованные линии.
После захвата фрагмента нажмите кнопку Сохранить фрагмент.
В окне «Сохранение файла» введите имя файла, а также выберите расположение и тип файла, после чего нажмите кнопку Сохранить.
При захвате фрагмента из окна браузера и сохранении его в виде HTML-файла под фрагментом появляется URL-адрес. Чтобы предотвратить появление URL-адреса:
В приложении «Ножницы» нажмите кнопку Параметры.
Вокне «Параметры Ножниц» снимите флажок Включать URL-адрес под фрагментами (только HTML) и нажмите кнопку ОК.
После захвата фрагмента нажмите стрелку рядом с кнопкой Отправить фрагмент, а затем выберите вариант из списка.
Open Snipping Tool and take a screenshot
To use the Snipping Tool when you have a mouse and a keyboard:
Select Start , type snipping tool, and then select it in the search results.
To take a new screenshot using the same mode you used last, select New. Or, to choose the type of snip you want, select Mode (or, in older versions of Windows, the arrow next to New), and then choose a capture mode. When making free-form or rectangular snips, use your mouse to select the area that you want to capture.
Use the Save and Copy buttons at the top of the snip to save or copy it to the clipboard.
The available snipping modes are Free-form, Rectangular, Window, and Full-screen Snip.
To use the Snipping Tool when you only have a mouse:
To open the Snipping Tool, press the Start key, type s nipping tool, and then press Enter. (There’s no keyboard shortcut to open Snipping Tool.)
To choose the type of snip you want, press Alt + M keys and then use the arrow keys to choose Free-form, Rectangular, Window, or Full-screen Snip, and then press Enter. ( Alt + M is available only with the latest update to Windows 10). When making a rectangular snip, hold down Shift and use the arrow keys to select the area you want to snip.
To take a new screenshot using the same mode you used last, press Alt + N keys.
To save your snip, press Ctrl + S keys. To copy it to the clipboard, press Ctrl + C keys.
Snipping Tool in Windows PC: Tips & Tricks to capture screenshots
Like Windows 7 and Windows 8, Windows 10 too includes the Snipping Tool which lets you take screenshots in Windows 10 computer. This Snipping Tool or SnippingTool.exe is located in the System32 folder, but it (shortcut) can also be accessed via the following location:
Snipping Tool for Windows PC
Lets us have a look at ways to use the Snipping Tool in Windows 10/8/7, effectively.
Capture screenshots in Windows
When on the Metro UI or Start Screen, you can click on the Snipping Tool tile to open it. The tool will open, and you will find yourself immediately on your desktop. When in the Desktop mode, you can open it by typing Snipping Tool in the Charms Bar Search. If you use it regularly, you can also create its desktop shortcut to access it easily.
To pin it as a Tile, when on the Windows 8 Start Screen, right-click on the screen (not the tile). Click on the ‘All App’ option. In the bar that pops up at the bottom of the screen, you will see Snipping Tool in All apps. Simply right-click on it and choose the ‘Pin to Start’ option to put it on your Start screen as a Tile.
When you capture a shot from a browser & save it as an HTML file, the URL appears below the snip. To prevent the URL from appearing, open Options and clear the Include URL below snips (HTML only) checkbox.
Open Snipping Tool using Hotkey
If you are a frequent user of the Snipping Tool, you can create a hotkey for it. To do so open the System32 folder and right-click on SnippingTool.exe (or on its shortcut in the Program/Accessories folder). Select Properties. Here, you can set a hotkey for it. I have as an example selected F5. So to open the snipping tool, all I have to do next time is press F5.
The Snipping Tool allows you to take four different types of screenshots:
- Free-form Snip lets you draw and captures any irregular part of the screen
- Rectangular Snip will allow you to drag the cursor around an object to form a rectangle
- Window Snip will let you select an open window, such as a browser window or dialog box and let you capture it
- Full-screen snip will capture the entire screen when you select this type of snip.
Once you have changed the Settings to your requirements, you can click on New or Ctrl+PrtnScr to take captures.
Win+PrntScr in Windows
Clicking on Win+PrntScr in Windows will let you capture the screenshot as per your settings. The image is automatically saved in your Pictures folder.
Snipping Tool Keyboard shortcuts
- Alt+M – Choose a snipping mode
- Alt+N – Create a new snip in the same mode as the last one
- Shift+Arrow keys – Move the cursor to select a rectangular snip area
- Alt+D – Delay capture by 1-5 seconds
- Ctrl+C – Copy the snip to clipboard
Disable white overlay
When the Snipping Tool is open and active, a white overlay appears. If you want to turn it off, you can do so via its Options. Uncheck the option to Show screen overlay when Snipping Tool is active.
To save the image, you have to click on the Save Snip button An extra feature in Windows 8 is that the full screen shots are automatically saved in your Pictures folder.
If you wish to share a snip, you can click the Arrow on the Send Snip button, and then select an (email) option from the menu.
The Snipping Tool will not normally work on the start screen. You will be able to only capture the full start screen using the Win+PrntScr buttons and not a part of the start screen. If you click your allotted hotkey when on the start screen, your windows will automatically switch to the desktop mode with the snipping tool opened. But there is a trick to do so, which we will see a bit later!
Capture Context Menu using Snipping Tool
If you wish to capture screenshots of your context menu, start Snipping Tool and click on Esc. Next right-click on the desktop, file or folder and then press Ctrl+PrntScr. This will let you capture the right-click context menu. In Windows 7 you can also capture the start menu using this trick.
Set Time delays for screen captures using Snipping Tool
The new Snipping Tool in Windows 10 now lets you set up to a 5 second delay to capture pop-up menus.
Capture part of screen using Hotkey
In Windows 10 now, you can capture a part of your screen using a keyboard shortcut – WinKey+Shift+S. You can even create a desktop shortcut using the command snippingtool /clip in the Location box.
Capture parts of Windows 8 Start Screen
In Windows 8, to capture a part of your start screen, open Snipping Tool, press Esc. Next, press Win key yo switch to Start Screen and then press Ctrl+PrntScr. Now move your mouse cursor around the desired area. This will let you capture a part of your Windows 8 start screen. To capture the entire Start Screen, you can, of course, press Win+PrntScr.
If you are aware of any more tips or tricks for the Snipping Tool, please do share them in the comments section.
You may also want to check out our freeware Windows Screen Capture Tool that allows you to capture full screen, selected screen area, windows, webpages and more. You can also add watermarks to your captured screenshot or edit the image using its basic image editor.
UPDATE: Check out the new Microsoft Snip Screen Capture Tool.
How To Use Windows Snipping Tool Shortcuts In Windows 10
A cool tool you may not even know existed
Using keyboard shortcuts with either the Snipping Tool or Snip and Sketch just makes life easier. Both Snipping Tool and Snip & Sketch, which can be used to take screenshots of the computer screen, are already part of your Windows 10.
We can also take screenshots using OneNote, if we have it. Keep in mind that these two tools might not be ideal for every situation. Check out our ultimate guide to taking screenshots for more information.
What Is The Windows Snipping Tool?
For a Windows utility that’s been around for 17 years, lots of people still don’t know it exists. It’s a simple, easy to use, screenshot utility. You can use it to capture an entire window, a rectangular part of your screen, or use the freeform tool to draw around things and capture just that uniquely shaped part of the screen.
The newest version even has a delay feature. This makes it easier to capture pop-out or right-click menus.

You can take the capture and make notes or draw on it to really highlight what you want to show. From there, sharing it is easy too. You can copy and paste it into a document or email, or just email it to someone directly from the Snipping Tool.
What Is Windows Snip and Sketch?
Since Windows Snipping Tool is 17 years old, Microsoft decided to put together a similar but updated screen capture tool. Snip and Sketch came out with the Windows 10 October 2018 Update. If you don’t have it, you can also get Snip and Sketch from the Windows Store.
Windows Snipping Tools Shortcuts
For these shortcuts to work, Snipping Tools must be open and be the app that has the focus. It can’t be open and behind anything, or the shortcuts do not work. There is no keyboard shortcut to open Windows Snipping Tools. We could make a keyboard shortcut to open Snipping Tools, though.
In the list of shortcuts below, Alt + N means to press the Alt key and the N key at the same time. If it says Alt + T then P that means press the Alt key and the T key at the same time and release, then press P.
| Keyboard Shortcut | What it Does |
| Alt + N or Ctrl + N |  Starts a new screen capture Starts a new screen capture |
| Alt + M |  Set the screen capture mode. Use ↑ and ↓ arrow keys to choose from: Free-form snip, Rectangular tool, Window snip, Full-screen snip. Then press Enter to commit the choice. Set the screen capture mode. Use ↑ and ↓ arrow keys to choose from: Free-form snip, Rectangular tool, Window snip, Full-screen snip. Then press Enter to commit the choice. |
| Alt + D |  Set the delay for starting the capture. Use ↑ and ↓ arrow keys to choose from: No delay, 1 Second, 2 Seconds, 3 Seconds, 4 Seconds, 5 Seconds. Then press Enter to commit the choice. Set the delay for starting the capture. Use ↑ and ↓ arrow keys to choose from: No delay, 1 Second, 2 Seconds, 3 Seconds, 4 Seconds, 5 Seconds. Then press Enter to commit the choice. |
| Ctrl + S |  Save the screen capture Save the screen capture |
| Ctrl + C |  Copy the screen capture Copy the screen capture |
| Ctrl + E |  Edit in Paint 3D Edit in Paint 3D |
| Ctrl + P | Print the screen capture |
| Alt + F | Access File menu |
| Alt + F then T then E | 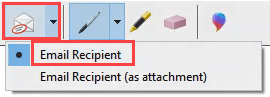 Send as an e-mail. Requires Outlook installed. Send as an e-mail. Requires Outlook installed. |
| Alt + F then T then A | 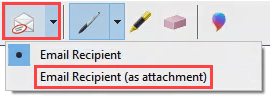 Send as an attachment in an e-mail. Requires Outlook installed. Send as an attachment in an e-mail. Requires Outlook installed. |
| Alt + T then P |  Select Pen tool Select Pen tool |
| Alt + T then P then R |  Red Pen Red Pen |
| Alt + T then P then B |  Blue Pen Blue Pen |
| Alt + T then P then L |  Black Pen Black Pen |
| Alt + T then P then P |  Custom Pen Custom Pen |
| Alt + T then P then C | 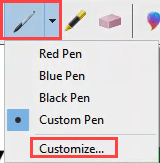 Customize Pen Customize Pen |
| Alt + T then H |  Select Highlighter tool Select Highlighter tool |
| Alt + T then E |  Select Eraser tool Select Eraser tool |
| Alt + T then O | Set Snipping Tool Options |
| F1 | Snipping Tool Help |
| Esc | When in the middle of getting a screen capture, Esc cancels it out, by escaping. |
Snip and Sketch Keyboard Shortcuts
Snip and Sketch can be opened using a keyboard shortcut, which makes it very handy to use. Make note of that. Unfortunately, there aren’t Windows snipping tool shortcuts to choose the delay time or type of snipping tool to use.

Once we’re in a tool, like the Highlighter tool, use the keyboard shortcut combination again to access the tools options. We can navigate through options using the arrow and Tab keys, and use Enter to make selections.
| Keyboard Shortcut | What it Does |
| Shift + Windows Key + S |  Opens Snip and Sketch screen capture bar. This only allows for taking the screen capture.It does not open the full Snip and Sketch app for editing. Opens Snip and Sketch screen capture bar. This only allows for taking the screen capture.It does not open the full Snip and Sketch app for editing. |
| Ctrl + N or Alt + N |  New screen capture New screen capture |
| Ctrl + O or Alt + O |  Open a file for editing Open a file for editing |
| Ctrl + P |  Print screen capture Print screen capture |
| Ctrl + Z |  Undo edit Undo edit |
| Ctrl + Y |  Redo edit Redo edit |
| Ctrl + T or Alt + T |  Toggle Touch Writing on and off. For use with touch screens. Toggle Touch Writing on and off. For use with touch screens. |
| Ctrl + B or Alt + B |  Ballpoint pen tool Ballpoint pen tool |
| Ctrl + C or Alt + I |  Pencil tool Pencil tool |
| Ctrl + H or Alt + H |  Highlighter tool Highlighter tool |
| Ctrl + E or Alt + E |  Eraser tool Eraser tool |
| Ctrl + R or Alt + R |  Crop tool Crop tool |
| Ctrl + Z or Alt + Z |  Zoom tool Zoom tool |
| Ctrl + S or Alt + S |  Save capture Save capture |
| Ctrl + C or Alt + C |  Copy capture Copy capture |
| Ctrl + A or Alt + A |  Share capture Share capture |
| Ctrl + M or Alt + M |  Opens See more menu Opens See more menu |
| Esc | When in the middle of getting a screen capture, Esc cancels it out, by escaping. |
Putting It All Together
Screen captures are a great way to tell a story. Whether it’s for helping someone else out, asking for help, or just sharing something interesting or funny, screen captures are great.
Take the time to try all of the key combinations and you’ll find that you can do almost anything you want with these tools without touching your mouse. That’s faster and easier on the hands.
Got any good screen capture tips or other favorite tools? We’d love to hear about it in the comments below. Know someone who isn’t sure how to explain what’s on their screen? Send them a link to this article. Help them out.


