- Fix sound problems in Windows 10
- Top 10 common computer problems & Solutions
- 10 Common PC Problems And Solutions
- 1. Computer won’t turn on
- Solutions:
- 1. Check the power supply
- 2. Make sure the monitor or display is functional
- 3. Eliminate external hardware
- 4. Reinstall system
- 2. Slow Internet
- Solutions:
- 1. Restart the modem
- 2. Fix your wifi signal
- 3. Kill any unwanted background software
- 4. Contact your ISP
- 3. PC Becoming Slow
- Solutions:
- 1. Find resource-hungry program
- 2. Disable startup program
- 3. Scan for malware and adware
- 4. Windows Update Problem
- Solutions:
- 5. Noisy Hard Drive
- Solutions:
- 1. Make sure the sound comes from the hard drive
- 2. Run a diagnostic software
- 3. Replace the hard drive
- 6. PC Fan Not Working
- Solution:
- 1. Determine the root cause
- 2. Assess the fan
- 7. Printer Isn’t Printing
- Solution:
- 1. Restart the printer
- 2. Check for issues on the computer
- 8. Blue Screen Of Death (BSOD)
- Solutions:
- 1. Check that there is enough space for updates
- 2. Scan your system for viruses
- 3. Update your hardware drivers
- 4. Return BIOS settings to their default levels.
- 5. Perform diagnostic tests on all hardware you’re able to test
- 9. Computer Freezes
- 10. System Automatically Restart
- Solutions:
- 1. Deleting bad registry files
- 2. Updating drivers
- 3. Checking hardware issues
- 4. Scanning for viruses or malware
- Recap
- Conclusion
Fix sound problems in Windows 10
If you’re having audio problems, the following suggestions might help. The tips are listed in order, so start with the first one, see if that helps, and then continue to the next one if it doesn’t.
If multiple audio output devices are available, check that you have the appropriate one selected. Here’s how:
Select the Speakers icon on the taskbar.
Next, select the arrow to open a list of audio devices connected to your computer.
Check that your audio is playing to the audio device you prefer, such as a speaker or headphones.
If this doesn’t help, continue to the next tip.
The audio troubleshooter might be able to fix audio problems automatically.
To run the troubleshooter
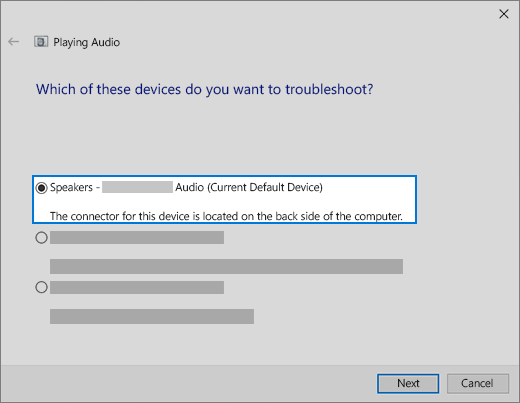
In the search box on the taskbar, type audio troubleshooter, select Fix and find problems with playing sound from the results, then select Next.
Select the device you want to troubleshoot and then continue through the troubleshooter.
You can also launch the troubleshooter from audio Settings. Select Start > Settings > System > Sound > Troubleshoot.
If running the troubleshooter doesn’t help, continue to the next tip.
To check for updates
Select Start > Settings > Update & Security > Windows Update > Check for updates.
Do one of the following:
If the status says «You’re up to date, go to the next tip.
If the status says «Updates are available,» select Install now.
Select the updates you want to install, then select Install.
Restart your PC and see if your sound is working properly.
If that didn’t solve your problem, continue to the next tip.
Try these steps
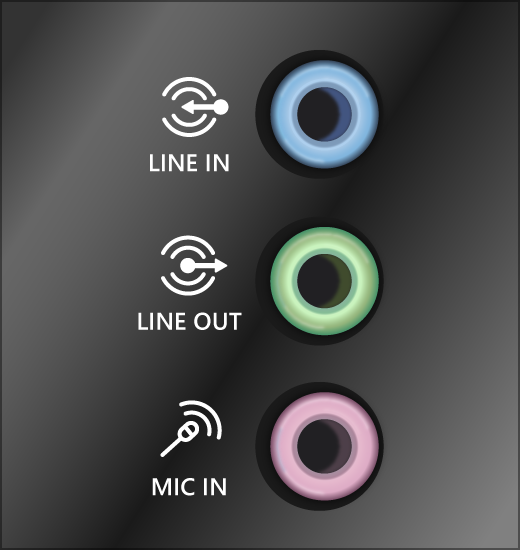
Check your speaker and headphone connections for loose cords or cables. Make sure all cords and cables are plugged in.
If you have multiple 5mm jacks to plug into, especially on a surround sound system, make sure all cords and cables are plugged into the correct jack.
If it’s not clear which jack goes with which cord, consult your hardware manufacturer, or try the most obvious outputs one at a time and see if they work.
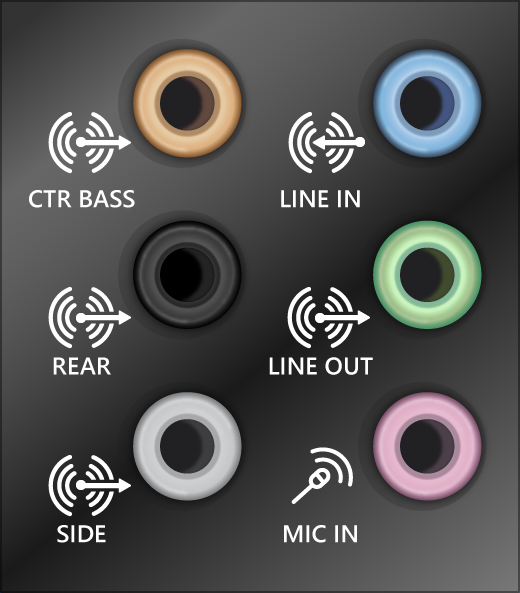
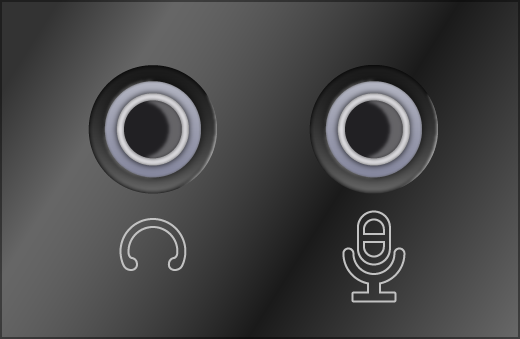
Note: Some systems use a green jack for output and pink for mic input and others will be labeled «headphone» or «microphone.»
Make sure the power is turned on and check the volume level.
Make sure the mute setting is not turned on, and try turning up all the volume controls.
Remember some speakers and apps have their own volume controls. Be sure to check them all.
Try connecting your speaker and headphones to a different USB port.
It’s possible that your speakers won’t work when your headphones are plugged in. Unplug your headphones and see if that helps.
If your cables and volume are OK, see the next sections for additional troubleshooting.
Check to make sure your audio devices aren’t muted and haven’t been disabled.
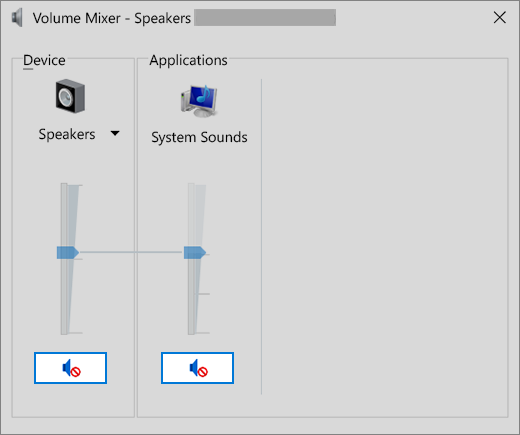
Right-click the Speakers icon on the taskbar, and then select Open Volume mixer.
You’ll see a set of volume controls for your devices. Make sure none of them are muted. If any of them are muted, you’ll see a red circle with a line through it next to the volume control. In that case, select the volume control to unmute.
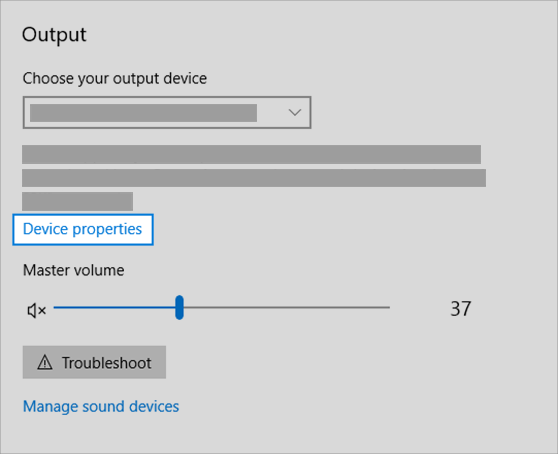
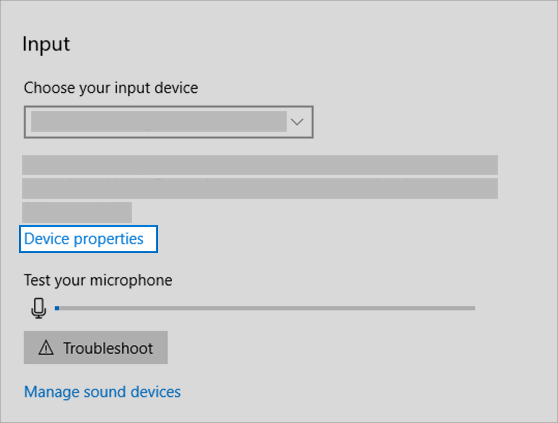
Check your device properties to make sure that your devices have not been disabled by mistake. Select Start > Settings > System > Sound .
Select your audio device, and then select Device properties. Be sure to select Device properties for both the output and input devices.
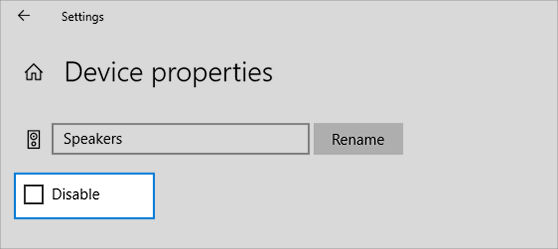
Make sure the Disable check box is cleared for the output and input devices.
If that didn’t solve your problem, continue to the next tip.
Hardware problems can be caused by outdated or malfunctioning drivers. Make sure your audio driver is up to date and update it if needed. If that doesn’t work, try uninstalling the audio driver (it will reinstall automatically). If that doesn’t work, try using the generic audio driver that comes with Windows. If you’re having audio issues after installing updates, try rolling back your audio driver.
To update your audio driver automatically
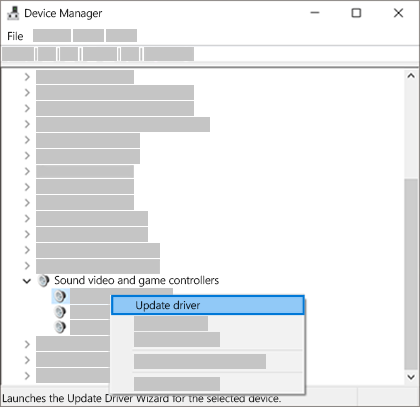
In the search box on the taskbar, type device manager, then select it from the results.
Select the arrow next to Sound, video and game controllers to expand it.
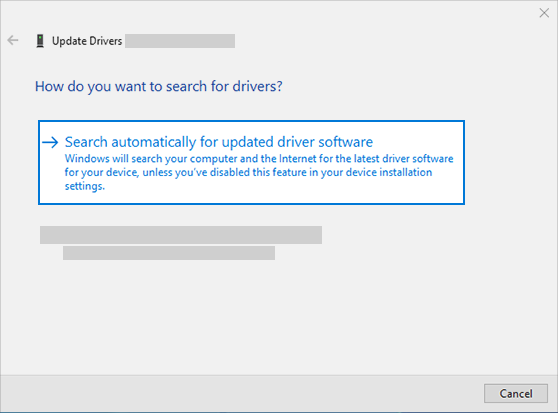
Right-click the listing for your sound card or audio device, such as headphones or speakers, select Update driver, then select Search automatically for updated driver software. Follow the instructions to complete the update.
If Windows doesn’t find a new driver, look for one on the device manufacturer’s website and follow those instructions. If that doesn’t work, try uninstalling your audio driver.
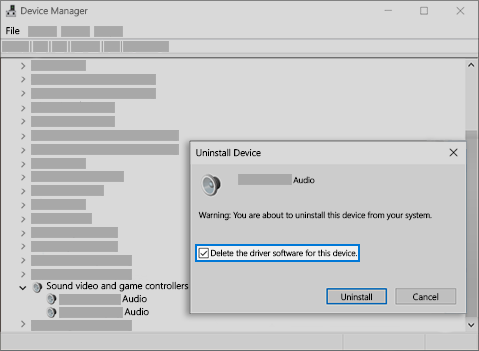
To uninstall your audio driver
In the search box on the taskbar, type device manager, then select it from the results.
Select the arrow next to Sound, video and game controllers to expand it.
Right-click the listing for your sound card or audio device, select Uninstall device, select the Delete the driver software for this device check box, and then select Uninstall.
Restart your PC.
Note: Be sure to save documents and any other current work before you restart.
This restart will automatically prompt your PC to reinstall your audio driver.
To restart, select Start > Power > Restart .
If those options didn’t work, try using the generic audio driver that comes with Windows.
To use the generic audio driver that comes with Windows
In the search box on the taskbar, type device manager, then select it from the results.
Select the arrow next to Sound, video and game controllers to expand it.
Right-click the listing for your sound card or audio device, then select Update driver > Browse my computer for driver software > Let me pick from a list of device drivers on my computer.
Select the audio device whose driver you want to update, select Next, and then follow the instructions to install it.
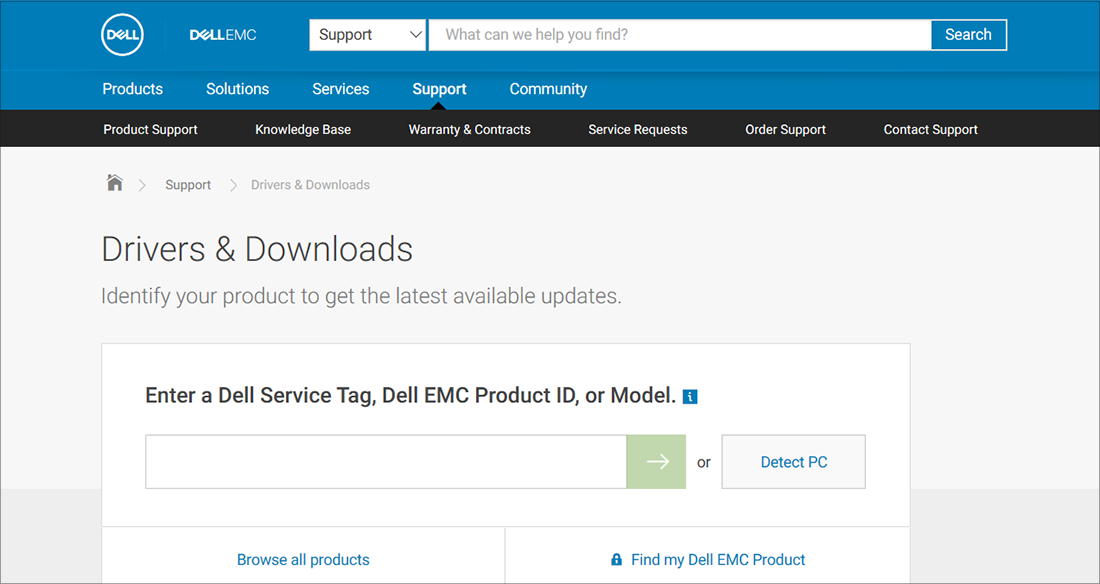
If these steps didn’t solve your audio issue, visit your device manufacturer’s website and install the most recent audio/sound drivers for your device. Following is an example of a driver download page for a sound device manufacturer.
If you have audio issues after installing updates
If your audio was working before you ran Windows Update and now isn’t working, try rolling back your audio driver.
To roll back your audio driver
In the search box on the taskbar, type device manager, then select it from the results.
Select the arrow next to Sound, video and game controllers to expand it.
Right-click the listing for your sound card or audio device, then select Properties.
Select the Driver tab, then select Roll Back Driver.
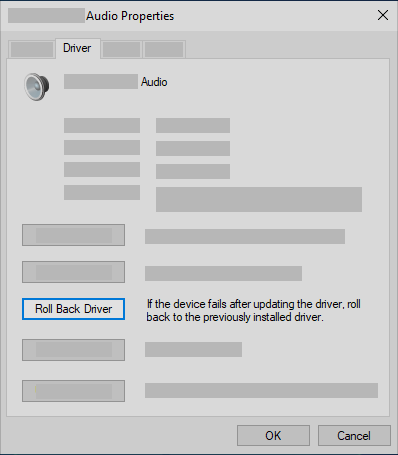
Read and follow the instructions and then select Yes if you want to roll back your audio driver.
If rolling back your audio driver didn’t work or wasn’t an option, you can try to restore your PC from a system restore point.
Restore your PC from a system restore point
When Microsoft installs updates on your system, we create a system restore point in case problems arise. Try restoring from that point and see if that fixes your sound problems. For more info, see «Restore from a system restore point» in Recovery options in Windows 10.
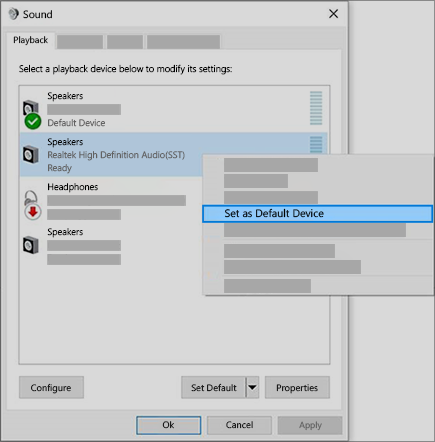
If you’re connecting to an audio device—such as headphones or speakers—using USB or HDMI, you might need to set that device as the default audio device. If you’re using an external monitor that doesn’t have built-in speakers, make sure that the monitor isn’t already selected as your default output device. if it is, you won’t have any audio. You can check that when you set your default output audio device. Here’s how:
In the search box on the taskbar, type control panel, then select it from the results.
Select Hardware and Sound from the Control Panel, and then select Sound.
On the Playback tab, right-click the listing for your audio device, select Set as Default Device, and then select OK.
If setting your audio device as the default device doesn’t help, continue to the next tip for additional troubleshooting.
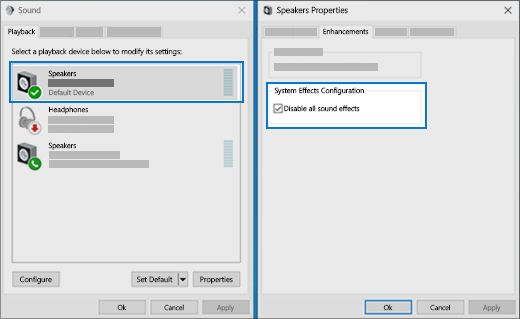
Sometimes having audio enhancements on can result in audio issues. Disabling them may resolve your issue.
In the search box on the taskbar, type control panel, then select it from the results.
Select Hardware and Sound from the Control Panel, and then select Sound.
On the Playback tab, right-click the Default Device, and then select Properties.
On the Enhancements tab, select either the Disable all enhancements or the Disable all sound effects check box (depending on which option you see), select OK, and try to play your audio device.
If that doesn’t work, on the Playback tab, select another default device (if you have one), select either the Disable all enhancements or the Disable all sound effects check box (depending on which option you see), select OK, and try to play audio again. Do this for each default device.
If turning off audio enhancements doesn’t help, see the next sections for additional troubleshooting.
In the search box on the taskbar, type services, then select it from the results.
Select each of the following services, right-click, and then select Restart:
Windows Audio Endpoint Builder
Remote Procedure Call (RPC)
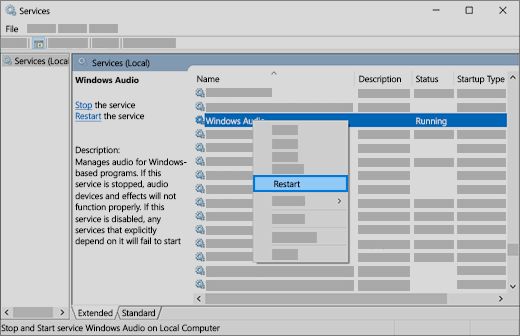
If restarting these services doesn’t resolve your issue, see the next sections for more troubleshooting.
In the search box on the taskbar, type control panel, and then select it from the results.
Select Hardware and Sound from the Control Panel, and then select Sound.
On the Playback tab, right-click (or press and hold) Default Device, and then select Properties.
On the Advanced tab, under Default Format, change the setting, select OK,and then test your audio device. If that doesn’t work, try changing the setting again.
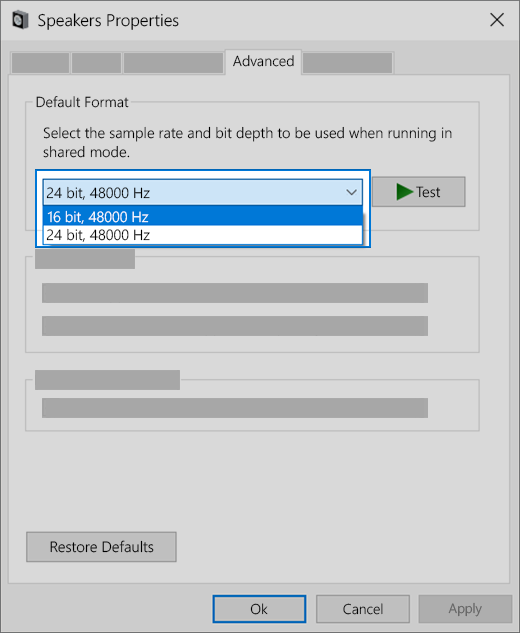
If trying different audio formats doesn’t help, see the next sections for additional troubleshooting.
Many updates require you to restart your device.
To check and see if you have installed updates pending and need to restart
Save your work and close all open applications.
Select Start > Power . If you have installed updates pending, you’ll see options to Update and restart and Update and shut down.
Select one of those restart options to apply the updates
If restarting doesn’t help, see the next section for additional troubleshooting.
Some audio problems might be caused by an issue with the audio system’s IDT High Definition Audio CODEC. This can be fixed with a manual driver update which allows you to choose the sound driver you want to use.
Note: Not all systems will have an IDT High Definition Audio CODEC.
To check and see if you have one, and to manually update the driver
In the search box on the taskbar, type device manager, then select it from the results.
Select the arrow next to Sound, video and game controllers to expand it.
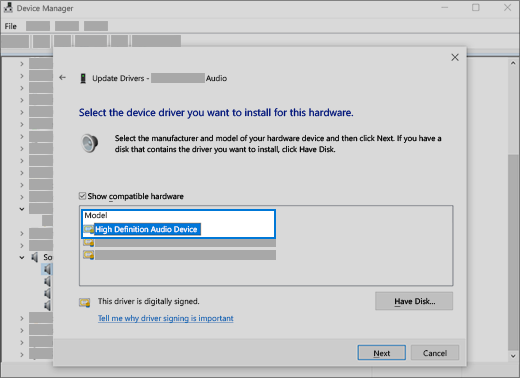
Look for IDT High Definition Audio CODEC. If it’s listed, right-click it and select Update driver, then select Browse my computer for driver software > Let me pick from a list of device drivers on my computer.
You’ll see a list of pre-installed drivers. Select High Definition Audio Device, and then select Next.
1. Select Start > Settings > Privacy , and then select Microphone from the left menu.
Under Allow access to the microphone on this device, select Change. Make sure the toggle is turned On.
If you’re having this issue with a specific app, scroll down to Choose which Microsoft Store apps can access your microphone and make sure that the toggle next to that app is turned On as well.
Top 10 common computer problems & Solutions

Common computer problems arise due to some small malfunctioning either in the software or hardware. Their solutions are often easy to apply.
Admit it, we all face them in our day to day lives when using a PC. So, don’t be panic. In today’s article, I will point out the top 10 common PC problems and how to fix them by yourself.
10 Common PC Problems And Solutions
1. Computer won’t turn on
This is probably the no.1 problem faced by many of us. To understand this problem, you can compare it to our human body.
When we are sick, we often get a fever. It’s the body mechanism to fight infection. In the same way, when the computer faces any problem, it usually won’t turn on until you fix that.
There are hundreds of reasons why a PC won’t boot up. The issues can range from power supply failure to virus infection. Normally, by following the steps given below, your computer should be able to start.
Solutions:
1. Check the power supply
- If it’s a laptop, a loss of power could result from a battery that has completely run out of charge. So, the first thing to do is to plug it in and leave it to charge for a few hours. If that doesn’t work, it could mean the charger is faulty, so, if you can try a different charger. If the charger has a power indicator, check whether it lights up when you plug it in.
- If your PC is a desktop computer and doesn’t start, check that it’s not the plug socket at fault by plugging it into a different socket. If that doesn’t work, it could be that the power supply in your PC has failed.
2. Make sure the monitor or display is functional
If you can see that your PC has power, because the fans start-up or the power lights come on, but nothing else happens, there are a couple of possible faults.
- If you have a desktop PC connected to an external monitor, it could be the display that’s faulty. Check the power connection to the monitor and that it’s properly connected to your PC. Try disconnecting it and reconnecting it. If that doesn’t work, try connecting a different monitor, if possible. That way you’ll be able to either determine it’s the monitor’s fault or rule it out.
- If you have a laptop, or if you’ve ruled out the external display, it could be that your PC is in sleep mode and is having trouble waking. To check that, shut it down completely and restart from cold. To do that, hold down the power button for 5 seconds and then press it again to start your PC.
3. Eliminate external hardware
If none of the steps above work, the peripherals could be the culprit. This could either happen because of electrical issues or external hardware failures.
After doing this, try restarting the system again to see if it works or not. If it doesn’t, move on the next final step.
4. Reinstall system
If none of the steps work, the last thing you would want to do is to reinstall your Windows. Because till this point, you can be sure that it’s the software and not a hardware issue.
Since you can’t turn your computer on, there’s no way to get access to your file. However, there are methods to backup your files from the hard drive. A clean installation will help to reset everything back to normal, should your system is infected or corrupted.
2. Slow Internet
Nothing can be more frustrated than a slow internet connection. I know, you can’t enjoy that famous Netflix show or stay connected on Facebook.
But this problem is usually pretty easy to deal with. The problem lies in 2 areas, i.e. internal issue ( issues related to your internet appliance) and external ( related to your Internet Service Provider )
Solutions:
1. Restart the modem
This solution is just like how you would resolve any gadgets. Sometimes a power fluctuation or overused of the internet modem can overload it.
In order to reset everything back to normal, simply switch off the modem, wait for few minutes and turn it back on. You should be good to go in most cases.
2. Fix your wifi signal
Speaking of wifi, you might find that your router and internet are fine, but your wireless signal is weak. This can cause a slowdown—or, at minimum, a latency-filled browsing experience. In that case, you may need to reposition, tweak, and boost your router with a few tricks.
Check out this link here to find out how to fix your wifi signal with some good tips.
3. Kill any unwanted background software
Sometimes, background processes like software updates or any other programs that require internet maybe pulling your data, hence slow down your internet speed.
By simply check your task manager, you can see the list of this software and are able to kill them off. Turn off any automatic updates in the setting and this should help.
4. Contact your ISP
If none of the above works, your problem is maybe an external issue, i.e. from your internet service provider.
This could be something like a network upgrade, bad weather, wires fixing, etc. Definitely, they will assess your internet signal and inform you of the necessary action to take.
3. PC Becoming Slow
I know that kind of feeling you feel when it takes like 5 minutes to open just an app. Well, this is another common computer problems people face in their daily lives.
The root cause is usually due to the duration of how long you have been operating the PC. A computer that is older than 2 years will experience this, regardless of their specifications.
Solutions:
1. Find resource-hungry program
With your system full of programs, there will definitely be one or two programs that use lots of your resources, for instance, a ram.
To find out, open the Task Manager. You can right-click your taskbar and select the “Task Manager” option or press Ctrl+Shift+Escape to open it. On Windows 8, 8.1, and 10.
Click the “CPU,” “Memory,” and “Disk” headers to sort the list by the applications using the most resources. If any application is using too many resources, you might want to close it normally — if you can’t, select it here and click “End Task” to force it to close.
2. Disable startup program
Autostart programs during system startup can be the major reason why your PC is slowing down.
On Windows 8, 8.1, and 10, there’s now a startup manager in the Task Manager you can use to manage your startup programs.
Right-click the taskbar and select “Task Manager” or press Ctrl+Shift+Escape to launch it. Click over to the Startup tab and disable startup applications you don’t need.
Windows will helpfully tell you which applications slow down your startup process the most.
3. Scan for malware and adware
Day-to-day usage of computers can make you accidentally catch malware and adware.
These are usually small malicious programs, caught from the internet when we browse or download something.
These programs are designed to steal your information and to that, they have to transfer information over the internet, which can potentially slow down your system.
To remove them, simply use your built-in anti-virus software to scan and detect. For more information on how to remove spyware and adware, check out my article here.
4. Windows Update Problem
Windows update errors can occur due to a bunch of reasons. Causes include Windows piracy, core files missing, license issues, etc.
The problem is, however, not that serious. But if you still want to have the latest software and security installed, you have to fix it.
Solutions:
The solution is quite straight forward. With an in-built error detection and troubleshooting, Windows has its own mechanism to fix this.
But if you still cannot fix it, I recommend going through the official Microsft Windows update errors fixing walkthrough here.
5. Noisy Hard Drive
Hard drives are usually nearly silent but some do make a muted clicking sound when they’re being accessed or turned off — this is completely normal.
On the other hand, if you start hearing noises only occasionally or noises that you’ve never heard before — like clicking, grinding, vibrations, or squealing — your hard drive may be failing.
Solutions:
1. Make sure the sound comes from the hard drive
Usually, when we hear the sound from our computers, it’s a hard drive sound. So when the sound suddenly gets louder, we assume that it’s from the hard drive.
To check this, you can simply unplug the power and data cables from the hard drive and reboot the system. If you still hear the sound, the issue is not with the hard drive.
2. Run a diagnostic software
If you’re certain that the sound comes from the hard drive itself, you can run a free hardware diagnostic software which is already available on many computers or available on the internet.
3. Replace the hard drive
If the diagnostic software fails, it simply means there is an issue related to the hardware of the drive. If in that case, there is nothing you can do except to replace it.
Remember to make a back up of your files before replacing it.
6. PC Fan Not Working
Another common computer hardware problem here. However, people usually get panic when the fan stops working.
In reality, that it is normal behavior for the CPU fan to stop spinning when the CPU temperatures are low or you are not running any power-hungry applications.
In most cases, it’s happening due to the motherboard, and not the fan itself.
Solution:
1. Determine the root cause
As mentioned, the motherboard is usually the main reason why the fan stops spinning. This could happen because the fan isn’t installed well on the board or there’s a problem on the board wires.
To check this, simply connect the fan to the external power source and see if it’s still working. If not, then the problem is with the fan itself.
2. Assess the fan
Three common issues related to the fan are:
- CPU Fan Save Dusts
- The Bearing of the CPU Fan is Stuck
- CPU Fan is Broken
For the first case, you can simply clean it with a cloth. For the second and third cases, which are the more serious case here, you need to hire professional computer repair service to replace the part.
7. Printer Isn’t Printing
There are many reasons why your printer won’t print, so start with the basics such as checking to see whether there is an error message or warning light on the printer.
Make sure there is paper in the tray(s), check the ink or toner cartridges aren’t empty, the USB cable is plugged in or the printer is connected to Wi-Fi.
The solution provided below will help you solve most of the underlying issues.
Solution:
1. Restart the printer
By simply cancel all the active printing work and restart the printer can do many wonders.
This is because the printer might be overloaded or the new ink cartridges are being installed. So to get the things in place, simply restart the device.
2. Check for issues on the computer
Every printer has its own driver and is connected to the computer. So should there be any issues related to it, the system will display that, along with the device troubleshooting mode.
Mostly things can be fixed at this point. Make sure your printer driver is up to date and is functioning normally.
8. Blue Screen Of Death (BSOD)
A Blue Screen of Death (BSoD) — also referred to as “blue screen,” “stop error,” or just “system crash” — will happen after a critical error that the system is unable to process and repair automatically.
Usually, you may see a blue screen while upgrading to a new version of Windows, during startup, or suddenly while actively using the computer, and the most frustrating thing is that it’s just a screen with a blue background and a sad character face without enough information to figure out the problem.
Solutions:
1. Check that there is enough space for updates
BSOD is usually a problem occurring due to corrupted files, file system failures and system spaces.
Sometimes, your system space may get filled during the update, causing some of the files to be missing, hence resulted in a corrupted file.
2. Scan your system for viruses
Some viruses can cause a Blue Screen of Death, especially ones that infect the master boot record (MBR) or boot sector.
3. Update your hardware drivers
Most Blue Screens of Death are hardware or driver related, so updated drivers could fix the cause of the STOP error.
4. Return BIOS settings to their default levels.
An overclocked or misconfigured BIOS can cause all sorts of random issues, including BSODs.
5. Perform diagnostic tests on all hardware you’re able to test
It’s highly likely that the root cause of any given Blue Screen of Death is a failing piece of hardware
9. Computer Freezes
A slow or aged computer can freeze from time to time. The main reason behind this is due to lack of enough resources.
Before regularly encounter this problem, your Windows should start becoming slow first. To fix that, you can read the above point.
10. System Automatically Restart
Last but not least for common computer problems here, and quite the most frustrated one too!
There are many reasons for this problem. It can be a result of various issues, including corrupted drivers, faulty hardware, and malware infection, among others.
It can be difficult to pinpoint exactly what keeps your computer in a reboot loop. In most cases, it usually happens after the Windows update.
Solutions:
1. Deleting bad registry files
Before you do this, you have to be completely confident that you can complete the process without making any mistake.
Keep in mind that the Windows Registry is a sensitive database. Even misplacing a comma can cause damages to your computer! As such, I suggest you opt for a one-click solution like Auslogics Registry Cleaner.
This freeware automatically searches for duplicate or corrupted registry files.
2. Updating drivers
When your drivers are outdated, it is possible for your computer to get stuck in a reboot loop. This is because your devices are not able to properly communicate with your system.
As such, it is important to check if your drivers are up to date
3. Checking hardware issues
In some cases, a computer may keep on restarting because of faulty hardware. The three main hardware to check on are:
4. Scanning for viruses or malware
It is possible that your computer has been infected by a virus or malware – that is why it keeps on restarting. You can run a complete virus scan by using Windows Defender.
On the other hand, you can also opt for 3rd party programs like AVG antivirus or Trend.
Recap
Here are the 10 computer problems and solutions:
- Computer won’t turn on
- Slow Internet
- PC Becoming Slow
- Windows Update Problem
- Noisy Hard Drive
- PC Fan Not Working
- Blue Screen Of Death (BSOD)
- Computer Freezes
- Printer Isn’t Printing
- System Automatically Restart
Conclusion
And that’s all for the top 10 common computer problems and their solutions. These problems can occur in day-to-day life and can be very frustrating.
Some of them can be easily fixed by yourself, whereas in some cases, these common problems can prove to be serious ones.
If you find yourself struggling to fix these, feel free to contact us for free technology assessment


