- Change Device Connection Sound in Windows 10
- Steps to change device connection sound in Windows 10:
- Windows sound change device
- How to change default sound devices in Windows 10 (playback and recording)
- What do you want to achieve?
- How to select the default playback device in Windows 10, using the Sound flyout
- How to select the default playback device in Windows 10, using the Settings app
- How to select the default playback device in Windows 10, using the Sound settings from the Control Panel
- How to select the default recording device in Windows 10, using the Settings app
- How to select the default recording device in Windows 10, using the Sound settings from the Control Panel
- How to set a different communications device in Windows 10
- Troubleshooting: Why can’t I see my preferred audio device listed?
- Did you manage to change your default sound devices in Windows 10?
- Change Default Sound Input Device in Windows 10
- Change Default Sound Input Device using Sound Dialog
- About Sergey Tkachenko
- 1 thought on “ Change Default Sound Input Device in Windows 10 ”
Change Device Connection Sound in Windows 10
When you connect other hard devices (e.g. phone, USB flash drive…) with your Windows 10 PC, you’ll hear a sound indicating their successful connection. If you dislike the default sound, you can change it according to the following guidance.
Video guide on how to change device connection sound in Windows 10:
Steps to change device connection sound in Windows 10:
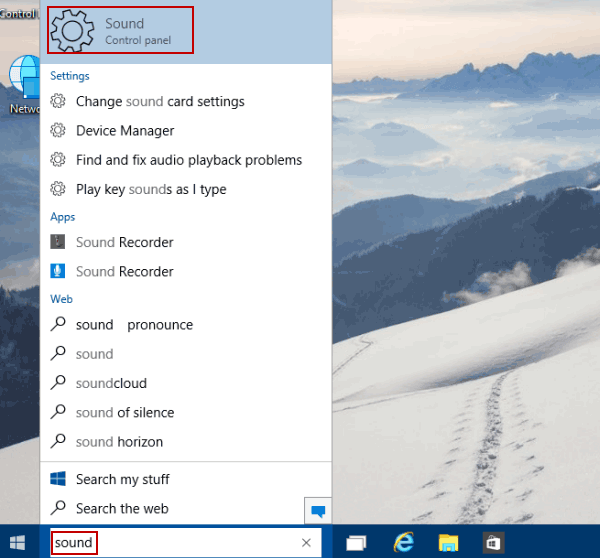
Step 1: Type sound in the search box and choose Sound in the result to open Sound settings.
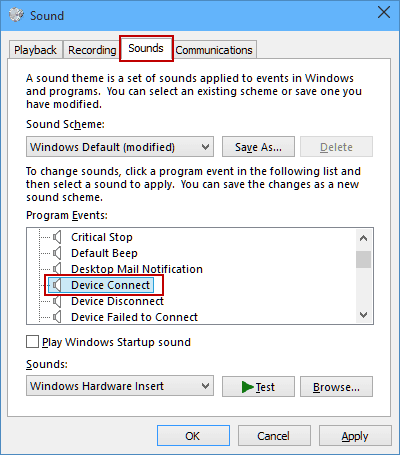
Step 2: In the Sound window, choose Sounds and select Device Connect in program events.
Step 3: Click the bar where Windows Hardware Insert is under Sounds, choose an option in the list provided and tap OK.
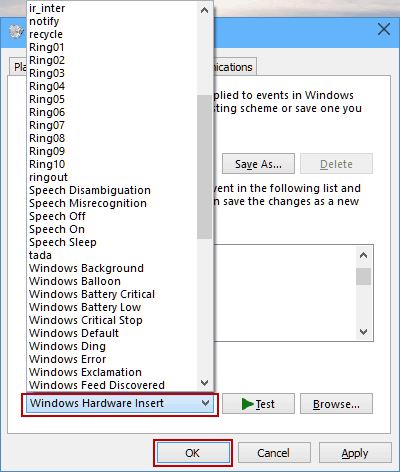
Tip: During this step, you can also click Browse to select music from your PC.
Windows sound change device
Most of us use multiple audio devices. Sometimes its a headset, at other times it’s the default laptop speakers, and at other times it might a speaker system connected to your docking station or even a webcam microphone.
Unfortunately, switching between the various audio devices can be tedious as you need to change the Windows “default device” or the “default communications device” each time for both recording and playback.
Today we’re going to see how you can create simple shortcuts on your taskbar that let you effortlessly switch between audio devices.

The three shortcuts you see in my little “Audio Control” custom toolbar let me switch between by Microsoft LifeChat LX-3000 headset, Internal Speakers and Logitech c920 HD webcam microphone. Here’s how I created these shortcuts:
Note: I have tried this on Windows 8, but I am pretty sure it will work on Windows 7 too.
1. Download the NIRCMD utility and extract it to a folder on your computer, let’s call it C:\NIRCMD
2. Open your Windows Playback devices (Right click on your speaker icon on the taskbar).

Note the names of each of the devices you need to change. You can click on Properties to view the correct name. You will need the exact same name for the NIRCMD command to work. If you have two devices with the same name (example: “Speakers”) you will need to rename one of them so that they are unique. Click Properties if you need to rename devices.
Note the names in a text file for easy copy-paste.
In my case, the three playback device names are:
3. Do the same with recording devices. Note the names in a text file. In my case the names of my 3 recording devices are:
- “Headset Microphone”
- “Microphone”
- “C920 Microphone” (renamed)
4. Now open the C:\NIRCMD folder, create a new batch file for each device, let’s call them SPEAKERS.BAT, HEADPHONE.BAT, and WEBCAM.BAT
5. Use similar commands as below for each of the BAT files. Use the device names you copied earlier.
SPEAKERS.BAT
@ECHO OFF
C:\NIRCMD\NIRCMDC setdefaultsounddevice «Speakers» 2
C:\NIRCMD\NIRCMDC setdefaultsounddevice «Internal Microphone» 2
C:\NIRCMD\NIRCMDC setdefaultsounddevice «Speakers» 1
C:\NIRCMD\NIRCMDC setdefaultsounddevice «Internal Microphone» 1
HEADSET.BAT
@ECHO OFF
C:\NIRCMD\NIRCMDC setdefaultsounddevice «Headset Earphone» 2
C:\NIRCMD\NIRCMDC setdefaultsounddevice «Headset Microphone» 2
C:\NIRCMD\NIRCMDC setdefaultsounddevice «Headset Earphone» 1
C:\NIRCMD\NIRCMDC setdefaultsounddevice «Headset Microphone» 1
WEBCAM.BAT
@ECHO OFF
C:\NIRCMD\NIRCMDC setdefaultsounddevice «Speakers» 2
C:\NIRCMD\NIRCMDC setdefaultsounddevice «C920 Microphone» 2
- The “1” in the NIRCMD command line argument indicates that the device is set as “Default Device”. A “2” in the command indicates that the device will be set as a “Default Communications Device” (useful for Skype, Lync etc).
- The device name string should be EXACTLY the same that is defined in Windows.
6. Test each batch file by double clicking on them and observing if the default device changed.
7. Create a folder «Audio Control” for your custom toolbar. Your NIRCMD folder should look like the below now.

7. Inside the Audio Control folder, create three shortcuts to the batch files that you created in step 5. Click Change Icon in the shortcut file properties if you want to change the icons like I have done.
8. Right click on an empty space on your taskbar and choose New toolbar.

9. Choose the C:\NIRCMD\Audio Control folder. You now have an awesome new Audio Controls toolbar.
You will appreciate the one-click ease with which you can now change your default audio device in Windows. Leave a comment and let us know your feedback! 🙂
How to change default sound devices in Windows 10 (playback and recording)
One of the many creative options built into Windows is the ability to record and play multimedia files of all kinds. Windows 10 makes it simple to select a default device for audio recording and playback. However, what if you would prefer that another device be used from your devices with similar capabilities? For example, you may have a webcam and a microphone on your computer, and you want the microphone to be the default recording device. Or, you may have both headphones and speakers available, and you want the headphones to be the default audio playback device. Let’s take a look at how to change the default audio devices in Windows 10:
What do you want to achieve?
Before we make any changes, it is important to know what we’re dealing with. For example, some Windows PCs have a large monitor with built-in speakers (which usually are of poor quality) and also external speakers which are connected to the PC. You may want to use the external speakers instead of the built-in ones for playing audio.
We record audio using microphones, for example, and play them through speakers. We can also record sounds from devices inside the computer, like the optical drive, and play them back through headphones. Many people have more than one audio device attached (like the microphone included in a webcam plus a standalone microphone plus a microphone built into a headset), and it is important to pick a default so that the sound is recorded and played back with the highest fidelity.
You do not want your voice to sound like you’re in an empty hallway because your default is the webcam microphone three feet away from you instead of the microphone in your headset or on your desk.
Therefore, before moving forward with this tutorial, you must be clear on what you want to achieve: which audio devices do you want to use for each task?
How to select the default playback device in Windows 10, using the Sound flyout
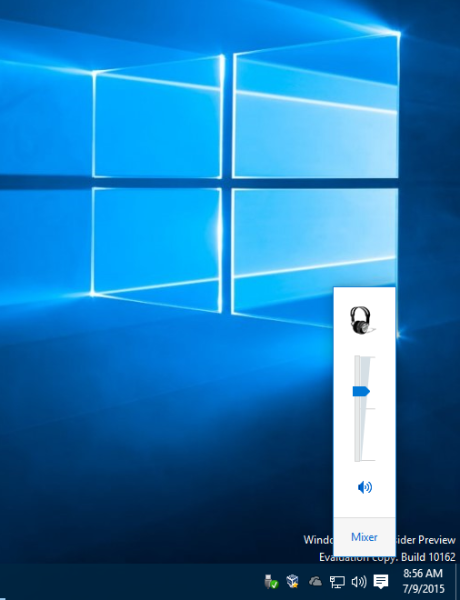
The simplest way to change your playback device in Windows 10 is to select it from the Sound flyout. Click or tap on the sound volume icon from the system tray, and then click/tap on the current playback device.
The Sound flyout then shows you all the playback audio devices that are available for you to use. All you have to do is to select the one you prefer from the list.
How to select the default playback device in Windows 10, using the Settings app
Similarly, you can also choose what audio device you prefer to use for playback, from the Settings app. However, this method involves a few more steps. Start by opening the Settings app: a fast way is to click or tap on its button from the Start Menu.
In the Settings app, navigate to System, and then to Sound. On the right side of the window, click or tap on the currently selected playback device under “Choose your output device.”
The Settings app should show you a list of all the audio playback devices available on your system. Select the one you prefer.
NOTE: There are also slightly faster ways to get to the Sound section from the Settings app. For instance, you can use the search, or you can right-click or press and hold on the sound volume icon from the system tray, and then click or tap on “Open Sound settings.”
How to select the default playback device in Windows 10, using the Sound settings from the Control Panel
You can also use the classic Sound window to change the default playback device on your Windows 10 system. However, getting to it is a bit more cumbersome than it used to be in the past. Open the Control Panel, navigate to Hardware and Sound, and click or tap on Sound.
This action opens the Sound window, where you set your default audio devices.
In the Playback tab, you are shown all the playback devices that are available on your Windows computer. Each system is different, and what you see reflects that. You can also see which devices are actually available. Some devices might not be plugged in, so they are greyed out. A green checkmark indicates the current default device.
To choose another audio device as your default playback device, click or tap on it, and then the Set Default button.
The selected device is now your default playback device in Windows. All playback audio is now routed through that device.
How to select the default recording device in Windows 10, using the Settings app
In the Settings app, navigate to System, and then to Sound. On the right side of the window, click or tap on the currently selected recording device under “Choose your input device.”
The Settings app should show you a list of all the input devices available on your system. Just select the one you prefer from the list.
The choice is immediately applied, as soon as you select the recording device you prefer.
How to select the default recording device in Windows 10, using the Sound settings from the Control Panel
Alternatively, you can also go to the Sound window: “Control Panel -> Hardware and Sound -> Sound.”
In the Sound window, click or tap the Recording tab. Here you see the devices you have available to record sound. Again, your current default device is indicated by a green checkmark. Choose your preferred device and click or tap Set Default.
TIP: You can see if the sound recording device is working by watching for movement in the bar beside each device when you talk as if you are trying to record sound.
How to set a different communications device in Windows 10
The Sound window also lets you set different default devices for communications. Note that this is the only place in Windows 10 where you can do this change, as it has not yet been added to the Settings app.
For example, you may want to use a headset or the speakers that are built into your monitor for Skype and your external speakers for everything else. To set this, first, select the device you want to use, and then click or tap on the down-arrow on the Set Default button. You can then assign a device to communications (Default Communication Device) or general playback (Default Device).
You can see that the default communication device has a different green icon from the default playback audio device.
When you are done setting your default playback communication devices, click or tap OK or repeat the same process for setting your default input devices for communications.
Troubleshooting: Why can’t I see my preferred audio device listed?
What if the audio device that you want to use for recording isn’t listed? We talked about this problem in Troubleshooting Common Speech Recognition Problems. Remember, speech recognition devices are also configured through the Sound window. By default, Windows does not show you devices that are disabled or disconnected or those without their correct drivers installed. If your device is not listed, right-click or press and hold anywhere in the blank space in the Sound window. You can then choose to see the devices that would otherwise be invisible, by clicking or tapping “Show disabled devices.”
The same goes for showing disabled audio playback devices in the Playback tab of the Sound window.
Did you manage to change your default sound devices in Windows 10?
As you can see, setting the default audio devices for playback and recording is a quick and easy process in Windows 10, and you can adjust the settings from multiple places. You can change them anytime you need to, to make the best of Windows 10’s recording and playback capabilities. Have you had a good or bad experience with recording or playback defaults? Let’s talk about it in the comments section below.
Change Default Sound Input Device in Windows 10
In Windows 10, the user can specify the default sound input device. Recent versions of the operating systems provide a number of ways to do it, including the Settings app, and the classic Sound applet of the Control Panel.
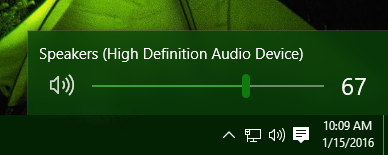
Windows 10 introduced a new style of items and their panes/flyouts which open from the notification area. All of the applets which open from the system tray are different now. This includes the Date/Time pane, the Action Center, the Network pane and even the volume control. Once you click the sound icon in the system tray, the new volume indicator will appear on the screen.
Note: In a number of situations, the Volume icon can be hidden in the taskbar. Even when you have all the drivers installed, the icon might remain inaccessible. If you are affected by this issue, see the following post:
Tip: It is still possible to restore the good old «classic» sound volume control.
Refer to the following article:
The default sound input device is the device that the operating system uses to record or hear sounds. If you have connected several audio devices to your PC or laptop, such as microphones, a web camera with a built-in microphone, a Bluetooth headset, it is possible to specify which device to use by default for audio input. Let’s see how it can be done.
To change Default Sound Input Device in Windows 10, do the following.
- Open the Settings app.

- Go to System -> Sound.
- On the right, go to the section Choose your input device and select the desired device in the drop-down list.

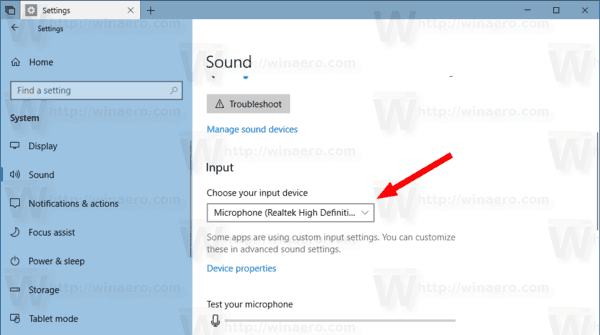
Windows 10 will switch the audio input device instantly.
Alternatively, you can use the classic Sound applet, as described below.
Change Default Sound Input Device using Sound Dialog
Tip: To save your time, you can open the classic Sound dialog using the following command:
Refer to the next article:
Then do the following.
- Open the classic Control Panel app.
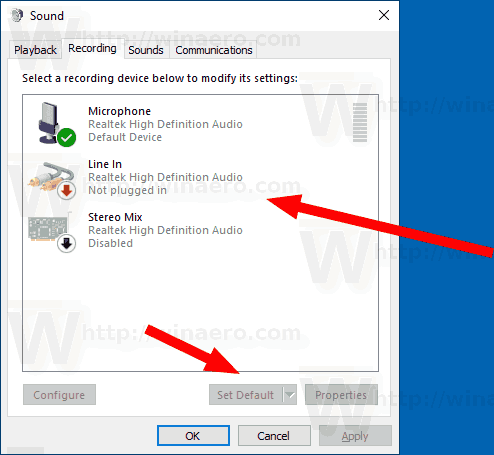
- Navigate to Control Panel\Hardware and Sound\Sound.
- On the Recording tab of the sound dialog, select the desired input device from the list of available devices.
- Click on the Set default button.
Winaero greatly relies on your support. You can help the site keep bringing you interesting and useful content and software by using these options:
Share this post
About Sergey Tkachenko
Sergey Tkachenko is a software developer from Russia who started Winaero back in 2011. On this blog, Sergey is writing about everything connected to Microsoft, Windows and popular software. Follow him on Telegram, Twitter, and YouTube.
1 thought on “ Change Default Sound Input Device in Windows 10 ”
You describe how to (simply) go to sound input device select panel and choose the device you want, but in both ways microphone is the only option listed on my laptop. If I disable it then there is nothing. So what do you do if you want ‘Stereo Mix’ or ‘Line In’ and it is not there to select?


