- Use dictation to talk instead of type on your PC
- Dictation commands
- Dictating letters, numbers, punctuation, and symbols
- What if your computer speaks what you type? — (FAQ)
- How to Make Your Computer Talk/Speak What You Type?
- How to Make Your Computer Speak Whatever You Type ?
- How to make your computer talk what you type (No Program ?
- How to make the computer read what you type?
- Do You Talk To Your Computer?
- What to Do When Your Keyboard Won’t Type?
- Make Windows 10 speak out the time every hour
- Make Windows 10 speak out the time
- How to Fix the Most Annoying Things in Windows 10
- Stop Auto Reboots
- Prevent Sticky Keys
- Calm the UAC Down
- Delete Unused Apps
- Use a Local Account
- Use a PIN, Not a Password
- Skip the Password Login
- Refresh Instead of Reset
- Hide or Disable Cortana
Use dictation to talk instead of type on your PC
Use dictation to convert spoken words into text anywhere on your PC with Windows 10. Dictation uses speech recognition, which is built into Windows 10, so there’s nothing you need to download and install to use it.
To start dictating, select a text field and press the Windows logo key + H to open the dictation toolbar. Then say whatever’s on your mind. To stop dictating at any time while you’re dictating, say “Stop dictation.”
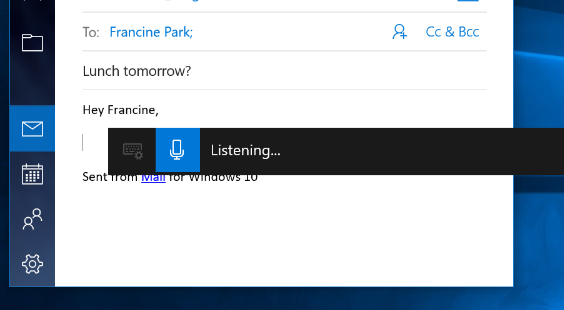
If you’re using a tablet or a touchscreen, tap the microphone button on the touch keyboard to start dictating. Tap it again to stop dictation, or say «Stop dictation.»
To find out more about speech recognition, read Use voice recognition in Windows 10. To learn how to set up your microphone, read How to set up and test microphones in Windows 10.
To use dictation, your PC needs to be connected to the internet.
Dictation commands
Use dictation commands to tell you PC what to do, like “delete that” or “select the previous word.”
The following table tells you what you can say. If a word or phrase is in bold, it’s an example. Replace it with similar words to get the result you want.
Clear a selection
Clear selection; unselect that
Delete the most recent dictation result or currently selected text
Delete that; strike that
Delete a unit of text, such as the current word
Move the cursor to the first character after a specified word or phrase
Go after that; move after word; go to the end of paragraph; move to the end of that
Move the cursor to the end of a unit of text
Go after word; move after word; go to the end of that; move to the end of paragraph
Move the cursor backward by a unit of text
Move back to the previous word; go up to the previous paragraph
Move the cursor to the first character before a specified word or phrase
Go to the start of the word
Move the cursor to the start of a text unit
Go before that; move to the start of that
Move the cursor forward to the next unit of text
Move forward to the next word; go down to the next paragraph
Moves the cursor to the end of a text unit
Move to the end of the word; go to the end of the paragraph
Enter one of the following keys: Tab, Enter, End, Home, Page up, Page down, Backspace, Delete
Tap Enter; press Backspace
Select a specific word or phrase
Select the most recent dictation result
Select a unit of text
Select the next three words; select the previous two paragraphs
Turn spelling mode on and off
Start spelling; stop spelling
Dictating letters, numbers, punctuation, and symbols
You can dictate most numbers and punctuation by saying the number or punctuation character. To dictate letters and symbols, say «start spelling.» Then say the symbol or letter, or use the ICAO phonetic alphabet.
To dictate an uppercase letter, say “uppercase” before the letter. For example, “uppercase A” or “uppercase alpha.” When you’re done, say “stop spelling.”
Here are the punctuation characters and symbols you can dictate.
at symbol; at sign
Pound symbol; pound sign; number symbol; number sign; hash symbol; hash sign; hashtag symbol; hashtag sign; sharp symbol; sharp sign
Dollar symbol; dollar sign; dollars symbol; dollars sign
Percent symbol; percent sign
And symbol; and sign; ampersand symbol; ampersand sign
Asterisk; times; star
Open paren; left paren; open parenthesis; left paren
Close paren; right paren; close parenthesis; right parenthesis
What if your computer speaks what you type? — (FAQ)
Category: what . Last Updated: 1 months ago . Views: 3
ANSWER
To use this trick, follow these steps: Save the file as speak.vbs. Double-click the file and it will open a prompt. Enter the sentence you want your computer to speak Click OK and Notepad will speak the sentence for you. Note – In case, if you encounter an error, re-type all the quotes and this notepad trick will work fine. 6.
How to Make Your Computer Talk/Speak What You Type?
How to Make Your Computer Talk/Speak What You Type There is cool feature in Windows that allows you to make your computer talk or speak whatever you tell it! This method takes advantage of a built-in API installed on Windows XP, Vista, 7, 8 and 10 called SAPI (Speech Application Programming Interface).
What You Type Computer Speaks, What Someone Speaks ? the computer speaks out loud what you just type. The other text box is where, if anyone is speaking into a microphone connected to your computer the speech is recognized and scrolled like CC on the second text box for you to read. Whatever letter you type in the first text box
How To Make Your Computer Speak Whatever You Type ? Today I’m going to show you how to make your computer speak whatever you type by using your owntext to voice software. This is a simple yet amazing trick that can really impress your friends! This trick works on all Windows OS and doesn’t require any programming skills. How to make your computer speak whatever you type: 1. Open Notepad and copy-paste…
How to Make Your Computer Speak Whatever You Type ?
Open Notepad Copy the below lines to Notepad Dim message, sapi message=InputBox(«What do you want me to say?»,»Speak to Me») Set sapi=CreateObject(«sapi.spvoice») sapi.Speak message 3. Save As anyname.vbs on desktop (Remember .vbs should be the extension ) 4. Its done. 🙂 enjoy This is basically to those…
Why dose my computer say every letter I type? why dose my computer say every letter I type? I don’t like that I have Windows 7 I must have changed my setings. I would like to change it back, how do I do that? This thread is locked. You can follow the question or vote as helpful, but you cannot reply to this thread. I …
Why is my computer speaking what I type? Narrator reads text on your PC screen aloud and describes events, such as notifications or calendar appointments, so you can use your PC without a display. its one of the accessibility features, to start it or stop it press . Windows logo key + Ctrl + Enter, then choose what you like.. good luck
How to make your computer talk what you type (No Program ?
Hey this is a video tutorial for making your computer talk what you type. If you like the video, please subscribe and comment. And btw the code is Dim messag
How to make your computer speak what you type? This Video which consists of following codes to execute voice message from the computer. For more Details follow and Subscribe my channel.
How to Make Your Computer Talk/Speak What You Type? You can also write programs that call the API, which would allow you to let your applications speak. But making your computer say what you want is pretty easy actually! Here’s how you do it: Step 1: Open Notepad and paste the following text into a new document: Dim message, sapi message=InputBox(“Enter the text you want spoken”,”Speak
How to Make Your Computer Talk? Run the speak.vbs file by double-clicking it and type whatever you want your computer to speak for you, and click Ok. Of course, turn on your speakers first.
How to make the computer read what you type?
In this article, we will show you how to make the computer read what you type. Simply create your own text-to-speech converter using notepad.
How to Make Your Computer Talk/Speak What You Type ? how stuff works,how to,how to do,ict,mashable,mashable.com,social media,social media marketing,stuff,the social network,wiki,wikihow
Can a computer speak what you type? The word ‘speak‘ is not a noun; the word speak is a verb (speak, speaks, speaking, spoke, spoken).The word ‘speak‘ is a suffix used with some words to form nouns describing the type of language
How to make your computer speak what you type using notepad? Simply follow the below step by step to make your computer speak what you type. Let’s rock and row. Step 1 : Open your notepad. [start >> run >> Type «notepad» >> Enter] or any other prefer text editor/method. Step 2 : Copy the following code in notepad then save it with .hta extension
Do You Talk To Your Computer?
First, you can dictate text instead of typing it. Second, you can give your computer commands. When you dictate, your spoken words appear in your document as you speak them. You also speak the punctuation — comma, period, open parenthesis, etc. When you give your computer commands, you must use specific words that your computer’s voice
What language do computers speak? What Xander’s dad does all day. Blog. Feb. 17, 2021. 3 ways to boost your virtual presentation skills; Feb. 16, 2021
How to Test your PC Speakers? If your PC speakers suddenly go mute on you, Windows has a tool you can use to troubleshoot the problem. Your PC console has one, internal speaker. Sometimes the sound coming from an internal speaker is barely audible, so you may need external speakers that provide greater volume and more control of the volume. Or […]
What to Do When Your Keyboard Won’t Type?
Restart your computer to check if it works. If your keyboard is still not responding, try reinstalling the correct driver and restarting your computer again. If you’re using Bluetooth, open the Bluetooth receiver on your computer and try to pair your device. If it fails, restart your computer and power the keyboard on and off before trying to
Last modified: February 26 2021
NEXT QUESTION:
Please let the audience know your advice:
Make Windows 10 speak out the time every hour
We have already seen how we can make Windows welcome us with an audio voice message during logon. Using the same commands, we will see how we can make Windows 10/8/7 tell us the time every hour. This can be especially useful if you tend to lose track of time while working.
Make Windows 10 speak out the time
First, open Notepad and copy-paste the following:
Save it as a .vbs file. If you wish, you can download the ready-to-use file by clicking here.
Next, type schedule tasks in search and click on the schedule tasks result, to open the Task Scheduler.
Under Action, select Create Task. Give the task a name. I have given it SpeakTime.
Set the Trigger parameters as shown in the image. One time – Start date & time, Repeat task every 1 hour, Duration – Indefinitely, and so on.
Under Actions, click New button. The New Action box will open. Select the action Start a program and browse to the vbs file to set the path.
You may change the change some parameters under the Conditions and Settings tabs – else you may leave them at their defaults.
Click OK and Exit.
Now every hour, Windows or rather Microsoft David will speak out the time to you…11…12…! If you don’t like Microsoft David, you may opt to hear the voice of Microsoft Hazel or Microsoft Zira instead, via Control Panel > Text to Speech tab under Speech Properties.
How to Fix the Most Annoying Things in Windows 10
Windows 10 is great, but it has its issues, from unpredictable reboots to aggravating notifications. Here’s how to fix some of the more irritating quirks with Microsoft’s latest operating system.


Windows 10 is probably the best edition of Microsoft’s venerable operating system. But Redmond has never made an entirely perfect OS. As much as we like Windows 10—and we really do like it a lot—it’s got problems. Just check the comments below to see how much our readers hate the tracking and lack of privacy. (For that, read How to Protect Your Privacy in Windows 10.)
Thankfully, many of the OS’s problems are easily corrected. Here are the steps you can take, so version 10 doesn’t drive you up the Windows wallpaper.
Stop Auto Reboots
Windows 10 updates are regular and seemingly never-ending, and pretty much out of the user’s control (unless you turn off updates altogether, which is a bad idea). What’s worse: if you don’t reboot your PC after an update, Windows 10 eventually takes it upon itself to reboot for you. That’s a good way to lose data in open apps.
Take advantage of a feature called Active Hours, which lets you schedule a time for updates and reboots. Navigate to Settings > Update & Security > Windows Update > Change active hours. To select your own timeframe, click Change and choose a start and end time.
Starting with the May 2019 Update (version 1903), meanwhile, you can also opt to have Windows automatically adjust active hours based on your device’s activity. Navigate to Settings > Update & Security > Windows Update > Change active hours and toggle on the option for Automatically adjust active hours for this device based on activity.
Prevent Sticky Keys
If you hit the Shift key five times in a row in Windows, you activate Sticky Keys, a Windows feature that allows for keyboard shortcuts where you hit one key at a time instead of simultaneously (so it works with any combo that includes the Shift, Ctrl, Alt, or Windows keys).
If you activate it without knowing—by hitting «yes» in a dialog box without thinking, for example—it can be seriously annoying. Prevent it from ever happening by hitting the Shift five times rapidly to bring up that very dialog box. Click the Disable this keyboard shortcut in Ease of Access Keyboard Settings and uncheck the box next to Turn on Sticky Keys when SHIFT is pressed five times.
Calm the UAC Down
Ever since Windows Vista, User Account Control (UAC) has been there to protect users so they can quickly grant administrative rights to software programs that need it—specifically when installing or uninstalling software. In the old days, when you went to do an install, the screen would suddenly dim and everything seemed to come to a halt, causing several (anecdotal, probably fictional) heart attacks amid the populace. UAC is still there in Windows and will still dim the desktop, but you have the option to turn it off, or at least prevent the screen dimming.
Type UAC into the Windows 10 search box to get Change User Account Control Settings. The screen presents a slider with four levels of security, from never notify (bad) to always notify (annoying—it’ll warn you when you make your own changes). Pick one of the middle options; the second from the bottom notifies you without the dimming scare tactic. With that option, you’ll still get a dialog box confirmation with a yes/no option when you install things.
Delete Unused Apps
Did you know you have a program in Windows 10 called Groove Music? Probably not, because the world uses other services. Thankfully, a few pre-installed Windows apps can finally be deleted. Navigate to Settings > Apps > Apps & Features, where you can ditch Mail and Calendar, Groove Music, Weather, and Maps.
If your uninstall option is grayed out, you could go the DOS route, but it gets a little complicated and you should be 100% sure of what you’re doing.
Type PowerShell in the Windows search box—when you see it, right-click and launch it via Run as Administrator.
Type in «Get-AppxPackage –AllUsers» without the quotes. A giant list of all the stuff you’ve got installed that came from Microsoft’s Store, plus some other stuff, will appear.
It’s hard to find those apps in there, but the last one will probably clearly read Microsoft.ZuneMusic—that’s actually Groove Music. Copy everything it says on the line next to PackageFullName.
You’ll then type in a command and paste that line, so it reads something like «remove-AppxPackage Microsoft.ZuneMusic10.16122.10271.0x64__8wekyb3d8bbwe» (yours will be different after the first underscore character).
Execute it with a stroke of the return key. If you don’t get any errors, the Groove Music app should be gone. Be careful using this on other apps—be sure you’ve picked the right one.
Use a Local Account
Microsoft really wants you to sign in to Windows 10 with your Microsoft account—the one attached to all things Microsoft, be it your Xbox, Office 365, or OneDrive account, buying apps or music or video in the Windows Store, even talking on Skype, to name just a few. When you set up Windows, Microsoft specifically asks you to sign in using that account.
But you don’t have to. During setup, just click Skip this step. If you already signed in with the Microsoft account, go to Settings > Accounts > Your info. Click Sign in with a local account instead. Enter a local account name and new password (with a hint for when you forget it).
The downside is that when you end up on a service or site that requires Microsoft credentials, you’ll have to enter your Microsoft login each time; it won’t automatically sign you in as it does if you log into Windows with a Microsoft account.
Use a PIN, Not a Password
If you’re okay using the Microsoft account, but hate how long it takes to type in your super secure password, reset it to a short personal identification number (PIN) used only on the PC. The PIN, which is only numerals—no mixed case letters or special characters—might not sound secure. But it’s PC-only, hopefully you’re the only user, and it doesn’t compromise the security of your Microsoft account anywhere else. Plus, the PIN can be as many digits as you desire.
Go to Settings > Accounts > Sign-in options, and click the Add button under PIN. Enter the PIN you want and restart to try it. If you’ve already got a PIN, you’ll see options to change it, remove it, or click «I forgot my PIN» to recover it.
Skip the Password Login
Are you the only person who ever—and I mean ever—uses your PC? Then you can probably skip the password login screen that appears after every reboot or sometimes even when you come back from the screensaver.
Go to the User Accounts control panel by typing «netplwiz» in the search bar. Select the account, uncheck the box next to Users must enter a username and password to use this computer. You’ll get a confirmation box that asks you to enter that very password—twice. Click okay. Reboot the PC, and it should roll smoothly into the desktop without requesting a password. Don’t do this if it’s shared PC. Remember, you’ll still need to know the password if you’re logging into the PC remotely. (Or, you could use TeamViewer.)
Refresh Instead of Reset
Windows 10 has a fantastic feature that lets you essentially reinstall Windows 10 on your computer from the ground up, like new—with the option to not delete any of your data (though you will have to reinstall software and drivers). When your PC is beyond repair, you access it at Settings > Update & Security > Recovery. Click Get Started under Reset this PC, pick settings like «Keep My Files» or «Remove Everything,» and let it rip. You don’t need any separate media, like a copy of Windows 10 on a disc or USB flash drive.
However, that can be overkill. Sometimes, Windows just needs a reset that does not eradicate your software and drivers. This is also easy to do, but it does require a copy of Windows 10 on separate media. Don’t have the media? Get it here. Run it and install the included ISO file onto a 4GB or larger USB drive to use in the reset now and in the future. Or you can just mount it as a virtual drive in Windows 10.
Double-click the setup on that media/drive’s Setup option, ask to download updates and check Keep personal files and apps when it appears. After a few more prompts and waiting, your Windows 10 system will get the refresh it needs.
Hide or Disable Cortana
Master Chief would never let this happen. Windows 10 took out the switch to turn off Cortana, Microsoft’s answer to Siri and Alexa. But Cortana searches more than your computer; it searches the entire internet. You can still turn her off, however.
First, there is the option to hide Cortana: just right-click the Taskbar and select Show Cortana Button. The Cortana halo ring disappears. She’s still active and easily accessible, however: tap the Windows key on your keyboard and start typing.
If you want to really take her out, so all searches are local, you need to edit the registry. Don’t do this if you’re not feeling like a Windows expert. Make a system restore point before you do it, just in case. This only applies to Windows 10 Home version.
Open the Registry Editor: Type +R, then type regedit and hit Enter. In Windows 10 Home, navigate to HKEYLOCALMACHINE\SOFTWARE\Policies\Microsoft\Windows\Windows Search. If it’s not there, create it. Right-click it to create a DWORD value and call it AllowCortana. Set that value to 0 (zero). Once you sign out and come back, the search box will now read «Search Windows.» You can put Cortana back by doing all this again and setting the value to 1 (one).
If you have Windows 10 Pro or Enterprise, you can use the Group Policy Editor to turn her off, but for that, you should first check with your IT admin. Type Windows Key+R, type in gpedit.msc to bring up the Group Policy Editor, then navigate to Computer Configuration > Administrative Templates > Windows Components > Search. Double-click on Allow Cortana, check the button next to Disabled. Close the window and restart Windows 10.
If you’re killing Cortana for privacy reasons, don’t forget to visit your Microsoft account online and delete everything Cortana collected about you. Under Cortana’s Notebook, click the Clear Cortana Data button.


