- Start
- Where is the Start and what does it do?
- How to click the Start with the keyboard
- What happens when you right-click the Start?
- Should I refer to Start as Start or the Start button?
- Related pages
- Related pages
- Windows 10 Start button and search not working in windows 10 on quite a few computers
- Replies (2)
- How do I get the start button back in Windows 8?
- The Start button
- Create a Windows Start menu toolbar
- Install a third-party add-on
- Start Orb Mover: Move your Start Button and Start Menu to different locations on your Taskbar
- Start Orb Mover for Windows 7
- Start Orb Mover free download
- Настройка макета меню Пуск и панели задач в Windows 10 через групповые политики
- Экспорт/импорт макета меню Пуск в Windows 10 с помощью PowerShell
- Распространение макета начального экрана пользователям с помощью GPO
- Partial Lockdown – частичная блокировка макета начального экрана Windows
- Управление закрепленными ярлыкам в панели задач с помощью GPO
Start
Start may refer to any of the following:
1. The Start or Start button was first introduced with the release of Microsoft Windows 95 and is found in all releases of Windows since. Start allows you to access your computer programs and configure Microsoft Windows easily by accessing the Start menu.
If you have an Apple computer with macOS, the Apple menu is Apple’s version of the Windows Start and Start menu.
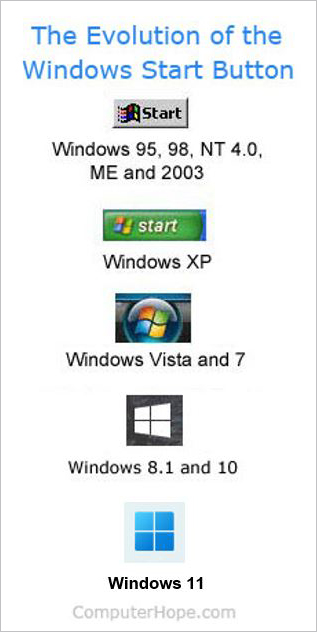
In the picture are examples of the different Start buttons in Windows. The gray Start at the top was the first Start, featured in early versions of Microsoft Windows. In the second picture, this green Start made a brief appearance in Windows XP. Next, the text «Start» was removed and made into the Start Orb, which was used with Windows Vista and Windows 7. In Windows 8.1 and 10, the orb was removed and only shows the updated version of the Windows logo.
In the initial release of Windows 8, the Start button was replaced by the Start Screen. Later versions of Windows 8, more commonly referred to as Windows 8.1, has a Start (shown in the image) that opens the Start Screen instead of the Start menu.
To determine what version of Windows is on your computer, see: How to determine the version of Windows on a computer.
Where is the Start and what does it do?
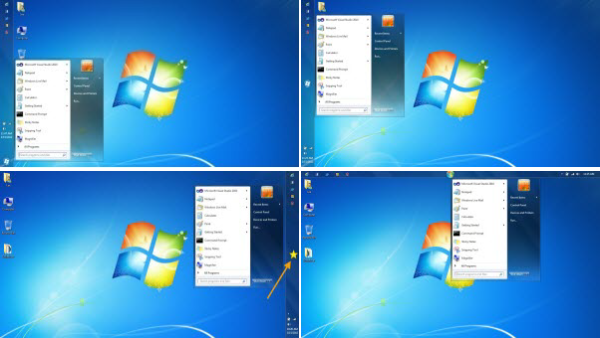
By default, the Windows Start is at the bottom left part of the desktop screen. However, Start can be placed at the top-left or top-right part of the screen by moving the Windows Taskbar. Clicking Start opens the Start menu (except in Windows 8) that gives you access to all the installed programs, and other Windows features. Below is a visual example of the Start button and its location in Windows 7.

The Start button is only part of the Microsoft Windows operating system and is not found on Apple computers that run macOS or Chromebooks running Chrome OS.
How to click the Start with the keyboard
The Start can also be activated using the Windows key or by pressing Ctrl + Esc on the keyboard.
What happens when you right-click the Start?
In new versions of Windows (Windows 8, Windows 8.1, and Windows 10), when you right-click Start, it gives you access to the Power User Task Menu.
Should I refer to Start as Start or the Start button?
According to the Microsoft Manual of Style, the button should not be referred to as the «Start button» or «Windows Start button.» Instead, when talking about this button, it should only be referred to as «Start.» For example, write «Click Start to open the Start menu.» and not «Click the Start button to open the Start menu.»
Related pages
2. Start is a Windows command line command that enables a user to start a separate window in Windows. See the start command overview for further information.
3. The term start (startup) can also be used to describe when a computer loads a software program or is first booting.
4. Start in general refers to the beginning of something. For example, if you’re new to computers, Computer Hope is an excellent place to start to learn more about computers.
Related pages
5. Start is also an HTML attribute. It is used to continue a numbered list that is broken up by other elements or objects, such as an image.
Windows 10 Start button and search not working in windows 10 on quite a few computers
We have quite a few computers that over the past days the start button and search does not work. Did you push through a update that might have done this?
Replies (2)
The start menu is built like the other «Windows 10 Store apps».
Here are some tips on how to fix problems with these apps
2016 07 19- 5 TIPS TO FIX WINDOWS STORE AND APP ISSUES IN WINDOWS 10
https://www.makeuseof.com/tag/5-tips-fix-window.
1. Win Store Trouble Shooter
2. Clear store Cache
3. Reset Windows update (use the tool in the following link)
4. Reg hack for Connection errors
5. Re-Register the Store
#1 MS DOWNLOADABLE WIN 10 STORE APP TROUBLE SHOOTER
http://aka.ms/diag_apps10
Note: both of these links above should take you to download the same diagnosis “CAB” file.
Use the built in Trouble shooter
Go to Settings > Update & security > Troubleshoot
Scroll down to the bottom
Click Windows Store Apps
Run it 2 or 3 times.
#3 MANUAL RESET WINDOWS UPDATES
the problems remain, you have to revert to a manual process to reset Windows Update
Check that System Restore is turned on and configured
https://www.pcworld.com/article/2955023/windows.
https://www.tekrevue.com/how-to-enable-system-r.
Create a System restore point. (https://support.microsoft.com/en-us/help/402753. )
Use the following process to effectively delete the folders used by Windows Update:
#1 Start a command prompt in Administrator Mode:
In start menu search for CMD
Right click on it
Select “Run as Administrator”
#2: Stop various Windows Update Service, Cryptographic, Background Intelligent Transfer Service, and MSI Installer Windows services.
To do this, disconnect from the Internet. That means turning off Wi-Fi and disconnecting from a wired connection. If you don’t, Windows 10 will indicate some files are in use and cannot be modified or the command will be non-responsive. Restart your computer after disconnecting from the Internet.
Then type the following commands at a command prompt. Press the “ENTER” key after you type each command.
net stop wuauserv
net stop cryptSvc
net stop bits
net stop msiserver
#3 Rename the folders used by Windows Update:
Ren C:\Windows\SoftwareDistribution SoftwareDistribution.old
Ren C:\Windows\System32\catroot2 Catroot2.old
Reconnect to the internet
#4 Restart the services:
net start wuauserv
net start cryptSvc
net start bits
net start msiserver
#5 Restart the computer:
Reboot the computer
open Windows Update
click Check for updates.
RESET ALL STORE APPS / REREGISTER / APPS MISSING FROM WIN START MENU
Re-register all store apps, so they appear again in start menu. For that, open a PowerShell window as Administrator. Copy and paste the following line into the PowerShell window and press Enter:
Get-AppxPackage -AllUsers| Foreach
Note: if you re-register all applications, all your apps are back, however all your pinned apps will be reset (the right panel will be empty) so you need to re-pin everything that you want. Personnaly I did a screen capture before, to remember what I pinned and where (use the “snipping tool” in startmenu/windows accessories, with a delay to be able to open the start menu before the capture)
****
Join the crowd
.
Be unique
How do I get the start button back in Windows 8?

With the release of Windows 8, Microsoft wanted everyone to use the Start screen instead of the Start button and the Start menu found in previous versions of Windows. However, there are a few ways to mimic the Windows Start button and Start menu combination. Read through the following to find the best option to suit your needs.
If you want to access the command prompt, Event Viewer, or Windows Explorer, try using the shortcut Windows key + X before trying the suggestions below. This shortcut key combination opens a menu containing these options and more.
The Start button
With the Windows 8.1 update, Microsoft has added a Start button that takes you to the Start Screen. This update does not, however, return the Start menu found in previous versions of Windows. If you’re ok with the Start Screen and only want the Start button, we recommend updating to Windows 8.1, as it is the fastest solution and updates are important. If you still want the Start menu (not the same as Start screen), proceed to the following sections of this page.
Create a Windows Start menu toolbar
The Start menu can be made into a toolbar, which allows you access to all the programs you would normally see in All Programs. To do this, follow the steps below.
Adding this toolbar will not look like the normal Windows Start menu. It will be on the right side of the Windows Taskbar as a little arrow that shows a list of programs.
- Make sure show hidden files is enabled.
- How do I view hidden files in Windows?
- Right-click the Taskbar and click Toolbars and then New toolbar.
- Browse to C:\ProgramData\Microsoft\Windows and select Start menu and choose Select Folder
Once these steps are completed, a new Start menu section on the Taskbar appears. This new section contains all of the programs located in the Programs folder in the standard Windows Start menu.
Install a third-party add-on
There are multiple third-party tools that can be installed in Windows 8 that can mimic the Start button and Start menu found in previous versions of Windows. Below are our suggestions on which third-party tools to try.
- ViStart 8 — A great, free utility to add a Start menu almost identical to what was in Windows 7. It also includes the ability to skin and lots of other features.
- Classic Shell — Another free, open source, software tool to add the Start menu and other previous Windows features to Windows 8.
- Start 8 — Another great tool for adding the start button to the Taskbar.
Start Orb Mover: Move your Start Button and Start Menu to different locations on your Taskbar
For as many years as long as one can remember – on websites, on blogs, on forums – users have been asking for and discussing a way to move the Start Orb – but without much success. There have been tools to change Start Orbs or change Start Button Tooltips or to remove Start Buttons – but none to move the Start Button or the Start Menu to another location.
Start Orb Mover for Windows 7
Customization and tweaking enthusiasts – we now present to you, our new freeware: Start Orb Mover! Our TWC developer Lee Whittington was working on it for the last one year, with little luck – until now! This portable freeware will now allow you to move the Start Button and the Start Menu to either the center of the Taskbar or far right\bottom, depending on Taskbar location.
 Start Orb Mover will let you move or re-locate your Start Button and Start Menu to any location on your Taskbar. Clicking on the re-located Start Orb will open the Start Menu, relative to the location of the Start Orb.
Start Orb Mover also gives users a quick option to do tasks such as Change Start Orb, Restart Explorer, Open an Administrative Command Prompt, Exit Explorer, Open Explorer, Open Start Menu and Taskbar Properties, Hide the Taskbar or change the location of Start Orb, simply by right-clicking the Start Orb.
Features of Start Orb Mover:
- Move Start Orb Center or Right\Bottom
- Start Orb Changer
- Show\Hide Taskbar
- Start Menu\Taskbar Properties
- Exit Explorer
- Open Explorer like how the standard Start Menu does
- Restart Explorer
- Open Administrative Command Prompt
- Load on Startup.
Start Orb Mover is a work-in-progress, and there are a few things you should note before you use the tool:
- Alignment of the Notification Area when Start Orb is set to Right\Bottom position is set this way, due to the Notification Area having the ability to resize when more applications having Notification Icons are opened. This keeps the Notification Area from “under-lapping” the Start Orb.
- Do not change the position of the Taskbar while Orb Mover is running, as it will cause the system to not update in a manner that keeps the Start Orb aligned with the change. If you do happen to move the Taskbar while Orb Mover is running, just change the position of Start Orb, and it will readjust properly.
- Sometimes when you open the Start Menu and scroll through the menu items on the right-hand side, it will leave an odd color hue behind. It appears to happen due to forcing the Start Menu to open in a position it was not designed for. The developer is working on finding a solution, and the app will be updated if a fix is found.
- When you click to open Start Menu and then close the Start Menu, the orb displayed in the background in the default position. Clicking or moving the mouse over Orb Mover will fix this.
Start Orb Mover free download
Start Orb Mover v1 has been tested on Windows 7, 32-bit and 64-bit.
Do remember that it is always a good idea to quickly create a system restore point first, before making any changes to your system, so that you have the option of going back, should things not go the way you expected them to,
Настройка макета меню Пуск и панели задач в Windows 10 через групповые политики
В домене Active Directory вы можете централизованно управлять макетом начального экрана (Start Layout) меню Пуск и панели задач на компьютерах пользователей Windows 10 с помощью групповых политик. Это позволяет назначить одинаковые настройки, вид и местоположение значков и ярлыков в меню Пуск и панели задач пользователям различных подразделений компании в зависимости от используемых програм и убедиться, что все рабочие места настроены одинаково.
Экспорт/импорт макета меню Пуск в Windows 10 с помощью PowerShell
Самый простой способ получить макет стартового меню Пуск в Windows 10 — вручную настроить внешний вид и элементы рабочего стола на эталонном ПК. Создайте ярлыки (плитки) для необходимых приложений, закрепите и сгруппируйте их, удалите ненужные элементы. Затем вы можете экспортировать текущее описание элементов стартового меню в xml файл.
Экспортировать текущие настройки можно с помощью PowerShell командлета Export-StartLayout:
Export-StartLayout –path c:\ps\StartLayoutW10.xml 
Вы можете вручную импортировать данный шаблон стартового меню на другом компьютере Windows 10 с помощью командлета Import-StartLayout:
Import-StartLayout –LayoutPath c:\ps\StartLayoutW10.xml –MountPath c:\
Основной недостаток командлета Import—StartLayout – он импортирует макет начального экрана не к профилю текущего пользователя, а к профилю пользователя по умолчанию (в каталоге C:\Users\Default\AppData\Local\Microsoft\Windows\Shell\ появляется файл Layoutmodification.xml). Данный XML макет начального экрана применится только к новым пользователя при первом входе в систему
Распространение макета начального экрана пользователям с помощью GPO
Чтобы распространить файл с макетом меню Пуск на компьютеры домена с помощью групповых политик (GPO), нужно скопировать полученный XML файл в каталог Netlogon на котроллере домена. Затем откройте консоль управления доменными групповыми политиками Group Policy Management Console (GPMC.msc) и создайте новую или отредактируйте существующую политику и назначьте ее на OU с пользователями.
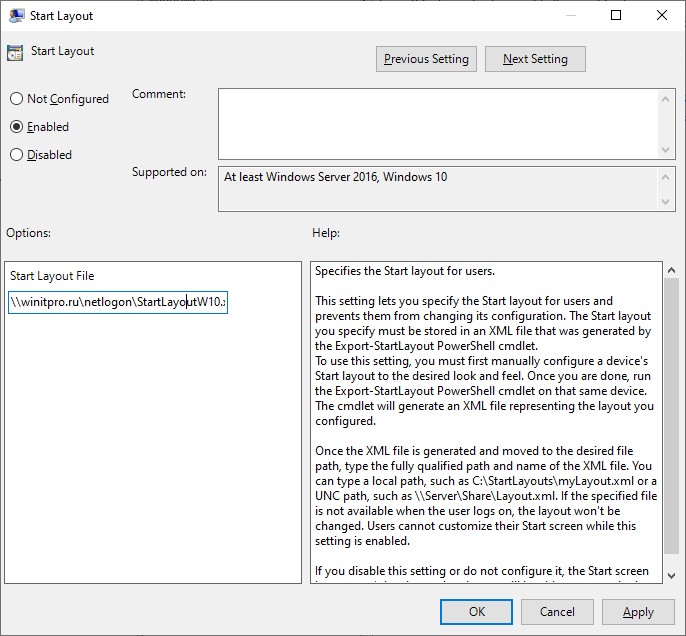
В редакторе GPO найдите политику с именем Start Layout (Макет начального экрана) в секции User Configuration -> Policies -> Administrative Templates -> Start Menu and Taskbar (также вы можете привязать макет меню Пуск к компьютеру, для этого нужно настроить политику в секции Computer Configuration).
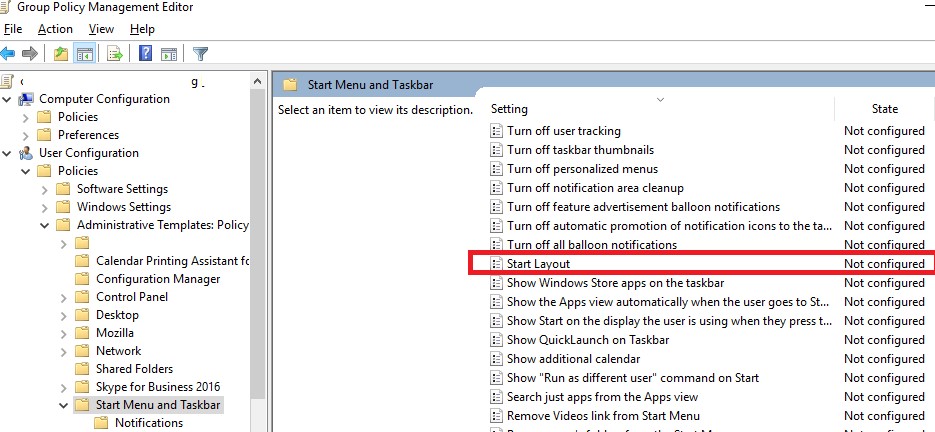
Откройте политику, включите ее (Enabled) и в поле Start layout file укажите UNC путь к xml файлу, содержащему макет стартового экрана Windows 10 на контроллере домена (например, \\domain.ru\netlogon\StartLayoutW10.xml).
Если вы хотите применить политику Start Layout, только к определенным группам пользователям или компьютерам, вы можете использовать Security Filtering или WMI фильтры GPO.
Partial Lockdown – частичная блокировка макета начального экрана Windows
Режим Partial Lockdown, появился в Windows 10 версии 1511, и позволяет указать группы плиток стартового меню, которые пользователи не могут изменить. Т.е. вы можете разрешить пользователяи изменять любые ярлыки, значки и плитки кроме определенной группы ярлыков корпоративных приложений.
Чтобы указать заблокированные группы начального экрана, нужно отредактировать XML файл с макетом с помощью любого текстового редактора (для редактирования XML файла удобно использовать Notepad++).
Откройте ваш файл StartLayoutW10.xml и найдите в нем секцию . Чтобы заблокировать определенную группу ярлыков, нужно в атрибуты данной секции изменить на .
Сохраните изменения в xml файле и распространите его на пользователей. Таким образом, будут заблокированы для редактирования пользователями только группы плиток (ярлыков), указанные в XML файле.
Partial Lockdown работает как в Windows 10 Enterprise так и в Pro (начиная с 1703).
В Windows 10 есть небольшой глюк, когда назначенный ярлык Internet Explorer не появляется после применения XML файла макета через GPO.
Для решения проблемы нужно отредактировать XML файл и исправить строку для ярлыка IE следующим образом:
И затем через GPO нужно скопировать ярлык “Internet Explorer.lnk” в каталог %ALLUSERSPROFILE%\Microsoft\Windows\Start Menu\Programs\.
Управление закрепленными ярлыкам в панели задач с помощью GPO
Начиная с Windows 10 1607 вы можете управлять закрепленными ярлыками в панели задач через тот же самый XML файл с макетом начального экрана. Чтобы добавить собственные закрепленные ярлыки в XML макет, который распространяется через GPO, отредактируйте XML файл. После тега нужно добавить следующий код:
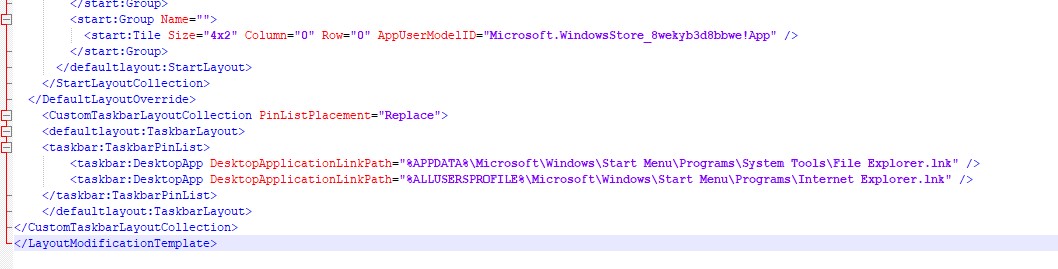
В данном примере мы добавим в панель задач два ярлыка: File Explorer и Internet Explorer. После применения политики на компьютере пользователя, в таскбаре появятся два закрепленных ярлыка.

В старых версия Windows 10 (до 1607) ярлыки приложений в панели задач настраивается по другому. Попробуем разобраться как.
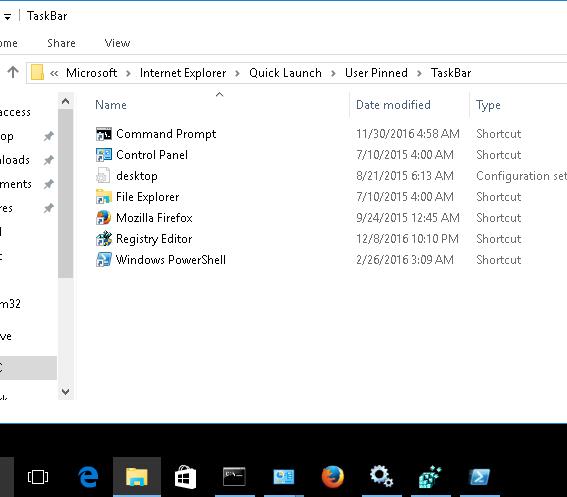
Список закрепленных в панели задач ярлыков хранится в Windows 10 в каталоге %APPDATA%\Microsoft\Internet Explorer\Quick Launch\User Pinned\TaskBar.
При этом параметры закрепленных в панели задач приложений хранятся в закодированном виде в ветке реестра HKEY_CURRENT_USER\Software\Microsoft\Windows\CurrentVersion\Explorer\Taskband.
Для распространения настроек таскбара на компьютеры компании, нужно экспортировать содержимое данной ветки в reg файл:
reg export HKCU\Software\Microsoft\Windows\CurrentVersion\Explorer\Taskband c:\ps\PinnedItem.reg
Этот reg файл и каталог с ярлыками (%APPDATA%\Microsoft\Internet Explorer\Quick Launch\User Pinned\TaskBar) нужно скопировать в общедоступную сетевую папку (например в Netlogon). И в редакторе доменной групповой политики (User Configuration- > Policies -> Windows Settings -> Scripts (Logon/Logoff) -> Logon) добавить логон скрипт с кодом:
@echo off
set Logfile=%AppData%\pinned.log
if not exist «%Logfile% (
IF EXIST «%APPDATA%\Microsoft\Internet Explorer\Quick Launch\User Pinned\TaskBar» GOTO NOTASKDIR
del «%APPDATA%\Microsoft\Internet Explorer\Quick Launch\User Pinned\TaskBar\*» /S /Q
:NOTASKDIR
xcopy /E /Y «\\domain.ru\netlogon\PinnedItem » «%APPDATA%\Microsoft\Internet Explorer\Quick Launch\User Pinned»
regedit.exe /s «\\domain.ru\netlogon\PinnedItem.reg «
echo PinnedItemImported on %date% at %time% >> %LogFile%
taskkill /IM explorer.exe /f
start explorer.exe
>
Теперь при входе пользователя в систему ему будет применен “корпоративный” набор закрепленных иконок приложений в панели задач.


