- Fix: Windows Failed to Start Error on Startup
- Solution 1: Remove any hardware that you recently installed and reboot
- Solution 2: Make sure that your computer detects its HDD and is booting from it
- Solution 3: Perform a System Restore
- Solution 4: Perform a Startup Repair
- Solution 5: Reinstall Windows altogether
- Windows failed to start — Система не загружается
- Windows failed to start a recent — ошибка загрузки
- 1] Установите правильный порядок загрузки
- 2] Проверить оборудование
- 3] Автоматическое восстановление при Загрузке
- 4] Восстановить BCD
- Error message when you start a Windows Vista-based computer: «Windows has blocked some startup programs»
- INTRODUCTION
- Symptoms of the problem
- Cause
- Steps to resolve the problem
- More Information
- References
Fix: Windows Failed to Start Error on Startup
Waking up to a computer that simply doesn’t want to boot into its Operating System is nothing short of a nightmare that has come to life. There are many different errors that Windows computers display when they fail to boot into their Operating Systems, and one of these is the “Windows failed to start” error. The entirety of this error message states the following:
“Windows has failed to start. A recent hardware or software change might be the cause.”
The error message screen also provides the user with a couple of options that can be used to resolve the issue (such as running Startup Repair or starting Windows normally), but no matter what option the user chooses, they are bound to return to the same “Windows failed to start” error message. The cause of this issue can be anything ranging from an incompatible or faulty hardware, software (program or application) or driver/update that you recently installed to corrupt boot files or an issue with your HDD (or SSD).
Since the causes of the “Windows failed to start” error message are so diverse, so are the solutions that have proven to work for Windows users who have been affected by this issue in the past. The following are some of the most effective solutions that you can use to try and resolve this issue and successfully boot into your Operating System:

Solution 1: Remove any hardware that you recently installed and reboot
If you installed any hardware (such as printers or cameras) before your computer started going haywire and spewing out the “Windows failed to start” error message on startup, it is quite likely that the hardware you installed is the culprit. If that is the case, simply remove the hardware that you installed (and preferably all other non-essential hardware, leaving only the mouse and keyboard attached) and restart your computer. If your computer boots into its OS as it should, the hardware you removed was indeed the culprit.
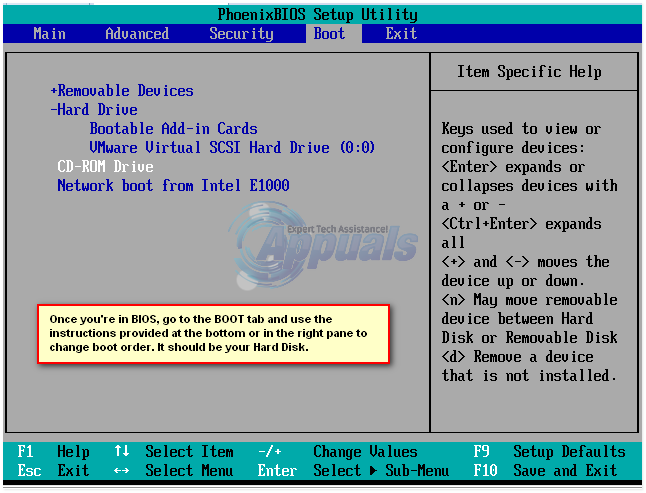
Solution 2: Make sure that your computer detects its HDD and is booting from it
Restart your computer, and at the first screen that you see, press the key that will take you into its BIOS settings. You will find this key on both your computer’ user manual and on the first screen you see when it boots up. Once in the BIOS settings, peruse its tabs until you find the Boot priority order (or Boot order). Highlight Boot priority order and press Enter, and when you see a list of devices that your computer tries to boot from, make sure that your HDD is on the top of the list.
If your HDD is nowhere to be found on the list, open your computer up, and remove and reseat the SATA or IDE cable connecting the HDD to the motherboard (or preferably replace it altogether), boot your computer up, access the BIOS settings and see if it now detects the HDD. If the HDD is still not detected, run diagnostics on it (See: this guide) to determine whether or not it has failed or is failing.
If your HDD is on the list but is just not on the top of it, configure the list so that the HDD in on top and is your computer’s first boot device. After doing so, save the change, exit the BIOS and restart the computer to see if the issue has been resolved.
Solution 3: Perform a System Restore
If this problem is being caused by a program, application, driver or update you installed, restoring your computer to a point in time before it was installed should be more than enough to fix it.
Insert a Windows installation disc or Windows system repair disc into the affected computer. Restart the computer and boot from the disc.
Note: To boot from the disc, you may have to once again access your computer’s BIOS settings and, instead of just looking at the boot order, change it to set your DVD/CD drive as your computer’s first boot device. Once done, save the change and exit the BIOS settings and you should be asked to press any key to boot from the disc you inserted when your computer starts up. (see how to start windows 7 in startup repair here, and windows 8/8.1/10 here).
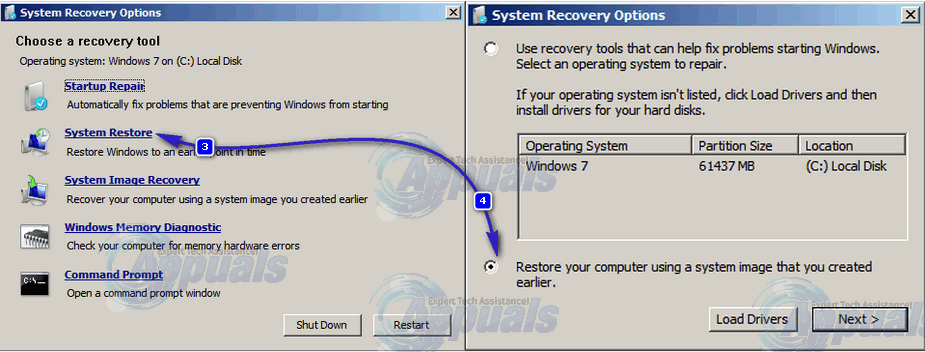
Select the Operating System you want to repair and chose Repair Your Computer. Click on System Restore. Choose a Restore Point (preferably one that was created days before the problem showed itself). Follow the onscreen instructions to initiate the System Restore. Once the System Restore completes, restart your computer and check to see if the System Restore got rid of the issue.
Solution 4: Perform a Startup Repair
Performing a Startup Repair will fix any and all issues keeping your computer from booting into its Operating System, which is why this method has pretty significant chances of fixing this problem for you. To perform a Start Repair on your computer, you need to:
Insert a Windows installation disc or Windows system repair disc into the affected computer.
Restart the computer and boot from the disc.
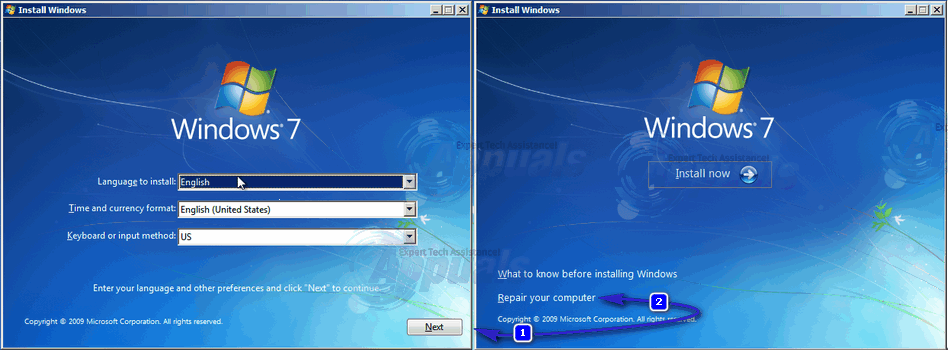
Choose your language and other preferences and then click on Next.
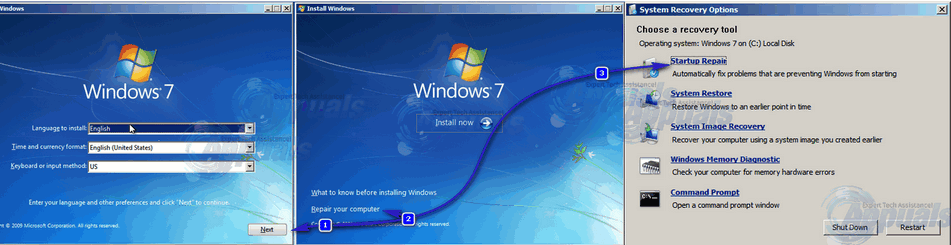
If you are using a Windows installation disc, you will be taken to a screen that has an Install Now button at its center. On this screen, click on Repair your computer in the bottom left corner. If you are using a system repair disc, you will be taken directly to the next step. Select the Operating System you want to repair. Click on Startup Repair. Follow the onscreen instructions, initiate the Startup Repair and when it completes, restart your computer to see if it fixed the problem.
Solution 5: Reinstall Windows altogether
If none of the solutions listed and described have worked for you, your last viable resort may just be reinstalling Windows altogether. Be warned that doing so will erase all of the data and third-party programs on your computer but also may very well be your last hope.
Windows failed to start — Система не загружается
Windows может перестать работать, фактически, не запуститься из-за любых изменений оборудования и программного обеспечения. Эти изменения мешают обычному процессу загрузки. В этом посте мы постараемся решить проблему с помощью советов по устранению неполадок.

Windows failed to start a recent — ошибка загрузки
Обычно проблема связана с отсутствующим загрузчиком или подключенным оборудованием. Вам нужно будет сделать загрузочный USB-накопитель для загрузки в режиме расширенного восстановления. Поскольку вы не можете получить доступ к своему компьютеру, вы можете использовать другой компьютер с Windows 10 для создания загрузочного диска.
У вас есть следующие варианты:
- Проверить оборудование
- Восстановление системы
- Восстановить BCD
- Установите правильный порядок загрузки
Вам также понадобится учетная запись администратора в одном из процессов, поэтому обязательно запомните это.
1] Установите правильный порядок загрузки

При запуске Windows загрузчик ищет набор файлов, откуда он может начать загрузку Windows. Если он не найдет нужные файлы, Windows не загрузится. Вы должны убедиться, что загрузочным диском по умолчанию является ваш SSD или HDD.
Если он не установлен по умолчанию и у вас подключен USB-накопитель, Windows зависнет. Поэтому загрузитесь в BIOS с помощью клавиши DEL или F2 при включении компьютера и измените порядок, Как изменить порядок загрузки.
2] Проверить оборудование
Если проблемы с порядком загрузки нет, вы можете проверить, есть ли проблема с жестким диском. Первым делом вам следует проверить, может ли BIOS его обнаружить. Если это так, то вам нужно проверить это на другом компьютере. Если жесткий диск или твердотельный накопитель не удается распознать, у вас проблема с оборудованием.
Если вы столкнулись с этим на ноутбуке, вам нужно вручную вынуть его и проверить. Если это аннулирует вашу гарантию. пожалуйста, отнесите его в сервисный центр, и не открывайте его самостоятельно.
3] Автоматическое восстановление при Загрузке

Windows Advanced Recovery предлагает функцию автоматического восстановления (восстановление при загрузке), которая сканирует системные файлы, параметры реестра, параметры конфигурации и многое другое и пытается решить проблему самостоятельно, автоматически. Обычно он запускается автоматически, если процесс перезагрузки прерывается несколько раз.
Вы можете использовать загрузочный USB-накопитель для загрузки в Recovery.
Вам нужно будет выбрать Устранение неполадок> Дополнительные параметры> Автоматическое восстановление. При появлении запроса введите данные учетной записи и позвольте процессу выполнить свою работу.
4] Восстановить BCD

BCD или данные конфигурации загрузки содержат информацию, которая позволяет загрузчику находить нужные файлы для загрузки Windows. Если BCD поврежден или не содержит информации, Windows зависает. Выполните следующие действия, чтобы восстановить BCD:
- Загрузите компьютер в расширенный режим восстановления
- Запустить командную строку, доступную в разделе «Дополнительные параметры».
- Чтобы восстановить BCD или файл данных конфигурации загрузки, используйте команду –bootrec /rebuildbcd
- Он просканирует систему и позволит вам выбрать ОС, которые вы хотите добавить в BCD.
Если он не находит загрузочный раздел, вы можете использовать bootrec /scanos, чтобы найти список раздела, на котором установлена ОС. Затем используйте команду bcdboot, чтобы добавить его в список. После того, как путь установлен, перезагрузите компьютер, и ошибка больше не должна возникать.
Вы также можете попробовать исправить MBR или основную загрузочную запись, выполнив команды в командной строке bootrec/fixMbr and bootrec /fixboot.
Error message when you start a Windows Vista-based computer: «Windows has blocked some startup programs»
INTRODUCTION
This article is intended for a beginning to intermediate computer user.You may find it easier to follow the steps if you print this article first.
When you start a Windows Vista-based computer, you receive a warning message that some startup programs have been blocked. This article contains several step-by-step methods that you can use to try to resolve this problem.
Symptoms of the problem
When you start a Windows Vista-based computer, you receive the following Windows warning message in the notification area at the far right of the taskbar:
Windows has blocked some startup programs.
Cause
This issue occurs because a program or a service that has User Account Control (UAC) restrictions tries to start during the Windows Vista startup process or logon process. User Account Control is a set of infrastructure technologies that helps prevent malicious programs, sometimes called «malware,» from damaging your computer. Software Explorer blocks programs or services that require User Account Control confirmation.
Steps to resolve the problem
Before we begin, you have to know which programs and services are being blocked. You can see a list of blocked programs and services by following these steps:
Click the Blocked startup programs icon that is in the notification area.
Point to the Run blocked program menu list. The programs and services that have been blocked from starting are located here.
To know which method you should try to solve your problem, decide which of the following actions you want to take:
After Windows Vista starts, you can run any blocked programs or blocked services by following these steps:
Click the Blocked startup programs icon that is in the notification area.
Point to Run blocked program, and then click the program or the service in the list that you want to start.
 If you are prompted for an administrator password or confirmation, type the password, or click Continue.
To disable a program or a service during the Windows Vista startup process, follow these steps:
Click the Blocked startup programs icon that is in the notification area.
Click Show or remove blocked startup programs. This starts Software Explorer in Windows Defender.
Locate, and then click to select the startup program or the startup service that is in Software Explorer.
Click Disable, and then click Yes in the confirmation dialog box.
To remove a program or a service from the startup process completely, try to use the Programs and Features item in Control Panel. To do this, follow these steps:
Click Start , type appwiz.cpl in the Start Search box, and then press ENTER.
Click the program in the Programs and Features list, and then click Uninstall/Change.
If you cannot remove the program by using the Programs and Features item in Control Panel, you can remove the program from the startup process by using Software Explorer. To do this, follow these steps:
Click the Blocked startup programs icon that is in the notification area.
Click Show or remove blocked startup programs. This starts Software Explorer in Windows Defender.
Locate, and then click to select the startup program or the startup service that is in Software Explorer.
Click Remove, and then click Yes in the confirmation dialog box.
More Information
For more information about Software Explorer, follow these steps:
Click Start, and then click Help and Support.
Type Software Explorer, and then click Search.
Click the Using Software Explorer in Windows Defender link.
References
For help with common system maintenance tasks in Windows Vista, visit the following Microsoft Web page:
Fix problems with common system maintenance tasks
For more information about User Account Control (UAC), click the following article numbers to view the articles in the Microsoft Knowledge Base:
922708 How to use User Account Control (UAC) in Windows Vista
942956 Information for advanced users about the changes to the built-in administrator account in Windows Vista


