- Desktop App Tiles on the Start Screen
- Design your tile for the Start screen
- Decide the right entry points to include in the Start screen
- Windows start screen apps
- Adding and removing apps and programs from the Windows 8 Start Screen
- Users who read this also read:
- How to Use and Tweak the Start Screen in Windows 10
- Enable Start Screen
- Customize Start Screen
- Change Tiles
- Start Screen Settings
Desktop App Tiles on the Start Screen
The following provides information on choices to consider when tailoring desktop app tiles for WindowsВ 8 including how to design desktop app tiles for the new Start screen and how to choose what entry points to show in the Start screen.
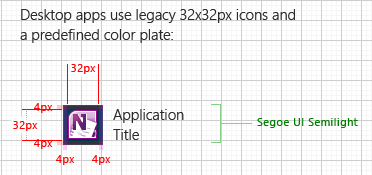
Design your tile for the Start screen
You can customize two aspects of your desktop app tiles: the app name, and icon. The background color is derived from the user’s chosen background color and isn’t programmatically customizable.

DO: Avoid truncation of your application name. Desktop tiles pinned to the Start screen can accommodate up to two lines of text each line, or about around ten characters (though this depends on the UI language), so try to keep the application name short enough to avoid truncation.
DO: Provide icons for the four supported Start screen scale values to ensure that your icons look crisp on all form factors.
| Scale | Tile size (in pixels) | Icon size used (in pixels) |
|---|---|---|
| 80% | 120 x 120 | 48 x 48 |
| 100% | 150 x 150 | 64 x 64 |
| 140% | 210 x 210 | 96 x 96 |
| 180% | 270 x 270 | 128 x 128 |
DO: Embrace the Microsoft design principles. The new look and feel for icons is flat, so if you want to mimic Windows Store app icons for your desktop app, consider taking out drop shadows and so on.
DON’T: Don’t avoid the use of color. While Windows Store app icons are sometimes monochromatic, we recommend using color icons for desktop apps. This helps differentiate desktop applications on the taskbar, and from other desktop app tiles in the Start screen because the background color of desktop tiles can’t be customized. Do consider using more saturated colors.
Decide the right entry points to include in the Start screen
DO: Add one shortcut per app in the Start screen when the app is installed. This ensures that people can launch your app directly from the Start screen or through search. If you do not include a shortcut in the Start screen, your app becomes difficult to launch. In particular, do not add a shortcut only on the desktop. Users see the Start screen when they first login, and so placing a shortcut only on the desktop isn’t as effective as including it in the Start screen.
DON’T: Don’t provide multiple shortcuts to the same app. For example, don’t have two shortcuts that launch an app in two different modes, such as one for Windows Internet Explorer and one for Internet Explorer with no add-ons.
DO: Minimize the number of tiles that are added as part of installation. Consider exposing other entry points to the extraneous apps. For example, instead of including a separate Settings app with a console app, access the settings through a feature in the console app.
DON’T: Don’t put shortcuts to the following items on the Start screen:
- Uninstallers. Users can access uninstallers through the Programs item in the Control Panel.
- Help files. Include help topics directly in your app.
- App settings and options. Include UI to configure settings for an app within the app or create a Control Panel item.
- Web sites. Provide any appropriate links to information like help and technical support sites directly in your app.
- Wizards. Wizards and other one-time configuration tasks should be launched from within the app.
DON’T: Don’t create shortcuts to features or functionality that can be launched from within the app itself. For example, Language Settings can be configured from any Microsoft Office app, so it’s unnecessary also to have a separate Language Settings entry point on the Start screen.
DON’T: Don’t create shortcuts to items that are not executable files. Shortcuts that don’t map to executables, such as shortcuts that launch web sites or help files, are filtered out of the Start screen.
DO: If you install a suite of apps rather than a single app, add one shortcut for each app in the suite. As mentioned above, avoid creating shortcuts to secondary functionality like help information, utilities, and settings. That functionality should be included in the relevant app(s) of the suite.
DO: Create a single-level product folder for suites that contain three or more tiles. In the Apps view of the Start screen, accessible from the Search charm, applications are grouped by their top level folder. Choose a descriptive yet concise folder name; three words or fewer are recommended. Be aware that while the Apps view groups tiles and shows the folder name, this name isn’t visible when a tile is pinned to the Start screen, so make your tile names sufficiently descriptive.
DON’T: Don’t create a product folder if your suite contains only a single shortcut. Place your shortcut in the top-level Start folder.
DO: When installing a suite of more than three apps, consider whether any of those apps are for secondary, more irregular use and should not be pinned to the Start screen. If so, perhaps those tiles can be removed entirely, according to the guidance above, and launched from within a primary app. If you can’t remove the tiles, consider unpinning them from the Start screen. That way, the shortcuts still appear in the All Apps view but don’t clutter the user’s Start screen.
To create add an app shortcut without pinning it to the Start screen, set the following property on the shortcut: System.AppUserModel.StartPinOption = 1. The symbolic name for 1 is APPUSERMODEL_STARTPINOPTION_NOPINONINSTALL.
This prevents the shortcut from being shown on the Start screen, but it can still be seen in the All Apps view and search results. Only the user can unpin existing shortcuts, so you must set this property during installation or immediately after placing the app on disk.
DON’T: Don’t create a tile for a host or runtime for applications, like Silverlight or Java. Provide an entry point to uninstall the framework in Add/Remove Programs and provide any settings entry point in Control Panel.
Windows start screen apps

- Home
- Tutorials & Tech Support Guides
- Windows 8 Tutorials
- Adding and removing apps and programs from the Windows 8 Start Screen
Adding and removing apps and programs from the Windows 8 Start Screen
Lawrence Abrams
- September 21, 2011
- Read 406,743 times
Table of Contents
Introduction
The Windows 8 Metro Start screen contains small squares and rectangles, called tiles, that are used to represent various programs that you can access. The default tiles that are on your Start screen are not, though, the only programs that you can add. It is possible to add other programs by searching for them or using more advanced techniques to make them available. This guide will explain how to go about adding and removing programs to the Windows 8 Start screen.
How to add Apps and programs to the Windows 8 Metro Start Screen
To add, or pin, a Metro App or Windows application we first need to find it. This can be done by using the Metro Search to look for the app or program that you would like to add. To search for a file, simply start typing the name of the app or program that you would like to find. For example, we will type notepad to search for the Windows Notepad application.
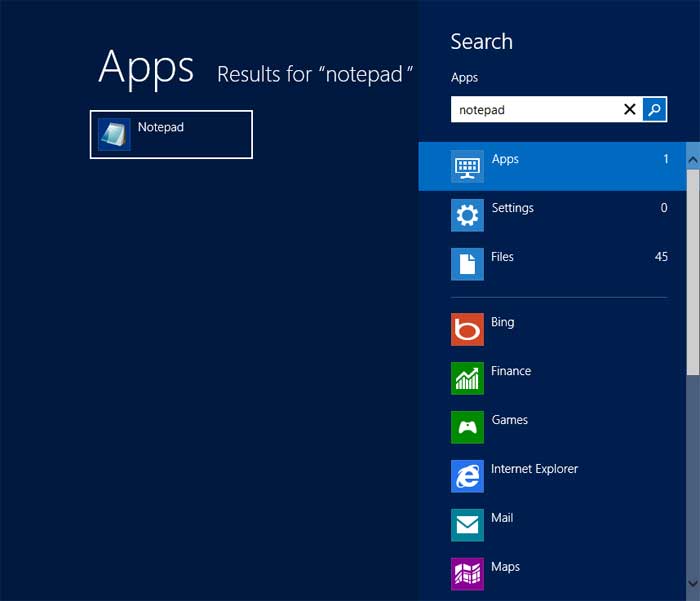
As you can see the search found the Notepad program. To add Notepad to the Metro Start screen, right-click on it with your mouse or hold your finger on it till it becomes checked. You will then see a panel open at the bottom of the Windows 8 Start screen where you can pin it.
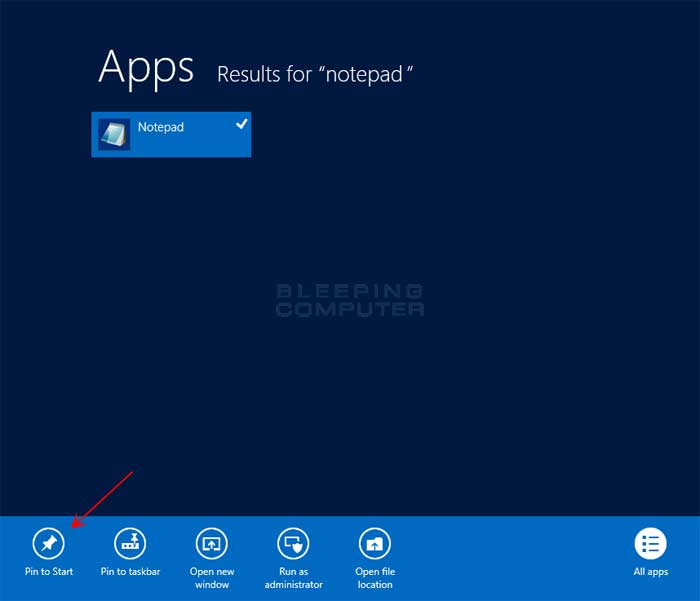
Just click on the Pin button and the program will now appear on your Windows 8 Metro Start screen.
How to make most programs available on the Windows 8 Metro Start Screen
Unfortunately, not every program on your computer is found when you search for it. To get around this you can create a Windows shortcut to the executable and place that shortcut in the user’s Windows Start Menu folder. Once added to the Start Menu folder the shortcut will be shown in the Metro Start screen. The Windows Start Menu is located at the %AppData%\Microsoft\Windows\Start Menu\Programs location. As this folder is hidden, you will first have to enable the viewing of Hidden files as described in this tutorial:
Once you have configured Windows 8 to view hidden files, you need to open the Start Menu folder. The easiest way is to just press the Windows key, and while holding it, press the R key on your keyboard. The Windows key is the button on your keyboard between the Ctrl and Alt keys and that has a Windows flag on it. Once you press both of these keys together the Run dialog box should open as shown below.
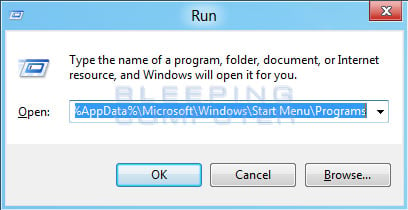
In the Open: field you should enter %AppData%\Microsoft\Windows\Start Menu\Programs and then press the OK button. This will then open the Start Menu folder for the logged in user.
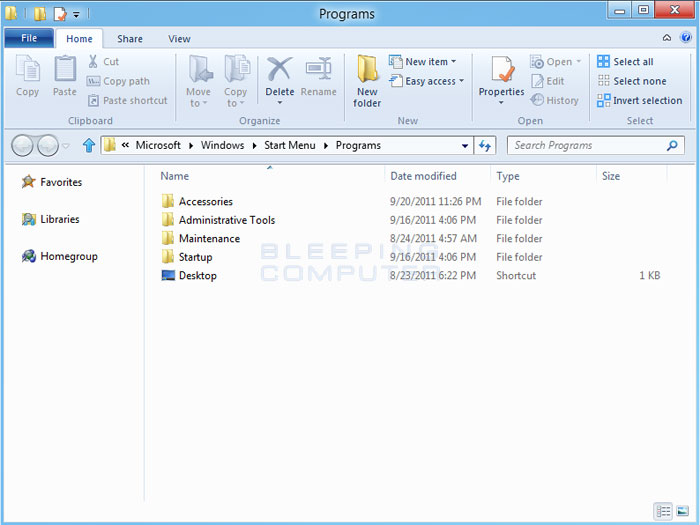
Now you need to find the file you wish you to add to the Metro Start Screen. The best way to do that is to use Windows Explorer and navigate to where the file is located. To start Windows Explorer simply press the Windows key and the E key at the same time. When Windows Explorer is open, navigate to the location of your file and right-click on it. When the menu appears, please select Create Shortcut. A shortcut to the program will now be created on your desktop. Simply move that shortcut into the %AppData%\Microsoft\Windows\Start Menu\Programs folder window that should already be open. Once the shortcut has been placed in your Start Menu it will now show on the Metro Start Screen.
How to remove Apps and programs to the Windows 8 Metro Start Screen
To remove, or unpin, a program or App that has been pinned to your Start screen, simply right-click on it with your mouse or hold your finger on it until it becomes checked. You will then see a panel open at the bottom of the Windows 8 Start screen where you can unpin it.
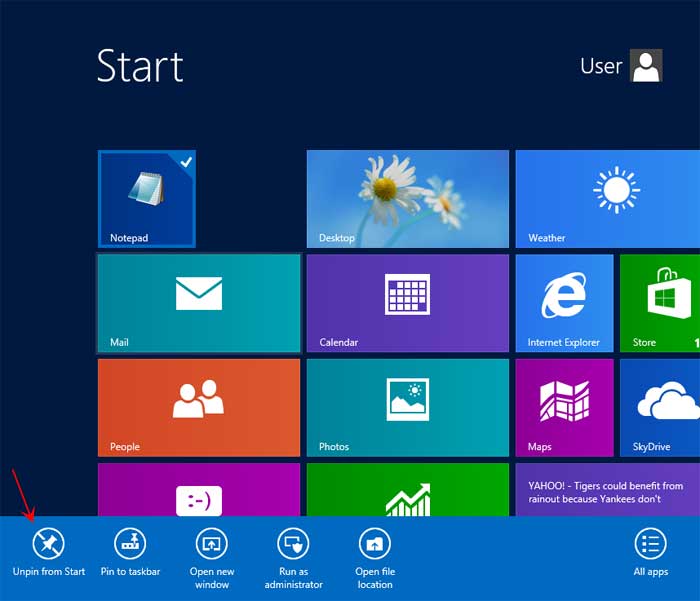
Just click on the Unpin button and the program will no longer appear on your Windows 8 Metro Start screen.
If you have any questions regarding these steps, please feel free to ask in the Windows 8 forum.
Users who read this also read:

How to uninstall an App in Windows 8
In the past when you wanted to uninstall an application in Windows, you would uninstall it from the Uninstall a Program control panel. Though this option still exists for installed programs, Metro Apps that are purchased from the Windows Store or that come with Windows 8 are not shown in this control panel. In order to uninstall these Apps, you will need to use a different procedure. To uninstall .
How to resize, move, and create new App tile groups in Windows 8
The Windows 8 Metro Start screen is designed to make it so that you can easily resize and move tiles as well as make new tile groups. This allows you to organize the interface in a way that works best for you. The instructions below will explain how you can perform these tasks in the Windows 8 Start screen.

Introduction to the Windows 8 Start Screen
Windows 8 comes with a new user interface called the Windows Start Screen that is the first thing you see when you login to Windows 8. This is the main interface that Windows 8 user’s use to launch applications, search for files, and browse the web. This Start screen contain tiles that represent different programs that you can launch by clicking on the title. One of the features of this new .
How to see hidden files in Windows 8
Windows 8 hides certain files so that you are not able to view them while exploring the files and folders on your computer. Windows has two types of files that Windows will classify as hidden and hide from the user. The first type are actually hidden files, which are ones that are given the +H attribute or specified as Hidden in a file or folder’s properties. The second type of file are System .
How to uninstall a program in Windows Vista, Windows 7, and Windows 8
There are two ways to uninstall a program in Vista; the wrong way and the right way. Unfortunately, though, too many people uninstall a program using the wrong ways, which can lead to poor performance and problems on the computer. These wrong ways are delete the program’s folder or just deleting the icons. When you attempt to remove a program in this way, there will be a large amount of .
How to Use and Tweak the Start Screen in Windows 10
Introduced in Windows 8, the Start screen still exists in Windows 10, and you can customize it according to your own preferences.


Whether you own a Windows 10 desktop, laptop, tablet, or hybrid, you have a choice between using the Start menu or the Start screen. For any device you control with a mouse and keyboard, the Start menu is typically the better option. However, you may find the Start screen easier to work with on touch-screen devices like a tablet or hybrid.
Either way, you can use the Start screen as efficiently as you can the Start menu. The trick lies in knowing how to control and tweak it.
Enable Start Screen
Let’s assume your current Windows 10 machine is set to use the Start menu by default. If you want to switch to the Start screen, click the Start button and go to Settings > Personalization > Start. Turn on the switch for Use Start full screen.
Click the Start button and you’ll now see that the Start menu has been replaced by the Start screen. The Windows 10 Start screen is friendlier and more functional than the old version from Windows 8 and 8.1.
The tiled portion of the Start screen in Windows 10 looks about the same as it did in previous versions, but by default is less cluttered and cramped because the tiles are sized better.
Customize Start Screen
Okay, but what are all the icons on the left sidebar of the screen? That’s where the smoother functionality comes into play, because it functions as a merger between the Start menu and the Start screen.
Hover your mouse over the button at the bottom left of the screen, just above the Start button. You’ll notice that the pane expands to include the name of each icon so you know what they all do. This menu can be customized, but it will give you easy access to control power, change settings, and access files.
Click the Power button to put Windows to sleep, restart your computer, or shut down the whole thing. Select your name to change your account settings, lock the screen, or sign out of Windows. At the top of the sidebar, you can view the apps and tiles you have pinned or all installed apps.
Change Tiles
You can modify the Start screen by adding or removing tiles. Right-click a tile and select Unpin from Start to remove it.
To add a tile, switch from the Pinned apps view to All Apps. Right-click on the tile you want to add and select Pin to Start.
However, adding a tile this way can be imprecise because it is just randomly placed on the Start screen. A better way of doing it is by manually dragging tiles to the appropriate spot or group. Go back to Settings > Personalization > Start and turn off the switch for Use Start full screen to return to Start menu mode.
Now you can just drag a tile from the menu to the Start screen and into the right area. When you’re done, go back into Settings and turn on the Start screen again.
Start Screen Settings
If you’re looking to do more to customize the Start menu or Start screen, head over to the settings and play with a variety of other options. Turn on Show more tiles on Start to reduce the size of all existing tiles so you can squeeze more onto the screen.
Turn on the option for Show recently opened items in Jump Lists on Start or the Taskbar and in File Explorer Quick Access to display recent items on the Taskbar icons and in the Quick Access section in File Explorer. This will work whether you’re using the Start menu or Start screen.
Click the Choose which folders appear on Start link at the bottom of the page to add or remove certain Windows folders and locations on the sidebar. You can display and access icons for File Explorer, Settings, Documents, Downloads, Music, Pictures, Videos, Network, and Personal Folder. Keep what you want and discard what you don’t want to see.


