- How to refresh, reset, or restore your PC
- Before you start to refresh or reset your PC
- Refresh, reset, or restore
- To refresh your PC
- To reset your PC
- To restore your PC to an earlier point in time
- Start your PC in safe mode in Windows 10
- Запуск Windows 10 в безопасном режиме
- Утилита MSConfig (Конфигурация системы)
- Сочетание Shift + Restart
- Запуск режим диагностики из интерфейса новой Панели управления
- Запуск безопасного режима из командой строки
- Возвращаем старое текстовое меню загрузки
- Запуск Safe Mode из режима восстановления
How to refresh, reset, or restore your PC
Note: For information about this topic in Windows 10, see Recovery options in Windows 10.
If you’re having problems with your PC, you can:
Refresh your PC to reinstall Windows and keep your personal files and settings. Refresh also keeps the apps that came with your PC and the apps you installed from the Microsoft Store.
Reset your PC to reinstall Windows but delete your files, settings, and apps—except for the apps that came with your PC.
Restore your PC to undo recent system changes you’ve made.
If you’re having trouble starting (booting) your PC, see Windows Startup Settings (including safe mode), and go to the “Get to Windows Startup Settings in the Windows Recovery Environment” section. You can refresh, reset, or restore your PC from the Windows Recovery Environment.
If you want to back up and restore your personal files using File History, see Set up a drive for File History.
Before you start to refresh or reset your PC
In most cases, once you start to refresh or reset your PC, it’ll finish on its own. However, if Windows needs missing files, you’ll be asked to insert recovery media, which is typically on a DVD disc or thumb drive. If that happens, what you’ll need depends on your PC.
If your PC came with Windows 8.1 or Windows RT 8.1, you’ll need the discs or thumb drive that came with your PC. Check the info that came with your PC to see if your PC manufacturer provided these discs or media. In some cases, you might have created them when you first set up your PC.
If you don’t have either of those, you can make them if you have a USB thumb drive of 16 GB or larger. Having a recovery drive can help you troubleshoot and fix problems with your PC, even if it won’t start. For more info, see Create a USB recovery drive.
If you upgraded your PC to Windows 8.1 or Windows RT 8.1 with a DVD, use that disc. If you don’t have Windows 8.1 or Windows RT 8.1 media, contact Microsoft Support.
Refresh, reset, or restore
Select any of the following for more detailed info.
If your PC isn’t performing as well as it once did, and you don’t know why, you can refresh your PC without deleting any of your personal files or changing your settings.
Note: If you upgraded your PC from Windows 8 to Windows 8.1 and your PC has a Windows 8 recovery partition, refreshing your PC will restore Windows 8. You’ll need to upgrade to Windows 8.1 after the refresh has finished.
Warning: Apps you installed from websites and DVDs will be removed. Apps that came with your PC and apps you installed from Microsoft Store will be reinstalled. Windows puts a list of removed apps on your desktop after refreshing your PC.
To refresh your PC
Swipe in from the right edge of the screen, tap Settings, and then tap Change PC settings.
(If you’re using a mouse, point to the upper-right corner of the screen, move the mouse pointer down, click Settings, and then click Change PC settings.)
Tap or click Update and recovery, and then tap or click Recovery.
Under Refresh your PC without affecting your files, tap or click Get started.
Follow the instructions on the screen.
If you want to recycle your PC, give it away, or start over with it, you can reset it completely. This removes everything and reinstalls Windows.
Note: If you upgraded your PC from Windows 8 to Windows 8.1 and your PC has a Windows 8 recovery partition, resetting your PC will restore Windows 8. You’ll need to upgrade to Windows 8.1 after the reset has finished.
Warning: All of your personal files will be deleted and your settings will be reset. All apps that you installed will be removed. Only apps that came with your PC will be reinstalled.
To reset your PC
Swipe in from the right edge of the screen, tap Settings, and then tap Change PC settings.
(If you’re using a mouse, point to the upper-right corner of the screen, move the mouse pointer down, click Settings, and then click Change PC settings.)
Tap or click Update and recovery, and then tap or click Recovery.
Under Remove everything and reinstall Windows, tap or click Get started.
Follow the instructions on the screen.
Note: You’ll be asked to choose whether you want to erase data quickly or thoroughly. If you choose to erase data quickly, some data might be recoverable using special software. If you choose to erase data thoroughly, this will take longer but it makes recovering data less likely.
If you think an app or driver that you recently installed caused problems with your PC, you can restore Windows back to an earlier point in time, called a restore point. System Restore doesn’t change your personal files, but it might remove recently installed apps and drivers.
System Restore isn’t available for Windows RT 8.1.
Windows automatically creates a restore point when you install desktop apps and new Windows updates, if the last restore point is older than 7 days. You can also create a restore point manually at any time.
To restore your PC to an earlier point in time
Swipe in from the right edge of the screen, and then tap Search.
(If you’re using a mouse, point to the upper-right corner of the screen, move the mouse pointer down, and then click Search.)
Enter Control Panel in the search box, and tap or click Control Panel.
Enter Recovery in the Control Panel search box, and then tap or click Recovery.
Tap or click Open System Restore, and then follow the instructions.
If you need additional help refreshing, resetting, or restoring your PC, check out the Repair and Recovery community pages in the Windows forum for solutions that other people have found for problems they’ve experienced.
Start your PC in safe mode in Windows 10
Safe mode starts Windows in a basic state, using a limited set of files and drivers. If a problem doesn’t happen in safe mode, this means that default settings and basic device drivers aren’t causing the issue. Observing Windows in safe mode enables you to narrow down the source of a problem, and can help you troubleshoot problems on your PC.
There are two versions of safe mode: Safe Mode and Safe Mode with Networking. Safe Mode with Networking adds the network drivers and services you’ll need to access the Internet and other computers on your network.
Select from the following sections to find out how to start your PC in safe mode from Settings, from the sign-in screen, or from a black or blank screen.
Press Windows logo key + I on your keyboard to open Settings. If that doesn’t work, select the Start button, then select Settings .
Under Advanced startup, select Restart now.
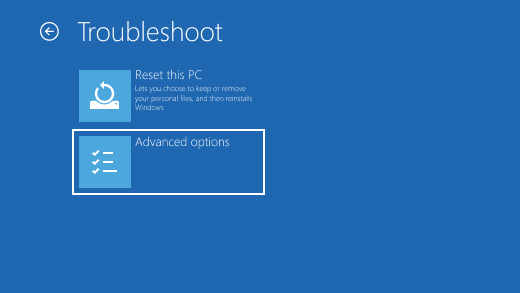
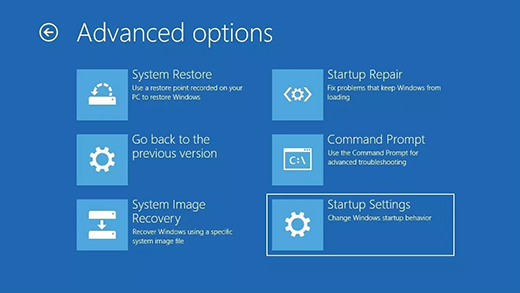
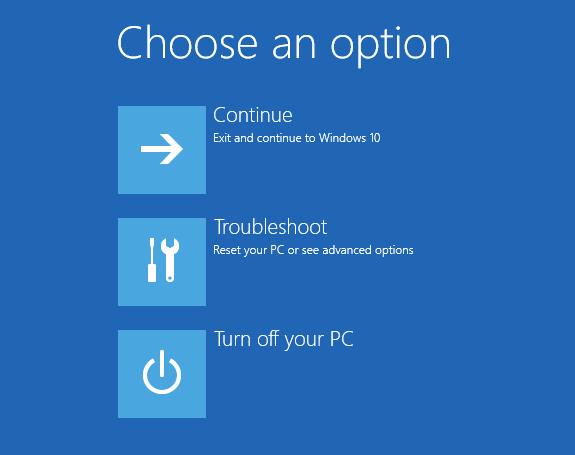
After your PC restarts to the Choose an option screen, select Troubleshoot > Advanced options > Startup Settings > Restart. You may be asked to enter your BitLocker recovery key.


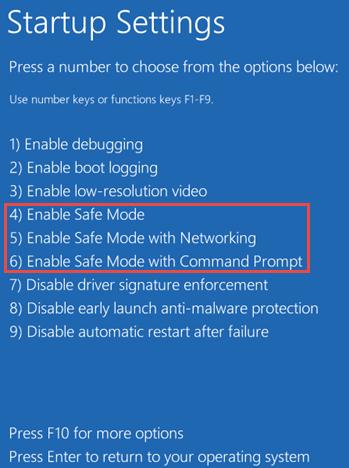
After your PC restarts, you’ll see a list of options. Select 4 or press F4 to start your PC in Safe Mode. Or if you’ll need to use the Internet, select 5 or press F5 for Safe Mode with Networking.
When you can’t open Settings to get into safe mode, restart your device from the Windows sign-in screen.
On the Windows sign-in screen, press and hold the Shift key while you select the Power > Restart .
After your PC restarts to the Choose an option screen, select Troubleshoot > Advanced options > Startup Settings > Restart. You may be asked to enter your BitLocker recovery key.
After your PC restarts, you’ll see a list of options. Select 4 or F4 to start your PC in safe mode. Or if you’ll need to use the Internet, select 5 or F5 for Safe Mode with Networking.
Note: If you’ve encrypted your device, you’ll need your BitLocker key to start in safe mode.
Before you enter safe mode, you need to enter the Windows Recovery Environment (winRE). To do this, you will repeatedly turn your device off, then on:
Hold down the power button for 10 seconds to turn off your device.
Press the power button again to turn on your device.
On the first sign that Windows has started (for example, some devices show the manufacturer’s logo when restarting) hold down the power button for 10 seconds to turn off your device.
Press the power button again to turn on your device.
When Windows restarts, hold down the power button for 10 seconds to turn off your device.
Press the power button again to turn on your device.
Allow your device to fully restart. You will enter winRE.
Now that you are in winRE, you will follow these steps to take you to safe mode:
On the Choose an option screen, select Troubleshoot > Advanced options > Startup Settings > Restart.
After your device restarts, you’ll see a list of options. Select option 5 from the list or press F5 for Safe Mode with Networking.
If you need more info on a black or blank screen error, see Troubleshoot black or blank screen errors.
Notes: If you need to exit safe mode, simply restart your device, or:
Press the Windows logo key + R.
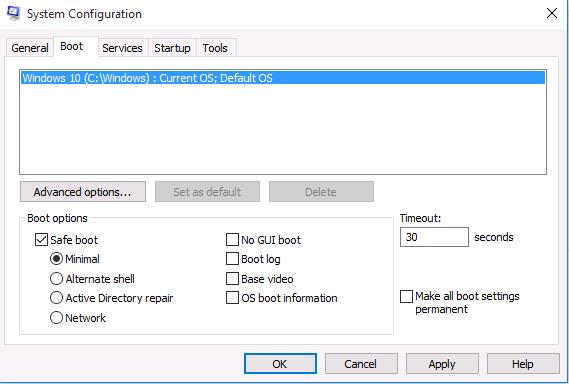
Type msconfig in the Open box and then select OK.
Select the Boot tab.
Under Boot options, clear the Safe boot checkbox.
Запуск Windows 10 в безопасном режиме
Windows 10 унаследовала все особенности системы загрузки у Windows 8, предоставляя такую же графическую среду для выполнения задач восстановления системы. Предполагается, что операции восстановления системы после сбоев будут преимущественно выполняться системой автоматического восстановления. В том случае, если Windows 10 не загружается корректно, запускается система автоматического восстановления, которая без участия пользователя пытается найти и исправить проблемы, мешающие нормальной загрузке системы. Однако это не означает, что в Windows 10 отсутствует безопасный режим (Safe mode), просто по умолчанию этот режим загрузки скрыт от пользователей.
В некоторых случаях необходимо запустить систему в безопасном режиме, например чтобы отладить или удалить службу, драйвер или приложение. Посмотрим как включить безопасный режим в Windows 10.
Windows 10 можно загрузить в безопасном режиме несколькими разными способами.
Утилита MSConfig (Конфигурация системы)
Самый простой способ загрузить Windows 10 в безопасном режиме, как и в предыдущих версиях Windows, воспользоваться утилитой msconfig.exe. Для этого:
- Нажмите сочетание клавиш Win+R и наберите msconfig
- В открывшемся окне перейдите на вкладку Boot
- В разделе Boot options поставьте флажок у пункта Safeboot

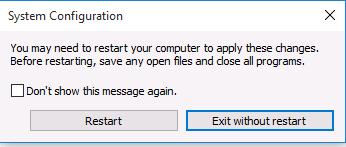
- Сохраните изменения (OK), согласитесь с предложением перезагрузить систему (Restart)
- После перезагрузки системы, Windows 10 загрузится в безопасном режиме (о чем свидетельствует надпись SafeMode во всех углах экрана)

Совет. Отключить загрузку в безопасном режиме нужно также с помощью msconfig, сняв флажок у пункта Safe boot.
Сочетание Shift + Restart
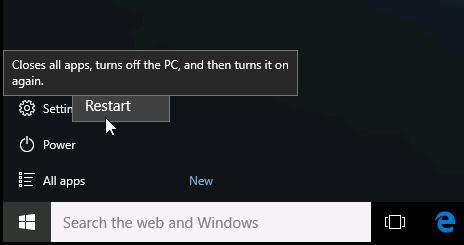
В стартовом меню нажмите кнопку Power и, зажав Shift на клавиатуре, выберите пункт перезагрузки системы (Restart)
В появившемся диалоге последовательно выберите пункты Troubleshoot (Диагностика) -> Advanced options (Дополнительные параметры)-> Startup Settings (Параметры загрузки).
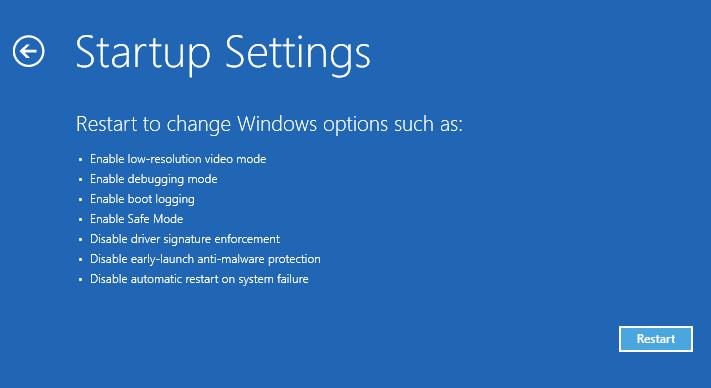
 Перезагружаем компьютер, нажав кнопку Restart.
 После перезагрузки появится окно с доступными опциями загрузки системы ( 9 вариантов, включая три вида безопасного режима). Для загрузки в безопасном режиме, нажмите клавишу F4 или 4 (или F5/F6 для загрузки в безопасном режиме с поддержкой сети или командной строки соответственно).
Запуск режим диагностики из интерфейса новой Панели управления
Для запуска новой современной Панели управления Windows 10, нажмите кнопку Start и выберите меню Settings. Затем перейдите в раздел Update & security.
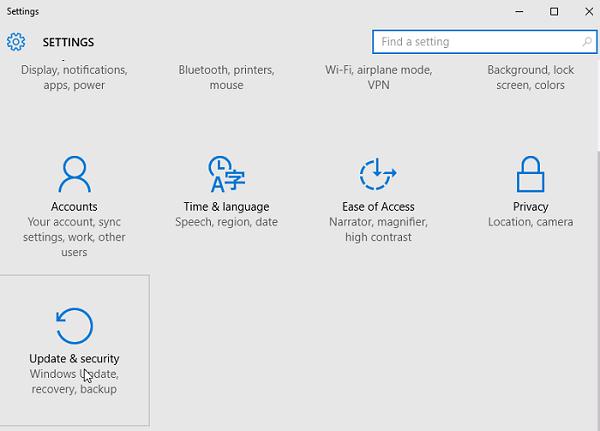
Перейдите в раздел Recovery и в секции Advanced Startup нажмите Restart now.

Далее все аналогично предыдущему способу.
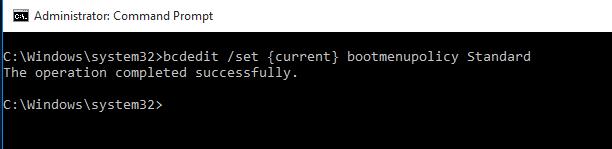
Запуск безопасного режима из командой строки
Возможно также настроить запуск Windows 10 в безопасном режиме и из командной строки. Для этого откройте командную строку (cmd) с правами администратора и выполните команду:
bcdedit /set
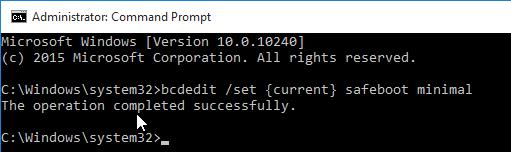 Затем перезагрузите компьютер командой:
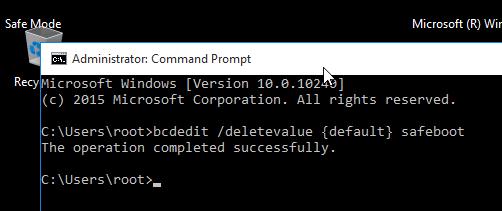
Теперь Windows 10 всегда будет загружаться в безопасном режиме. Чтобы вернуть обычный режим загрузки:
bcdedit /deletevalue
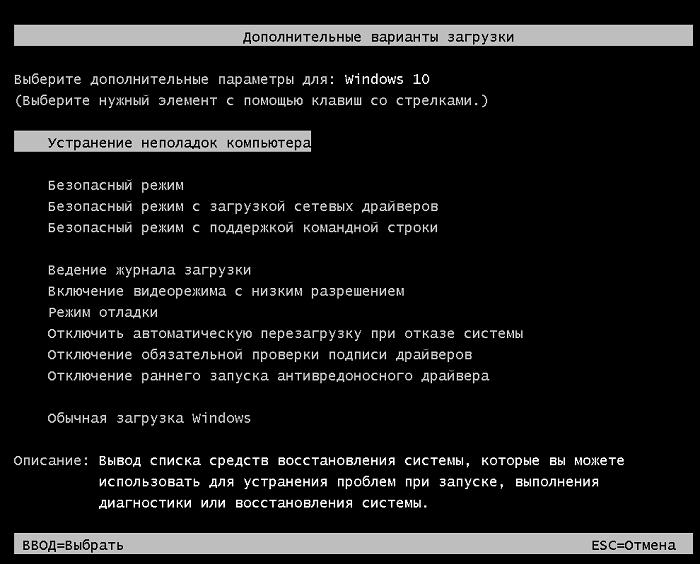
Возвращаем старое текстовое меню загрузки
В Windows 10/8 возможно вернуться к старому текстовому загрузчику Windows, поддерживающего клавишу F8 (Shift+F8) и возможность выбора параметров запуска системы.
Чтобы вернуть тестовый загрузчик, выполните в командной строке с правами администратора:
bcdedit /set
Теперь при загрузке компьютера после стадии самотестирования (POST) , нужно несколько раз нажать клавишу F8. Должно появится старое-доброе текстовое меню с параметрами загрузки системы.
 Чтобы отключить текстовый режим загрузчика, и вернуться к быстрой загрузке, выполните:
bcdedit /set
Запуск Safe Mode из режима восстановления
Мало кто знает, что, чтобы включить безопасный режим и прочие параметры восстановления в Windows 10, достаточно 3 раза подряд прервать загрузку системы кнопкой отключения питания.
На 4 раз запустится среда восстановления системы (Recovery mode), из которой можно выбрать загрузку в безопасном режиме или другие варианты загрузки системы.
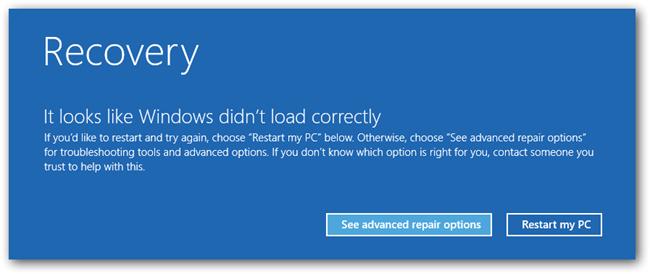 Выберите пункт See advanced repair options и следуйте инструкциям из второго пункта нашей статьи.


Нашел способ захода в безопасный режим на новых компьютерах, поддерживающих загрузку с efi-файла.
Необходимо просто выбрать в вариантах загрузки — загрузка с файла EFI (ну или как там будет написано).
Далее выбрать файл /efi/boot/bootx64.efi
Запустится автоматическое восстановление. Но необходимо нажать не кнопку восстановление, а отмену.
После этого переходим в раздел «Диагностика». Потом открываем подраздел «Дополнительные параметры». Перейдите в «Параметры загрузки». «Перезагрузить».
После перезагрузки откроется меню, в котором с помощью функциональных клавиш F1-F9 можно выбрать необходимый режим загрузки, например безопасный режим.
После восстановления работы не забываем включить F8 через команду bcdedit /set
Ну и пакость эта Win 10… замаялся искать причины тормозов. Уже поотключал все что позможно вирусы вычистил NOD-ом и касперским … все равно тормозит по страшнрому , загружается по 10 минут , посреди работы начинает обращаться к диску и наглухо зависает минут на 20 (можно пойти кофе попить прогулятться ) пока запускается приложение. Обращегние к диску загружено на 100 % . И не понять что за хрень. До этого была Win 7 купленная вместе с компом работала без проблем … Отвлекся на телефонный разговор не отменил очередное обновление и Мелкософт втюхал Win 10 … уроды !
Скорее всего винт посыпался, либо криво установили ОС


