- BIOS/UEFI Setup Guide: Boot from a CD, DVD, USB Drive or SD Card
- How-to Summary: Boot Your Computer from a CD/DVD/USB/SD Drive
- BIOS vs. UEFI: What’s the Difference?
- How to Access Your BIOS or UEFI Setup Screen
- Navigating BIOS / UEFI Setup
- How to Change the BIOS / UEFI Boot Order to Boot from a USB / CD Drive
- Booting from a USB drive or CD/DVD
- Troubleshooting Boot Options
- Disabling Fast Startup
- Boot Device Menu / Boot Override
- Как загрузить компьютер с USB-устройства или CD/DVD диска
- Два способа загрузки компьютера
- Как загрузиться с устройства без входа в БИОС
- Загрузка в UEFI BIOS
- Рассмотрим вариант с биосом Award
- Как выбрать с чего загрузиться в AMI BIOS
- Проблемы при загрузке с USB-устройств
BIOS/UEFI Setup Guide: Boot from a CD, DVD, USB Drive or SD Card

Windows runs on thousands of computer configurations, but installing a new operating system like Windows 10 on the variety of configurations that exist is another thing. The steps may be different depending on whether your computer has an existing Windows 10 installation on it, an earlier version of Windows on it or a completely different operating system on it, like macOS or Linux. In each case, installing Windows 10 relies on booting from a device other than your main hard disk drive (HDD) or solid state drive (SSD). To do that, you need to access the BIOS or UEFI setup page. Sometimes, this is easier said than done.
In this guide, we’ll walk through the basic steps that apply to most scenarios. Then, we’ll discuss some troubleshooting and alternate methods, in case the simple approach doesn’t work for you.
How-to Summary: Boot Your Computer from a CD/DVD/USB/SD Drive
- BIOS vs. UEFI: What’s the Difference?Optional. In case you want some background info on what the heck UEFI is and why it makes things difficult.
- How to Access BIOS / UEFI Setup Screen. Includes the keyboard commands you need to access the BIOS or UEFI setup screen.
- Navigate BIOS / UEFI Setup Screen. Finding your way around without a typical keyboard/mouse interface.
- How to Change Boot Order in BIOS / UEFI. These are the settings you need to change in BIOS / UEFI to allow your PC to boot from a USB or CD.
- Booting from a USB/CD/DVD Drive or SD Card. Once you’ve configured your BIOS / UEFI correctly, here’s what to do.
Best case scenario, those steps will get you up and running. If not, see our Troubleshooting section. This includes details for changing the boot order on a Microsoft Surface device and booting from another device on a Mac.
Note: Once you master the steps to boot your computer from a USB or CD/DVD, you can use this to boot other operating systems or bootable live environments on your machine.
BIOS vs. UEFI: What’s the Difference?
Each computer, whether it’s a DELL, HP, Acer or even a custom built system, is an island unto itself before Windows 10 (or some other operating system) starts. Since the 1980s, hardware vendors have worked together to standardize around common access routines and commands for managing your BIOS Boot Options. The BIOS, which stands for Basic In Output System, is a critical bit of low-level code stored in nonvolatile memory that your computer uses to manage your hardware and load Windows 10 or another operating system.
A new standard called UEFI or Universal Extensible Firmware Interface came online a decade ago and became the standard for new PCs and devices preinstalled with Windows 8 or later. UEFI offers more advanced options than BIOS, with support for features such as a graphical user interface and mouse support, making it easier to configure boot and hardware settings. UEFI also supports recent security standards required by Windows 10 and previous releases such as Secure Boot, which maintains the integrity of a computer’s state and prevents malicious code from compromising your system at boot time. After decades of systems using BIOS, malware has become more sophisticated, where it is even possible for malicious code to easily infect key operating system code such as the Master Boot Record.
How to Access Your BIOS or UEFI Setup Screen
Because of the variety of brands and configurations, and the ongoing revisions to these systems, this article is not exhaustive. That said, the following provides a comprehensive list of common methods for booting into the BIOS or UEFI firmware interfaces.
To enter the BIOS, you need to press a certain key or combination of keys while your computer is booting up. Usually, your window to do this is very brief—you have to press the button when the splash screen with the manufacturer’s logo is displayed. If it seems like your computer boots too fast for you to get a chance to hit the button, you may need to disable fast startup.
Here is a list of the common functions or commands for loading the BIOS. Please note, your BIOS screen might display a hint to indicate the appropriate function key for loading the firmware. Start your computer then proceed to strike the appropriate key or command to load the BIOS. After loading the BIOS or UEFI, connect your USB media or connect the DVD install media.
F1 / Ctrl + Alt + Esc
F1 / F2 / F10 / Delete
Ctrl + Alt + Enter / Fn + Esc / Fn + F1 / Delete / Reset twice
Esc / F2 / F10 / F12
Ctrl + Alt + F3 / Ctrl + Alt + Ins / Fn + F1
F2 / F10 / Delete
Navigating BIOS / UEFI Setup
Each BIOS or UEFI looks different and works differently, but most share basic principles for navigation. For menu driven BIOS or UEFI interfaces, your keyboard’s arrow keys are used to access and enter menus. The settings for configuring boot options are sometimes hidden under submenus, which you will have to navigate using these keys.
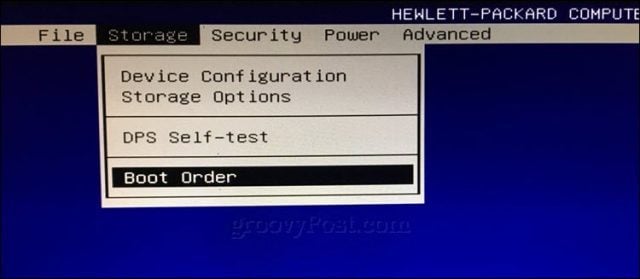
On my HP desktop, the option for changing the system’s boot order is located under Storage > Boot Order. On my other computer, an HP Elitebook, the boot order is called Boot Options located under the System Configuration tab, which uses a graphical interface. So, the experience will vary depending on the system you are using; even if they are the same brands. Navigate through these interfaces by browsing and looking for logical labels that might suggest what you are looking for – storage, boot, disks, etc.
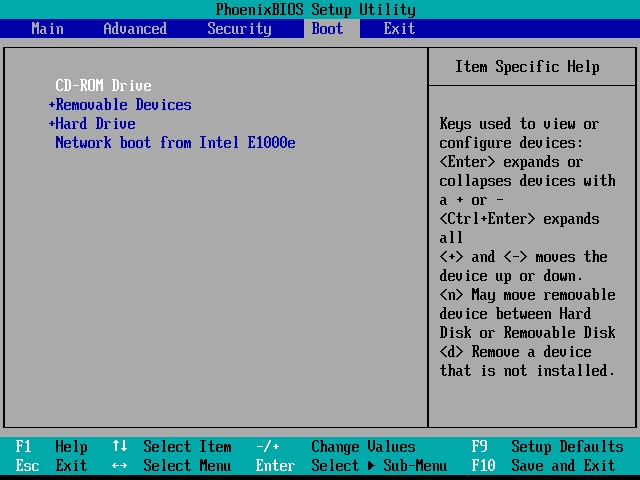
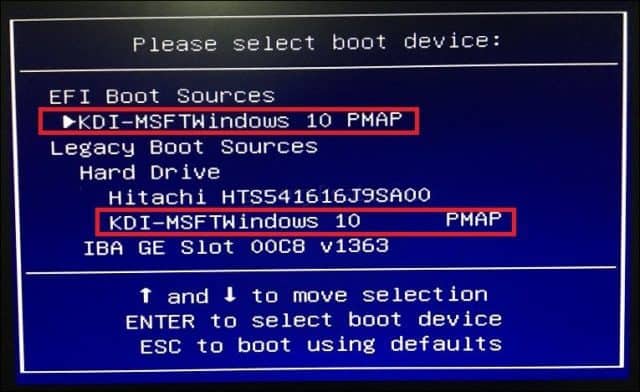
How to Change the BIOS / UEFI Boot Order to Boot from a USB / CD Drive

Once you’ve found the Boot Order menu, the interface will present menus displaying the structure of your boot order. Boot order determines which devices your computer will try to boot from first, second, etc. when you turn it on. Most often, your first boot device is your hard disk or SSD containing Windows 10. You can also have your DVD, CD or USB thumb drive, set as the first boot device without it affecting Windows 10 loading into main memory. If you have a removable storage device set as your first boot device the BIOS will check if there is any attached removable storage as part of POST (Power On Self Test). If a USB thumb drive or DVD is detected, the system will prompt you to boot from it before loading any existing operating systems on the local disk.
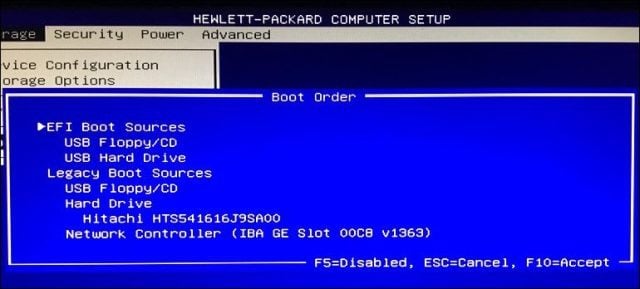
Moving through the options will require using the arrow keys. If you don’t see your connected USB device listed, choose the USB storage listed under EFI or Legacy sources. Use the down arrow key to navigate to the selection; some older BIOS interfaces will require using function keys such as F5 and F6 to navigate up and down the boot order. After selecting the appropriate option, you will need to confirm these changes; pressing F10 will usually save them. If not, read the on-screen instructions, which will identify the appropriate function key for saving or accepting changes.
Booting from a USB drive or CD/DVD
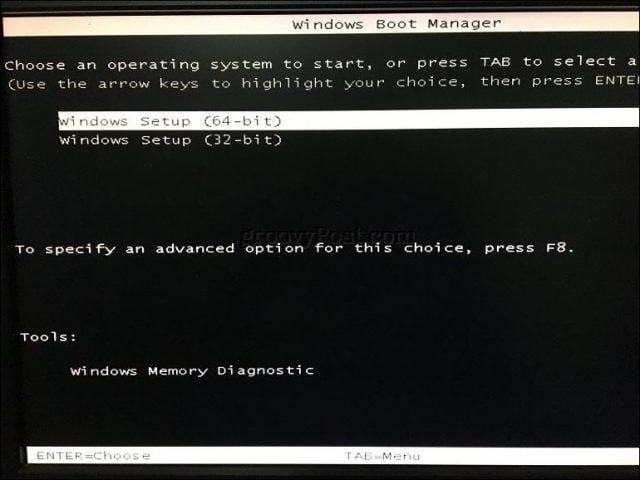
Once the desired option has been selected and confirmed, depending on the type of installation media you are using, you might see different options. USB media will immediately boot into a Windows Boot Manager, prompting selection of the architecture of Windows 10 – 32 or 64 bit – you would like to install.
If you are installing from DVD media, Windows 10 setup will prompt you to hit any key on your keyboard to load setup.

From there, you should be home free. As long as you created your bootable installation media correctly, the on-screen instructions should guide you through the rest of the process.
Troubleshooting Boot Options
Some systems might encounter problems when attempting to boot from removable media. If you are following the steps above to a T and you’re still having issues, look into some of the items below.
- Accessing the UEFI setup page on a Microsoft Surface device. The steps for accessing the BIOS / UEFI page on Surface devices are a bit different. See the steps below for Setting Up UEFI on a Microsoft Surface.
- Changing UEFI settings on an out-of-the-box Windows 8 or Windows 10 device. For computers that you buy with Windows 8 or Windows 10 pre-installed, it may be tricky to access the UEFI / BIOS. See the steps below for Configuring UEFI on Windows 8 or Windows 10 Computers.
- What about Mac? Apple computers support installing Windows, but they don’t have a BIOS / UEFI setup page like your typical PC. See our section on installing Windows on a Mac below.
- Make sure the bootable media was created properly. Boot issues can sometimes be attributed to how the install media was configured or prepared. For instance, on UEFI-based systems – systems designed for Windows 8 or later – preparing the install media, if downloaded from the Microsoft software page, will require using the Microsoft Media Creation Tool or a third-party utility such as Rufus.
- Enable Legacy Boot Sources. If you are installing on an older computer using BIOS, selecting the option under Legacy Boot Sources or Legacy USB will let you start Windows setup from a USB or CD drive.
- Disable Secure Boot. Security technologies included in UEFI such as Secure Boot can be a blocker and prevent the system from booting external storage sources. Disabling Secure Boot, temporarily—normally accessible under the security menu or tab—will often resolve this.
- Disable Fast Startup. If you are unable to access the BIOS, you may need to disable Fast Startup, if it is enabled.
- Resetting BIOS settings. Some BIOS / UEFI setup screens have a factory reset option. This can sometimes be a quick fix but proceed with caution. If you have your drive BitLocker encrypted with TPM enabled, this may make your existing system drive unusable. OF course, this is a non-issue if your goal is to reinstall your operating system from scratch.
Disabling Fast Startup
If you are attempting to load the firmware on a computer already running Windows, this might prove difficult because of the Fast Startup setting that might be enabled. Fast Startup was first introduced in Windows 8 as a way to make Windows start quicker after shutdown by caching key pieces of operating system code.
If you are experiencing problems loading your BIOS or UEFI or changing your boot order, start Windows then turn off Fast Startup.
- Press Windows key + X
- Click Power Options
- Click Choose what the power buttons do
- Click the link Change settings that are currently unavailable
- Under Shutdown settings, uncheck Turn on fast startup (recommended)
Boot Device Menu / Boot Override
Some computers will let you press a function key that takes you to a direct menu where you can immediately choose, which volume: USB thumb drive, SD Card, external hard disk, local disk or optical media you would like to boot from. Dell and HP systems, for instance, will present an option to boot from USB or DVD after striking the F12 or F9 keys respectively. This boot device menu is accessed once you’ve already entered into the BIOS or UEFI setup screen.
Here is a list of commands for accessing the direct boot menu on popular brands:
Как загрузить компьютер с USB-устройства или CD/DVD диска
 В предыдущей статье я показал как войти с БИОС на разных компьютерах и ноутбуках. Но зачем туда заходят? В 90% случаев для того, чтобы поменять загрузочный диск по умолчанию и загрузить портативную операционную систему или начать новую установку Windows. На самом деле принцип везде одинаков, от вас требуется лишь немного внимательности и логичности. А чтобы получше разобраться в этом, я вам покажу несколько видео, снятых на различных компьютерах.
Два способа загрузки компьютера
Есть два варианта. Первый – выставить в БИОСе (он же SETUP) устройство загрузки по умолчанию. Это будет означать, что при каждом включении компьютер будет загружаться с указанного устройства. Если оно окажется недоступным или не загрузочным, то он попытается загрузиться с второго по списку устройства, которое вы также можете указать. Если и оно не сработает, то компьютер пойдёт дальше по списку.
Второй способ поддерживают почти все современные компьютеры и ноутбуки. Нужно при старте компьютера вызвать меню выбора загрузочного устройства. Так можно единоразово выбрать с чего грузиться, это очень удобно.
Чтобы выбрать загрузочное устройство в БИОСе первым способом нужно в него зайти и посмотреть на его интерфейс. Если это синенькие окошки, то скорей всего это Award, если серенькие – то AMI, если графический интерфейс – значит UEFI. Есть и другие варианты. В общем, просто посмотрите на скриншоты или видео, и соотнесите это с увиденным у себя.
Как загрузиться с устройства без входа в БИОС
Для этого достаточно при старте компьютера или ноутбука нажать какую-то кнопку. Например, этот BIOS Award предлагает нажать «F9» для вызова загрузочного меню:

Там будет написано что-то похожее на «Press F9 to Select Booting Device after POST», т.е. нажмите «F9» чтобы выбрать загрузочное устройство. Нажимаем и видим следующее:
Это список обнаруженных устройств. Выбираем флешку, диск CD/DVD или ещё что-то и жмём «Enter». В AMI биосе может быть по-другому:
Там написано «Press F8 for BBS POPUP». Это значит, что надо нажать «F8» чтобы появилось меню выбора. На нотбуках это может быть клавиша «F12», а меню будет таким:
Просто выбираем что хотели и ждём загрузки. Вот видео с этим моментом:
Загрузка в UEFI BIOS
А это наглядный пример БИОСа EFI (UEFI) с графическим интерфейсом и даже работающей мышкой! Если у вас компьютер с UEFI, то при попадании в БИОС вы увидите такую картину:
В нижней части экрана есть раздел Boot Priority , где можно с помощью мышки (перетаскиванием) выставить нужный порядок загрузки. Также можно:
- нажать в правом верхнем углу кнопку «Exit/Advanced mode»
- выбрать в появившемся окне Advanced mode (расширенный режим)
- перейти на вкладку «Boot»
- в разделе Boot Option Priorities в поле «Boot Option #1» установить загрузочным устройством по умолчанию флешку, DVD-ROM, жёсткий диск или другое доступное устройство.
Владельцы компьютеров Hewlett-Packard вероятно обнаружат такую картину в БИОСе:
В меню «Storage –> Boot order» выберите нужное устройство, нажмите «Enter», затем передвиньте его на самый верх и ещё раз нажмите «Enter». Сохраните настройки в меню «File -> Save and Exit» .
Рассмотрим вариант с биосом Award
После входа в SETUP нужно пройти в пункт «Advanced BIOS Features». Он располагается вторым или третим сверху:
Далее ситуация может разниться. В первом случае нужно зайти в пункт, похожий по названию с «Boot Seq & Floppy Setup»
Во втором случае нужные нам пункты находятся сразу перед глазами:
Теперь разберёмся с нужными пунктами меню:
- First Boot Device – устройство, с которого компьютер будет загружаться в первую очередь
- Second Boot Device – второе устройство, если «First Boot Device» не окажется загрузочным
- Third Boot Device – третье устройство, если «Second Boot Device» не окажется загрузочным
На каждое из этих «…Boot Device» задаётся жёсткий диск (или флешка), CD/DVD диск или другое загрузочное устройство.
Boot Other Device – в состоянии «Enabled» позволяет искать операционную систему на других накопителях, если ни один из вариантов не сработал.
Hard Disk Boot Priority – если в одном из «…Boot Device» мы выбрали один или несколько жёстких дисков (Hard Drive), то в этом пункте нужно выбрать какой именно жёсткий диск использовать. Это касается и флешек, потому что загрузочная флешка для компьютера считается как внешний жёсткий диск.
Таким образом, чтобы загрузиться с диска CD или DVD нужно в «First Boot Device» выбрать «CDROM» или «ATAPI CD» и больше ничего не нужно. Чтобы загрузиться с флешки «First Boot Device» выбираем «Hard Drive», а затем переходим в меню «Hard Disk Boot Priority» и передвигаем нашу флешку на самый верх с помощью кнопок «+» и «-» или «PageUp» и «PageDown»:
Флэшка должна быть вставлена в компьютер до его включения или до перезагрузки! Иначе БИОС может её не обнаружить! Флешка может называться по-разному. Чаще всего начинается на «USB…» или «Generic USB…», ещё может быть «External Device». После проделанных действий, результат необходимо сохранить. Нажимаем «F10» (точную клавишу смотрите в подсказке внизу экрана с названием «Save», «Exit») или выходим в главное меню БИОСа и выбираем пункт «Save and Exit Setup». В красном окошке выбираем «Yes» кнопкой «Y» на клавиатуре и нажимаем «Enter»
Компьютер перезагрузиться и при загрузке с установочного диска с Windows может возникнуть такой запрос на несколько секунд «Press any key to boot from CD or DVD…»
Дословно перевожу: «Нажмите любую кнопку чтобы загрузиться с CD иди DVD». Это означает, что если в этот момент не нажать любую кнопку на клавиатуре, то компьютер продолжит загружаться со следующего по списку устройства.
Посмотрите видео как войти в БИОС Award и выставить загрузочное устройство
Как выбрать с чего загрузиться в AMI BIOS
AMI БИОСы выглядят по-другому, нежели Award’ы. После захода в SETUP переходим в раздел «Boot» с помощью кнопки «вправо». Там вы обнаружите два важных пункта:
Hard Disk Drives — понадобится чтобы поставить загрузку с флешки или жёсткого диска. Заходим туда и выбираем своё USB-устройство (флешку) в строчке «1st Drive» (может называться «First Drive») и выходим в предыдущее меню кнопкой «ESC»
Далее идём в Boot Device Priority , заходим в 1st Boot Device и снова выбираем из списка флешку:
Чтобы загрузиться с CD/DVD диска нужно в этом меню выбрать «ATAPI CD-ROM» (или просто «CDROM»), при этом нет надобности заходить в меню «Hard Disk Drives». Теперь сохраняем результаты кнопкой «F10» или переходим в раздел БИОСа «Exit» и выбираем «Exit Saving Changes»
На вопрос отвечаем «OK» А вот пример AMI БИОСа, который выглядит как Award. Здесь всё так же по аналогии, нужно зайти в подменю «Hard Disk Drives»
и выбрать в пункте «1st Drive» свою флешку, а потом выбрать её в строчке «1st Boot Device» на предыдущем скриншоте вместо жёсткого диска
На компьютерах и ноутбуках всё примерно одинаково. Например на обычном ноутбуке Lenovo в разделе «Boot» перечислены сразу все устройства, что очень удобно. Нет путаницы с приоритетом и дополнительных пунктов меню. Достаточно просто выставить порядок загрузки устройств с помощью кнопок «F5/F6». Т.е., чтобы загрузиться с USB надо просто передвинуть флешку на самый верх:
На всякий случай даю расшифровку:
- USB HDD: флешка или внешний жёсткий диск
- ATAPI CD: это CD или DVD-ROM
- ATA HDD или просто HDD: жёсткий диск
- USB FDD: внешний дисковод для дискет
- USB CD: внешний привод для дисков
- PCI LAN: загрузка по локальной сети
Посмотрите видео как войти в БИОС AMI и выставить загрузочное устройство https://www.youtube.com/watch?v=WojKPDi6a74
На некоторых моделях ноутбуков, например Lenovo G500, нужно нажать клавишу OneKey Recovery при выключенном ноутбуке.
Проблемы при загрузке с USB-устройств
Куда же без них. Что делать если компьютер не загружается с флешки? Рассмотрим основные ошибки. Чаще всего БИОС просто не видит флешку, для решения проблемы вам нужно поменять режим загрузки «Legacy» вместо «UEFI» или выключить режим «Secure Boot», подробнее в статье по ссылке.
Далее, проверьте не отключён ли контроллер USB в BIOS. В Award это можно проверить в разделе «Advanced Chipset Features» или «Integrated Peripherals». Ищите опцию «USB Controller», она должна быть в состоянии «Enabled»
В AMI в разделе «Advanced» опция «USB 2.0 Controller» должна быть «Enabled» и «USB 2.0 Controller Mode» в состоянии «HiSpeed»
Ещё могут быть проблемы с гнёздами на передней панели системного блока – попробуйте подключиться к USB сзади компьютера.
Если у вас SETUP как на фото, то на вкладке «Startup» значение «UEFI/Legacy Boot» переключите в положение «Legacy Only»
Потом причина может быть в самой флешке или в диске. Они должны быть точно загрузочными! Проверить это можно на другом компьютере, где всё работает.
На очень старых компьютерах вообще нет возможности загружаться с USB-флешек. Если не существует более нового БИОСа, тогда вам поможет проект PLOP. Нужно скачать последнюю версию Plop Boot Manager и распаковать архив. Там есть файлы: plpbt.img – образ для дискеты, и plpbt.iso – образ для CD-диска.
Соответственно, если у вас есть дискета, то на неё записываете образ для дискеты, а если есть CD-R/RW диск, то записываете образ для диска. Просто переписать файл на носитель нельзя, для записи образа нужно использовать специальные программы. Далее загружаетесь с этого диска и в появившемся меню нужно выбрать своё USB-устройство. Таким образом можно загружаться с флешек даже на очень старых компьютерах.


