- Как запускать нужную программу при старте Windows
- Простой способ добавить программу в автозагрузку
- Шаг 1: Откройте папку автозагрузки Windows
- Шаг 2: Создайте ярлык в папке Startup
- Авто-запуск программы с правами администратора
- Автозагрузка программ в Windows 10 через реестр
- Добавление/удаление программы из автозапуска из реестра
- Включение/отключение автозапуска через Диспетчере задач
- Программа для управления авто-запуском
- How to Add an App or Program to Startup in Windows 10: Startup Folder, Registry, Scheduler
- Windows 10 Startup Folder Location
- How to Quickly Open the Startup Folder in Windows 10, 8, 7
- Method 1
- Method 2
- How To Add Programs To Startup In Windows 10 For The Current User
- Add a Startup Program For All Users At Once
- Alternative Method To Create A Shortcut In Windows 10 Startup Folder
- How to Make Modern Apps Run on Startup in Windows 10
- How to Disable Startup Apps in Windows 10
- Method 1: Use Settings
- Method 2: Use Task Manager
- Add or Remove Startup Apps / Programs in the Task Scheduler
- Use Registry Editor to Manage Windows 10 Startup Apps & Programs
- How to Add Programs to Startup Using the Registry Editor
- Manage Startup Apps & Programs Using the Autoruns Utility
- The Conclusion
Как запускать нужную программу при старте Windows
Некоторые программы Windows позволяют настроить себя так, чтобы они запускались при запуске Windows. Но такая возможность есть далеко не у всех программ. Однако запускать при старте системы можно абсолютно любую программу. Более того, при запуске можно открывать нужные папки или запускать какой-либо скрипт ( .bat ). Ниже рассмотрим как добавить программу в автозагрузку, а также как удалить программу из автозагрзуки Windows.
Простой способ добавить программу в автозагрузку
Все что нужно сделать — это добавить нужный файл (ссылка на основной .exe файл программы), папку, скрипт в папку Windows “Startup”. Для этого
- Нажмите Windows+R, чтобы открыть диалоговое окно “Выполнить”.
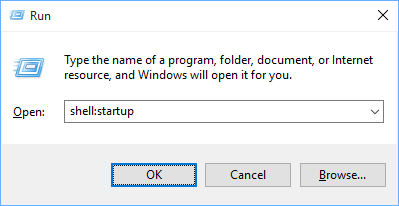
- Впишите в поле shell:startup, а затем нажмите Enter. Откроется папка Startup.
- Создайте ярлык в папке «Startup» для любого файла, папки или исполняемого файла приложения. Он откроется при запуске при следующей загрузке.
Этот метод будет работать с любой версией Windows, от Vista до Windows 7 и 8, и 10.
Шаг 1: Откройте папку автозагрузки Windows
Startup (автозагрузка) — это скрытая системная папка, в которую можно перейти в проводнике (при условии, что у вас включен показ скрытых файлов).
Технически эта папка находится по пути:
- Для отдельного пользователя:
C:\Пользователи\Имя_Пользователя\AppData\Roaming\Microsoft\Windows\Главное меню\Программы\Автозагрузка - Для всех пользователей:
C:\ProgramData\Microsoft\Windows\Главное меню\Программы\Автозагрузка
Однако совсем не обязательно открывать проводник искать где там эта папка находится, гораздо проще и быстрее использовать команду shell . С помощью этой команды можно открывать многие скрытые или специальные папки Windows, достаточно знать название папки.
Команду shell можно запускать прямо из диалогового окна Run .
Для этого нажмите комбинацию клавиш Windows+R, в поле ввода напишите shell:startup и нажмите Enter.
Шаг 2: Создайте ярлык в папке Startup
Теперь, чтобы запустить приложение, файл или папку вместе с Windows, нужно создать ярлык программы/папки в открытой папке Startup.
Давайте в качестве примера добавим в авто-запуск бесплатный почтовый клиент Thunderbird. Для этого нужно найти папку где находится программа. У меня она лежит в папке C:\Program Files (x86)\Mozilla Thunderbird .
Теперь нужно создать ярлык основного файла программы в папке Startup. Существуют различные способы создания ярлыков в Windows, но я поклонник супер быстрого метода «правого перетаскивания»: хватайте файл правой кнопкой мыши и удерживая её тащите в папку “Startup”. Когда вы отпустите кнопку, появится всплывающее меню с параметрами перемещения. Нажмите “Создать ярлык.”
При следующем запуске Windows приложение, файл или папка будут запущены вместе с ним.
Авто-запуск программы с правами администратора
Вариант 1
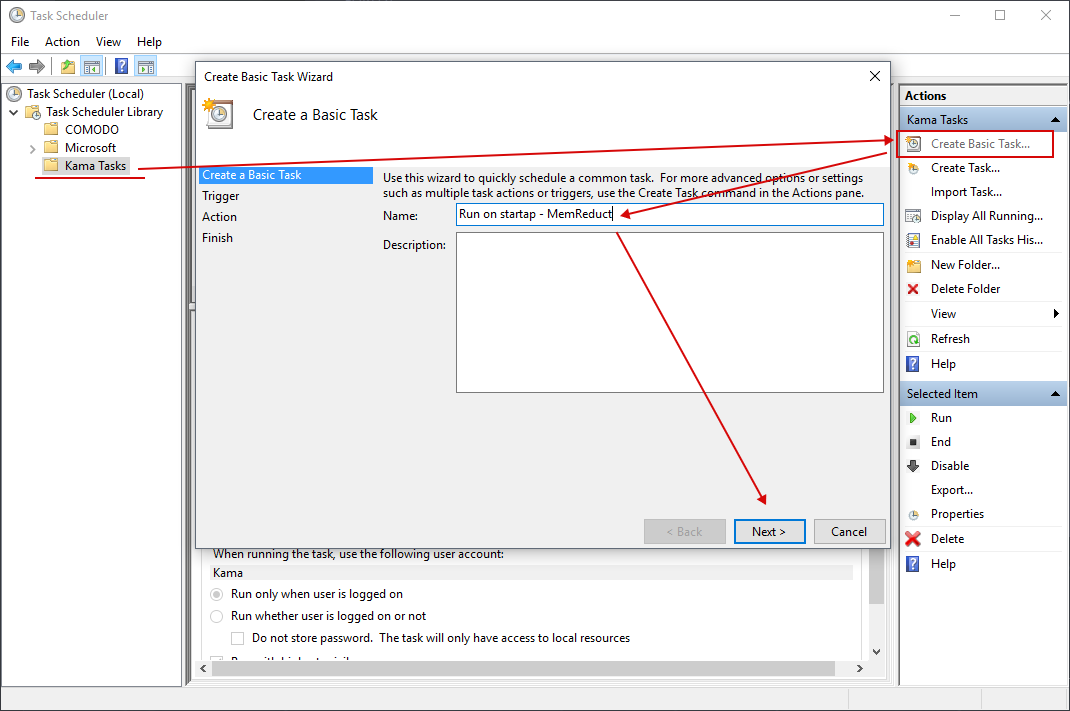
- Windows+R >Taskschd.msc. Или Пуск > Все программы > Стандартные > Служебные > Планировщик заданий .
- Создать простую задачу (кнопка в правом меню). Или Действия > Создать простую задачу.
- Откроется окно в котором настраиваем задачу:
- Вводим Имя задачи.
- Выбираем когда запускать: «При запуске компьютера».
- Выбираем какую программу запускать.
- Остальные настройки.
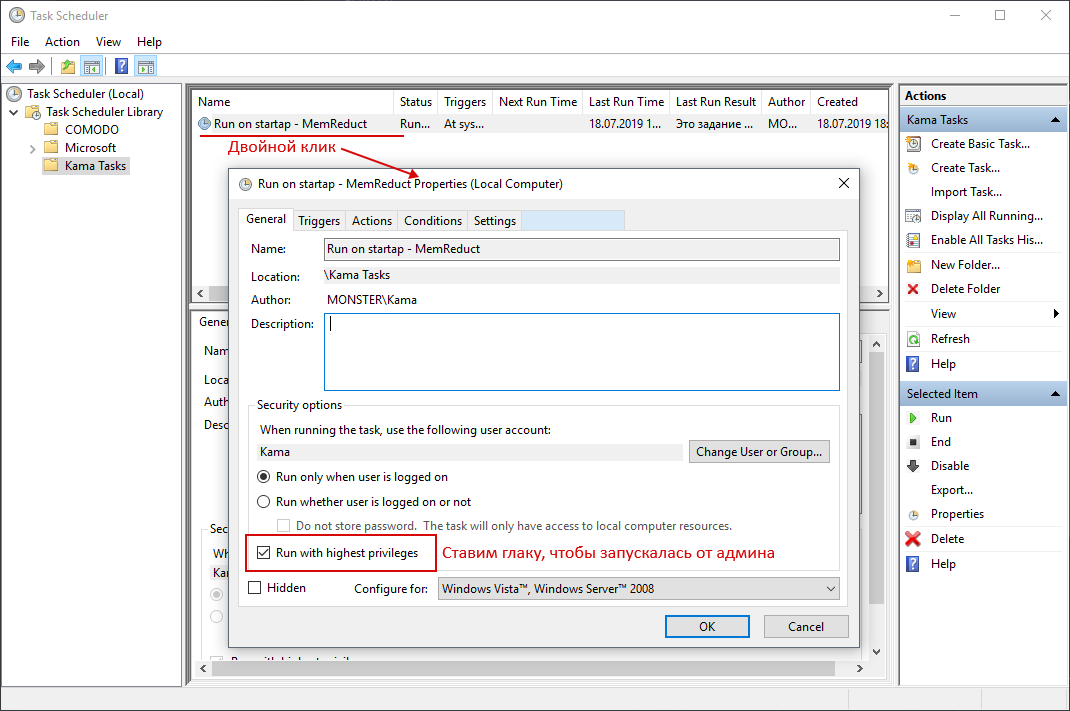
- После создания задачи, кликаем по ней два раза и в открывшемся окне свойств задания ставим галочку «Запускать с наивысшими правами».
- Готово!
Вариант 2 (не всегда работает)
Чтобы запускать программу как администратора по клику на иконку (ярлык), нужно установить соответствующую опцию этому ярлыку.
- Кликните правой кнопкой мышки по ярлыку и выберите пункт Свойства.
- В модальном окне нажмите кнопку Дополнительно.
- Поставьте галочку Запускать как администратор.
Автозагрузка программы с правами администратора
Автозагрузка программ в Windows 10 через реестр
Есть еще одно место, откуда Windows запускает программы — это раздел реестра Windows 10. Как правило этот раздел используется другими программами, чтобы добавить себя в авто запуск. Но мы с вами также можем добавлять или, что более важно, удалять от туда программы.
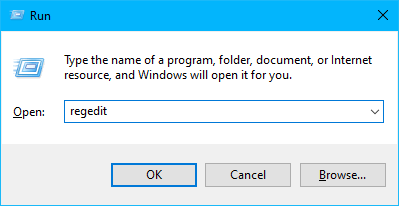
Для удаления автозапускающихся программ из реестра нужно нажать Win+R и там написать команду regedit. В открывшемся реестре перейти в одну из веток:
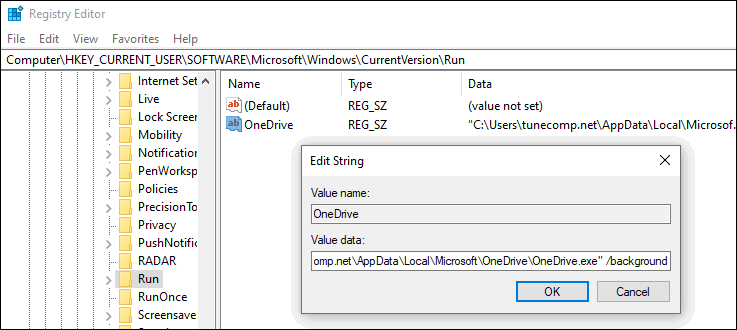
- Для отдельного пользователя: HKEY_CURRENT_USER\Software\Microsoft\Windows\CurrentVersion\Run .
- Для всех пользователей: HKEY_LOCAL_MACHINE\Software\Microsoft\Windows\CurrentVersion\Run .
вверх
Добавление/удаление программы из автозапуска из реестра
Для удаления кликаем на ненужной программе правой кнопкой и жмем Удалить (Delete):
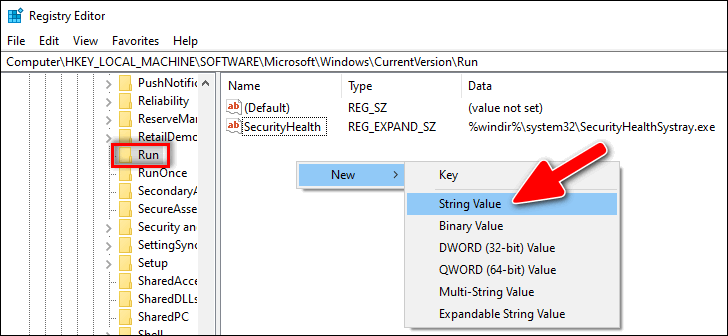
Для добавления кликаем правой кнопкой в пустом месте окна и жмем Создать > Строковой параметр:
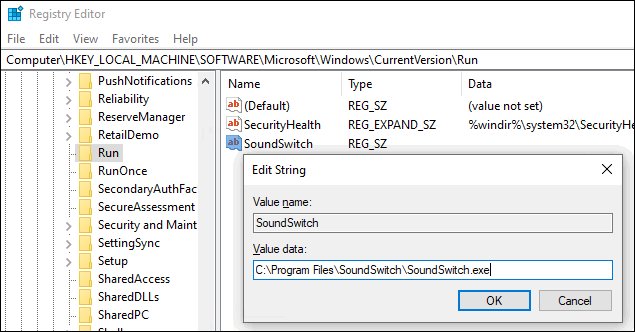
После создания строкового ключа, на нем нужно кликнуть правой кнопкой и выбрать Изменить, далее нужно добавить пусть до файла программы которую нужно запустить:
Включение/отключение автозапуска через Диспетчере задач
Диспетчер задач Windows 10 содержит информацию какие программы запускаются при старте системы. Там же можно быстро включить или отключить программу из автозапуска. Добавить программу от туда невозможно.
Для управления нужно:
- Нажать Ctrl+Shift+Esc и перейти на вкладку Автозагрузка. В ней находится список программ и данные о них.
- Кликните правой кнопкой и включите/отключите авто-запуск.
Программа для управления авто-запуском
Для комплексного управления программами автозапуска есть хорошая программа:
Autorun Organizer (ссылка на сайт производителя).
Программа показывает сразу все точки автозапуска: папка автозапуска, реестр (пользователя и общий). А также показывает другую информацию о том как была запущена программа, сколько времени занял запуск и т.д.
How to Add an App or Program to Startup in Windows 10: Startup Folder, Registry, Scheduler
Not all programs have such an option in their settings that lets you enable or disable its automatic start when you turn on your PC.
But you may want to add apps and programs to startup in Windows 10 and make them automatically launch when the PC boots up to a user account.
By the way, it’s not only about apps. You can do the same even with a document, URL address or folder if you need.
Here is an ultimate guide on how to find the startup folder for a particular user or for all users and make any program run at startup in Windows 10.
[Quick Navigation]:
Before we start explaining the boring process, it should be mentioned that some programs have a special option in their settings called “load when Windows starts”, “launch when system starts” or something alike.
Thus, all you need to do is go to the program’s setting, enable the auto-start option and that’s all. No shortcuts needed:
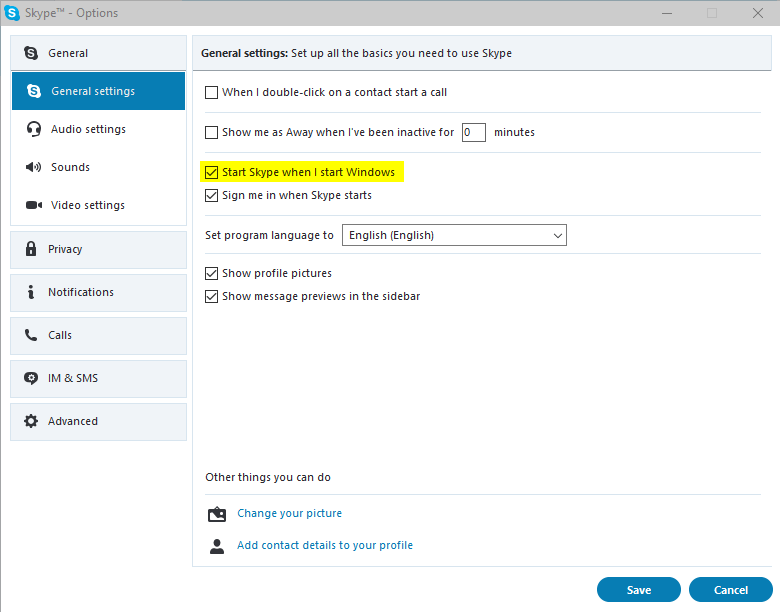
For programs that don’t have such parameter read the rest of the tutorial on how to find the startup folder and change startup programs in Windows 10.
Note that in the latest versions of Windows 10 all programs that were running at the moment when you shut down or rebooted your computer, automatically start the next time you log in.
This in any case doesn’t mean that those programs are added to Windows 10 startup folder, scheduler, or whatever. This is a standalone feature of Windows 10 which is enabled by default.
Windows 10 Startup Folder Location
If you want to add a program, app, URL or document to startup you should place its shortcut to user startup folder. By default it is located in:
How to Quickly Open the Startup Folder in Windows 10, 8, 7
Method 1
- Copy this address: %APPDATA%\Microsoft\Windows\Start Menu\Programs\Startup
- Press Win+E to open Windows 10 Explorer.
- Paste it into the address bar:
- Hit Enter :
Method 2
Another way to open Windows 10 startup folder is to use the Run dialogue:
- Press Win+R
- Type
- Click OK or press Enter :
How To Add Programs To Startup In Windows 10 For The Current User
You may put shortcuts to various items into this directory. But be cautious: adding too many programs to the startup folder can make your PC boot slowly (especially if you are still using a classic hard disk drive as your system disk).
Perform the following steps:
STEP 1. Open the Startup Folder using any method explained above.
STEP 2. Copy a program, app, folder, document, link or anything else: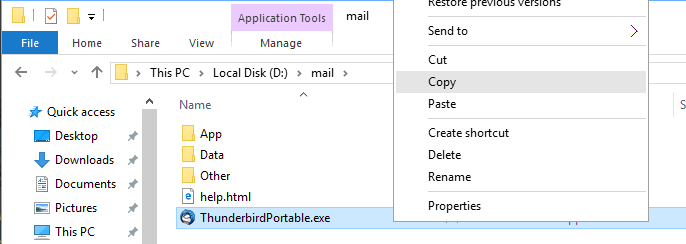
STEP 3. Paste the shortcut to startup folder: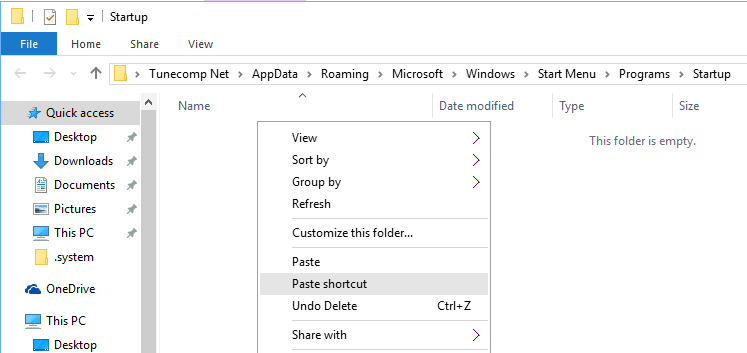
This is how it should look like:
The same steps in the video guide:
Add a Startup Program For All Users At Once
If you wish to set a program to run on startup for all users accounts, create its shortcut in common startup folder. In Windows 10 its default location is:
You can open it by the path: %ProgramData%\Microsoft\Windows\Start Menu\Programs\StartUp or using the Run dialogue as we explain below.
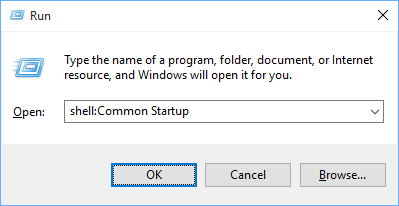
- Press Win+R .
- Type
- Press Enter :
- Copy the executive file or document.
- Use Paste or Paste shortcut to place one to Common startup folder:
Alternative Method To Create A Shortcut In Windows 10 Startup Folder
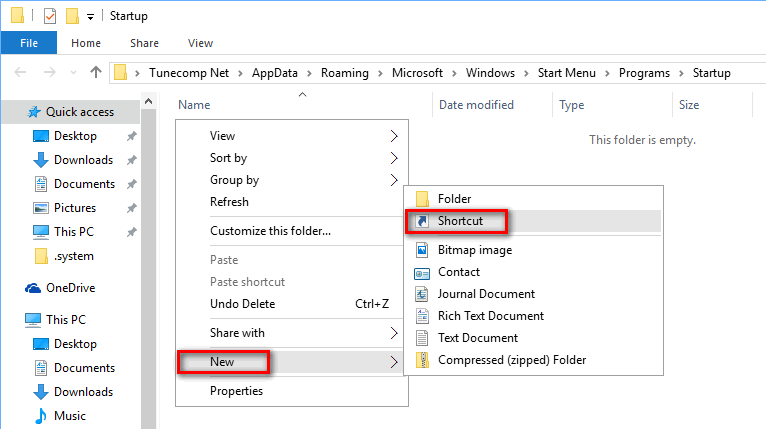
- Right-click the empty area and select New -> Shortcut :
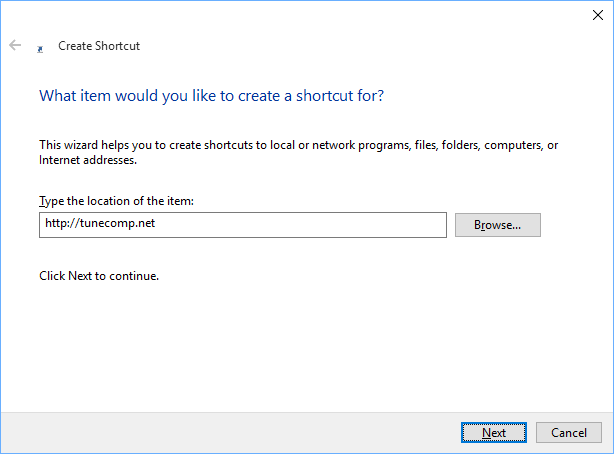
- Browse the file or folder or enter URL and press Next :
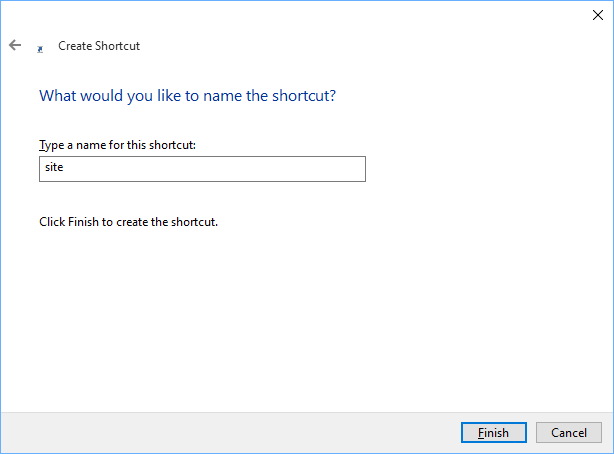
- Give a name to your new shortcut and press OK :
How to Make Modern Apps Run on Startup in Windows 10
You can also add Modern apps from Microsoft Store to startup folder. Follow the steps:
-
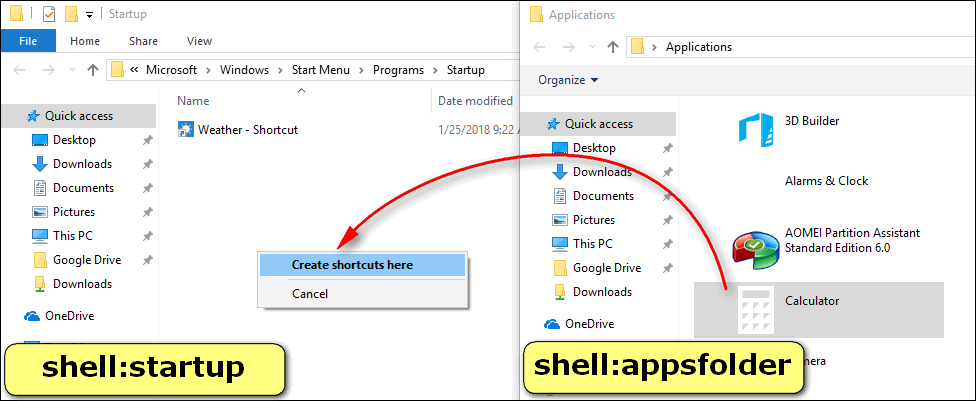
- Open the startup folder: press Win+R , type shell:startup , hit Enter .
- Open the Modern apps folder: press Win+R , type shell:appsfolder , press Enter .
- Drag the apps you need to launch on startup from the first to the second folder and select Create shortcut:
Now restart your computer and check if your program, app or another item you specified runs correctly as you log in to the user account (or as soon as your PC signs in automatically as we explained here).
How to Disable Startup Apps in Windows 10
As you might know, the more apps are added to startup, the longer you have to wait before you start using your PC.
That’s why users often apply the following steps to disable unnecessary programs from being launched at log in.
Here is how to stop programs from running at startup in Windows 10.
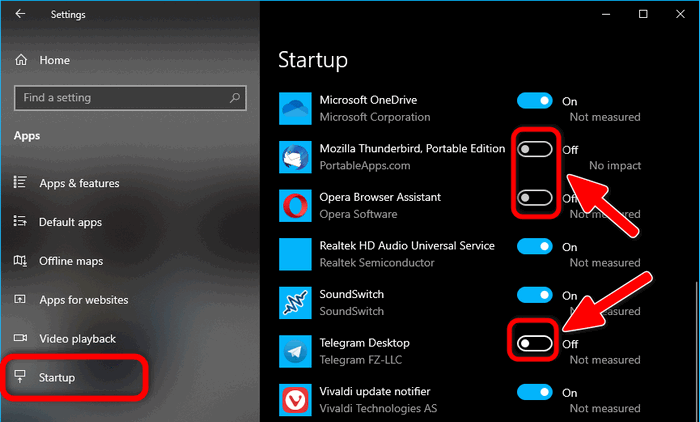
Method 1: Use Settings
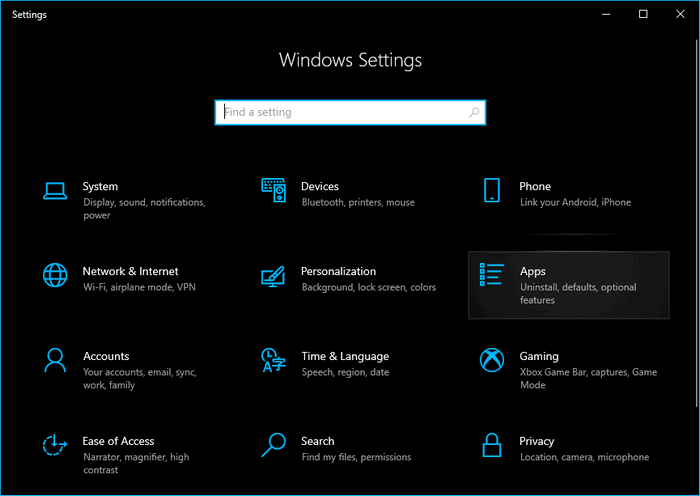
- Press Win+I on your keyboard to launch Windows 10 Settings;
- Dive into the Apps category:
- Select Startup in the left pane;
- Disable apps you don’t want to be launched when you log in to your user account:
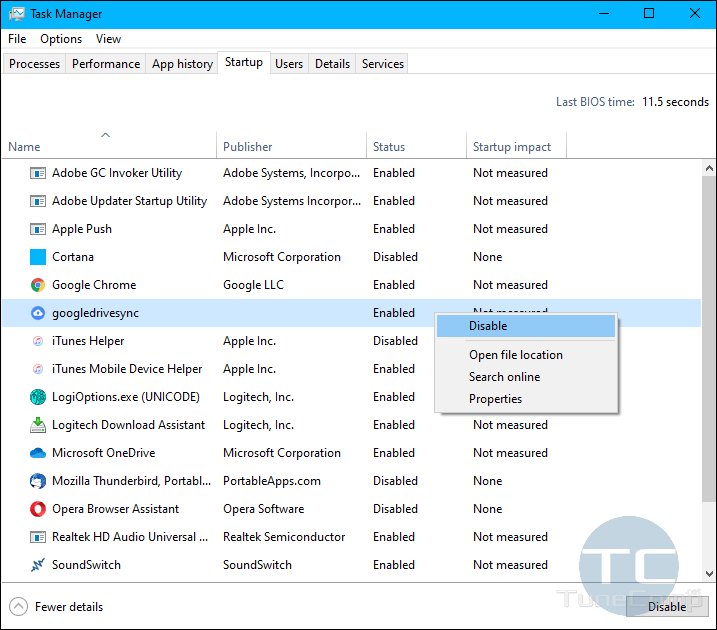
Method 2: Use Task Manager
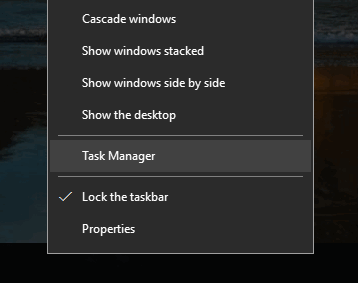
- Right-click the Taskbar and click Task Manager :
- Go to the Startup tab;
- Select the app you wish to disable from auto launching;
- Click Disable :
Here is the video guide:
Add or Remove Startup Apps / Programs in the Task Scheduler
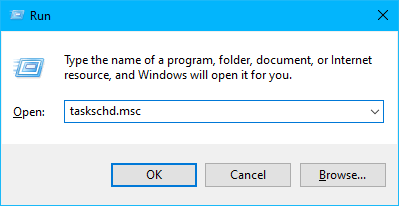
The simplest way to open the Task Scheduler in Windows 10 is to press “Win+R”, type “taskschd.msc” and hit “Enter”.
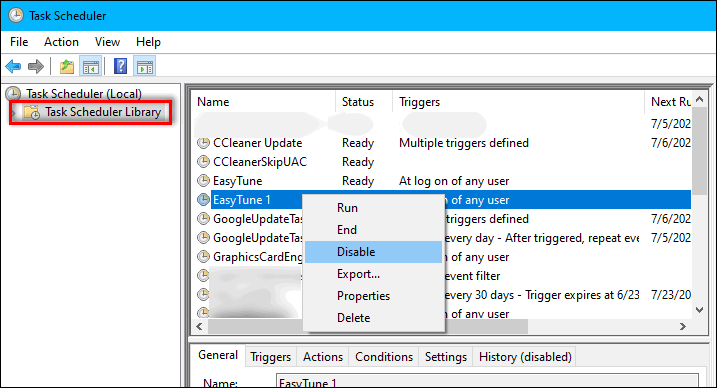
Here you can look through the list of auto-start items, add new or remove existing. Using the Task Scheduler requires some experience. So, be careful while using it.
If you are not sure what to do with a certain startup item, first opt to “Disable” it and check the result rather than “Delete”.
Use Registry Editor to Manage Windows 10 Startup Apps & Programs
The system registry is yet another way to add or remove auto-start apps in Windows 10. Feel free to use it if this option is more preferable.
Launch the registry editor: press “Win+R”, type “regedit” and hit “Enter”.
Here you will see all programs that start when the current user logs in.
If you didn’t find the app you expected, check another registry key responsible for the common startup (for all users on the current PC):
How to Add Programs to Startup Using the Registry Editor
First, you need to decide either you want to run the program when the current user logs in, or all users on the computer at once. Depending on your decision, navigate to the one of the mentioned above registry keys.
Then, in the right part of the Registry Editor window right-click on the empty area and select New > String value
Give it a name, enter the path to the program you wish to add to Windows 10 startup and click “OK”.
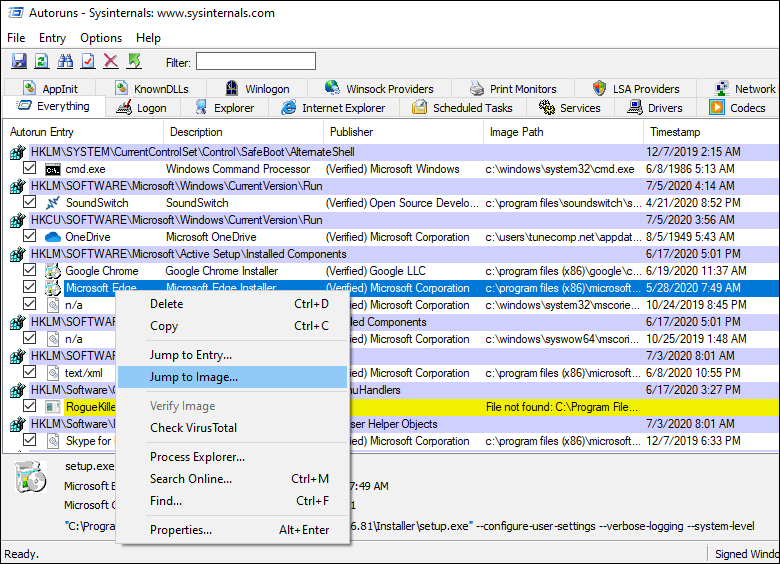
Manage Startup Apps & Programs Using the Autoruns Utility
Sysinternals Autorun is a free utility that you can download from its official website https://docs.microsoft.com/en-us/sysinternals/downloads/autoruns
It doesn’t require the installation – you need just to launch the exe file.
With the help of the Autoruns utility you can:
- view the list of everything that automatically starts on your PC and remove startup items;
- use the Jump to Image option to reveal the location of the program;
- use the Jump to entry option to find out the way how the particular program added to auto-start (startup folder, registry key, scheduler, etc);
- scan startup items for viruses using VirusTotal in 1 click and see the result in the corresponding field of the program;
- and much more.
The Conclusion
If you know how to achieve the same result in easier ways, please drop a comment below. We will also be very grateful if you share this article on social networks. Thank you and good luck!


