- Create a recovery drive
- How to: Perform Startup Repair in Windows 8/8.1 and 10
- How to BOOT into BIOS to change Boot Order
- Method 1: Perform a Startup Repair from the Startup Options screen
- Method 2: Perform a Startup Repair using installation media
- Method 3: Perform a Startup Repair using a system repair disc
- Create a system repair disc
Create a recovery drive
It’s a good idea to create a recovery drive. That way, if your PC ever experiences a major issue such as hardware failure, you’ll be able to use the recovery drive to reinstall Windows 10. Windows updates to improve security and PC performance periodically so it is recommended to recreate the recovery drive annually. Personal files and any applications that did not come with your PC will not be backed up. You’ll need a USB drive that’s at least 16 gigabytes.
Warning: Use an empty USB drive because this process will erase any data that’s already stored on the drive.
To create a recovery drive in Windows 10:
In the search box next to the Start button, search for Create a recovery drive and then select it. You might be asked to enter an admin password or confirm your choice.
When the tool opens, make sure Back up system files to the recovery drive is selected and then select Next.
Connect a USB drive to your PC, select it, and then select Next.
Select Create. Many files need to be copied to the recovery drive, so this might take a while.
If you ever need to use the recovery drive to reinstall Windows 10 on your PC, see Recovery options in Windows 10 for further instructions. It’s a good idea to back up your files frequently because the recovery drive isn’t a system image. It doesn’t contain your personal files, settings, or programs.
Need more options for creating a recovery drive?
To download Windows 10 installation media, see Recovery options in Windows 10.
How to: Perform Startup Repair in Windows 8/8.1 and 10
Hardware defects and issues aren’t the only things that can cause a computer running on the Windows Operating System to fail to start up properly. Software issues – everything from corrupt Windows startup files to invalid boot files – can also cause a computer to fail at startup. This is where Startup Repair comes in. Startup Repair is a tool developed by Microsoft designed to detect any issues with the files and software in general that a computer needs to have in order to correctly boot into Windows and fix them. Startup Repair is available for all versions of the Windows Operating System starting from Windows XP.
On Windows 8, 8.1 and 10, there are three distinctly different ways using which you can perform a Startup Repair on your computer. The following are the three methods that you can use to perform a Startup Repair in Windows 8, 8.1 and 10:
How to BOOT into BIOS to change Boot Order
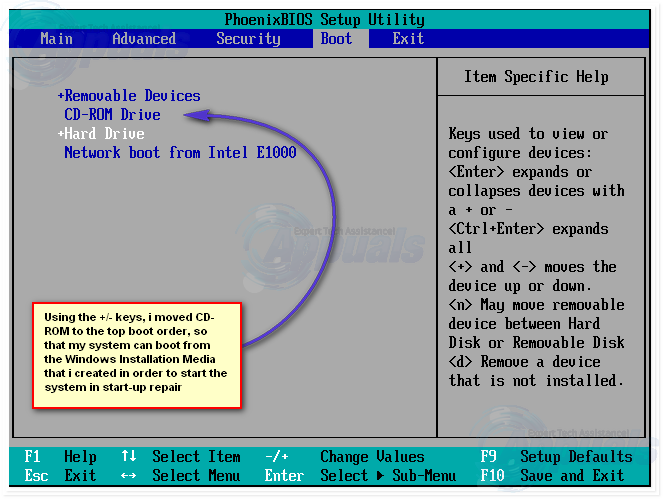
You must know how to boot and change boot order since this will be needed to perform the solutions below. Restart your computer. Enter your computer’s BIOS (or UEFI) settings as soon as it starts up. The key that you need to press to enter these settings depends on the manufacturer of your computer’s motherboard and can be anything from Esc, Delete or F2 to F8, F10 or F12, usually F2. This is displayed on the post screen, and the manual that was supplied with your system. A quick google search asking “how to enter bios” followed by model number will also list results. Navigate to the Boot.
Method 1: Perform a Startup Repair from the Startup Options screen
Almost every single computer that comes with Windows 8, 8.1 and 10 has a horde of recovery and restoration utilities built into its Operating System, and Startup Repair happens to be one of these tools. On such a computer, you can easily access and perform a Startup Repair from the Startup Options screen which can be accessed quite easily. However, it should be noted that you can only perform a Startup Repair using this option if you can manage to sign into Windows or at least get to the Windows login prompt (this is the screen on which you sign into your account).
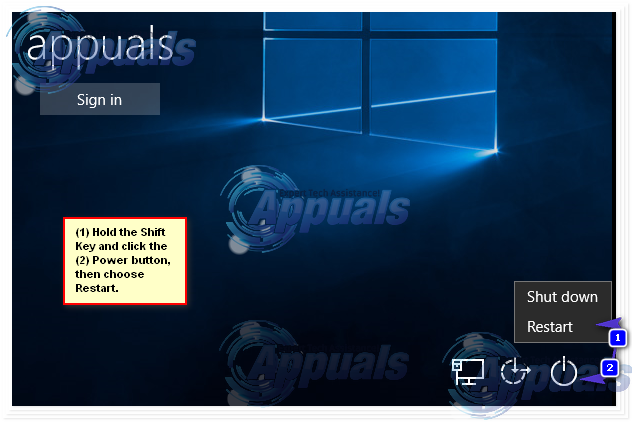
To access the Startup Options screen, click on the Power button and then, while holding down the Shift key, click on Restart.
When your computer boots up, you will be at the Startup Options screen. Once you are at this screen, click on Troubleshoot.
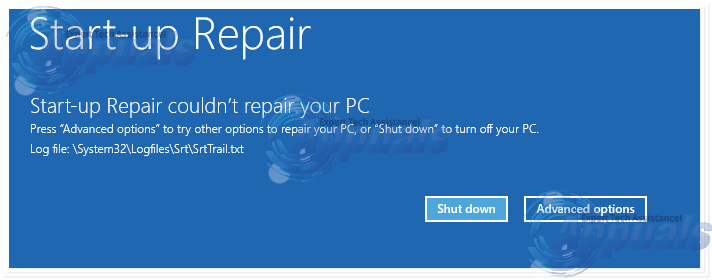
Click on Advanced options. Click on Automatic Repair (it may also be displayed as Startup Repair or Start-up repair). If prompted to do so, choose the Operating System you want to perform the Startup Repair on. If prompted to do so, select an account that is an Administrator.
Enter the password for the account you selected and click on Continue. The Startup Repair process will now begin. If you are asked to do something or make a choice, do so. If the computer needs to be restarted, restart it.
Once the process has been completed, you will be informed of whether or not any problems were detected and whether or not the detected problems were fixed by Startup Repair.
Method 2: Perform a Startup Repair using installation media
You can also perform a Startup Repair in Windows 8, 8.1 or 10 using an installation disc or installation USB. To do so, you need to: Insert the Windows installation disc or USB into the affected computer and restart it. If you don’t have one, you can create it using Rufus or the Media Creation Tool. As soon as the computer starts booting up, get into its BIOS settings (the instructions for which vary depending on the manufacturer of the computer’s motherboard), usually F2 key needs to be pressed when the first screen appears before the logo and configure the computer’s boot order from the boot tab to boot from the installation media instead of the hard drive.
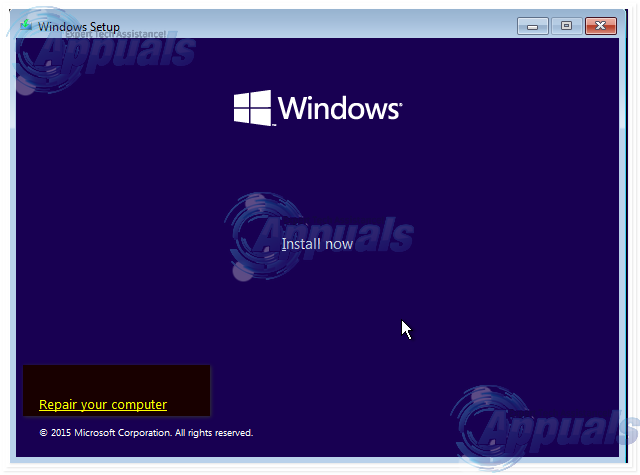
Save the changes and exit the BIOS settings. If prompted to do so, press any key to boot from the installation media. Select your language, time zone and keyboard layout preferences and then click on Next. When you reach a window with an Install now button at its center, look for and click on Repair your computer in the bottom left corner of the window.
You will now arrive at the Startup Options screen. Once you are here, you need to:
Click on Troubleshoot > Advanced options. Click on Automatic Repair (it may also be displayed as Startup Repair or Start-up repair).
If prompted to do so, choose the Operating System you want to perform the Startup Repair on. If prompted to do so, select an account that is an Administrator. Enter the password for the account you selected and click on Continue.
The Startup Repair process will now begin. If you are asked to do something or make a choice, do so. If the computer needs to be restarted, restart it.
Once the process has been completed, you will be informed of whether or not any problems were detected and whether or not the detected problems were fixed by Startup Repair.
Method 3: Perform a Startup Repair using a system repair disc
A Startup Repair can also be performed using a system repair disc that you created for your computer beforehand or one that you created using a computer that is in working condition and is running on the same version of the Windows OS as yours. To perform a Startup Repair using a system repair disc in Windows 8, 8.1 or 10, you need to:
Insert the system repair disc into the computer and restart it.
As soon as the computer starts booting up, get into its BIOS settings (the instructions for which vary depending on the manufacturer of the computer’s motherboard) and configure the computer’s boot order to boot from the system repair disc instead of the hard drive.
Save the changes and exit the BIOS settings.
If prompted to do so, press any key to boot from the system repair disc.
If a list of keyboard language layouts is displayed, click on the one you prefer.
Once you do so, you will arrive at the Startup Options screen.
At the Startup Options screen, you need to:
Click on Troubleshoot > Advanced options.
Click on Automatic Repair (it may also be displayed as Startup Repair or Start-up repair).
If prompted to do so, choose the Operating System you want to perform the Startup Repair on.
If prompted to do so, select an account that is an Administrator.
Enter the password for the account you selected and click on Continue.
The Startup Repair process will now begin. If you are asked to do something or make a choice, do so. If the computer needs to be restarted, restart it.
Once the process has been completed, you will be informed of whether or not any problems were detected and whether or not the detected problems were fixed by Startup Repair.
Create a system repair disc
System recovery options can help you repair Windows if a serious error occurs. To use system recovery options, you’ll need a Windows installation disc or access to the recovery options provided by your computer manufacturer. If you don’t have either of those choices, you can create a system repair disc to access system recovery options.
Open Backup and Restore by clicking the Start button, clicking Control Panel, clicking System and Maintenance, and then clicking Backup and Restore.
In the left pane, click Create a system repair disc, and then follow the steps. 
Note: If you’re prompted to insert a Windows installation disc, it means that the files needed to create the system repair disc can’t be found on your computer. Insert a Windows 7 installation disc.
Insert the system repair disc into your CD or DVD drive.
Restart your computer using the computer’s power button.
If prompted, press any key to start the computer from the system repair disc.
If your computer isn’t configured to start from a CD or DVD, check the information that came with your computer. You might need to change your computer’s BIOS settings.
Choose your language settings, and then click Next.
Select a recovery option, and then click Next.
Tip: Print these instructions and keep them in a safe location with your system repair disc.
Start your computer from a Windows 7 installation disc or USB flash drive
You might need to start, or boot, your computer using the Windows 7 installation disc or a USB flash drive if you want to:
Install or reinstall Windows 7.
Recover Windows 7 from a serious error. If your computer won’t start Windows at all, you can access Startup Repair and other tools in the System Recovery Options menu from the Windows 7 installation disc or USB flash drive. These tools can help you get Windows 7 running again.
Note: If you use a Tablet PC or other computer with a touchscreen, you might need to attach a keyboard and mouse in order to use Startup Repair and other tools in the System Recovery Options menu.
Turn on your computer, insert the Windows 7 installation disc or USB flash drive, and then turn off your computer.
Restart your computer.
Press any key when prompted to do so, and then follow any instructions that appear.
When the Install Windows page appears, click Install now to begin the installation process or click Repair your computer to access system recovery options.
Follow the instructions.
If the Install Windows page doesn’t appear, and you aren’t asked to press any key, you might have to specify that your computer uses its DVD drive or a USB flash drive as the first startup device. To do this, you need to change settings in the computer’s basic input/output system (BIOS).
Note: Most newer computers can start from a USB device, but some older computers might not have this capability. For more information, check the documentation that came with your computer or go to the manufacturer’s website.
Before you change BIOS settings, check the information that came with your computer or go to the computer manufacturer’s website. Specific procedures for accessing the BIOS and changing settings can differ depending on your computer’s manufacturer, or you might be able to choose which startup device your computer uses without changing BIOS settings.
Warning: Be careful when changing BIOS settings. The BIOS interface is designed for advanced users, and it’s possible to change a setting that could prevent your computer from starting correctly.
Turn on your computer, insert the Windows 7 installation disc or USB flash drive, and then restart your computer.
Newer computers often display a startup (or boot) menu. On the startup menu, choose «BIOS setup,» or «BIOS settings,» or something similar.
Procedures vary depending on the BIOS manufacturer. Usually, you must press a key (such as F2, F12, Delete, Esc) or a key combination immediately after you turn on your computer but before Windows starts. If the Windows logo appears, you need to try again by waiting until the Windows logon prompt appears, and then shutting down and restarting your computer again.
The BIOS setup screen appears. On the BIOS setup screen, choose the option called «Boot order,» or something similar. Boot order settings might also be listed under «Advanced settings» or something similar.
Select your DVD drive or USB flash drive as the first startup device. (The USB flash drive might be listed under «Removable devices» or something similar.)
Save the setting changes, and then exit the BIOS.
Restart your computer, and then start Windows 7 from the installation disc or USB flash drive as previously described.


