- How to use Startup Repair to fix boot problems with Windows 10
- How to quickly repair startup problems on Windows 10
- Accessing Advanced startup when PC isn’t loading
- Accessing Advanced startup using bootable media
- Accessing Advanced startup when PC is loading
- Using Startup Repair to fix loading problems
- More Windows 10 resources
- Halo: MCC’s live service elements make it better, not worse
- Microsoft’s Surface Duo is not ‘failing up’
- Here’s what you can do if Windows 10 update KB5001330 is causing issues
- These are the best PC sticks when you’re on the move
- How to Perform a Startup Repair in Windows 7
- Fix problems in Windows 7 automatically with Startup Repair
- Boot From the Windows 7 DVD
- Wait for Windows 7 to Load Files
- Choose Windows 7 Setup Language and Other Settings
- Click ‘Repair Your Computer’
- Wait for System Recovery Options to Locate Windows 7 on Your Computer
- Choose Your Windows 7 Installation
- Choose the Startup Repair Recovery Tool
- Wait While Startup Repair Searches for Problems With Windows 7 Files
- Wait While Startup Repair Attempts to Repair Windows 7 Files
- Choose ‘Finish’ to Restart to Windows 7
- Startup Repair Didn’t Fix the Problem?
How to use Startup Repair to fix boot problems with Windows 10
It’s just a matter of time before your device gets stuck loading or won’t start at all. Instead of spending time trying to find out the problem, Windows 10 includes the Startup Repair feature designed to quickly fix most common issues that may be preventing your computer from loading correctly.
In this Windows 10 guide, we’ll walk you through the steps to use the Startup Repair tool to fix boot problems on your device.
How to quickly repair startup problems on Windows 10
To use the Startup Repair feature to fix boot issues with Windows 10, you’ll need to access the Advanced startup settings, which you can do in at least three different ways depending on your situation.
Accessing Advanced startup when PC isn’t loading
If your device isn’t loading or stuck during boot, you can use this method to access the recovery environment:
As soon as the Windows logo appears on your screen, press the power button. (This will immediately interrupt the boot sequence.)

After the third interruption, Windows 10 will open into the Advanced Startup environment, and then you can continue with the steps below to use the Startup Repair tool to fix booting issues with Windows 10.
Accessing Advanced startup using bootable media
Alternatively, in the case your device isn’t starting at all, you can use a USB installation media to get to the Advanced settings environment. Here’s how:
Start your device using a USB bootable media.
- Quick Tip: If your computer isn’t starting from the USB flash drive, you’ll need to change your system’s BIOS settings to make sure it can boot from USB. Usually, you can access the BIOS by powering up your device and pressing one of the functions, Delete, or ESC keys, but make sure to check your manufacturer’s support website for more information.
Click the Repair your computer link in the bottom-right corner.
Accessing Advanced startup when PC is loading
If you have access to the desktop, you can use these steps to access the recovery environment to use the Startup Repair tool:
- Open Settings.
- Click on Update & Security.
- Click on Recovery.
Under the «Advanced startup» section, click the Restart now button.
After completing the steps, you can now continue with the steps below to fix loading problems with your device using the automatic repair feature.
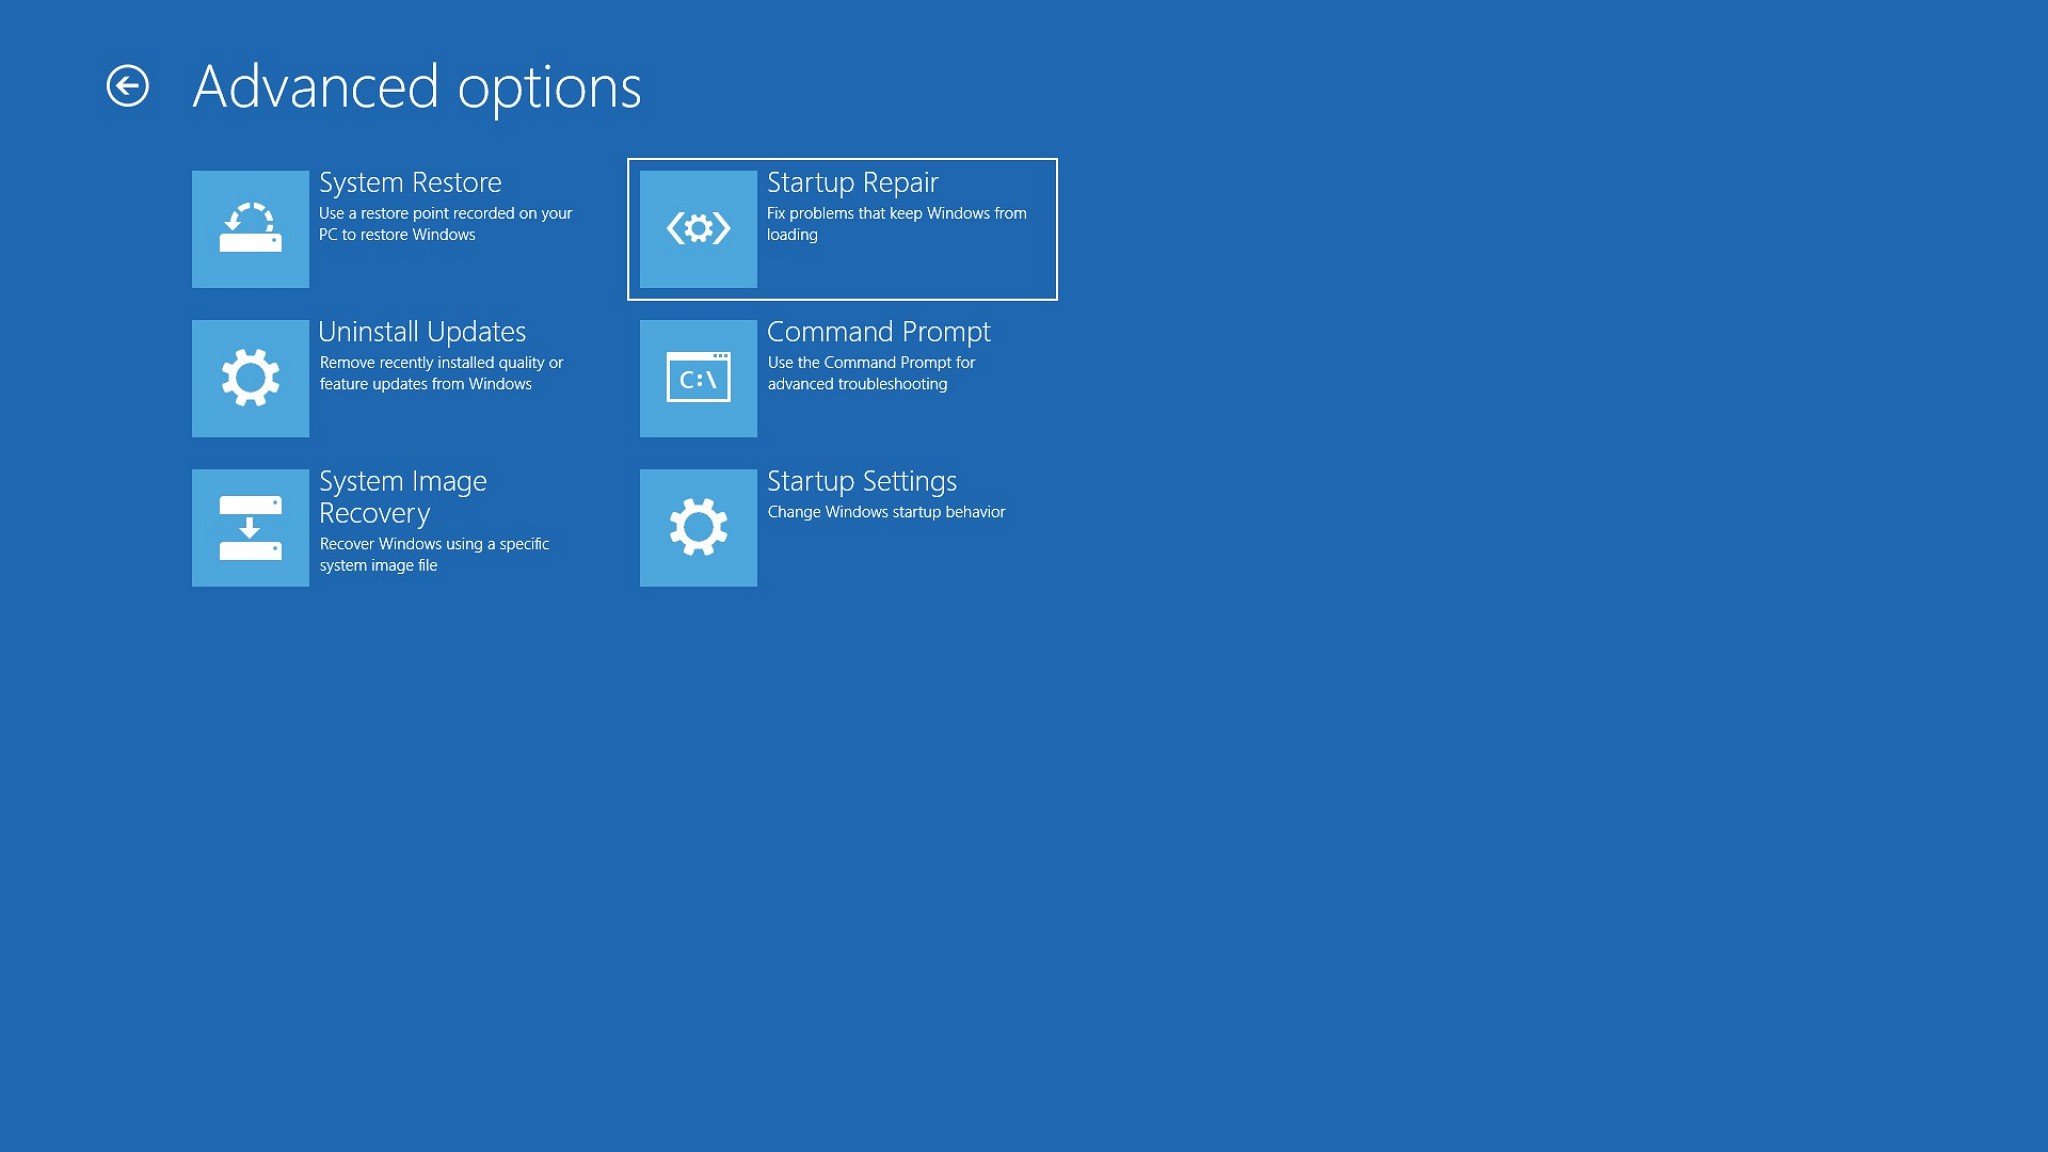
Using Startup Repair to fix loading problems
While in the Advanced startup environment, use the following steps to use Startup Repair:
Click the Troubleshoot button.
Click the Advanced options button.
Click the Startup Repair button.
Click the Continue button.
Quick Tip: If your computer is loading correctly, using this tool, you’ll get the «Start Repair couldn’t repair your PC» message because there’s nothing that needs fixing.
Once you’ve completed the steps, the Start Repair feature will proceed to scan, detect, and fix any problems that may prevent your device from loading correctly.
Also, the repair process creates a SrtTrail.txt file in the «C:\Windows\System32\Logfiles» folder with log information that you can view to have a better understanding of the diagnostics.

If you’re still having problems, you should use the Windows Central forums to find help.
Alternatively, if you’ve been running the same installation for a long time, you should consider nuking the old installation with a clean copy of Windows 10. This process will take longer, and it’ll erase everything on your computer, but it’ll help to fix the loading issues, as well as performance, battery life, and other problems.
More Windows 10 resources
For more helpful articles, coverage, and answers to common questions about Windows 10, visit the following resources:
![]()
Halo: MCC’s live service elements make it better, not worse
Halo: The Master Chief Collection is more popular than ever, but some fans don’t agree with the live service approach 343 Industries has taken with it. Here’s why those elements are, at the end of the day, great for the game and for Halo overall.
![]()
Microsoft’s Surface Duo is not ‘failing up’
Microsoft announced this week that it was expanding Surface Duo availability to nine new commercial markets. While Surface Duo is undoubtedly a work in progress, this is not a sign of a disaster. It’s also doesn’t mean that Surface Duo is selling a ton either. Instead, the reason for the expansion is a lot more straightforward.
![]()
Here’s what you can do if Windows 10 update KB5001330 is causing issues
In this guide, we’ll show you the steps to get rid of the update KB5001330 to fix profile, gaming, and BSoD problems with the Windows 10 October 2020 Update and May 2020 Update.
![]()
These are the best PC sticks when you’re on the move
Instant computer — just add a screen. That’s the general idea behind the ultra-portable PC, but it can be hard to know which one you want. Relax, we have you covered!
How to Perform a Startup Repair in Windows 7
Fix problems in Windows 7 automatically with Startup Repair
:max_bytes(150000):strip_icc()/tim-fisher-5820c8345f9b581c0b5a63cf.jpg)
:max_bytes(150000):strip_icc()/WorkBadgePhoto-61c0b98ef5a74e4a85851a8f706dbd65.jpg)
The Startup Repair tool repairs Windows 7 by replacing important operating system files that might be damaged or missing. Startup Repair is an easy diagnostic and repair tool to use when Windows 7 fails to start properly and you can’t use Safe Mode.
:max_bytes(150000):strip_icc()/how-to-perform-a-startup-repair-in-windows-7-2626170-9d465e8f46124f78adb436ddbe2c2643.png)
As of January 2020, Microsoft is no longer supporting Windows 7. We recommend upgrading to Windows 10 to continue receiving security updates and technical support.
The Windows 7 repair tool is available from the Windows 7 DVD, so you must have a physical copy of the operating system in order for this to work. If you don’t, you can always create a Windows 7 System Repair Disc.
Not using Windows 7? Every modern Windows operating system has a similar operating system file repair process.
Boot From the Windows 7 DVD
:max_bytes(150000):strip_icc()/windows-7-startup-repair-step-1-59949f88aad52b001167dc84.png)
To begin the Windows 7 Startup Repair process, you’ll need to boot from the Windows 7 DVD.
- Watch for a Press any key to boot from CD or DVD. message similar to the one shown in the screenshot above.
- Press any key to force the computer to boot from the Windows 7 DVD.
If you don’t press a key, your PC will try to boot to the operating system that’s currently installed on your hard drive. If this happens, just restart your computer and try to boot to the Windows 7 DVD again.
- Press any key to force the computer to boot from the Windows 7 DVD.
If you want the Startup Repair to work properly, you must remove any flash drives or other USB storage devices, like external hard drives, from your computer before continuing. Due to the way some computers report the storage space on USB connected drives, the Windows 7 Startup Repair may incorrectly report that it found no problems when in fact there may actually be an issue.
Wait for Windows 7 to Load Files
:max_bytes(150000):strip_icc()/windows-7-startup-repair-2-580711695f9b5805c20a8d3e.jpg)
No user intervention is required here. Just wait for the Windows 7 setup process to load files in preparation for whatever task you might want to complete.
In our case, it’s a Startup Repair, but there are lots of tasks that could be completed with the Windows 7 DVD.
No changes are being made to your computer during this step. Windows 7 is only temporarily «loading files.»
Choose Windows 7 Setup Language and Other Settings
:max_bytes(150000):strip_icc()/windows-7-startup-repair-3-580711675f9b5805c20a8953.jpg)
Choose the Language to install, Time and currency format, and Keyboard or input method that you’d like to use in Windows 7.
Choose Next.
Click ‘Repair Your Computer’
:max_bytes(150000):strip_icc()/windows-7-startup-repair-4-580711653df78cbc28c6c546.jpg)
Click Repair your computer on the bottom-left of the Install Windows window.
This will begin the Windows 7 System Recovery Options which contains several useful diagnostic and repair tools, one of which is Startup Repair.
Do not select Install now. If you already have Windows 7 installed, this option is used to perform a Clean Install of Windows 7 or a Parallel Install of Windows 7.
Wait for System Recovery Options to Locate Windows 7 on Your Computer
:max_bytes(150000):strip_icc()/windows-7-startup-repair-5-580711633df78cbc28c6c064.jpg)
System Recovery Options, the set of tools that contains Startup Repair, will now search your hard drive(s) for any Windows 7 installations.
You don’t need to do anything here but wait. This Windows installation search shouldn’t take more than a few minutes at most.
Choose Your Windows 7 Installation
:max_bytes(150000):strip_icc()/windows-7-startup-repair-6-5807115f3df78cbc28c6ba23.jpg)
Choose the Windows 7 installation that you’d like to perform the Startup Repair on.
Select Next.
Don’t worry if the drive letter in the Location column doesn’t match the drive letter that you know Windows 7 is installed on in your PC. Drive letters are somewhat dynamic, especially when using diagnostic tools like System Recovery Options.
For example, as you can see above, this Windows 7 installation is listed as being on drive D: when it’s actually the C: drive when Windows 7 is running.
Choose the Startup Repair Recovery Tool
:max_bytes(150000):strip_icc()/windows-7-startup-repair-7-5807115d3df78cbc28c6b5e7.jpg)
Click Startup Repair from the list of recovery tools in System Recovery Options.
As you can see, several other diagnostic and recovery tools are available in the Windows 7 System Recovery Options including System Restore, System Image Recovery, Windows Memory Diagnostic, and Command Prompt.
In this guide, however, we’re only repairing operating system files using the Startup Repair tool.
Wait While Startup Repair Searches for Problems With Windows 7 Files
:max_bytes(150000):strip_icc()/windows-7-startup-repair-8-57c76d513df78c71b65cf882.jpg)
The Startup Repair tool will now search for problems with files that are important to the proper functioning of Windows 7.
If the Windows 7 repair tool finds a problem with an important operating system file, the tool might suggest a solution of some kind that you have to confirm, or it might solve the problem automatically.
Whatever happens, follow the prompts as necessary and accept any changes suggested by Startup Repair.
Wait While Startup Repair Attempts to Repair Windows 7 Files
:max_bytes(150000):strip_icc()/windows-7-startup-repair-9-5807115b5f9b5805c20a73db.jpg)
Startup Repair will now attempt to repair whatever problems it found with Windows 7 files. No user intervention is required during this step.
Your computer may or may not restart several times during this repair process. Do not boot from the Windows 7 DVD on any restart. If you do, you’ll need to restart the computer immediately so the Startup Repair process can continue normally.
You won’t see this step if Startup Repair didn’t find any problems with Windows 7.
Choose ‘Finish’ to Restart to Windows 7
:max_bytes(150000):strip_icc()/windows-7-startup-repair-10-580711593df78cbc28c6adaf.jpg)
Select Finish once you see the Restart your computer to complete the repairs window to restart your PC and start Windows 7 normally.
Startup Repair Didn’t Fix the Problem?
It’s possible that Startup Repair didn’t fix whatever problem you were having. If the Startup Repair tool determines this itself, it might automatically run again after your computer restarts. If it doesn’t automatically run but you’re still seeing problems with Windows 7, repeat these steps to run Startup Repair again manually.
Also, be sure to read the Important note on Step 1.
If it becomes apparent that Startup Repair isn’t going to solve your Windows 7 problem, you do have some additional recovery options including a System Restore or a System Image Recovery, assuming you have previously backed up your entire computer.
You could also try a Parallel Install of Windows 7 or a Clean Install of Windows 7.
However, if you’ve tried a Startup Repair of Windows 7 as part of another troubleshooting guide, you’re probably best served by continuing with whatever specific advice that guide is giving as your next step.


