- How To Disable Startup Programs In Windows 7 and Vista
- “What is the MSConfig Utility?”
- How To Disable Startup Applications In Windows
- Step 1
- Step 2
- Step 3
- How to disable startup programs with CCleaner
- How to Change Startup Programs in Windows 7, 8 And 10
- Dillion Megida
- In Windows 7
- Open the Startup Apps Control Panel
- Disable/Enable Startup App
- Add Startup App
- In Windows 8
- Open the Startup Apps Control Panel
- Disable/Enable Startup App
- Add Startup App
- In Windows 10
- Open the Startup Apps Control Panel
- Disable/Enable Startup Apps
- Add Startup App
- Wrap Up
- Dillion Megida
- How to make a Program run on startup in Windows 10
- Make a Program run on startup in Windows 10
- 1] Place Program shortcut in Startup folder
- 2] Add Programs to startup using freeware
- 3] Make Program run with Windows boot via Registry
- 4] Use Task Scheduler to make programs run at startup
- How to manage/remove startup Programs in Windows 7
- How to change startup programs in Windows 10
- What exactly is the Windows 10 startup folder?
- Why it’s important to manage the startup folder in Windows 10
- Locating the startup folder in Windows 10
- How to add programs to the startup folder in Windows 10
- How to disable startup programs in Windows 10
- Which programs should I add to startup in Windows 10?
- Windows blue screen (BSOD): How to cure the error
- What version of Windows do I have?
- Windows Photo Viewer: How to reactivate the old display for images and photos in Windows 10
- Resetting Windows 10 – step-by-step instructions
How To Disable Startup Programs In Windows 7 and Vista


 Over time as you install more and more software you may start to notice that it takes longer and longer for your computer to startup. More likely than not, this is probably because many applications these days hook into your Windows Startup process and automatically load up each time you start your computer. For some applications, that’s a good thing (Anti-Virus, Firewall, etc.) and I’m OK with that. However, for the majority of apps out there, it’s just a resource suck which is doing nothing more than taking up memory, CPU, and extending my startup times.
By using the Microsoft Configuration tool (msconfig.exe), we can quickly and easily audit what’s running at startup and disable the things we would prefer just to start manually after boot.
Editor’s Note: See Disabling Startup Programs for Windows 10 and Windows 8.1. Those articles contain more detailed information for the latest Microsoft operating systems.
“What is the MSConfig Utility?”
MsConfig.exe has been around for a while. It’s a Microsoft-built utility so you can trust it as well. Essentially it’s used to reconfigure your startup items within all Windows 7, Vista, or XP as well as several other things, so you need to be careful (I thought of the Spiderman reference here “With great power comes great responsibility”) as you play around with it. If you stick to the Step-by-Step How-To below, you should be okay.
How To Disable Startup Applications In Windows
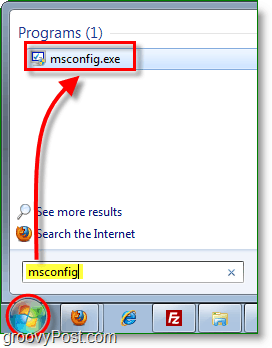
Step 1
Click the Start Menu Orb then in the search box Type MSConfig and Press Enter or Click the msconfig.exe program link.
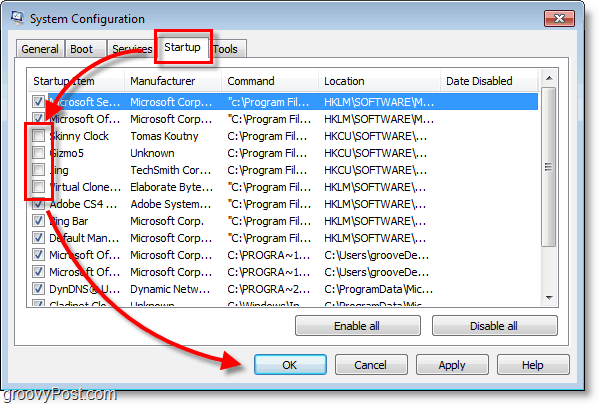
Step 2
From within the System Configuration tool, Click Startup tab and then Uncheck the program boxes that you would like to prevent from starting when Windows starts. Click OK to save changes when finished.
Step 3
Now that you’ve saved changes Restart Windows and the selected programs should no longer automatically start up.

How to disable startup programs with CCleaner
CCleaner is another free app for Windows or Mac you can use to disable startup programs.
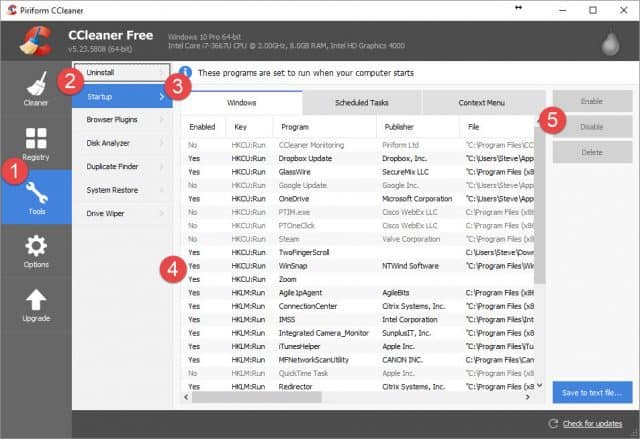
Take a look at our full tutorial which outlines how to disable apps using CCleaner.
How to Change Startup Programs in Windows 7, 8 And 10

Dillion Megida

Startup programs are programs which run automatically when a system is booted. This is a good practice for programs which you use frequently. It saves you the stress of looking for those programs, or, in some cases, manually setting them up.
Some programs also have this feature by default when they are newly installed.
But if you have too many startup programs it can slow down the boot process. This has a negative effect especially on systems with small capabilities or less processing power.
In this article, we’ll learn how to open the startup apps control panel, how to enable and disable startup apps, and finally how to add our desired startup programs in Windows 7, 8 and 10.
In each of these Windows versions, there is a Control Panel for Startup Apps which shows a list of applications that can be run automatically on startup. These applications are either enabled for startup or disabled.
So let’s look at the process for each Windows version.
In Windows 7
Open the Startup Apps Control Panel
Open the windows startup menu, then type «MSCONFIG«. When you press enter, the system configuration console is opened. Then click the «Startup» tab which will display some programs that can be enabled or disabled for startup.
Disable/Enable Startup App
The checkboxes beside the applications indicate the status. If checked, it is enabled for startup, otherwise, it is disabled.
To disable an enabled app, simply uncheck the checkbox and click apply.
To enable a disabled app, check the checkbox and click apply.
These two processes require the system to be restarted before the changes are applied on the applications.
Add Startup App
To add an app, you’ll need to explore the Startup Folder. To do this, try any of the following methods;
- Open the start menu and type «Startup» (to search for it). When found, right-click and select Explore to open the folder.
- Open the start menu, select «All Programs» and scroll down the list until you find the Startup Folder. When found, Explore it.
Create a shortcut of your desired program, then copy it and paste it in this folder. After this, the program will automatically be added to the panel with a status of «enabled«.
In Windows 8
Open the Startup Apps Control Panel
To open the panel, try any of the following;
- Open «Task Manager» and select the «Startup» tab
- Open windows startup menu, and type «Startup» to search for the program. Then select any of the options provided.
Disable/Enable Startup App
To disable a startup app which is enabled, right-click on the app and select «Disable«.
To enable a startup app which is disabled, right-click on the app and select «Enable«.
Add Startup App
Press the window and letter R key to open the Run dialog. Then enter %AppData%. This will open a roaming folder.
Navigate to \Microsoft\Windows\Start Menu\Programs\Startup. In this folder, paste the shortcut of your desired app. This will make it a startup application with a status of «enabled».
In Windows 10
Open the Startup Apps Control Panel
- Open the start menu, type «Startup Apps» (to search for it) and click any of the results.
- Open «Task Manager«, then select the «Startup» tab
Disable/Enable Startup Apps
To disable a startup app, right-click on any app in the list with a status of «enabled» and select «disable«.
To enable a startup app in the list which is disabled, right-click on the app and select «enable«.
Add Startup App
Hold the windows and letter R key on the keyboard. In the run dialog, enter «shell:startup«.
In the folder, you can add any application of your choice which you’d want to run at startup. They’ll be added to the list so when you access your Startup Apps, you can disable or enable them.
Wrap Up
If there’s any application which you always run when you boot up your system, it is good practice to make it a startup program.
When your system becomes slow to boot, it’s most likely because startup programs are responsible. Now you know how to disable or reduce them.
Dillion Megida
Frontend Web Engineer and Technical Writer. I love teaching what I know. Javascript / ReactJS / NodeJS
If you read this far, tweet to the author to show them you care. Tweet a thanks
Learn to code for free. freeCodeCamp’s open source curriculum has helped more than 40,000 people get jobs as developers. Get started
freeCodeCamp is a donor-supported tax-exempt 501(c)(3) nonprofit organization (United States Federal Tax Identification Number: 82-0779546)
Our mission: to help people learn to code for free. We accomplish this by creating thousands of videos, articles, and interactive coding lessons — all freely available to the public. We also have thousands of freeCodeCamp study groups around the world.
Donations to freeCodeCamp go toward our education initiatives, and help pay for servers, services, and staff.
How to make a Program run on startup in Windows 10
There may be some programs that you may want to always run on startup or boot. Let us say that the first thing you always do is fire up your browser and start browsing the web. Sure, when your Windows PC boots to desktop, you can always fire up your browser manually and enter the URL, but if you wish to make it auto-start, then you can easily make Programs, like say a Browser, run on startup automatically every time in Windows 10/8/7.
Make a Program run on startup in Windows 10
First, you want to check in the Program’s settings and see if there is a setting that allows you to make it run at every startup. If there is then it answers the question easily. If not, then there are three other ways you can do it. Let us take a look at them:
1] Place Program shortcut in Startup folder
The simplest way would be to place a shortcut of the Program in the Windows Startup folder.
The Current Users Startup folder in Windows is located at:
These programs start up for the current logged in user only. To directly access this folder, open Run, type shell:startup and hit Enter.
The All Users Windows startup folder is located at:
To open this folder, bring up the Run box, type shell:common startup and hit Enter.
You can add shortcuts to the programs you want to start with your Windows in this folder.
2] Add Programs to startup using freeware
While the built-in MSCONFIG or System Configuration Utility allows you to disable or delete startup entries, it does not allow you to add startup programs. There are many free tools that let you manage startup programs.
To add startup programs easily, you can make use of freeware like Chameleon Startup Manager or Quick Startup. Both are feature-rich startup managers that let you easily add startup programs along with their launch parameters.
3] Make Program run with Windows boot via Registry
You can make use of the Registry Startup Paths to add programs to start with every boot. You can use the Run and RunOnce registry keys to make programs to run each time that a user logs on or run just once.
The registry keys are located here. They are for Current User and for All Users – Run every time or run just once:
You can read more about this on MSDN.
4] Use Task Scheduler to make programs run at startup
You can create a Basic Task Wizard using Windows Task Scheduler to make a program start at boot every time, by using the When the computer starts option as the Task Trigger.
PS: This post will show you how to open Windows Store apps on startup.
How to manage/remove startup Programs in Windows 7
«knwetlk» wrote in message news:c2ff3fd1-3e32-46d9-9522-ec05034a2db1.
> How do I manage programs that startup on Windows 7
First, note that you should be concerned with *all* programs that start
automatically, not just with those that go into the system tray. Not all
autostarting programs manifest themselves by an icon in the tray.
On each program you don’t want to start automatically, check its Options to
see if it has the choice not to start (make sure you actually choose the
option not to run it, not just a «don’t show icon» option). Many can easily
and best be stopped that way. If that doesn’t work, run MSCONFIG from the
Start | Run line, and on the Startup tab, uncheck the programs you don’t
want to start automatically.
However, if I were you, I wouldn’t do this just for the purpose of running
the minimum number of programs. Despite what many people tell you, you
should be concerned, not with how *many* of these programs you run, but
*which*. Some of them can hurt performance severely, but others have no
effect on performance.
Don’t just stop programs from running willy-nilly. What you should do is
determine what each program is, what its value is to you, and what the cost
in performance is of its running all the time. You can try google searches
and ask about specifics here.
Once you have that information, you can make an intelligent informed
decision about what you want to keep and what you want to get rid of.
—
Ken Blake, Microsoft MVP (Windows Desktop Experience) since 2003
How to change startup programs in Windows 10
When you boot up your operating system or log on to your computer, some programs run automatically without any actions on your part. In Microsoft systems such Windows 10, these programs are launched from the startup folder. Some of these applications are defined by Microsoft, whereas others are user-defined. We’ll explain which programs you should always run at startup and show you how to add and remove programs from startup in Windows 10.
What exactly is the Windows 10 startup folder?
As soon as you boot up your system or log on to your user account, Windows 10 automatically runs all programs or files listed in the startup folder. Up until Windows 8, you could view and change these applications directly from the Start menu. As of version 8.1 and higher, including Windows 10, you can only access the startup folder from your personal user files.
There is also an All Users startup folder in addition to your personal startup folder. The applications in this folder run automatically when all users log on. This folder is usually managed by the system administrator. Windows 10 may also need to access this folder itself, for example when installing software.
Don’t confuse the startup folder with the autorun function. Autorun is a feature that allows the operating system to perform a specific action automatically when you insert a removable storage device such as a CD or a USB thumb drive.
The startup folder typically only contains links to the programs that you want to start automatically. However, the startup folder can also contain any other files (such as scripts) that you want to run when you log on. In addition to the programs in the Windows 10 startup folder, there are other files that are a permanent part of your operating system and run automatically at startup. These include the Run, RunOnce, RunServices and RunServicesOnce keys in the Windows registry.
Most malware takes advantage of the autostart function of these keys by placing malicious programs in the above registry keys so that the programs run automatically without your knowledge every time you boot up Windows.
Why it’s important to manage the startup folder in Windows 10
Good management of Windows 10 startup programs is important for several reasons. The main reason for adding applications, services, or scripts to the startup folder is obvious: If you use programs or processes that you need or want to run automatically when you log on, you can save a lot of time by adding them to your startup folder. If you’re an administrator, you can even add programs directly to the shared startup folder for all users in Windows 10.
Automatically running processes, services and applications at startup can be convenient, but it can be a disadvantage if it uses too much of your computer’s resources, making it slower for you to log on and use the system. In other words, it won’t save you time unless your computer has enough resources to start all the applications without having performance issues. If you struggle with performance issues, it’s worth taking a look at your startup folder in Windows 10. Windows may be running too many applications or overly CPU-intensive programs for no good reason every time you log on to the system. To address this problem, remove unnecessary applications from your startup folder.
If you’re having regular performance problems, you should also check whether certain processes are consuming unnecessary amounts of RAM. If so, try freeing up some memory. To learn how, see our step-by-step guide to freeing up memory.
Locating the startup folder in Windows 10
As mentioned earlier, the startup folder in Windows 10 is no longer listed directly in the Start menu, although both the user-specific and All Users startup folders are still in the Start menu directory. Here are the exact locations of these folders:
Both folders are buried deep in the directory structures of the Windows 10 partition, which is why the operating system allows you to open either directory using shell commands. To do this, open the Run dialog box from the Start menu or using the keyboard shortcut [Windows] + [R], and then enter one of the following, depending on whether you want to open your own startup folder or the folder for all users:
In order to protect your privacy, the video will not load until you click on it.
How to add programs to the startup folder in Windows 10
Many programs offer the option to run at startup in their settings. You should first check to see if the software you’d like to add to startup offers this option. If so, you can use this option and save yourself the following steps.
If not, you can easily add already installed programs to your startup folder in Windows 10. All you have to do is create a shortcut to the executable file (.exe file) and save it to the startup folder. If you don’t know where to find the executable file, just use the Windows search bar: Enter the name of the application, right-click the program and select Open file location:

Windows 10’s result when searching for Firefox
If you’ve hidden the search bar in Windows 10, you can unhide it at any time by right-clicking the Windows logo and choosing “Search.”

Creating a desktop shortcut on Windows 10
Next, right-click the file, which is automatically selected by Windows, and choose Send to -> Desktop (create shortcut).
Find the new shortcut on your desktop and copy it to the startup folder in Windows 10 using copy-and-paste or drag-and-drop:

Shortcut in your personal startup folder in Windows 10
In order to protect your privacy, the video will not load until you click on it.
How to disable startup programs in Windows 10
Of course, you can also remove any programs you’ve added to your startup folder in Windows 10. To do this, simply delete the shortcuts from the startup folder. Note that you require administrator privileges to remove shortcuts from the All Users startup folder. Alternatively, if you set a program to run at startup in the settings of the program, you can disable it there.
You can also delete startup configurations using the Task Manager, although the Task Manager also lists programs and services that are not in your startup folders. To open task manager, simply hold down the [Ctrl] and [Shift] keys and press [Esc]. Go to the Startup tab:

Startup tab in the Task Manager in Windows 10
This tab lists the startup programs of your Windows 10 system, including publisher information, the current status (enabled/disabled), and the impact of the program on system startup (low, high, or not measured). If you’re an administrator, you’ll also see additional information about whether the startup programs are from a folder or the registry as well as the exact location of each program.
To remove a program, right-click the program in the Task Manager and select Disable:

Task Manager in Windows 10: startup programs
In order to protect your privacy, the video will not load until you click on it.
Which programs should I add to startup in Windows 10?
The core services that Windows 10 requires to function properly are automatically loaded when Windows boots up. You don’t have to manage these processes, nor are you able to. However, you have the freedom to manage installed user software on your own computer or as a system administrator.
The following programs should always run at startup or are at least recommended:
- Security software (antivirus programs, firewall etc.): Windows 10 comes with its own arsenal of software to protect your computer against external attacks. However, if you’ve disabled these applications and use other software, make sure it runs from the moment you log on. The best way to ensure this is to use the startup folder in Windows 10.
- Backup software: If you use backup software to back up your data, you should add it to the Windows 10 startup folder. That way you won’t forget to turn on your backup software.
- Software you use regularly: Other candidates for the startup folder in Windows 10 are programs that you use regularly. These include clipboard managers or VPN programs as well as cloud storage solutions and email clients.
You should remove all non-essential applications, scripts and services from the startup folder to ensure that startup is as efficient as possible in Windows 10. Gaming and chat clients, Apple and Adobe applications such as QuickTime or Adobe Reader, and utilities such as registry cleaners or toolbars are typical examples of applications that may be loading every time you boot up, but probably don’t belong in the startup folder.

Windows blue screen (BSOD): How to cure the error
The infamous blue screen of death usually shows up without any warning. It’s an important indicator of internal problems with hardware, software, or drivers. If Windows can no longer be run as a result of such a problem, then the forced shutdown takes place in the form of a blue screen containing an error message. This may cause unsaved files and documents to be lost. The most important thing with.

What version of Windows do I have?
Are you a Windows user, but aren’t sure what version of the operating system you have installed on your PC? This article introduces three ways of checking your Windows version in just a few seconds: using a keyboard shortcut, via the Control Panel, or using the Windows Command Prompt (CMD).

Windows Photo Viewer: How to reactivate the old display for images and photos in Windows 10
If you have been using Microsoft operating systems for a long time, you may have noticed that in Windows 10 what was previously the Windows Photo Viewer has been replaced by the so-called ‘Photos’ app. If you would like to continue using the classic viewer instead, you can reactivate it with a few small changes to the Windows Registry.

Resetting Windows 10 – step-by-step instructions
If your system is causing you problems, it could make sense to reset Windows 10. As of Windows 7, it has been possible to reset or refresh a system without having to start from scratch – you canand documents to . Luckily, you always have the option to reset your Microsoft operating system with or without losing your files. We reveal how it works.


