Create a system repair disc
System recovery options can help you repair Windows if a serious error occurs. To use system recovery options, you’ll need a Windows installation disc or access to the recovery options provided by your computer manufacturer. If you don’t have either of those choices, you can create a system repair disc to access system recovery options.
Open Backup and Restore by clicking the Start button, clicking Control Panel, clicking System and Maintenance, and then clicking Backup and Restore.
In the left pane, click Create a system repair disc, and then follow the steps.  If you’re prompted for an administrator password or confirmation, type the password or provide confirmation.
Note: If you’re prompted to insert a Windows installation disc, it means that the files needed to create the system repair disc can’t be found on your computer. Insert a Windows 7 installation disc.
Insert the system repair disc into your CD or DVD drive.
Restart your computer using the computer’s power button.
If prompted, press any key to start the computer from the system repair disc.
If your computer isn’t configured to start from a CD or DVD, check the information that came with your computer. You might need to change your computer’s BIOS settings.
Choose your language settings, and then click Next.
Select a recovery option, and then click Next.
Tip: Print these instructions and keep them in a safe location with your system repair disc.
Start your computer from a Windows 7 installation disc or USB flash drive
You might need to start, or boot, your computer using the Windows 7 installation disc or a USB flash drive if you want to:
Install or reinstall Windows 7.
Recover Windows 7 from a serious error. If your computer won’t start Windows at all, you can access Startup Repair and other tools in the System Recovery Options menu from the Windows 7 installation disc or USB flash drive. These tools can help you get Windows 7 running again.
Note: If you use a Tablet PC or other computer with a touchscreen, you might need to attach a keyboard and mouse in order to use Startup Repair and other tools in the System Recovery Options menu.
Turn on your computer, insert the Windows 7 installation disc or USB flash drive, and then turn off your computer.
Restart your computer.
Press any key when prompted to do so, and then follow any instructions that appear.
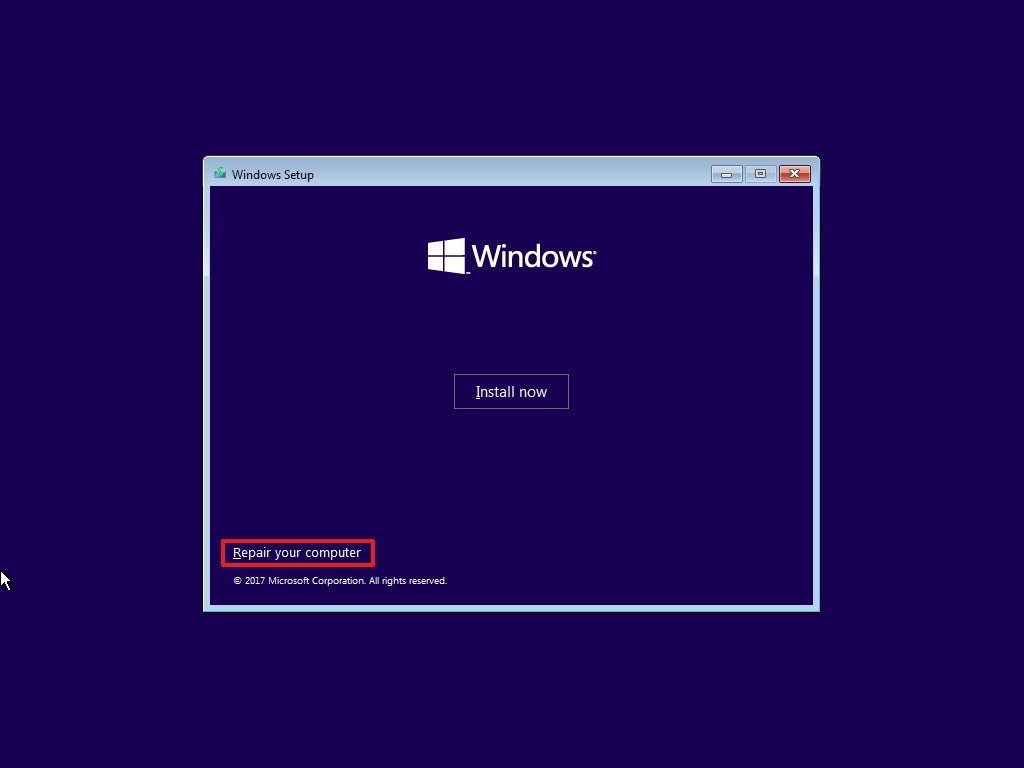
When the Install Windows page appears, click Install now to begin the installation process or click Repair your computer to access system recovery options.
Follow the instructions.
If the Install Windows page doesn’t appear, and you aren’t asked to press any key, you might have to specify that your computer uses its DVD drive or a USB flash drive as the first startup device. To do this, you need to change settings in the computer’s basic input/output system (BIOS).
Note: Most newer computers can start from a USB device, but some older computers might not have this capability. For more information, check the documentation that came with your computer or go to the manufacturer’s website.
Before you change BIOS settings, check the information that came with your computer or go to the computer manufacturer’s website. Specific procedures for accessing the BIOS and changing settings can differ depending on your computer’s manufacturer, or you might be able to choose which startup device your computer uses without changing BIOS settings.
Warning: Be careful when changing BIOS settings. The BIOS interface is designed for advanced users, and it’s possible to change a setting that could prevent your computer from starting correctly.
Turn on your computer, insert the Windows 7 installation disc or USB flash drive, and then restart your computer.
Newer computers often display a startup (or boot) menu. On the startup menu, choose «BIOS setup,» or «BIOS settings,» or something similar.
Procedures vary depending on the BIOS manufacturer. Usually, you must press a key (such as F2, F12, Delete, Esc) or a key combination immediately after you turn on your computer but before Windows starts. If the Windows logo appears, you need to try again by waiting until the Windows logon prompt appears, and then shutting down and restarting your computer again.
The BIOS setup screen appears. On the BIOS setup screen, choose the option called «Boot order,» or something similar. Boot order settings might also be listed under «Advanced settings» or something similar.
Select your DVD drive or USB flash drive as the first startup device. (The USB flash drive might be listed under «Removable devices» or something similar.)
Save the setting changes, and then exit the BIOS.
Restart your computer, and then start Windows 7 from the installation disc or USB flash drive as previously described.
Create a recovery drive
It’s a good idea to create a recovery drive. That way, if your PC ever experiences a major issue such as hardware failure, you’ll be able to use the recovery drive to reinstall Windows 10. Windows updates to improve security and PC performance periodically so it is recommended to recreate the recovery drive annually. Personal files and any applications that did not come with your PC will not be backed up. You’ll need a USB drive that’s at least 16 gigabytes.
Warning: Use an empty USB drive because this process will erase any data that’s already stored on the drive.
To create a recovery drive in Windows 10:
In the search box next to the Start button, search for Create a recovery drive and then select it. You might be asked to enter an admin password or confirm your choice.
When the tool opens, make sure Back up system files to the recovery drive is selected and then select Next.
Connect a USB drive to your PC, select it, and then select Next.
Select Create. Many files need to be copied to the recovery drive, so this might take a while.
If you ever need to use the recovery drive to reinstall Windows 10 on your PC, see Recovery options in Windows 10 for further instructions. It’s a good idea to back up your files frequently because the recovery drive isn’t a system image. It doesn’t contain your personal files, settings, or programs.
Need more options for creating a recovery drive?
To download Windows 10 installation media, see Recovery options in Windows 10.
Startup Repair Offline что это и как исправить?
При включении своего компьютера пользователь может столкнуться со сбоем в загрузке операционной системы. Последняя попытается восстановить свою работу, но безуспешно, после чего система отрапортует о невозможности решить данную проблему, а также о необходимости отправки информации по проблеме в «Майкрософт». При нажатии на «Показать подробности» пользователь сможет прочесть имя имеющегося события — «Startup Repair Offline». В данном материале я расскажу, что означает данное событие, и как исправить данную ошибку на вашем ПК.
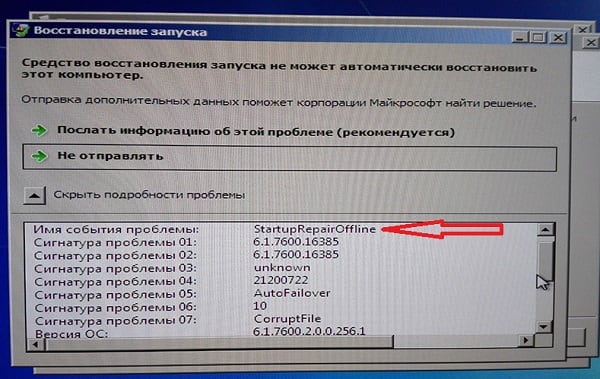
Что это означает Startup Repair Offline?
В переводе с английского языка данный текст звучит как «Восстановление запуска оффлайн», обычно обозначая ситуацию, при которой какая-либо ошибка (сбой) привела к нестабильности в работе компьютера. После перезагрузки ПК система попыталась восстановить свою нормальную работу (без использования сетевого подключения), но это ей не удалось.
Довольно часто после этого ПК входит в «циклическую перезагрузку», вновь и вновь перезагружаясь в попытке исправить возникшую дисфункцию. Рекомендую прервать такую «дурную бесконечность», далее действуя по советам, которые я опишу ниже.

Причины появления проблемы
Наиболее часто появление проблемы связано с проблемами в работе жёсткого диска, в частности с повреждением системной области жёсткого диска, ответственной за корректную загрузку операционной системы вашего ПК.
В ряде случаев причиной дисфункции может выступать повреждение системного реестра, а также злокачественная деятельность вирусных программ. Мы изучили, что это за ошибка Startup Repair Offline и разобрали причины возникновения, теперь научимся исправлять данную проблему.
Как исправить дисфункцию
Для решения проблемы рекомендую выполнить следующее:
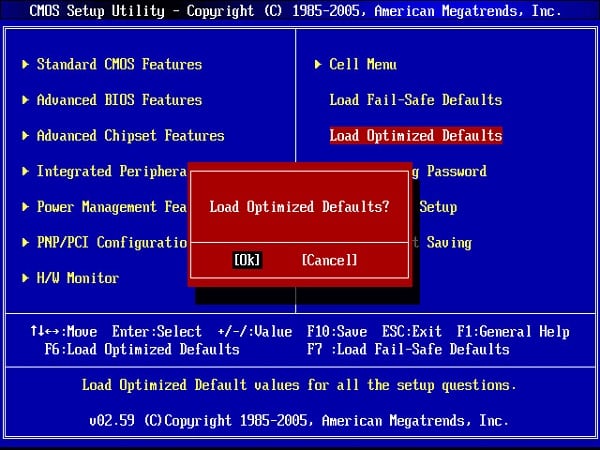
- Сбросьте настройки вашего БИОСа. Перейдите в ваш БИОС (обычно с помощью нажатия на F2 или Del при запуске системы), и загрузите настройки по умолчанию (обычно это опция «Load optimized defaults»). Затем сохраните данные изменения (обычно нажатием на F10), и перезагрузите ваш ПК;

- Проверьте плотность подключения шлейфов к соответствующим разъёмам жёсткого диска и материнской платы вашего ПК;
- Проверьте, виден ли ваш жёсткий диск в БИОСе. Если нет, тогда попробуйте подключить его к другому компьютеру. Если он не виден и там, тогда, возможно, вам винчестер нуждается в ремонте или замене;
- Используйте опцию «восстановление запуска» инсталляционного диска. Поскольку нормальная загрузка ОС на данном компьютере не возможна, рекомендуется использовать загрузочный диск (флешку) с имеющейся на них инсталляционной версией операционной системы (симметричной к уже установленной на компьютере). Необходимо выполнить загрузку с такого диска (в БИОСе необходимо перед тем установить опцию загрузки с диска или флешки), в меню установки выбрать язык, время и клавиатуру, нажать на «Далее» (Next). На следующем экране внизу кликнуть на «Восстановление системы» (Repair your computer) внизу слева. Выберите опцию «Восстановление системы»
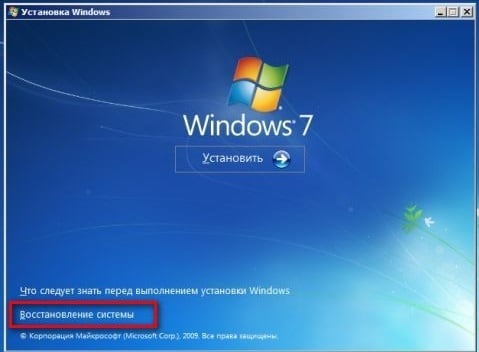 Выберите опцию «Восстановление системы»
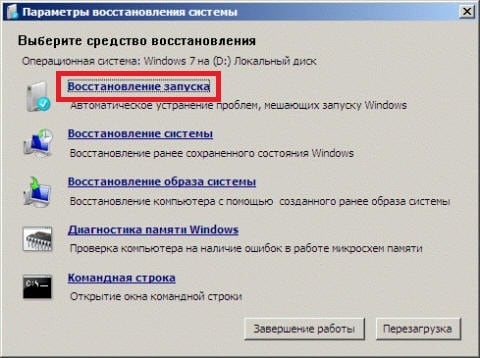
 Система произведёт поиск проблем, нажмите на «Далее», выберите актуальную операционную систему. В окне «Параметры восстановления системы» кликните на «Восстановление запуска» и дождитесь окончания процесса проверки и восстановления корректного запуска системы. После завершения процесса перезагрузите ваш ПК.
bcdedit /export c:\bckp_bcd
attrib c:\boot\bcd -h -r -s
ren c:\boot\bcd bcd.old
Перезагрузите наш компьютер. Если система не загрузилась нормально, тогда, по крайней мере, в возникшем сообщении о зафиксированной проблеме может быть указан проблемный файл (к примеру, какая-нибудь библиотека с расширением .dll). Тогда вам необходимо попытаться найти данный файл в сети, или попробовать скопировать его с другого стабильно работающего компьютера с аналогичной ОС, а потом и переместить его на проблемный жёсткий диск в соответствующую директорию (обычно, это windows\system32).
Заключение
Что делать со возникшей проблемой? Рекомендую, прежде всего, воспользоваться диском (флеш-накопителем) с соответствующей версией операционной системы, и выполнить восстановление запуска вашей ОС, выбрав соответствующий пункт меню восстановления (также можно воспользоваться пунктом «восстановление системы» в том же меню). Если данный способ не помог, запустите командную строку, а затем и введите в ней перечисленные выше команды, это позволит устранить Startup Repair Offline на вашем ПК.
Repair a Windows Image
Repair a Windows image using DISM. You can repair offline Windows image in a WIM or VHD file, or an online Windows image. An online Windows image will also attempt to repair itself if it becomes unserviceable. The repair source for this operation is the same source that is used for Features on Demand and is determined by Group Policy settings. For more information, see Configure a Windows Repair Source. When you use the DISM tool to repair an online or offline image, you can use the /Source argument with the /RestoreHealth argument to specify additional repair source locations to use to search for the required files.
For a quick check of an online image, you may be able to use the command: sfc /scannow to scan and repair files.
For a more extensive check that can repair issues with the store, use DISM /Cleanup-Image .
To check if an image is repairable
Scan the image to check for corruption. This operation will take several minutes. For example, at a command prompt, type the following command:
Check the image to see whether any corruption has been detected. For example, at a command prompt, type:
When you use the /CheckHealth sfc argument, the DISM tool will report whether the image is healthy, repairable, or non-repairable. If the image is non-repairable, you should discard the image and start again. If the image is repairable, you can use the /RestoreHealth argument to repair the image.
To repair an image
Use the /RestoreHealth argument to repair the image. For example, to repair an offline image using a mounted image as a repair source, at a command prompt, type the following command:
Or to repair an online image using some of your own sources instead of Windows Update, type:
If you do not specify a /Source for the repair files, the default location for Features on Demand is used. For more information, see Configure a Windows Repair Source. If you specify more than one /Source, the files are copied from the first location where they are found and the rest of the locations are ignored. You can use /LimitAccess to prevent the DISM tool from using Windows Update as a repair source or as a backup repair source for online images.
Repairing images during servicing
In some cases, an image can be corrupted while modifying it with DISM. Use /Cleanup-MountPoints to repair it. This command will not unmount images that are already mounted, nor will it delete images that can be recovered using the /Remount-Image command.
Surface Pro
Однажды ваше устройство может начать загружаться очень медленно или перестанет загружаться вообще. Вместо того, чтобы тратить время на поиски причины, в Windows 10 включили инструмент Startup Repair, который позволит быстро решить большую часть возможных проблем с загрузкой.
В этой инструкции мы объясним вам, как воспользоваться данным инструментом.
Как быстро решить проблемы Windows 10 с загрузкой
Сначала вам нужно зайти в продвинутые настройки, сделать это можно как минимум тремя способами.
Зайти в настройки, если компьютер не загружается
Если ваше устройство зависло при загрузке, вы можете воспользоваться этим способом:
Включите компьютер
Как только на экране появится логотип Windows, нажмите на кнопку включения (это сразу же прервет процесс загрузки)
Повторите шаги 1 и 2 дважды
После третьего раза Windows 10 откроет раздел продвинутых настроек, где вы сможете восстановить загрузку Windows, воспользовавшись инструкцией в конце статьи.
Зайти в настройки, использовав устройство запуска
Если ваш компьютер вообще не запускается, вы можете также воспользоваться устройством запуска следующим образом:
Запустите компьютер с помощью устройства запуска Подсказка: если ваш компьютер не запускается с помощью флешки, вам нужно поменять настройки базовой системы входа-выхода и удостовериться в том, что запуск будет возможен через USB-устройство. Как правило, настроить BIOS можно запустив компьютер и зажав клавишу Delete или ESC, но лучше проверьте это заранее на сайте производителя.
Нажмите «Далее»
Нажмите «Восстановить компьютер» в правом нижнем углу экрана
Выполнив все эти шаги, воспользуйтесь инструкцией в конце статьи для инструмента восстановления.
Как зайти в настройки, пока компьютер загружается
Если у вас есть доступ к рабочему столу, вы можете воспользоваться этой инструкцией для доступа к Startup Repair
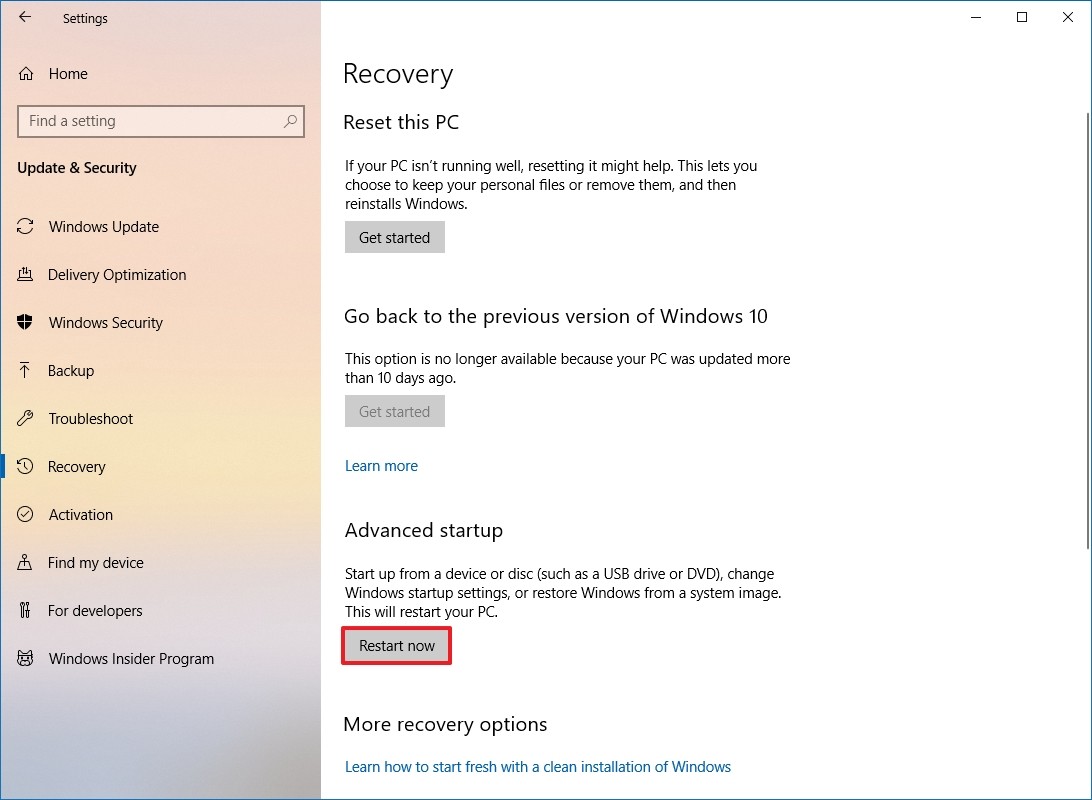
Откройте настройки
Нажмите «Обновления и безопасность»
Нажмите на «Восстановить»
В разделе «Продвинутые настройки» выберите «Перезапустить сейчас»
После выполнения этих шагов воспользуйтесь инструкцией ниже, чтобы решить проблемы с загрузкой вашего компьютера
Как воспользоваться инструментом Startup Repair
В разделе продвинутых настроек, выполните следующие шаги:
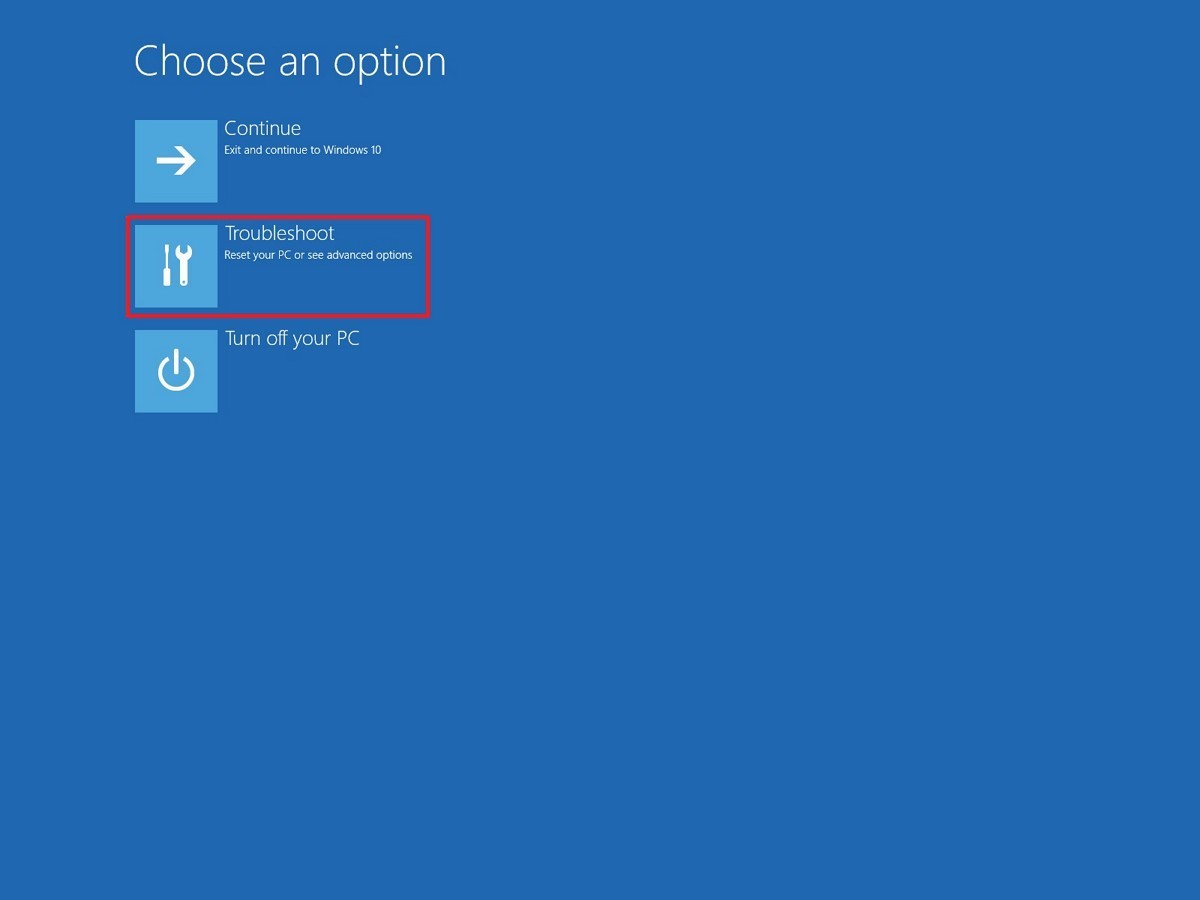
Выберете «Продвинутые настройки»

Выберите Startup Repair
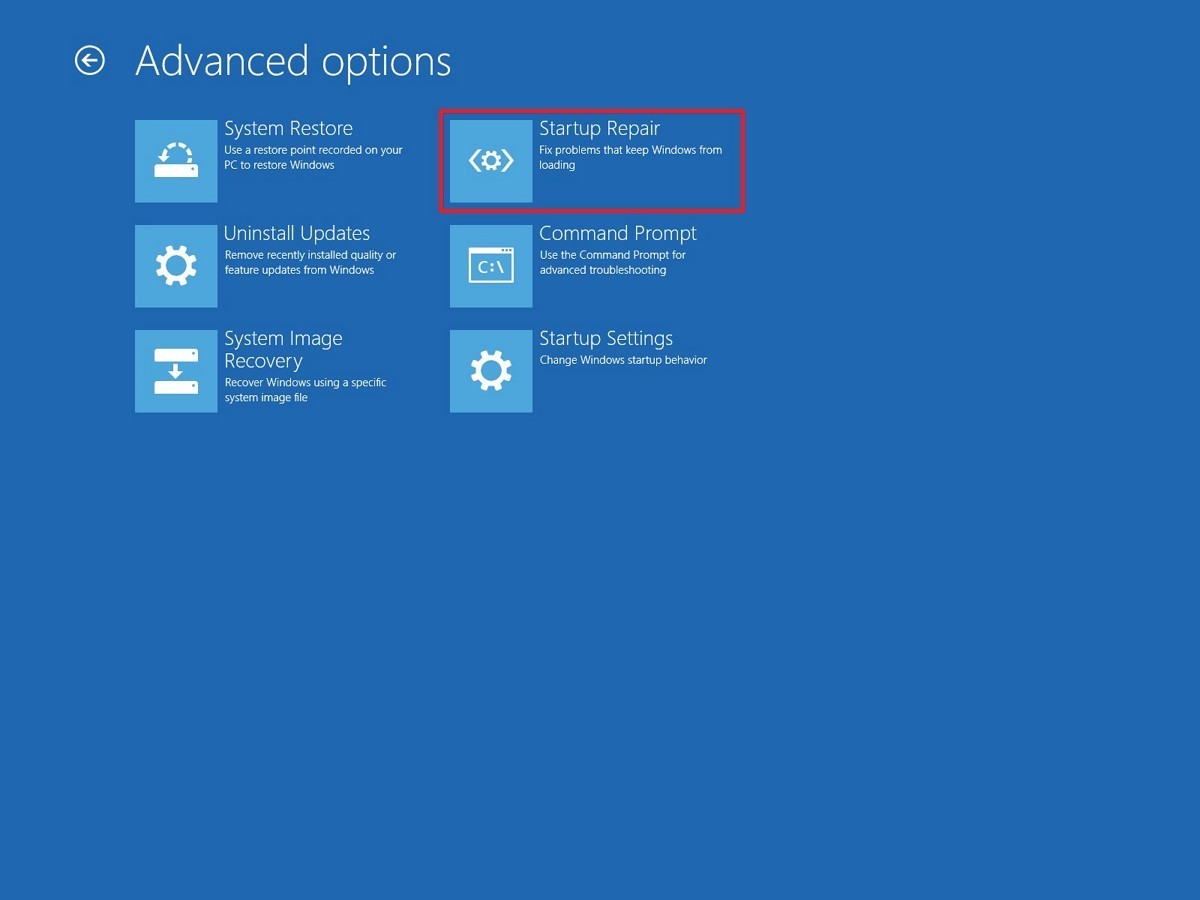
Выберите свой аккаунт
Введите пароль
Нажмите «Далее»Подсказка: как только вы выполните все эти шаги, программа начнет сканировать ваш ПК на предмет неполадок.
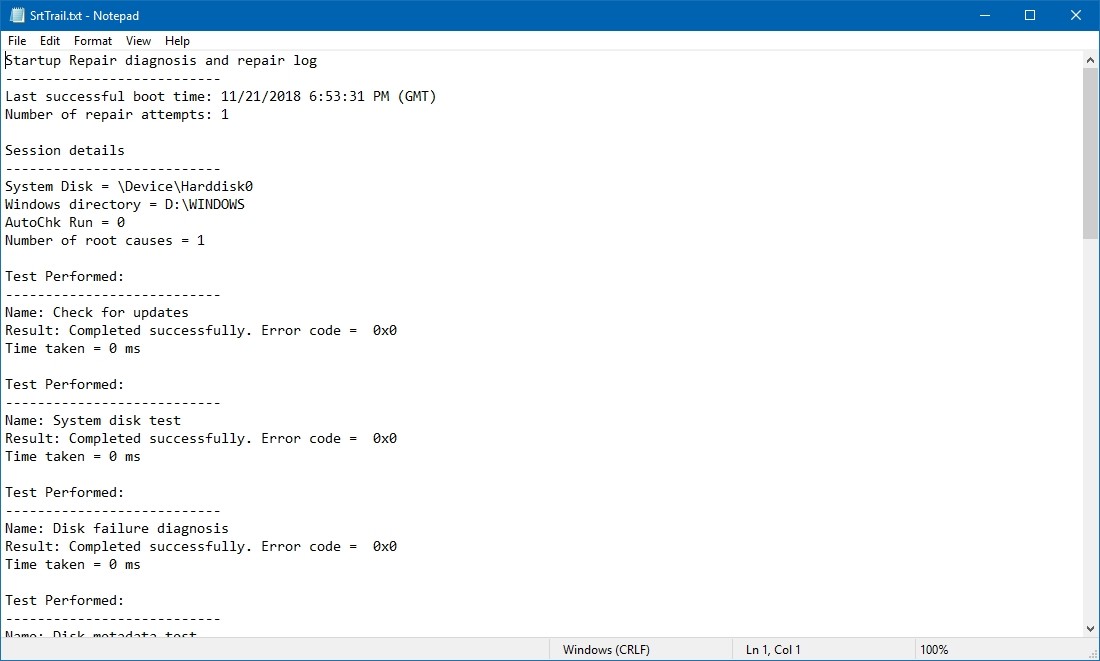
Во время этого процесса создается текстовый файл Srt.Trail.txt в папке C:\Windows\System32\Logfiles. В нем вы можете подробнее ознакомиться с результатами диагностики.
Если же вы уже давно пользуетесь одной и той же версией ПО, попробуйте переустановить Windows 10. Этот процесс займет больше времени и удалит все с вашего ПК, но он поможет решить все проблемы не только с загрузкой, но и с производительностью, жизнью батарейки и другим.
Добавить комментарий Отменить ответ
Для отправки комментария вам необходимо авторизоваться.


