- How to: Perform Startup Repair in Windows 8/8.1 and 10
- How to BOOT into BIOS to change Boot Order
- Method 1: Perform a Startup Repair from the Startup Options screen
- Method 2: Perform a Startup Repair using installation media
- Method 3: Perform a Startup Repair using a system repair disc
- What are the system recovery options in Windows?
- What each recovery option does
- To open the System Recovery Options menu on your computer
- To open the System Recovery Options menu using the Windows 7 installation disc or a USB flash drive, or a system repair disc
- Как убрать окно «System Recovery Options» при загрузке Windows 7
- Убираем окно «System Recovery Options» при загрузке Windows 7
- «System Recovery Options» требует пароль
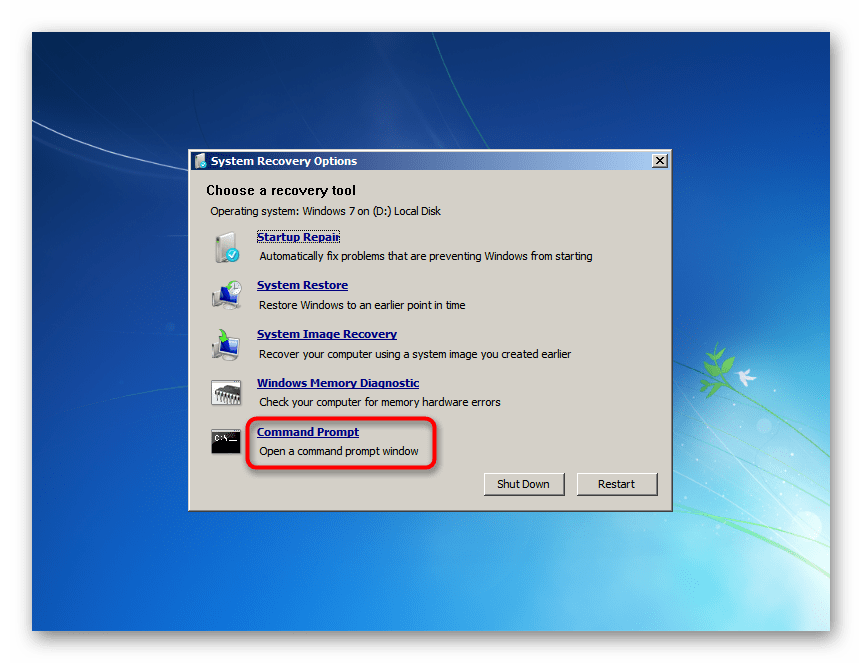
- Выбор утилиты для восстановления
- Startup Repair
- System Restore
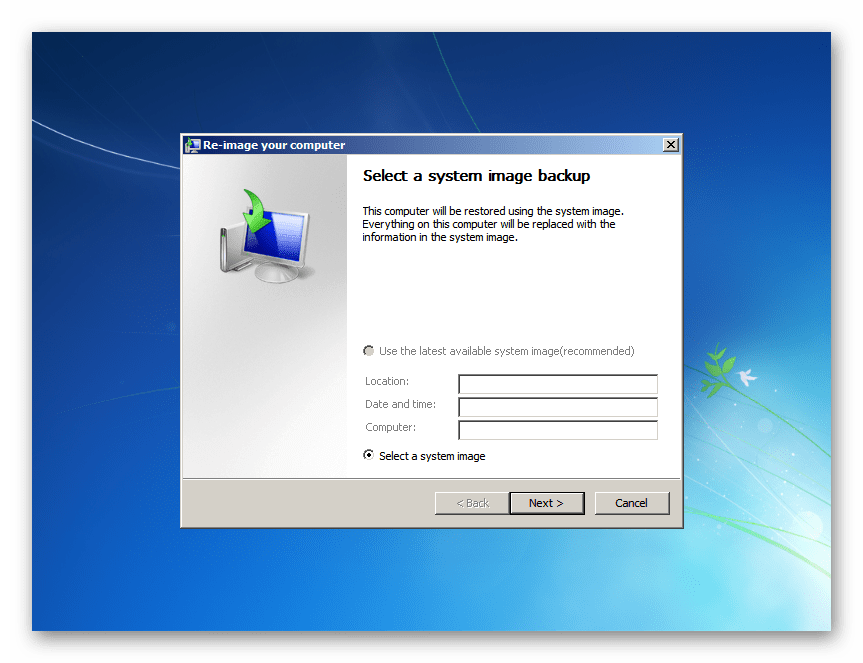
- System Image Recovery
- Windows Memory Diagnostic
- Command Prompt
How to: Perform Startup Repair in Windows 8/8.1 and 10
Hardware defects and issues aren’t the only things that can cause a computer running on the Windows Operating System to fail to start up properly. Software issues – everything from corrupt Windows startup files to invalid boot files – can also cause a computer to fail at startup. This is where Startup Repair comes in. Startup Repair is a tool developed by Microsoft designed to detect any issues with the files and software in general that a computer needs to have in order to correctly boot into Windows and fix them. Startup Repair is available for all versions of the Windows Operating System starting from Windows XP.
On Windows 8, 8.1 and 10, there are three distinctly different ways using which you can perform a Startup Repair on your computer. The following are the three methods that you can use to perform a Startup Repair in Windows 8, 8.1 and 10:
How to BOOT into BIOS to change Boot Order
You must know how to boot and change boot order since this will be needed to perform the solutions below. Restart your computer. Enter your computer’s BIOS (or UEFI) settings as soon as it starts up. The key that you need to press to enter these settings depends on the manufacturer of your computer’s motherboard and can be anything from Esc, Delete or F2 to F8, F10 or F12, usually F2. This is displayed on the post screen, and the manual that was supplied with your system. A quick google search asking “how to enter bios” followed by model number will also list results. Navigate to the Boot.
Method 1: Perform a Startup Repair from the Startup Options screen
Almost every single computer that comes with Windows 8, 8.1 and 10 has a horde of recovery and restoration utilities built into its Operating System, and Startup Repair happens to be one of these tools. On such a computer, you can easily access and perform a Startup Repair from the Startup Options screen which can be accessed quite easily. However, it should be noted that you can only perform a Startup Repair using this option if you can manage to sign into Windows or at least get to the Windows login prompt (this is the screen on which you sign into your account).
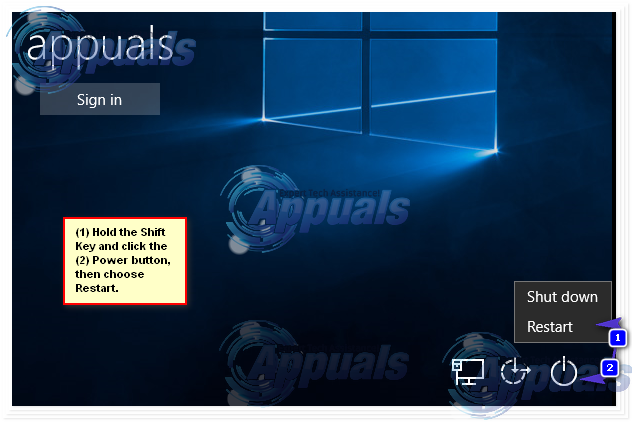
To access the Startup Options screen, click on the Power button and then, while holding down the Shift key, click on Restart.
When your computer boots up, you will be at the Startup Options screen. Once you are at this screen, click on Troubleshoot.
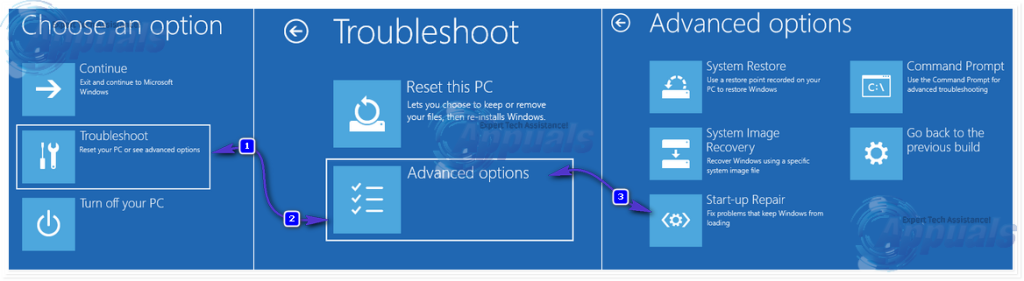
Click on Advanced options. Click on Automatic Repair (it may also be displayed as Startup Repair or Start-up repair). If prompted to do so, choose the Operating System you want to perform the Startup Repair on. If prompted to do so, select an account that is an Administrator.
Enter the password for the account you selected and click on Continue. The Startup Repair process will now begin. If you are asked to do something or make a choice, do so. If the computer needs to be restarted, restart it.
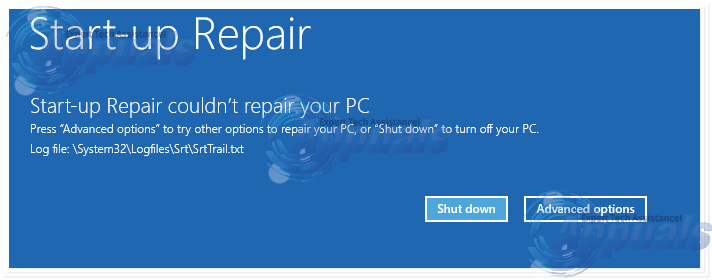
Once the process has been completed, you will be informed of whether or not any problems were detected and whether or not the detected problems were fixed by Startup Repair.
Method 2: Perform a Startup Repair using installation media
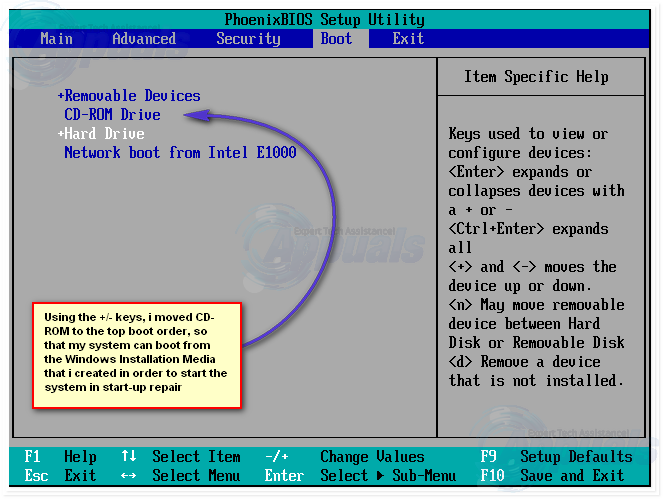
You can also perform a Startup Repair in Windows 8, 8.1 or 10 using an installation disc or installation USB. To do so, you need to: Insert the Windows installation disc or USB into the affected computer and restart it. If you don’t have one, you can create it using Rufus or the Media Creation Tool. As soon as the computer starts booting up, get into its BIOS settings (the instructions for which vary depending on the manufacturer of the computer’s motherboard), usually F2 key needs to be pressed when the first screen appears before the logo and configure the computer’s boot order from the boot tab to boot from the installation media instead of the hard drive.
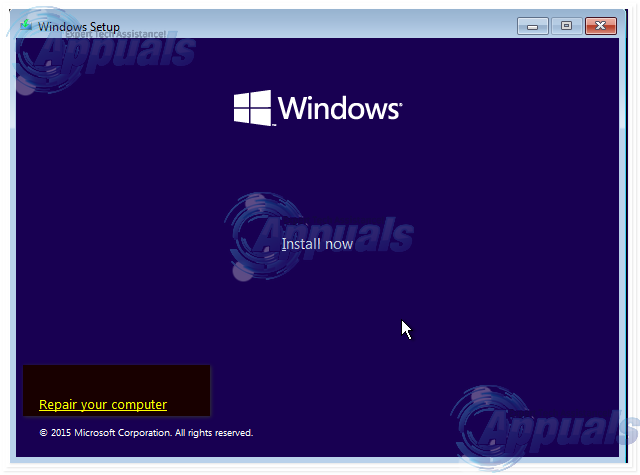
Save the changes and exit the BIOS settings. If prompted to do so, press any key to boot from the installation media. Select your language, time zone and keyboard layout preferences and then click on Next. When you reach a window with an Install now button at its center, look for and click on Repair your computer in the bottom left corner of the window.
You will now arrive at the Startup Options screen. Once you are here, you need to:
Click on Troubleshoot > Advanced options. Click on Automatic Repair (it may also be displayed as Startup Repair or Start-up repair).
If prompted to do so, choose the Operating System you want to perform the Startup Repair on. If prompted to do so, select an account that is an Administrator. Enter the password for the account you selected and click on Continue.
The Startup Repair process will now begin. If you are asked to do something or make a choice, do so. If the computer needs to be restarted, restart it.
Once the process has been completed, you will be informed of whether or not any problems were detected and whether or not the detected problems were fixed by Startup Repair.
Method 3: Perform a Startup Repair using a system repair disc
A Startup Repair can also be performed using a system repair disc that you created for your computer beforehand or one that you created using a computer that is in working condition and is running on the same version of the Windows OS as yours. To perform a Startup Repair using a system repair disc in Windows 8, 8.1 or 10, you need to:
Insert the system repair disc into the computer and restart it.
As soon as the computer starts booting up, get into its BIOS settings (the instructions for which vary depending on the manufacturer of the computer’s motherboard) and configure the computer’s boot order to boot from the system repair disc instead of the hard drive.
Save the changes and exit the BIOS settings.
If prompted to do so, press any key to boot from the system repair disc.
If a list of keyboard language layouts is displayed, click on the one you prefer.
Once you do so, you will arrive at the Startup Options screen.
At the Startup Options screen, you need to:
Click on Troubleshoot > Advanced options.
Click on Automatic Repair (it may also be displayed as Startup Repair or Start-up repair).
If prompted to do so, choose the Operating System you want to perform the Startup Repair on.
If prompted to do so, select an account that is an Administrator.
Enter the password for the account you selected and click on Continue.
The Startup Repair process will now begin. If you are asked to do something or make a choice, do so. If the computer needs to be restarted, restart it.
Once the process has been completed, you will be informed of whether or not any problems were detected and whether or not the detected problems were fixed by Startup Repair.
What are the system recovery options in Windows?
Support for Windows 7 ended on January 14, 2020
We recommend you move to a Windows 10 PC to continue to receive security updates from Microsoft.
The System Recovery Options menu contains several tools, such as Startup Repair, that can help you recover Windows from a serious error. This set of tools is on your computer’s hard disk and on the Windows installation disc.
Note: You can also create a system repair disc that contains the System Recovery Options menu. For more information, see Create a system repair disc. If you use a Tablet PC or other computer with a touchscreen, you might need to connect a keyboard and mouse in order to use Startup Repair and the other tools in the System Recovery Options menu.
What each recovery option does
System recovery option
Fixes certain problems, such as missing or damaged system files, that might prevent Windows from starting correctly.
Restores your computer’s system files to an earlier point in time without affecting your files, such as e‑mail, documents, or photos.
If you use System Restore from the System Recovery Options menu, you cannot undo the restore operation. However, you can run System Restore again and choose a different restore point, if one exists.
System Image Recovery
You need to have created a system image beforehand to use this option. A system image is a personalized backup of the partition that contains Windows, and includes programs and user data, like documents, pictures, and music.
Windows Memory Diagnostic Tool
Scans your computer’s memory for errors.
Advanced users can use Command Prompt to perform recovery-related operations and also run other command line tools for diagnosing and troubleshooting problems.
Note: Some computer manufacturers might customize the menu by adding or removing recovery tools, or including their own tools.
To open the System Recovery Options menu on your computer
Remove all floppy disks, CDs, and DVDs from your computer, and then restart your computer using the computer’s power button.
Do one of the following:
If your computer has a single operating system installed, press and hold the F8 key as your computer restarts. You need to press F8 before the Windows logo appears. If the Windows logo appears, you need to try again by waiting until the Windows logon prompt appears, and then shutting down and restarting your computer.
If your computer has more than one operating system, use the arrow keys to highlight the operating system you want to repair, and then press and hold F8.
On the Advanced Boot Options screen, use the arrow keys to highlight Repair your computer, and then press Enter. (If Repair your computer isn’t listed as an option, then your computer doesn’t include preinstalled recovery options, or your network administrator has turned them off.)
Select a keyboard layout, and then click Next.
On the System Recovery Options menu, click a tool to open it.
To open the System Recovery Options menu using the Windows 7 installation disc or a USB flash drive, or a system repair disc
If your computer’s system is severely damaged and you can’t access the System Recovery Options menu on your computer, you can access it using the Windows 7 installation disc or a USB flash drive, or using a system repair disc if you created one earlier.
To use this method, you need to restart (boot) your computer using the disc or USB flash drive.
Insert the Windows 7 installation disc or USB flash drive, or a system repair disc, and then shut down your computer.
Restart your computer using the computer’s power button.
When prompted, press any key, and then follow the instructions that appear.
On the Install Windows page, or on the System Recovery Options page, choose your language and other preferences, and then click Next.
If neither the Install Windows page nor the System Recovery Options page appear, and you’re not asked to press any key, you might need to change some system settings.
If you’re using the Windows installation disc or USB flash drive, click Repair your computer.
Select the Windows installation you want to repair, and then click Next.
On the System Recovery Options menu, click a tool to open it.
Как убрать окно «System Recovery Options» при загрузке Windows 7

При правильной работе в Windows 7 редко случаются непредвиденные ошибки и сбои. Однако иногда происходят серьезные системные сбои, из-за чего операционная система даже не может до конца загрузиться. Одним из следствий такой ситуации является окно «System Recovery Options», обозначающее переход в «Параметры восстановления системы». Малоопытные опытные пользователи не знают, что делать с этим окном и как вернуть обычную загрузку ОС. Давайте разбираться, как это можно сделать.
Убираем окно «System Recovery Options» при загрузке Windows 7
Логично, что если система открывает нам это окно, значит в ее файлах произошла некая ошибка, не дающая выполнить загрузку в обычном режиме. От пользователя потребуется выполнить несколько действий, которые должны устранить сбой и нормализовать работу ОС.
«System Recovery Options» требует пароль
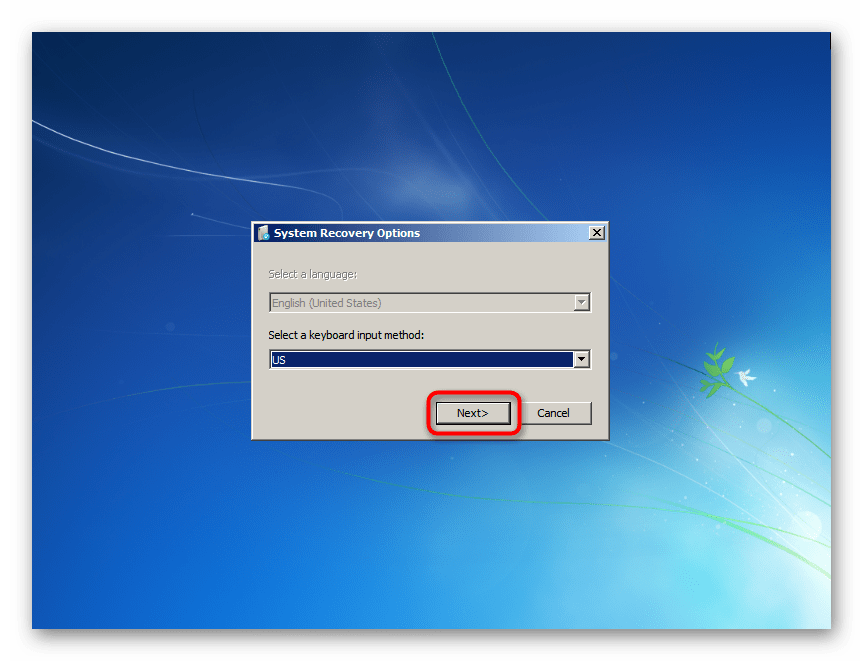
Часто юзеры даже не могут попасть в само меню восстановления, поскольку их останавливает окно, демонстрируемое на скриншоте ниже. Первый шаг просто просит выбрать раскладку клавиатуры для дальнейшего ввода. Здесь можно оставить все как есть и просто нажать на «Next>».
Вот здесь и наступает сложность для большинства новичков, поскольку система просит пароль, которого вроде как у нас и нет. Однако достаточно сменить имя пользователя на то, которое отображается при запущенной Windows (имя вашей учетной записи), а затем нажать «ОК», и вы попадете в меню восстановления.

Выбор утилиты для восстановления
Хорошо, если пользователь знает, что предшествовало появлению окна «System Recovery Options». Благодаря этому он сам сможет выбрать необходимую утилиту для исправления ошибки. Однако если вы не в курсе, почему попали в режим Recovery и у вас совсем нет знаний касательно того, как же возобновить работу «семерки», понадобится поочередно запускать представленные приложения, пока какое-то из них не возымеет успех.

Startup Repair
Утилита автоматического поиска и исправления неполадок.

Запустите ее, чтобы компонент смог просканировать важные системные файлы и восстановить их самостоятельно. Учитывайте, что при восстановлении ПК может перезагружаться несколько раз.
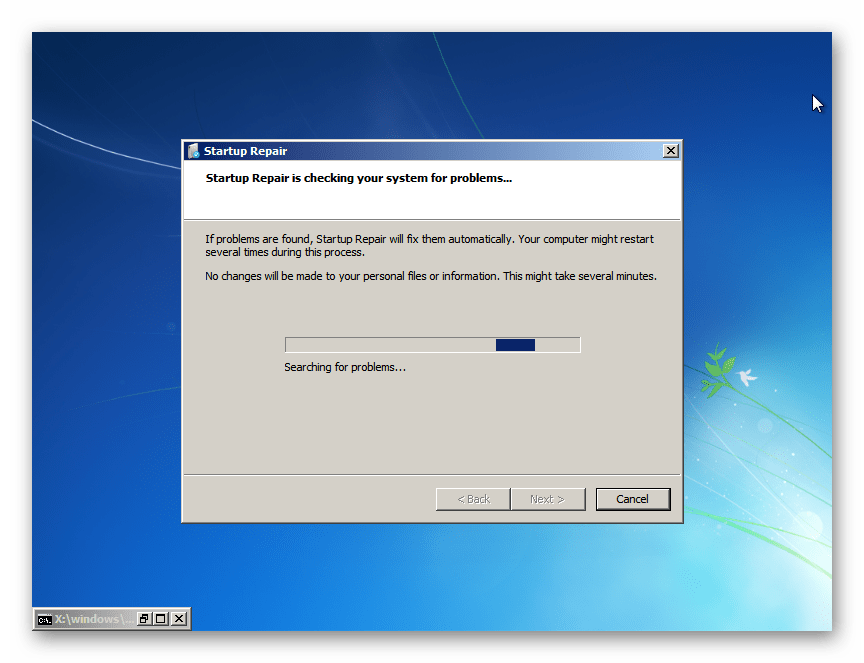
При успешном развитии событий вы сможете попасть на рабочий стол Windows 7 уже через несколько минут. В принципе, довольно часто этот вариант срабатывает и исправляет все возникшие проблемы. Однако в ходе сканирования система может ничего и не обнаружить, уведомив вас об этом. Жмите «Cancel» и переходите к следующему варианту.
System Restore
Знакомый многим инструмент восстановления системы.
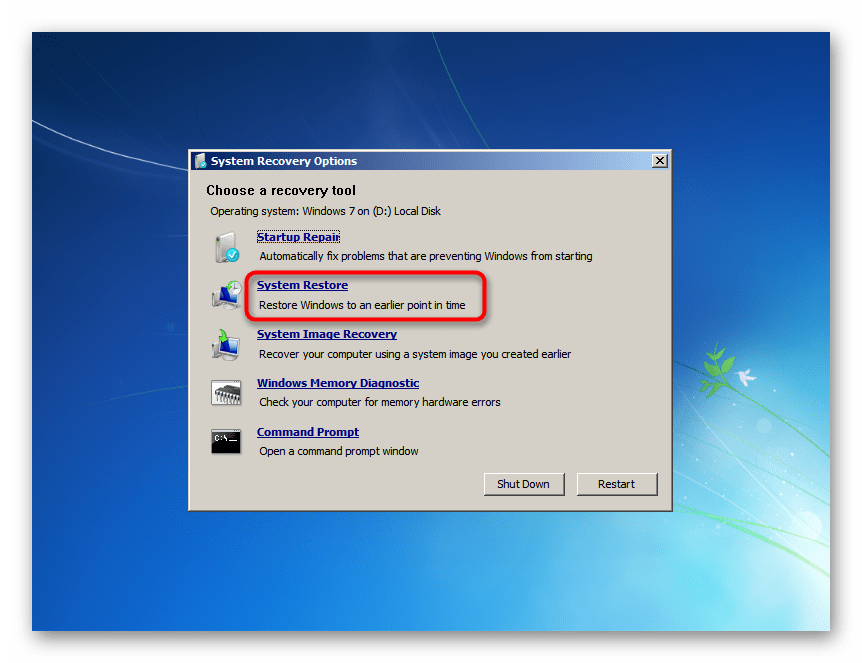
Он будет актуален только в том случае, когда в Windows не отключалась функция «Восстановление системы» и на жестком диске есть созданные автоматически или вручную точки восстановления. Так вы сможете откатиться до предыдущего состояния ОС, когда не наблюдалось никаких сбоев в функционировании. Подробнее о том, как пользоваться восстановлением системы, читайте в другой нашей статье — в этом вам поможет Способ 1, начиная с шага 5. И хотя на том примере показано действие из запущенной Виндовс 7, на самом же деле этот процесс нисколько не отличается от того, что происходит в среде восстановления.
При отсутствии точек восстановления вы получите соответствующее уведомление. Остается нажать «Cancel» и переходить далее.

System Image Recovery
Утилита восстановления системы через ее резервный образ, созданный ранее.
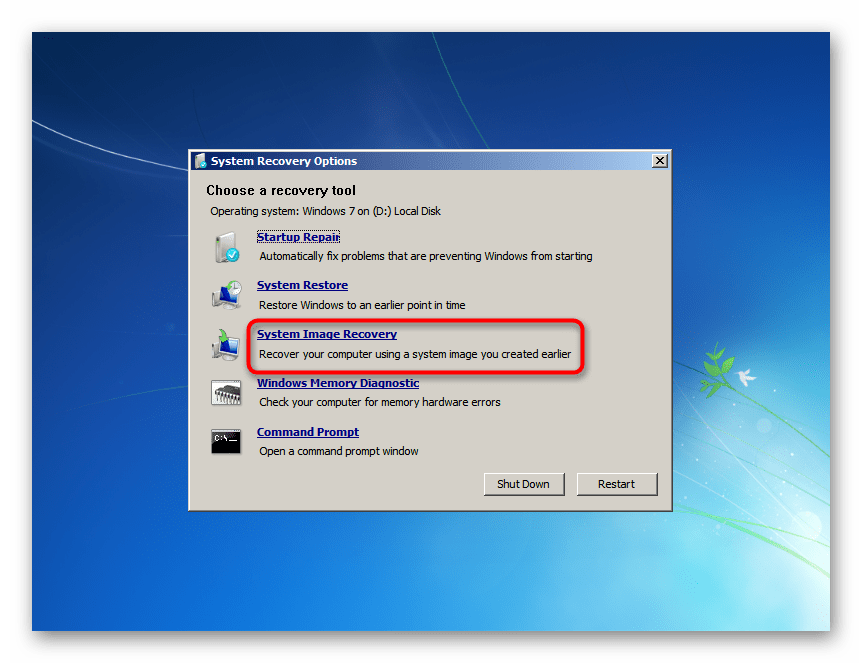
Этот способ подходит только тем, кто вручную создавал ранее архивный образ. Как это сделать, мы показали в отдельной инструкции, а именно в Способе 2, начиная с шага 10 статьи по ссылке ниже.
Всем остальным, кто ничем подобным не занимался, следует прибегнуть к другим доступным методам.
Windows Memory Diagnostic
Проверка оперативной памяти компьютера.
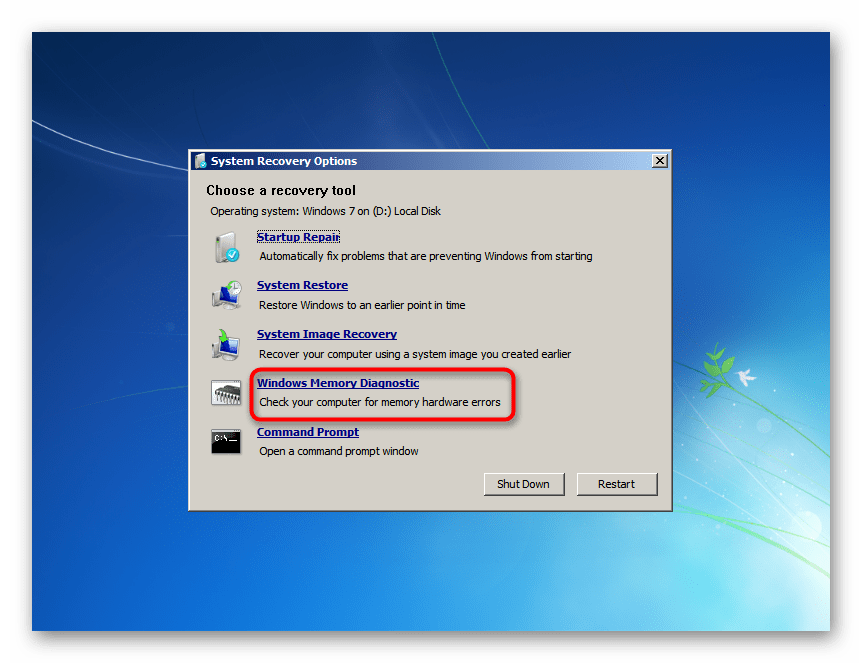
Вполне возможно, что вы попали в это окно восстановления из-за неустранимых ошибок оперативной памяти. Система предлагает либо проверить память сразу после автоматической перезагрузки («Restart now and check for problems») или в другое время. Конечно, выбираем первый вариант. О том, как происходит проверка RAM, мы рассказывали в отдельной статье. Для вас она окажется полезной, начиная со Способа 2, шага 6.
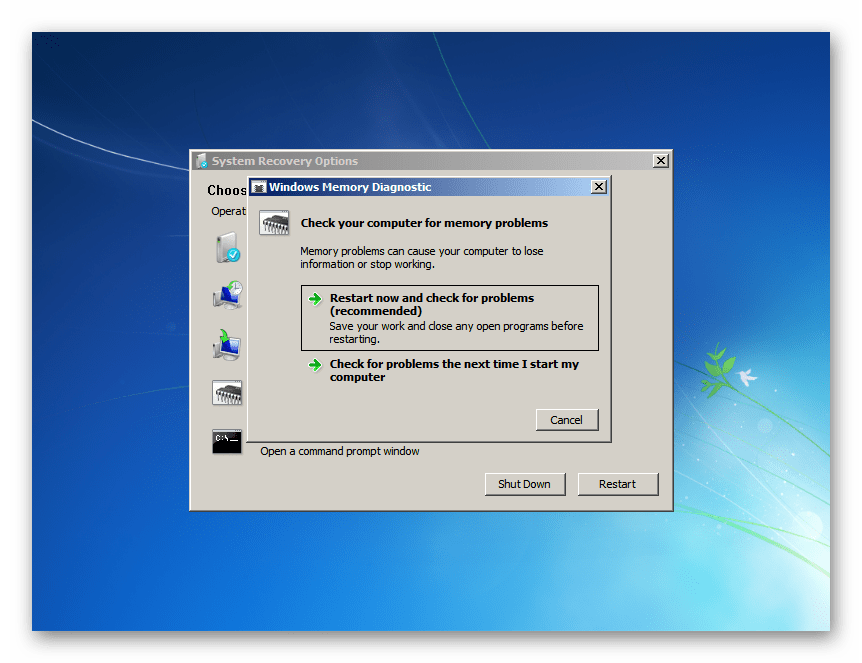
К сожалению, если будут найдены ошибки, система не сможет их самостоятельно исправить — эта утилита служит исключительно в диагностических целях. Впрочем, побороть аппаратные ошибки RAM не удастся никаким софтом, поэтому если вы получили уведомление о наличии проблем, придется покупать новую оперативную память. Разобраться с тем, как выбрать новые планки для ОЗУ и установить их самостоятельно, помогут наши статьи ниже.
Command Prompt
Запуск классической «Командной строки».
Окно «Командной строки» дает возможность пользователю устранить возникшие неполадки на компьютере путем ввода разных команд. Поскольку мы не знаем, что именно вызвало сбой, будем пробовать запускать различные средства поочередно. После ввода каждой из них дожидайтесь, пока произойдет какое-то действие, например, сканирование или исправление.
Не закрывайте окно раньше времени и не перезапускайте компьютер, не дождавшись окончания работы консольной утилиты! Узнать, что она закончила работать, можно по появлению строчки X:\windows\system32>_, которая будет расположена в самом низу окна.
- bootrec.exe /fixmbr — команда, исправляющая главную загрузочную запись;
- bootrec.exe /fixboot — исправление загрузочного сектора;
- sfc /scannow /offbootdir=X:\ /offwindir=X:\windows — проверка целостности системных файлов. Вместо X вам необходимо подставить букву того диска, на котором находится операционная система для среды восстановления (то есть если для нас ОС всегда установлена на C, то пока мы не загрузились в Windows, раздел с ней имеет другую букву). Узнать это можно в окне «System Recovery Options» — вверху там есть строчка «Operating system: Windows 7 on (X:) Local Disk». Букву в скобках и используем за основу;

dism.exe /cleanup-image /restorehealth — восстановление поврежденных системных компонентов. Актуально, когда утилита предыдущая утилита SFC нашла ошибки, но не смогла их исправить из-за поврежденного хранилища. Воспользуйтесь ссылкой ниже, если сперва хотите посмотреть, как она функционирует (шаги 1-3), а затем в обязательном порядке снова переходите к SFC.
Мы разобрали основные способы восстановления поврежденной Windows 7, запускающей окно с параметрами восстановления системы. Представленных инструментов должно быть достаточно для того, чтобы суметь устранить возникшие неполадки и вернуть ОС работоспособность.


