- Surface Pro
- Добавить комментарий Отменить ответ
- Windows Repair для Windows
- How to: Perform Startup Repair in Windows 8/8.1 and 10
- How to BOOT into BIOS to change Boot Order
- Method 1: Perform a Startup Repair from the Startup Options screen
- Method 2: Perform a Startup Repair using installation media
- Method 3: Perform a Startup Repair using a system repair disc
Surface Pro

Однажды ваше устройство может начать загружаться очень медленно или перестанет загружаться вообще. Вместо того, чтобы тратить время на поиски причины, в Windows 10 включили инструмент Startup Repair, который позволит быстро решить большую часть возможных проблем с загрузкой.
В этой инструкции мы объясним вам, как воспользоваться данным инструментом.
Как быстро решить проблемы Windows 10 с загрузкой
Сначала вам нужно зайти в продвинутые настройки, сделать это можно как минимум тремя способами.
Зайти в настройки, если компьютер не загружается
Если ваше устройство зависло при загрузке, вы можете воспользоваться этим способом:
Включите компьютер
Как только на экране появится логотип Windows, нажмите на кнопку включения (это сразу же прервет процесс загрузки)
Повторите шаги 1 и 2 дважды
После третьего раза Windows 10 откроет раздел продвинутых настроек, где вы сможете восстановить загрузку Windows, воспользовавшись инструкцией в конце статьи.
Зайти в настройки, использовав устройство запуска
Если ваш компьютер вообще не запускается, вы можете также воспользоваться устройством запуска следующим образом:
Запустите компьютер с помощью устройства запуска Подсказка: если ваш компьютер не запускается с помощью флешки, вам нужно поменять настройки базовой системы входа-выхода и удостовериться в том, что запуск будет возможен через USB-устройство. Как правило, настроить BIOS можно запустив компьютер и зажав клавишу Delete или ESC, но лучше проверьте это заранее на сайте производителя.
Нажмите «Далее»
Нажмите «Восстановить компьютер» в правом нижнем углу экрана
Выполнив все эти шаги, воспользуйтесь инструкцией в конце статьи для инструмента восстановления.
Как зайти в настройки, пока компьютер загружается
Если у вас есть доступ к рабочему столу, вы можете воспользоваться этой инструкцией для доступа к Startup Repair
Откройте настройки
Нажмите «Обновления и безопасность»
Нажмите на «Восстановить»
В разделе «Продвинутые настройки» выберите «Перезапустить сейчас»
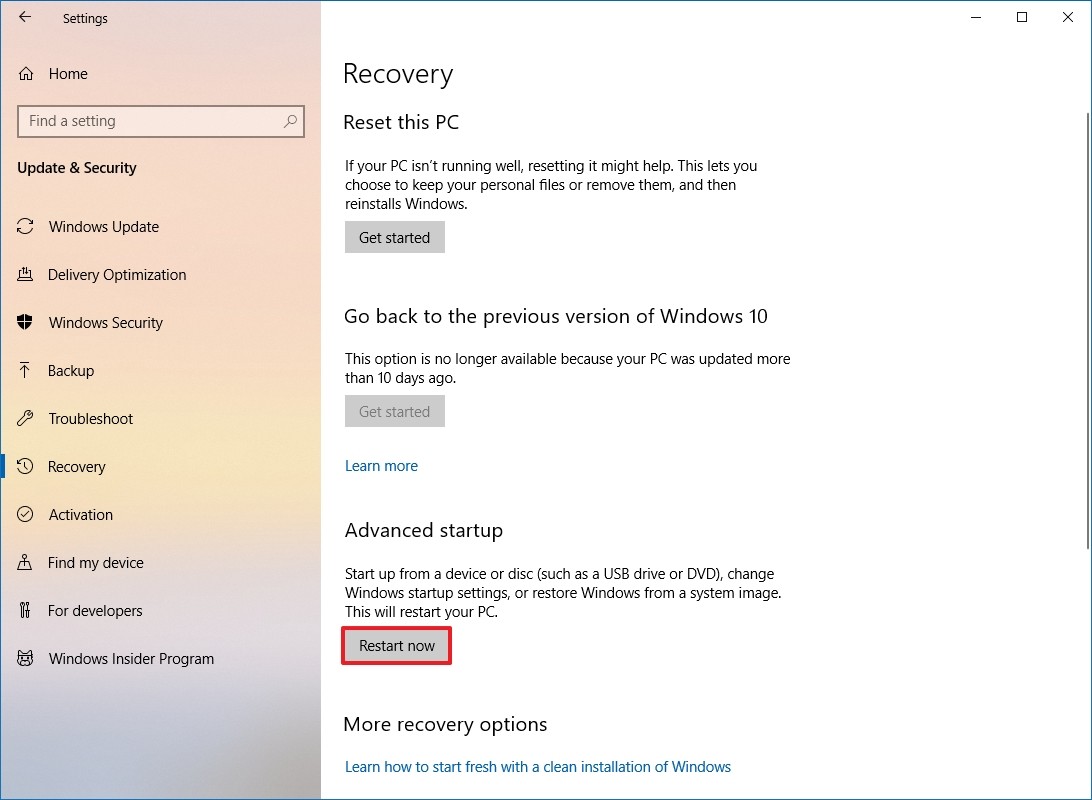
После выполнения этих шагов воспользуйтесь инструкцией ниже, чтобы решить проблемы с загрузкой вашего компьютера
Как воспользоваться инструментом Startup Repair
В разделе продвинутых настроек, выполните следующие шаги:
Выберете «Продвинутые настройки»

Выберите Startup Repair
Выберите свой аккаунт
Введите пароль
Нажмите «Далее»Подсказка: как только вы выполните все эти шаги, программа начнет сканировать ваш ПК на предмет неполадок.
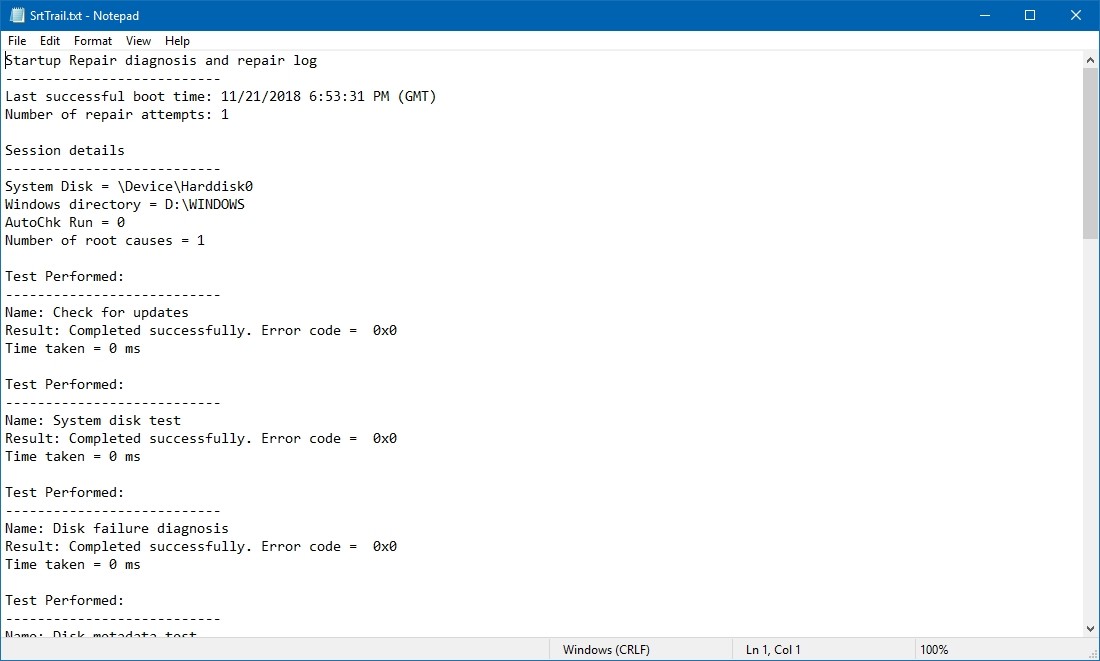
Во время этого процесса создается текстовый файл Srt.Trail.txt в папке C:\Windows\System32\Logfiles. В нем вы можете подробнее ознакомиться с результатами диагностики.
Если же вы уже давно пользуетесь одной и той же версией ПО, попробуйте переустановить Windows 10. Этот процесс займет больше времени и удалит все с вашего ПК, но он поможет решить все проблемы не только с загрузкой, но и с производительностью, жизнью батарейки и другим.
Добавить комментарий Отменить ответ
Для отправки комментария вам необходимо авторизоваться.
Windows Repair для Windows
| Оценка: |
3.05 /5 голосов — 57 |
| Лицензия: | Бесплатная |
| Версия: | 4.11.2 | Сообщить о новой версии |
| Обновлено: | 18.03.2021 |
| ОС: | Windows 10, 8.1, 8, 7, XP |
| Интерфейс: | Английский |
| Разработчик: | Tweaking.com |
| Категории: | Реестр, Автозагрузка — Настройка, оптимизация |
| Загрузок (сегодня/всего): | 7 / 48 460 | Статистика |
| Размер: | 45,16 Мб |
| СКАЧАТЬ | |

Windows Repair — инструмент все-в-одном для ремонта системы. Предназначен для восстановления различных параметров Windows к их значениям по умолчанию. Помогает исправить большинство известных проблем, в том числе ошибки реестра и права доступа к файлам, а также проблемы с Internet Explorer, Windows Update, Windows Firewall и многое другое.
Перед запуском программы будет предложено выполнить 4 простых действия предупреждающие ошибки в работе системы: проверка на вирусы, проверка жесткого диска, проверка на поврежденные файлы системы и создание точки восстановления. Затем можно выбрать один из трех режимов Basic, Advanced и Custom, каждый из которых предлагает различные варианты ремонта системы.
Основные функции программы:
- Исправление ошибок реестра
- Исправление прав доступа к файлам
- Ремонт WMI
- Ремонт Windows Firewall
- Ремонт Internet Explorer
- Ремонт MDAC и MS Jet
- Ремонт Hosts файлов
- Удаление установленных вирусами ограничений
- Ремонт иконок
- Ремонт Winsock и DNS Cache
- Удаление временных файлов
- Исправление настроек Proxy
- Исправление Windows Updates и многое другое.
How to: Perform Startup Repair in Windows 8/8.1 and 10
Hardware defects and issues aren’t the only things that can cause a computer running on the Windows Operating System to fail to start up properly. Software issues – everything from corrupt Windows startup files to invalid boot files – can also cause a computer to fail at startup. This is where Startup Repair comes in. Startup Repair is a tool developed by Microsoft designed to detect any issues with the files and software in general that a computer needs to have in order to correctly boot into Windows and fix them. Startup Repair is available for all versions of the Windows Operating System starting from Windows XP.
On Windows 8, 8.1 and 10, there are three distinctly different ways using which you can perform a Startup Repair on your computer. The following are the three methods that you can use to perform a Startup Repair in Windows 8, 8.1 and 10:
How to BOOT into BIOS to change Boot Order
You must know how to boot and change boot order since this will be needed to perform the solutions below. Restart your computer. Enter your computer’s BIOS (or UEFI) settings as soon as it starts up. The key that you need to press to enter these settings depends on the manufacturer of your computer’s motherboard and can be anything from Esc, Delete or F2 to F8, F10 or F12, usually F2. This is displayed on the post screen, and the manual that was supplied with your system. A quick google search asking “how to enter bios” followed by model number will also list results. Navigate to the Boot.
Method 1: Perform a Startup Repair from the Startup Options screen
Almost every single computer that comes with Windows 8, 8.1 and 10 has a horde of recovery and restoration utilities built into its Operating System, and Startup Repair happens to be one of these tools. On such a computer, you can easily access and perform a Startup Repair from the Startup Options screen which can be accessed quite easily. However, it should be noted that you can only perform a Startup Repair using this option if you can manage to sign into Windows or at least get to the Windows login prompt (this is the screen on which you sign into your account).
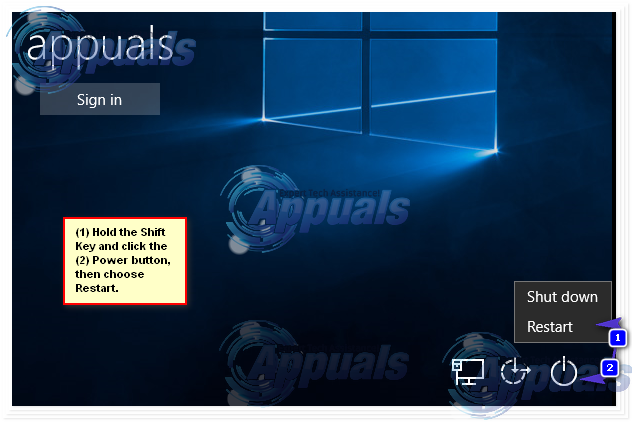
To access the Startup Options screen, click on the Power button and then, while holding down the Shift key, click on Restart.
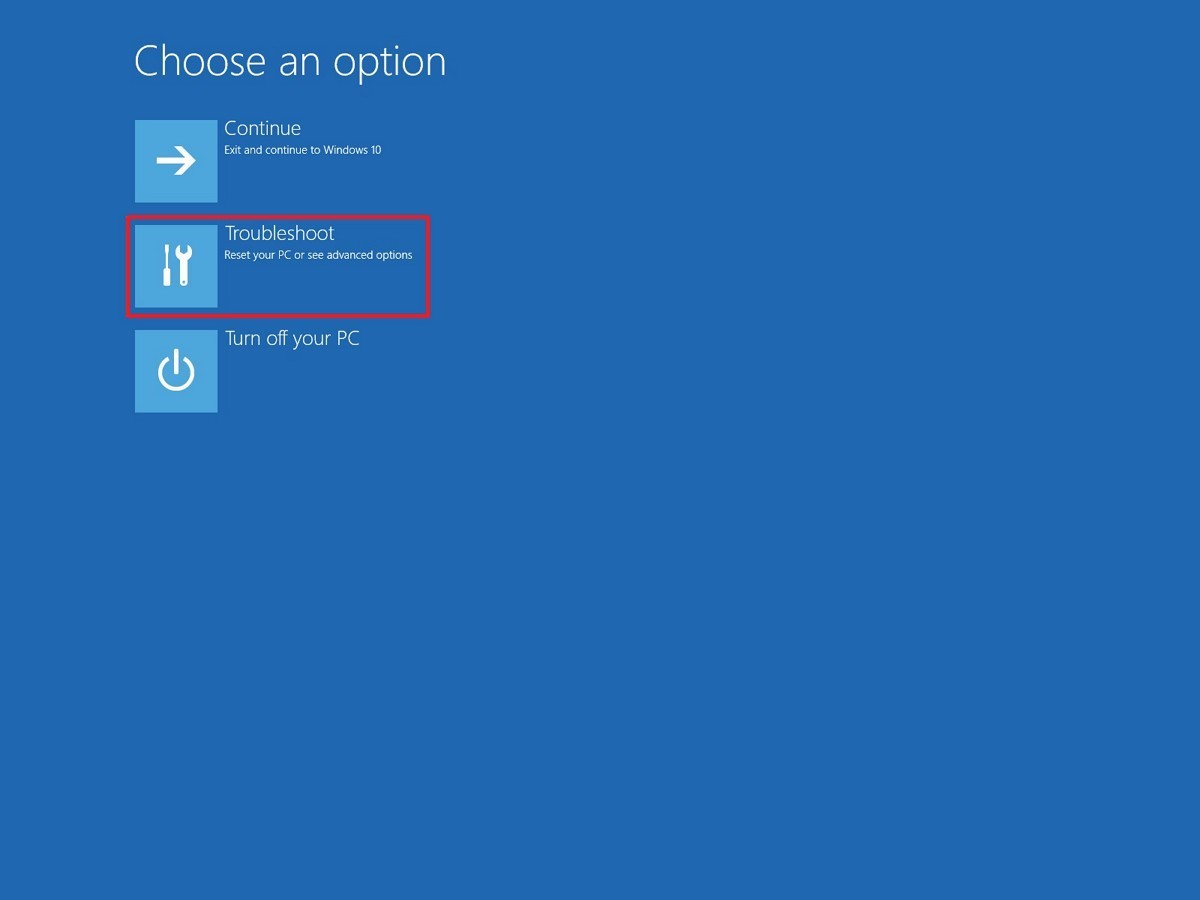
When your computer boots up, you will be at the Startup Options screen. Once you are at this screen, click on Troubleshoot.
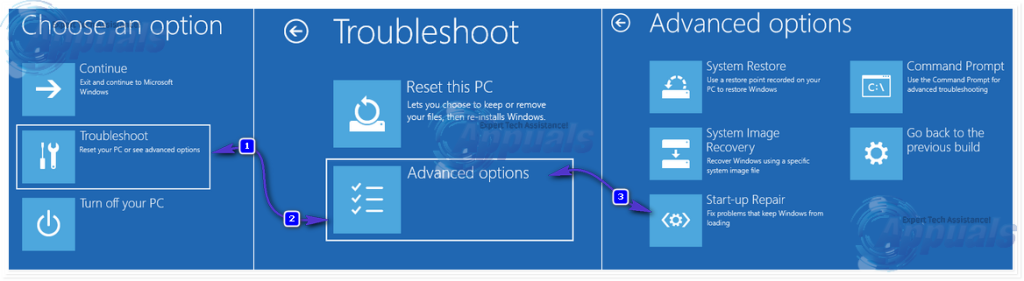
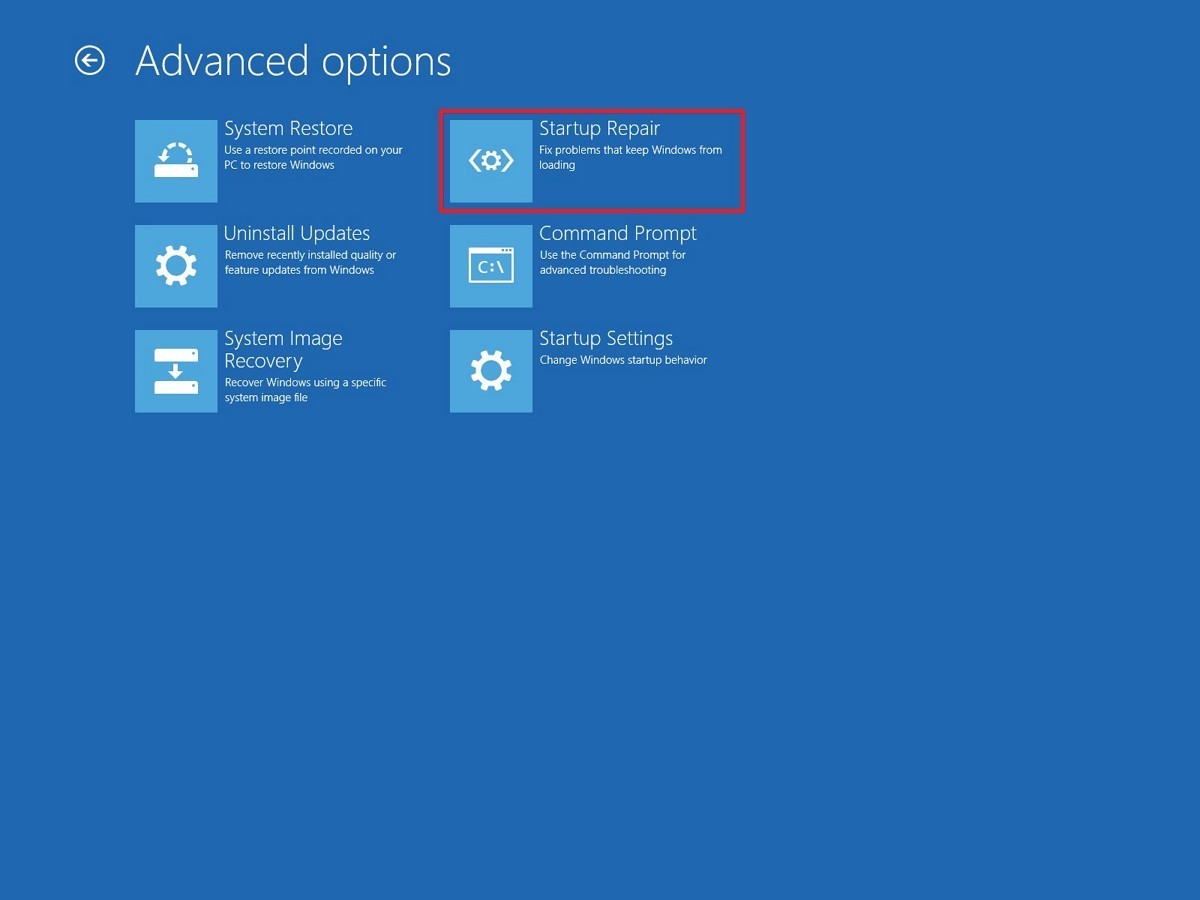
Click on Advanced options. Click on Automatic Repair (it may also be displayed as Startup Repair or Start-up repair). If prompted to do so, choose the Operating System you want to perform the Startup Repair on. If prompted to do so, select an account that is an Administrator.
Enter the password for the account you selected and click on Continue. The Startup Repair process will now begin. If you are asked to do something or make a choice, do so. If the computer needs to be restarted, restart it.
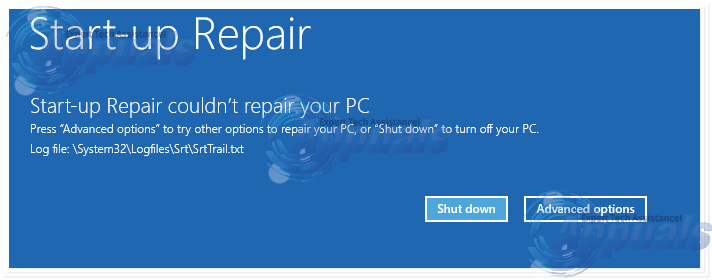
Once the process has been completed, you will be informed of whether or not any problems were detected and whether or not the detected problems were fixed by Startup Repair.
Method 2: Perform a Startup Repair using installation media
You can also perform a Startup Repair in Windows 8, 8.1 or 10 using an installation disc or installation USB. To do so, you need to: Insert the Windows installation disc or USB into the affected computer and restart it. If you don’t have one, you can create it using Rufus or the Media Creation Tool. As soon as the computer starts booting up, get into its BIOS settings (the instructions for which vary depending on the manufacturer of the computer’s motherboard), usually F2 key needs to be pressed when the first screen appears before the logo and configure the computer’s boot order from the boot tab to boot from the installation media instead of the hard drive.
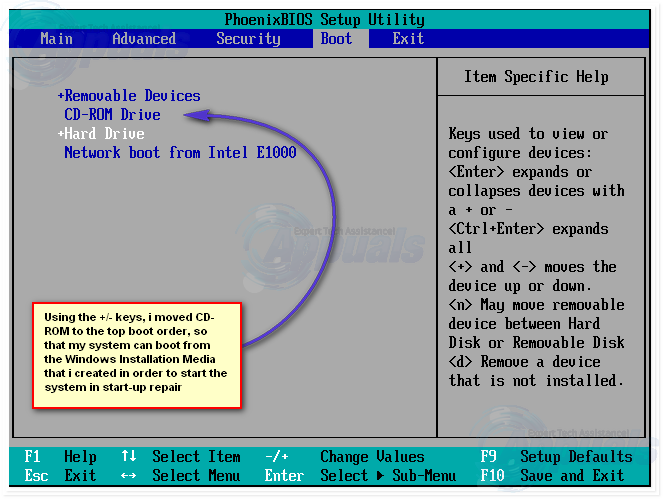
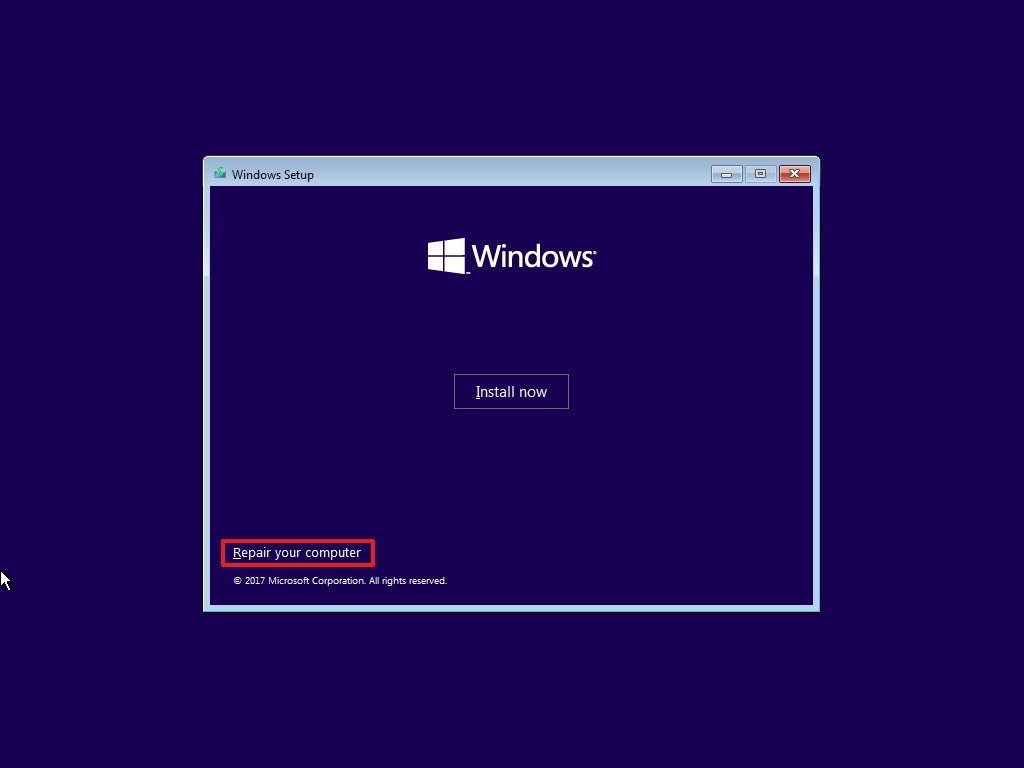
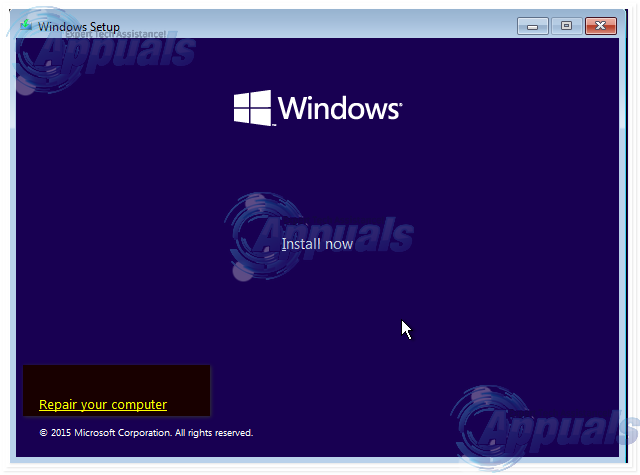
Save the changes and exit the BIOS settings. If prompted to do so, press any key to boot from the installation media. Select your language, time zone and keyboard layout preferences and then click on Next. When you reach a window with an Install now button at its center, look for and click on Repair your computer in the bottom left corner of the window.
You will now arrive at the Startup Options screen. Once you are here, you need to:
Click on Troubleshoot > Advanced options. Click on Automatic Repair (it may also be displayed as Startup Repair or Start-up repair).
If prompted to do so, choose the Operating System you want to perform the Startup Repair on. If prompted to do so, select an account that is an Administrator. Enter the password for the account you selected and click on Continue.
The Startup Repair process will now begin. If you are asked to do something or make a choice, do so. If the computer needs to be restarted, restart it.
Once the process has been completed, you will be informed of whether or not any problems were detected and whether or not the detected problems were fixed by Startup Repair.
Method 3: Perform a Startup Repair using a system repair disc
A Startup Repair can also be performed using a system repair disc that you created for your computer beforehand or one that you created using a computer that is in working condition and is running on the same version of the Windows OS as yours. To perform a Startup Repair using a system repair disc in Windows 8, 8.1 or 10, you need to:
Insert the system repair disc into the computer and restart it.
As soon as the computer starts booting up, get into its BIOS settings (the instructions for which vary depending on the manufacturer of the computer’s motherboard) and configure the computer’s boot order to boot from the system repair disc instead of the hard drive.
Save the changes and exit the BIOS settings.
If prompted to do so, press any key to boot from the system repair disc.
If a list of keyboard language layouts is displayed, click on the one you prefer.
Once you do so, you will arrive at the Startup Options screen.
At the Startup Options screen, you need to:
Click on Troubleshoot > Advanced options.
Click on Automatic Repair (it may also be displayed as Startup Repair or Start-up repair).
If prompted to do so, choose the Operating System you want to perform the Startup Repair on.
If prompted to do so, select an account that is an Administrator.
Enter the password for the account you selected and click on Continue.
The Startup Repair process will now begin. If you are asked to do something or make a choice, do so. If the computer needs to be restarted, restart it.
Once the process has been completed, you will be informed of whether or not any problems were detected and whether or not the detected problems were fixed by Startup Repair.


