Troubleshoot problems updating Windows 10
In Windows 10, you decide when and how to get the latest updates to keep your device running smoothly and securely. This article will help you answer questions and troubleshoot common problems with your Windows 10 update.
If you’re looking for info on how to activate Windows 10 or to verify that your installation of Windows 10 is activated, see Activate Windows 10.
Have issues installing Windows updates? Start here.
Your device may not be able to update to the latest version of Windows 10 for a few reasons. The following tips can help you pinpoint the issue affecting your device.
Before you begin, make sure your device is plugged into a power source and connected to the internet. Then, try the steps listed below to get your PC to update.
Some updates require administrator access. If your account doesn’t have administrator access, see Create a local user or administrator account in Windows 10. Or if someone else at home or in your office has an administrator account on your device, try asking them to install the updates.
Before trying any of the solutions below, make sure you back up your personal files. You can use File History to back up your files to another drive, or insert a USB drive and use File Explorer to drag and copy important files to the USB drive. If you’re signing into Windows with a Microsoft account, your system settings will be automatically restored after updating, once you’re connected to the internet.
You can also back up your files with OneDrive. For more info, go to Back up your Documents, Pictures, and Desktop folders with OneDrive.
Make sure that your device has enough space. Your device requires at least 16 GB of free space to upgrade a 32-bit OS, or 20 GB for a 64-bit OS. If your device has a small hard drive, you may need to insert a USB drive to update it.
If your PC is running low on storage, try the techniques at Free up drive space in Windows 10.
Many updates require you to restart your device. Save your work and close all open applications. Then, select Start > Power , and select either Update and restart or Update and shut down.
Even if you have downloaded some updates, there may be more available. After trying the preceding steps, run Windows Update again by selecting Start > Settings > Update & Security > Windows Update > Check for updates. Download and install any new updates.
Remove any external storage devices and drives, docks, and other hardware plugged into your device that aren’t needed for basic functionality. Then try to run updates again and see if this resolved your issue. If it didn’t, continue to the next tip.
If you’ve added hardware to your device, check for third-party driver updates and installation instructions on the hardware manufacturer’s website. Update any drivers, then try to run updates again and see if this resolved your issue. If it didn’t, continue to the next tip.
In the search box on the taskbar, type device manager, then select Device Manager from the list of results.
In the window that appears, look for any device with a yellow exclamation mark next to it. (You may have to select each category to view the list of devices.) Select the device name.
Select Action, and then choose either Update driver or Uninstall to correct the errors.
Common troubleshooting questions
If you are receiving an error message with a specific error code, try running the Windows Update Troubleshooter. If that doesn’t resolve the issue, see Fix Windows Update errors and follow the instructions to help resolve common update issues.
The time required to download and install updates depends on connection speed, network settings, and the size of the update. If the installation remains stuck at the same percentage, try checking for updates again or running the Windows Update Troubleshooter.
To check for updates, select Start > Settings > Update & Security > Windows Update > Check for updates.
To get help, in the search box on the task bar, type get help, then select Get Help from the list of results. To leave feedback if you run into further problems, in the search box on the taskbar, type feedback hub, then select Feedback Hub from the list of results.
Windows 10 is the most secure Windows ever, and we recommend you stay updated to protect your PC from security risks and to keep it running smoothly. However, you can temporarily pause updates as well as schedule a restart to install updates at a time that’s convenient for you.
Learn how to temporarily pause updates
Find out how to schedule a restart to install updates at a convenient time
You will only receive a notification when it’s time to restart your computer to apply the installed updates.
If you need to know where you left off in your work after an update, use Timeline to jump back in.
To get started with Timeline, select Task View on the taskbar, or press the Windows logo key +Tab and select the activity you want to resume.
Monthly quality updates on Windows 10 are quite small and have a minimal impact on data usage. Feature updates typically happen twice per year, and you can control when to install them. They require more data but are less frequent.
If you’re on a metered connection, some updates for Windows won’t be installed automatically. Metered connections in Windows 10
Your computer might be slow for a number of reasons, but updating to the latest version of Windows 10 can improve its performance. For help with a slow computer, see Tips to improve PC performance in Windows 10.
If you’re having trouble finding your files after an upgrade, see Find lost files after the upgrade to Windows 10 for other things to try.
Warning: Microsoft only recommends trying the procedures in this section if you’re comfortable working in the command line. These procedures require administrator permissions on your device.
In the search box on the taskbar, type command prompt, then select Run as administrator from the list of options. Select Yes. Next, in the window that appears, type the following commands one at a time, including the spaces as shown. After you type each command, press Enter. Then let each command complete before you type the next command.
net stop wuauserv
ren %systemroot%\softwaredistribution softwaredistribution.bak
ren %systemroot%\system32\catroot2 catroot2.bak
net start wuauserv
After all these commands are completed, close the Command Prompt window and restart your computer.
In some instances, third-party antivirus or security software can cause errors when you try to update to the latest version of Windows 10. You can temporarily uninstall this software, update your PC, and then reinstall the software after your device is up to date. We recommend using third-party antivirus or security software that’s compatible with the latest version of Windows 10. You can check compatibility by visiting the software manufacturer’s website.
Note: Before uninstalling software, make sure you know how to reinstall your programs and that you have any necessary product keys.
In the search box on the taskbar, type command prompt, and then select Run as administrator from the list of options. Select Yes. In the window that appears, type the following command, including the space as shown:
chkdsk/f C:
and then press Enter. Repairs will automatically start on your hard drive, and you’ll be asked to restart your device.
A clean restart starts Windows with a minimal set of drivers and startup programs. This helps eliminate software conflicts that occur when you install a program or an update that may cause issues updating your PC.
Learn how to do a clean restart
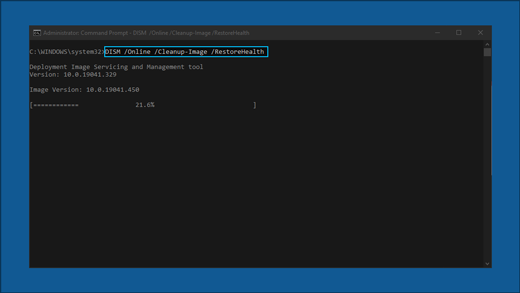
In the search box on the taskbar, type command prompt, then select Run as administrator from the list of options.
In the window that appears, type this command including spaces as shown:
DISM.exe /Online /Cleanup-image /Restorehealth
Press Enter. When the command operation has run successfully, you’ll see a confirmation message from Command Prompt that says, “The restore operation completed successfully” or “The operation completed successfully”.
Note: If you don’t see a confirmation message, retype the command and try again.
Next, type this command, including the space as shown:
sfc /scannow
Press Enter. Wait until the sfc scan verification reaches 100% completion, and then close Command Prompt.
Try running the Windows Update again.
Go to the software download page and select Download tool now to download the clean installation tool. Make sure to carefully read the notes on the software download page before using the tool.
Still stuck?
Contact Microsoft support if you continue to have problems with your Windows updates.
WIFI Windows 10 stopped working after new update
A windows update today killed my WIFI.
I reinstalled it and also tried an older version and some other ways to fix it, but nothing works.
The WIFI adapter is disabled and any attempt to start it is unsuccessful.
Realtek RTL8188EE 802.11 bgn Wi-Fi Adapter
Driver Date: 09.07.2015
Replies (6)
![]()
Thank you for posting your question on Microsoft Community.
I see that after installing the latest Windows Updates, Wi-Fi connection doesn’t work.
What is the KB number of Windows update?
Do you get any error message when you try to connect to a Wi-Fi network?
Please check whether the updates had installed successfully on your computer in Windows update history. If the updates had failed to install then install the updates manually and check if it helps.
Method : Run Windows Update Troubleshooter
1. Go to Start and type troubleshooting.
2. Select Troubleshooting.
3. Select View all on the top left corner.
4. Click Windows Update troubleshooter .
5. Follow the on-screen instructions to run the troubleshooter .
6. Check if issue persists.
If the issue persist again I suggest to refer to the following Microsoft articles and check.
Mic. Stopped working after update Windows 1803 on 1st May. 2018.
My Laptop Mic. Stopped working after updating Windows 1803 yesterday (1st May, 2018)
Please arrange to fix this problem.
Replies (23)
* Please try a lower page number.
* Please enter only numbers.
* Please try a lower page number.
* Please enter only numbers.
Please try following —
1. Microphone is not disabled and is set as default
Type Sound in Windows Start Seach box > Click Sound > Under Recording tab, right click on an empty space and select, Show disconnected devices and Show disabled devices > Select Microphone and click on Properties and make sure that the microphone is enabled > You may also check if the microphone that you are using is set as default.
2. Run Hardware & Devices Troubleshooter
Type Troubleshoot in Windows Start Search box > Click Troubleshoot > Click Hardware & Devices > Run the Troubleshooter
3. Run audio troubleshooting
Type Troublshoot in Windows Start Search box > Troubleshoot > Click Playing Audio > Run the Troubleshooter > Restart once it finishes
4. Set up microphone
Type microphone in Windows Start Search box > Click Set up a Microphone > Select required type of microphone (for internal mic, select Others) > Follow the onscreen directions to set it up
5. Update audio driver
Please provide me your computer’s make and model number so that I can provide you the link to download the driver.
Best regards
Vijay A. Verma @ http://www.eforexcel.com/
Timezone: UTC+05:30, PST+12:30
Availability Hours (UTC) : 05:00 AM — 05:00 PM
4 people found this reply helpful
Was this reply helpful?
Sorry this didn’t help.
Great! Thanks for your feedback.
How satisfied are you with this reply?
Thanks for your feedback, it helps us improve the site.
How satisfied are you with this reply?
Thanks for your feedback.
Thanks for your immediate response.
Your required details are as follows:-
Laptop: DELL Vostro 5470
Windows 10 Version 1803.
Was this reply helpful?
Sorry this didn’t help.
Great! Thanks for your feedback.
How satisfied are you with this reply?
Thanks for your feedback, it helps us improve the site.
How satisfied are you with this reply?
Thanks for your feedback.
Try reinstalling the Realtek High-Definition Audio ALC 275, ALC290, ALC283, ALC3223, AL3234 Driver
Other things you can try:
First, run the Playing audio troubleshoot — open Start > Settings > Update & security > Troubleshoot
Scroll down, select Playing audio
Click Run the troubleshooter
When complete, restart your computer then check if audio is working again.
Press Windows key + X
Click Device Manager
Expand Sound, video and game controllers
Right click your audio adapter
Click Properties
Click the Driver tab
Is there an option rollback?
If so, click it.
Also, check to make sure the audio driver is fully updated. This is often the problem when you upgrade to a new version of Windows 10. Sometimes reinstalling the latest available driver from the manufacturers website helps.
Open Start, type: change sound card
Hit Enter
Select the Playback
Right click your microphone
Click Set as Default Device if it isn’t already
There seems to be some early adopter issues at this time with Windows 10 1803, if you can, I recommend you downgrade to your previous version until the Fall Creators Update matures with future cumulative updates.
Open Start > Settings > Update & security > Recovery > under Go back to my previous version of Windows 10, click Get started.
Press Control + Alt + Delete
Click Sign out
At the Sign In screen, hold down the shift key on your keyboard while clicking the Power button on the screen
Continue to hold down the shift key while clicking Restart
Continue to hold down the shift key until the Advanced Recovery Options menu appears
Click Advanced options
Click Go back to the previous version of Windows


