Windows doesn’t start on Surface
If Windows doesn’t start correctly when you turn on your Surface, here are solutions for some of the more common screens that might appear.
Before you begin
Leave your Surface plugged in to the power supply included with the device, then remove all accessories. This includes the Type Cover, accessories, adapters, external monitor, and microSD card. If you’re using a docking station, remove your Surface from it.
Before trying these solutions, make sure that you’ve checked your connections as described in Surface battery won’t charge or Surface won’t run on battery.
If Windows starts but then freezes or stops responding: See Windows stops responding on Surface.
If your Surface stops responding while installing updates: See Trouble installing Surface updates?
Which screen do you see?
If your Surface is turned on but Windows doesn’t start up correctly, you may see one of the screens below. Select the one that matches your problem and follow the troubleshooting steps.

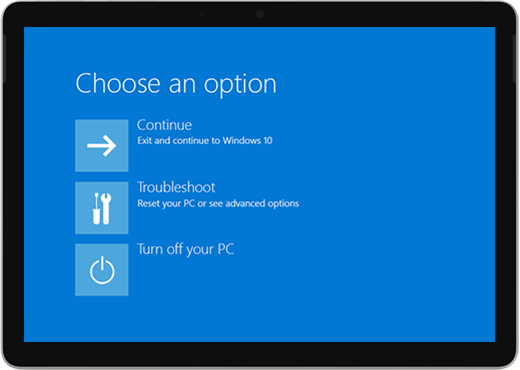

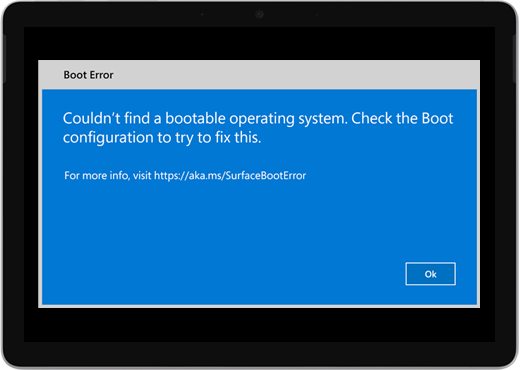
A blue Choose an option screen with options like Use a device and Troubleshoot.
If you see this screen, go to Solution 1.
Solution 1: Continue to Windows
Select Continue to exit the options screen and continue to Windows.
If Windows starts: Install the latest Surface and Windows updates to help prevent future problems. For more info, see Update Surface firmware and Windows 10.
If Windows doesn’t start: Continue to Solution 2.
Solution 2: Repair your Surface
On the Choose an option screen, select Troubleshoot.
Select Advanced Options > Startup Repair and follow the on-screen instructions. Windows will try to find and fix the problem.
If Windows starts: Install the latest Surface and Windows updates to help prevent future problems. For more info, see Update Surface firmware and Windows 10.
If Windows doesn’t start: Go to Solution 3.
Solution 3: Perform a System Restore
When you perform a system restore, Windows will restore your Surface to an earlier point in time when Windows was working correctly.
System Restore doesn’t change your personal files, but it might remove recently installed apps and drivers.
Make sure you have access to product keys and installation files for all desktop apps (for example, Microsoft Office) that you may have installed after the point to which you’re restoring your Surface.
Here’s how to do a system restore on your Surface:
On the Choose an option screen, select Troubleshoot > Advanced options.
Select System Restore and follow the on-screen instructions.
If Windows starts: Install the latest Surface and Windows updates to help prevent future problems. For more info, see Update Surface firmware and Windows 10.
If Windows doesn’t start: Go to Solution 4.
Solution 4: Reset your Surface
A reset does the following:
Reinstalls Windows and the apps that came installed on your Surface
Removes all your personal settings
Removes all apps that you installed
Provides options for keeping or removing your personal files or restoring factory settings:
Keep my files: Removes apps and settings but keeps your personal files.
Remove everything: Removes all your personal files, apps, and settings.
Make sure that you have access to the product keys and installation files for any desktop apps (for example, Microsoft Office) that you plan to reinstall after the reset. This includes desktop apps you installed from websites or USB drives.
Here’s how to reset your Surface:
On the Choose an option screen, select Troubleshoot > Reset this PC and follow the on-screen instructions.
If Choose an option appears again, choose Continue.
If Windows starts: Install the latest Surface and Windows updates to help prevent future problems. For more info, see Update Surface firmware and Windows 10.
If Windows doesn’t start: If the Choose an option screen appears again, your Surface needs service. Go to Send my Surface in for service.
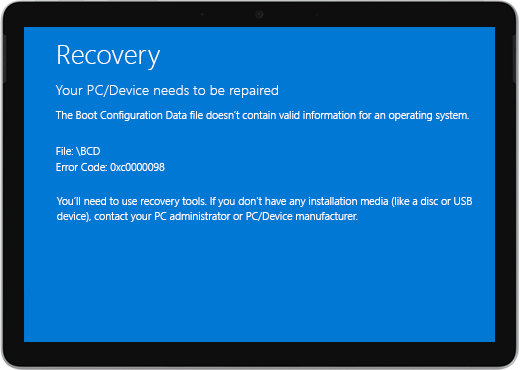
A black screen that says Preparing Automatic Repair and then Diagnosing your PC.
You may then see a blue Automatic Repair or Recovery screen.
If Automatic Repair starts when you turn on your Surface, follow the steps below.
If your Surface freezes at the Automatic Repair screen or shortly after you select an option, see Creating and using a USB recovery drive for Surface for solutions you can try.
Solution 1: Restart your Surface
On the Automatic Repair screen, select Restart.
If Windows starts: Install the latest Surface and Windows updates to help prevent future problems. For more info, see Update Surface firmware and Windows 10.
If Windows doesn’t start: Go to Solution 2.
Solution 2: Continue to Windows
On the Automatic Repair screen, select Advanced options.
On the Choose an option screen, select Continue to exit the options screen and continue to Windows.
If Windows starts: Install the latest Surface and Windows updates to help prevent future problems. For more info, see Update Surface firmware and Windows 10.
If Windows doesn’t start: Go to Solution 3.
Solution 3: Repair your Surface
If the Automatic Repair screen appears again, select Advanced options.
On the Choose an option screen, select Troubleshoot.
Select Advanced options > Startup Repair and follow the on-screen instructions.
Windows will try to find and fix the problem.
If Windows starts: Install the latest Surface and Windows updates to help prevent future problems. For more info, see Update Surface firmware and Windows 10.
If Windows doesn’t start: Go to Solution 4.
Solution 4: Perform a System Restore
A system restore will restore your Surface to an earlier point in time when Windows was working correctly.
Performing a system restore doesn’t change your personal files, but it might remove recently installed apps and drivers.
Make sure you have access to product keys and installation files for all desktop apps (for example, Microsoft Office) that you may have installed after the point to which you’re restoring your Surface.
Here’s how to do a system restore on your Surface:
On the Choose an option screen, select Troubleshoot > Advanced options.
Select System Restore and follow the on-screen instructions.
If Windows starts: Install the latest Surface and Windows updates to help prevent future problems. For more info, see Update Surface firmware and Windows 10.
If Windows doesn’t start: Go to Solution 5.
Solution 5: Reset your Surface
A reset does the following:
Reinstalls Windows and the apps that came installed on your Surface
Removes all your personal settings
Removes all apps that you installed
Provides options for keeping or removing your personal files or restoring factory settings:
Keep my files: Removes apps and settings but keeps your personal files.
Remove everything: Removes all your personal files, apps, and settings.
Make sure that you have access to the product keys and installation files for any desktop apps (for example, Microsoft Office) that you plan to reinstall after the reset. This includes desktop apps you installed from websites or USB drives.
Here’s how to reset your Surface:
On the Choose an option screen, select Troubleshoot.
Select Reset this PC and follow the on-screen instructions.
If Windows starts: Install the latest Surface and Windows updates to help prevent future problems. For more info, see Update Surface firmware and Windows 10.
If Windows doesn’t start: If the Automatic Repair screen appears again, your Surface needs service. Go to Send my Surface in for service.
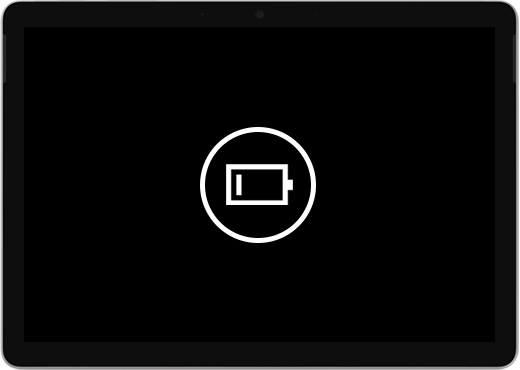
A black screen with a large battery icon, and your Surface shuts down immediately.
When the battery icon appears, it means the battery is critically low. If you haven’t done so already, plug in the power supply and charge your Surface.
If you already have the power supply plugged in, the problem may be with the power supply or battery. Here are some solutions to try.
Solution 1: Change the power connector orientation where possible
Important: Don’t try this solution on Surface 3. The micro USB power connector on Surface 3 plugs into the micro USB charging port with the power cord extending downward only.
If your Surface isn’t charging even when the power connector light is on, try this:
Remove the power connector from your Surface, turn it over, and plug it back in. Make sure the connection is secure and the power connector light is on.
Wait 10 minutes and turn on your Surface.
If your Surface still won’t turn on, go to Solution 2.
Solution 2: Force a shut down and restart
To find out how to force your Surface to shut down and restart, see Force a shut down and restart your Surface.
If Windows starts: The battery is probably very low and needs to charge for a while. When the battery has at least a 40 percent charge, install the latest Surface and Windows updates to help prevent future problems. For more info, see Update Surface firmware and Windows 10.
If Windows doesn’t start: Your Surface needs service. Go to Send my Surface in for service.
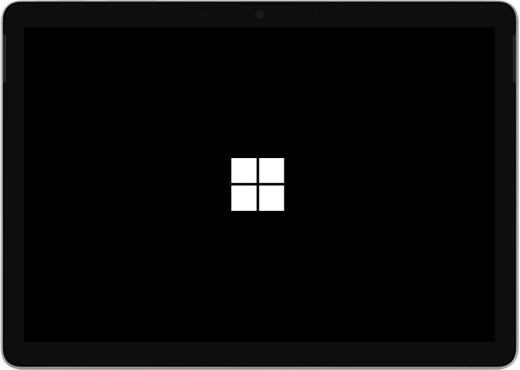
A black screen with the Microsoft logo and a drive cache rebuild icon in the lower-right corner.

If the drive cache is rebuilding when you start your Surface, follow the steps below:
Solution 1: Wait for 5 minutes
If the Surface device previously experienced an unexpected shutdown, the SSD drive cache might have been corrupted, and you’ll see the drive cache rebuild icon in the lower right corner of your screen. Wait for at least 5 minutes for the cache to be rebuilt.
If the icon is still on the screen after 5 minutes: Go to Solution 2.
Solution 2: Force restart
To find out how to force your Surface to shut down and restart, see Force a shut down and restart your Surface.
If Windows starts after you force a shut down and restart: Install the latest Surface and Windows updates to help prevent future problems. For more info, see Update Surface firmware and Windows 10.
If Windows doesn’t start: Go to Solution 3.
Solution 3: Reset your Surface using a USB recovery drive
Start your Surface by using a USB recovery drive: Insert the USB recovery drive into the USB port on your Surface, and then press and hold the volume-down button while you press and release the power button. When the Surface logo appears, release the volume-down button. For more info, see Creating and using a USB recovery drive for Surface.
Windows surface windows problem

2012:
● Touch Cover
● Touch Cover LE
● Type Cover
● HDMI-адаптер Его отлично заменяет обычный microHDMI-HDMI кабель
● VGA-адаптер
● Wedge Mouse
2013:
● Touch Cover 2
● Type Cover 2
● Arc Touch Mouse
● Автомобильное ЗУ
● Беспроводной адаптер для клавиатур-обложек
Сброс и восстановление Surface с помощью USB диска (ВНИМАНИЕ! Сброс удалит все ваши файлы и программы, прежде чем совершать эти действия, позаботьтесь о сохранении нужной Вам информации на сменном носителе!)
1. Откройте правое меню, нажмите иконку питания, а затем нажмите Завершение работы. (Или, нажмите на значок питания в нижнем правом углу на экране входа в систему.)
2. Вставьте подготовленный USB диск восстановления с файловой системой FAT32 (образ можно скачать по ссылкам в шапке темы, просто разархивируйте содержание архива в корень USB объемом более 4гб)
3. Зажмите кнопку уменьшения громкости (-) .
4. Нажмите и отпустите кнопку питания.
5. При появлении логотипа Surface, отпустите регулятор громкости.
6. Выберите параметры языка.
7. Выберите раскладку клавиатуры.
8. На экране BitLocker, нажмите «пропустить этот диск». (клавиатура может закрыть собой этот параметр, нажмите на любую область над ней, чтобы скрыть ее)
9. Нажмите кнопку Устранение неполадок.
10. Нажмите Сброс компьютера.
11. Нажмите кнопку Далее. (Отображается как кнопка восстановления Windows 8.1, но на самом деле восстановится Windows 8.0)
12. Только для Surface Pro: Нажмите «Нет, сохранить существующие разделы.» (На Surface RT будет похожее сообщение. Нужно выбрать «Нет».)
13. Нажмите «Только удалить мои файлы»
14. Когда на экране появится надпись «Все готово к работе» нажмите кнопку «Сброс» (Этот шаг может не отобразиться, и восстановление начнется после шага 13)
Вот и всё, дожидаемся появления рабочего стола, Surface восстановлен до заводского состояния. Также рекомендую отключить автоматическое обновление системы (см. спойлер ниже), если хотите пользоваться Jailbreak, так как в случае обновления системы до 8.1 работоспособность Jailbreak теряется.
Инструкция актуальна только для Windows RT, в версии 8.1 RT съемные диски добавляются в библиотеку так же, как и любая папка в памяти устройства.
● Наберите в строке поиска текст «Создать раздел» (без кавычек). В открывшемся окне «Управление дисками», в нижней части вы увидите карту памяти microSD, которой назначена определенная буква диска.
● Кликните второй клавишей мыши по «Съемное устройство» и выберите пункт «Изменить букву диска или путь к диску…»
● Откроется окно с кнопками «Добавить», «Удалить», «Изменить», в котором при вставленной карте памяти две последние кнопки будут недоступны.
● Нажмите «Добавить» и выберите пункт «Подключить том как пустую NTFS-папку». В открывшемся окне создайте новую папку в своем каталоге пользователя. Например, C:\Users\имя вашего пользователя\microSD.
● Выберите эту папку.
Всё. Теперь вы можете работать с картой памяти точно также, как и с любой другой папкой в Windows 8 а также добавлять её в библиотеки «Видео», «Музыка», «Изображения». Для этого в проводнике кликните правой кнопкой по этой папке, в открывшемся списке опций кликните по «Добавить в библиотеку» и выберите нужную библиотеку.
После этого, приложения для работы с видео файлами, музыкальными файлами и изображениями смогут увидеть файлы, расположенные на карте памяти планшета.
Джейлбрейк позволяет устанавливать классические ARM приложения (см. список ниже).
● Установка:
- Распаковать архив в любую папку;
- Запустить «runExploit.bat»;
- Нажать «R» в появившемся окне для запуска процесса;
- После установки программа попросит нажать кнопку громкости (любую);
- Для того, чтобы джейлбрейк не слетал после перезагрузки, снова открываем «runExploit.bat» и жмем «I»;
● Скачать RT Jailbreak Tool / Тема на xda-developers.
Джейлбрейк позволяет устанавливать классические ARM приложения (см. список ниже).
● Установка:
- Скачать Windows RT 8.1 Development Tool на планшет. (Мод Windows RT 8.1 Development Tool by Porsche-928)
- Распаковать архив.
- Запустить .bat файл с правами администратора.
- Нажать любую клавишу, появится меню:
Уважаемые пользователи, всё, что вы делаете со своим плашетом, вы делаете на свой страх и риск.
Сообщение отредактировал M|A|G — 07.04.21, 14:35


