- How To Switch Monitors 1 and 2 On Windows 10
- Change the primary monitor on Windows 10
- Turn Off Monitor Software Utility for Windows
- Download Turn Off Monitor Software
- How to Use Turn Off Monitor Software to Switch Off the Monitor
- Create a Desktop Shortcut to Turn Off Monitor
- Create a Keyboard Shortcut to Turn Off Monitor
- Turn Off Monitor from Taskbar Shortcut Icon
- Turn Off Monitor from Notification Tray Icon
- Turn Off Monitor Software — Other Features
- Benefits of Turn Off Monitor Software
- Contact Us
- Privacy Policy
- How to Change the Primary Monitor on Windows 10
- For Windows 7
- For Windows 10
How To Switch Monitors 1 and 2 On Windows 10
Windows 10 has the ability to support multiple monitors connected to the computer. Having more than one monitor helps increase productivity as more apps can be viewed at once on the display. If you have two monitors connected to your computer then you can set which is the primary monitor and which is the secondary monitor. In this latest installment of our troubleshooting series we will show you how to switch monitors 1 and 2 on windows 10.
Change the primary monitor on Windows 10
Setting up which monitor acts as the primary monitor in a multi-monitor setup will improve your productivity.
Time Needed : 1 minutes
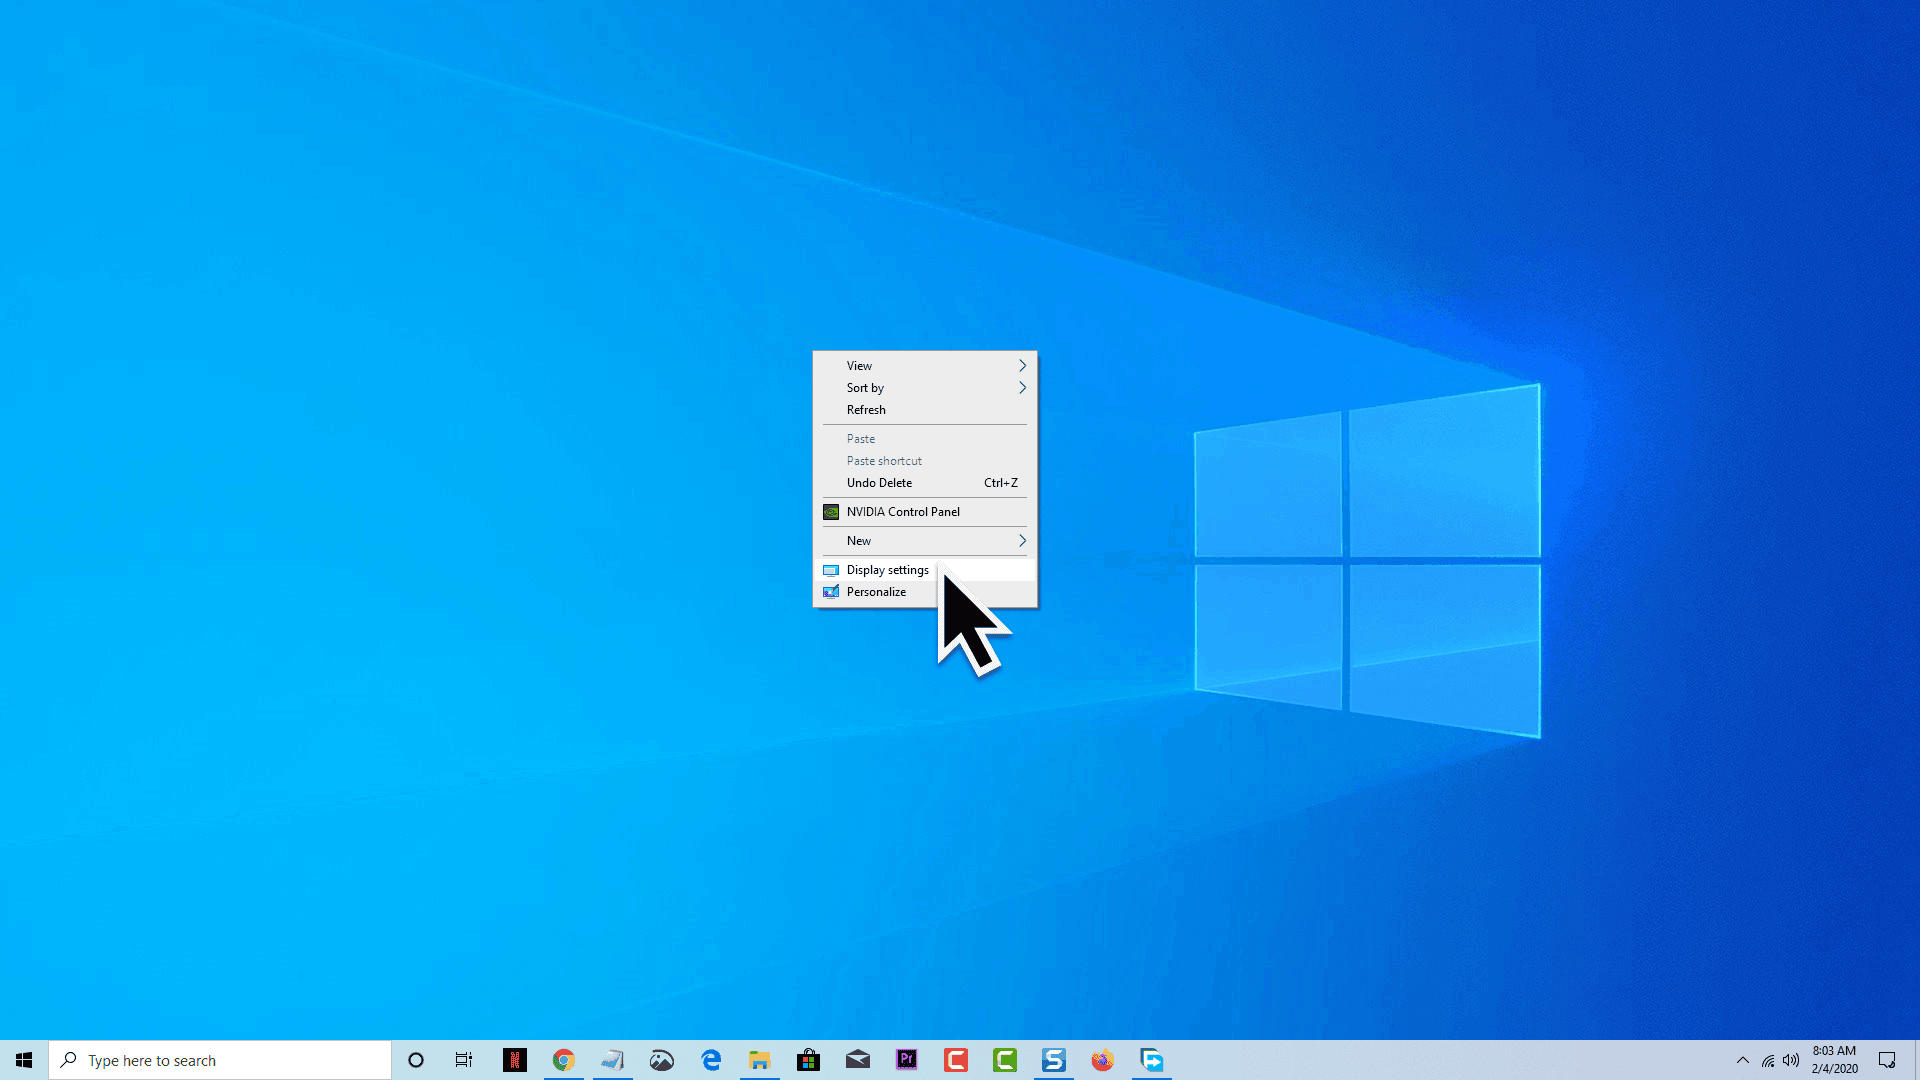
- Right-click anywhere in the Desktop
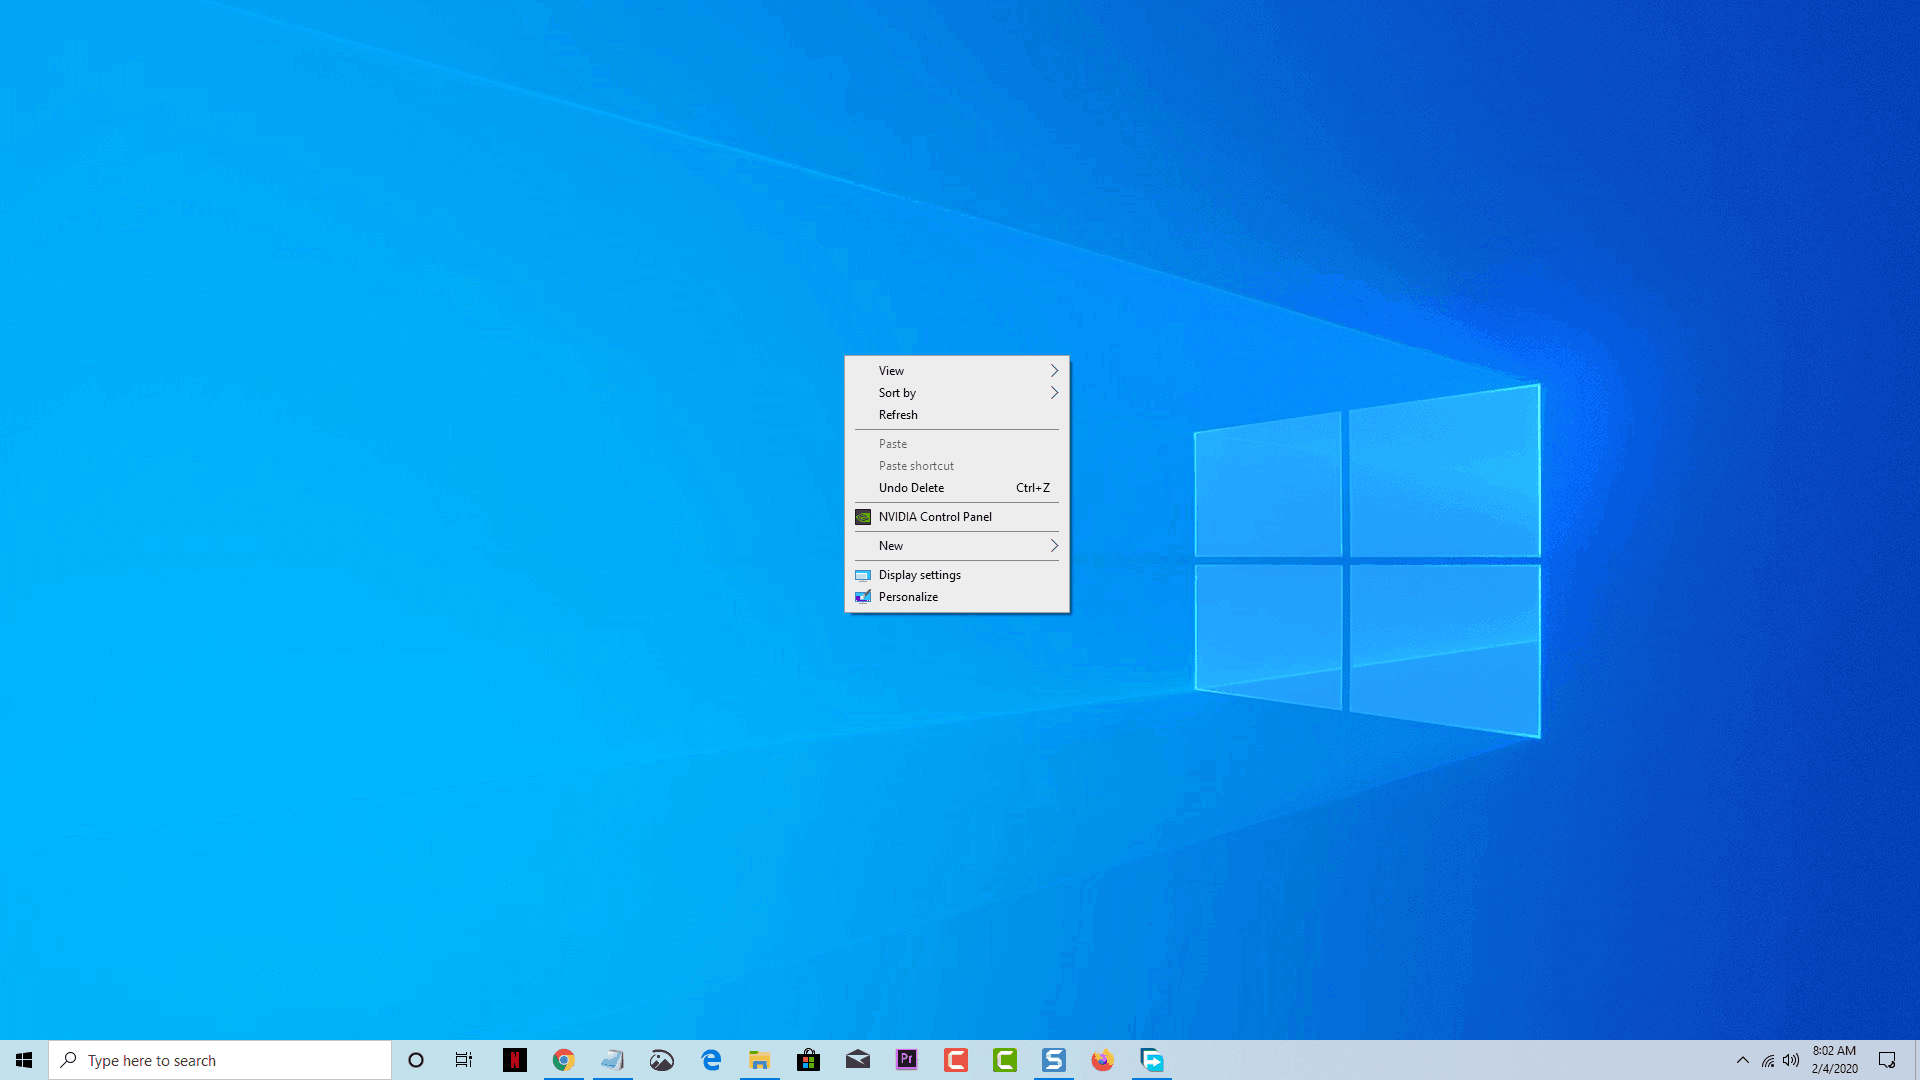
Select Display Settings
The displays will be shown in graphical shapes. Select the display which you want to set as the primary display.

Navigate down at the screen and select Make this my main display.
If this setting is greyed out then it means that the current monitor which you are trying to set as the primary display is set already.
Having Issues with your computer? Feel free to contact us using this form. We’ll try to help.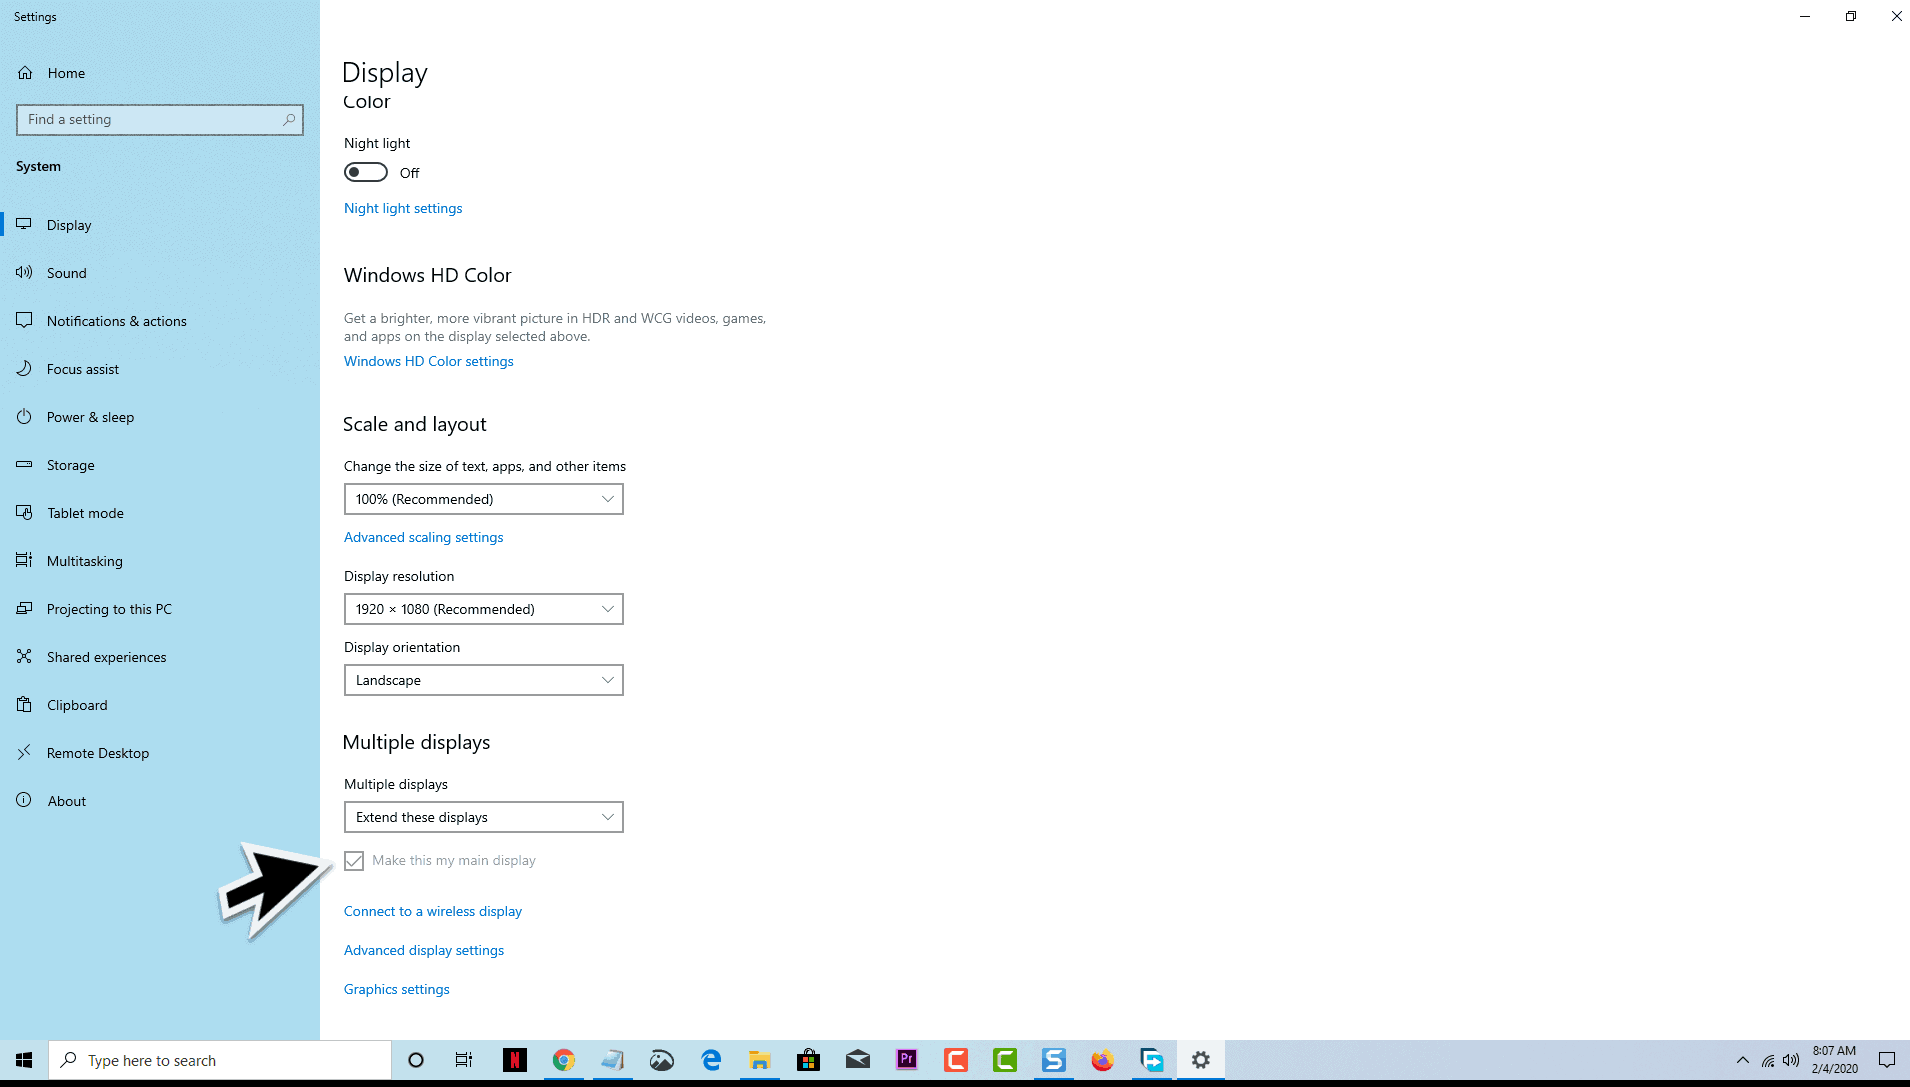
The above steps are what you need to do to switch monitors 1 and 2 on Windows 10.
Having Issues with your computer? Feel free to contact us using this form. We’ll try to help.
Turn Off Monitor Software Utility for Windows
Turn Off Monitor Software is a Utility to Switch Off your Desktop or Laptop Monitor with single Mouse click or by pressing a Keyboard key. The Software also supports Switching Off multiple Monitors on a Multi Monitor Computer. Once the Monitor is Switched Off, you can Switch it On by providing any kind of User input like Mouse movement or by pressing any Keyboard key.
Computer Monitors consume a lot of energy. When using devices like Laptop which run on battery, you can significantly increase the battery life by simply Turning Off your Monitor when not required,or when performing any background tasks like a virus scan or listening to Music or downloading a huge file. When your Computer’s Display Device cannot be switched off due to any technical reason, then using Turn Off Monitor Software you can display a Blank Screen to avoid the glare / light emitted by the Monitor / Display Device.
Download Turn Off Monitor Software
Download the Turn Off Monitor for Free Switch Off your Monitor without waiting for Power Settings to Switch off your Monitor. Turn Off Monitor Software can be used on Laptop, Notebook or a Desktop computer running Windows Operating System such as Windows 10, Windows 8.1, Windows 8, Windows 7 and other older Windows versions like Windows XP or Windows Vista. To install the Software, all you need to do is to follow the steps provided in the installer wizard. You can register the Full Version of Turn Off Monitor Software Utility by paying a minimal fees. The Free trial version has the full functionality and limits only the number of uses. You can explore all the features of this Monitor Control Application by watching video tutorial of this Turn Off Monitor Software.
How to Use Turn Off Monitor Software to Switch Off the Monitor
Turn Off Monitor Software helps you to create Desktop Shortcut as well as Keyboard Shortcut to Switch Off the Monitor. Using any of these Shortcuts you can Power Off your Monitor instantly as and when required. To Turn On your Monitor, just move Mouse Cursor or press any Keyboard Key.
Create a Desktop Shortcut to Turn Off Monitor
By creating a Desktop shortcut you can very easily launch the Software from your Desktop. Apart from creating a Shortcut for Powering Off your Display, you can create Desktop shortcuts for various other functions like Shutdown Computer, Restart Computer, Log off the signed on User, etc. Follow the below steps to create a Desktop Shortcut to Turn Off Monitor.
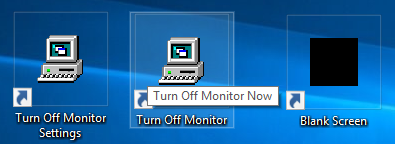
- Double Click on the Turn Off Monitor Settings Shortcut created on the Desktop by Software Installer.
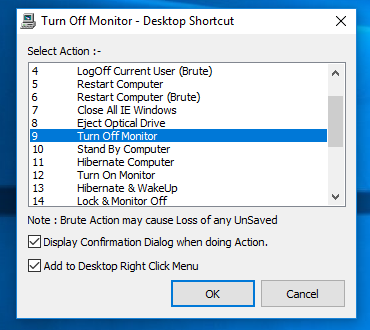
- From the Turn Off Monitor Settings Screen, Click on the button Create Desktop Shortcut.
- Select Turn Off Monitor Action from the list of actions displayed.
- Click on the OK button and the shortcut will be created successfully.
- To Turn Off the Monitor, double click on your new Destop Shortcut. In case your have Multiple Monitors connected to your Computer, all Monitors would be switched off instantly.
Note: On successful installation, the Turn Off Monitor Installer also creates a Desktop shortcut to turn off your Monitor by default. You can just double click on the shortcut that is created and your monitor will be Switched Off.
Create a Keyboard Shortcut to Turn Off Monitor
Given below procedure outlines the procedure to Turn Off Monitor with a Keyboard Shortcut. Pressing a Keyboard key is an easy way to Switch Off your Monitor without spending efforts to locate and launch the Desktop Shortcut to Turn Off Monitor. You can configure your own key to perform the action. Below are the steps to create a Keyboard shortcut or a Hot Key to Turn Off the Monitor easily.
- Double Click on the Turn Off Monitor Settings Shortcut on the Desktop.
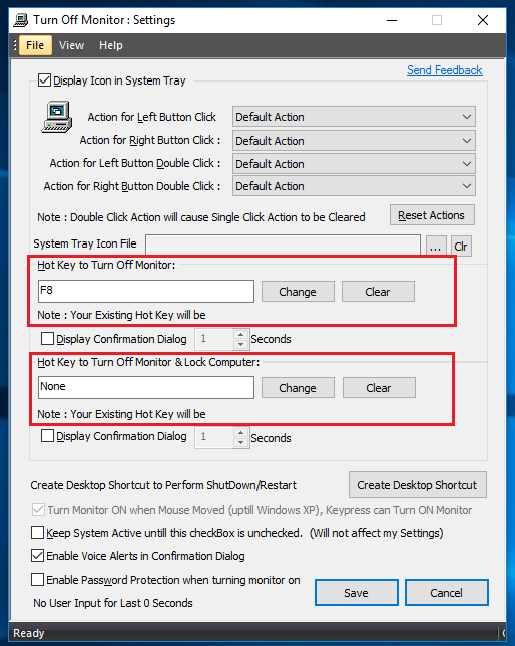
- From the Turn Off Monitor Settings Screen, press a Keyboard Key to be used to Turn Off Monitor and click on the button titled Change.
- When assiging a Keyboard Shortcut to Turn Off Monitor, you can optionally enable a Confirmation Screen to appear before the Software actually Turns off the Monitor.
- Check and verify that the Keyboard Shortcut actually Turns Off Monitor by pressing the Keyboard Shortcut.
- To Switch On your Monitor again, move your Mouse Cursor and finally click on the Save button to close the Turn Off Monitor Settings Screen.
By following the above procedure, you can also create a Keyboard Shortcut to Lock your Computer and then Turn Off Monitor. This will not only save energy but also protect your Computer by Locking it.
Turn Off Monitor from Taskbar Shortcut Icon
Drag the Desktop Shortcut to Turn Off Monitor and pin it to the Taskbar. With a Single Click on the Taskbar Shortcut, you can Switch Off your Monitor without having the trouble to locate the appropriate Desktop Shortcut.
You can even Drag the Turn Off Monitor Shortcut in the Taskbar to Left or to the Right. To unpin the Turn Off Monitor Shortcut, right click on the shortcut and select unpin from taskbar.
Turn Off Monitor from Notification Tray Icon
The Turn Off Software provides easy way to Switch Off Monitor by double clicking on the Notification Tray Icon of the Software. Right Click on the Notification Tray icon of the Turn Off Monitor Software to view a configurable menu offering other Computer Power Control features.
Turn Off Monitor Software — Other Features
This unique Software Utility offers various Computer Control features. The given below features give you complete control over your Computer. Automating Computer Shutdown, Managing Screensaver, Configurable Keyboard Shortcuts to launch Applications are just few of the features. You can either read on or Download fully functional Turn Off Monitor Software for Free and try it yourself.
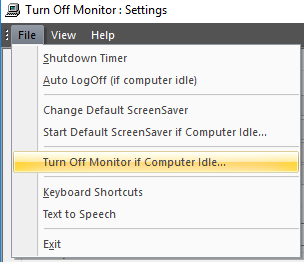
- Switch Off the Monitor only if the Computer is idle for a certain time interval.
- ShutDown, Hibernate, Logoff or Retsart after the Computer is idle or inactive for a specified duration.
- ShutDown, Restart or Logoff after a configurable time duration.
- Lock the Screen and Turn Off Monitor with Keyboard Shortcut.
- Power Off Monitor based on Mouse Position.
- Schedule Monitor Off and Monitor On Time for Automated Monitor Control.
- Lock Keyboard and Lock Mouse to avoid any accidental Key press or Mouse movement.
- Start a screensaver instantly or change the default screensaver.
Benefits of Turn Off Monitor Software
From individual users to Network Administartors, everybody can use this Software Utility to Control Desktop and Laptop Computers. Below are some of the benefits of using the Turn Off Monitor Software.
- Simple and easy to use Graphical User Interface.
- Supports Switching Off Multiple Monitors.
- Can display a Blank Screen to stop the glare emitted by the Monitor.
- Switch Off Monitor instantly and easily with Turn Off Monitor Software Application.
- Free to Download and try Software without any functionality limitation.
Contact Us
Write to us at support@rtsoftwares.com for any suggestions, queries or concerns. In case you want a new feature to be implemented in the Turn Off Monitor Software Application, please do send us purpose and usage of the new suggested feature.
Privacy Policy
This Website does not stores any cookies on your Computer and neither collects any information to personally identify you. Please do contact us at the above mentioned email address for questions or concerns related to this Turn Off Monitor Software Website or the Application itself.
How to Change the Primary Monitor on Windows 10
All versions of the Windows Operating System that are currently supported by Microsoft have dual monitor and even multiple monitor support. This means that you can have more than one monitor not only connected to your computer but also display whatever you want it to display in order to increase productivity and improve ease of use. Windows 10, the latest and greatest in a long line of Windows Operating Systems, also has multiple monitor support. In fact, Windows 10 is rather good at handling more than one monitor. Multiple monitor support is a godsend for power users as most power users out there have more than one monitors connected to their computers.
When you connect more than just one monitor to a computer running on the Windows Operating System, Windows makes one of the monitors the primary monitor (in almost all cases, this is the monitor that was connected to the computer first) and the rest of the monitors the secondary, tertiary and so on monitors. The primary monitor is the default monitor Windows displays everything on, which is why being able to determine which monitor connected to your computer you want to be the primary monitor is immensely important. Thankfully, Windows 10 not only allows users with multiple monitors to choose their primary monitor at any given time but the process used to do so is also pretty simple.
For Windows 7
To change the primary monitor on a computer running on Windows 7 with more than one monitor connected to it, you need to simply:
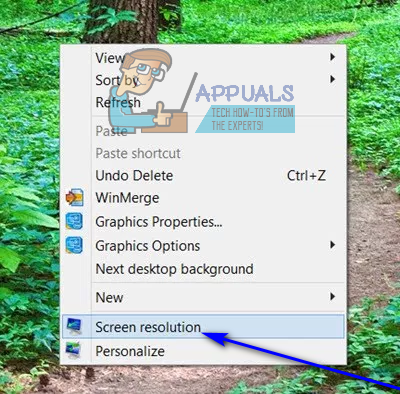
- Right-click on an empty space on your Desktop.
- Click on Screen resolution.

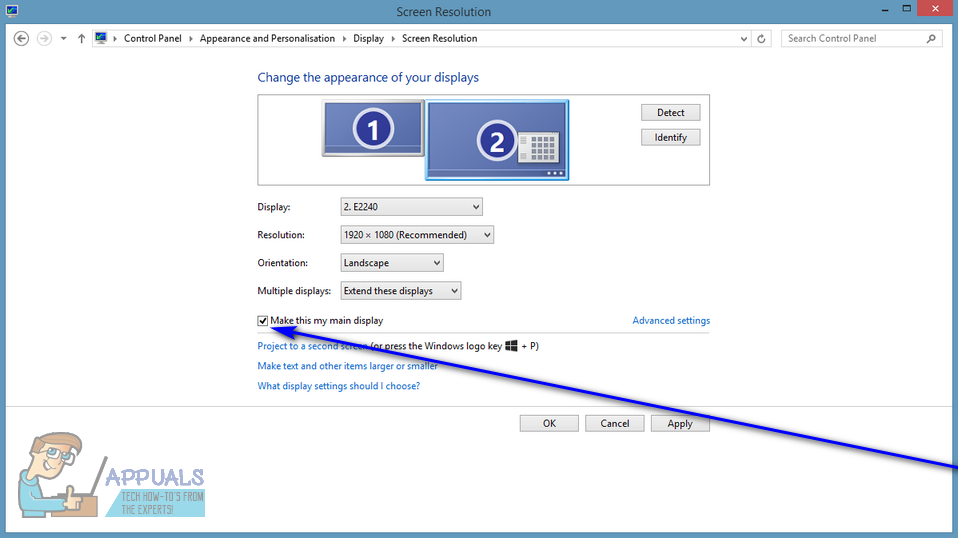
- In the space underneath Change the appearance of your display, all of the computers connected to your computer will be visible, each represented as a screen with a number in the middle. The screen that has the number 1 at its center is the monitor that is currently configured as your computer’s primary monitor. Click on the monitor that you would like to make your computer’s primary monitor to select it.
- Check the checkbox beside the Use this device as the primary monitor option (or the Make this my main display option, depending on the iteration of Windows you are using) to enable it. Doing so will tell Windows 10 to change the primary display to the monitor you have just chosen.
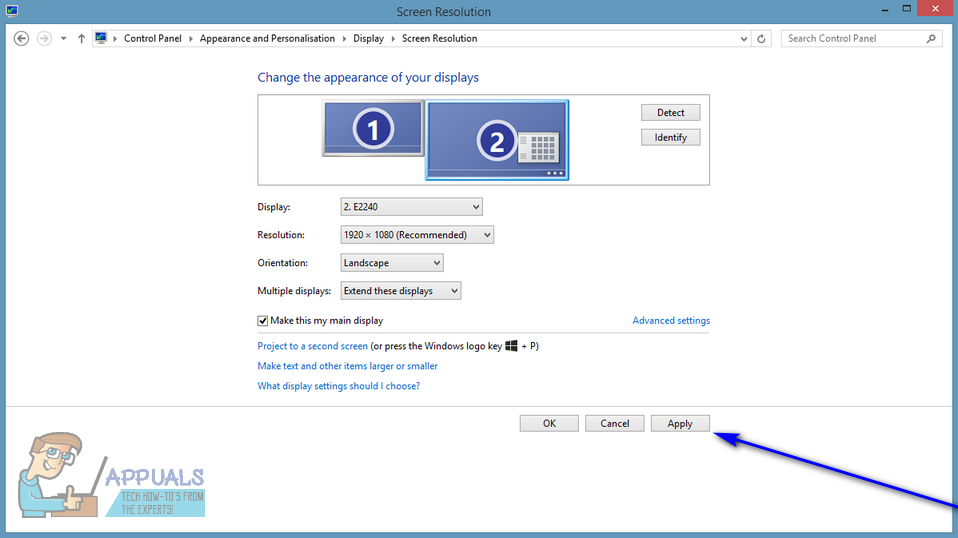
- Click on Apply, and the change you have made to your computer’s display configuration will be applied.
- Click on OK and close the Screen Resolution window.
For Windows 10
In Windows 10, the steps are slightly a little different. Some names are changed here and there but the main method is the same.
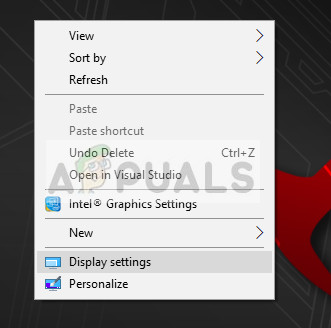
- Right-click anywhere in the Desktop and select Display Settings.
 Display Settings – Win 10 home screen
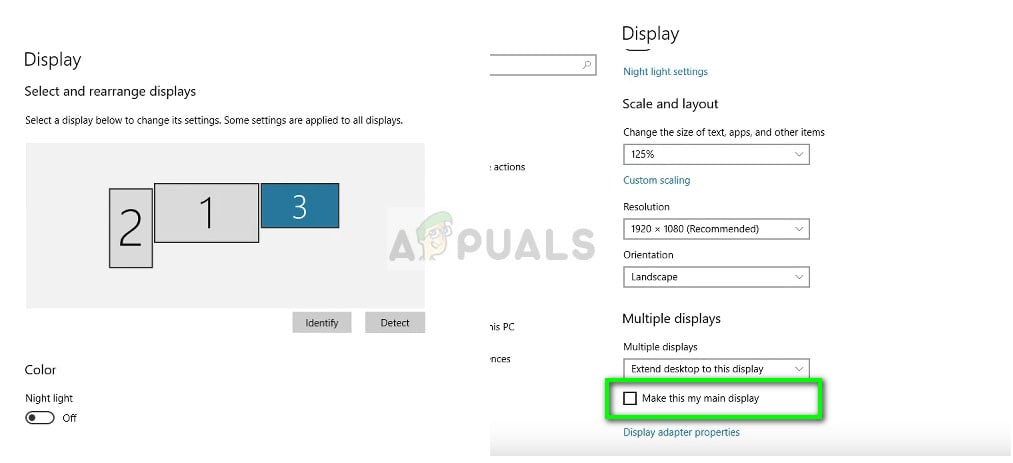
- Here all the displays will be shown in graphical shapes. You can easily distinguish the screens from one another. Now select the display which you want to set as the primary display. Now navigate down at the screen and select Make this my main display.
 Settings screen as the primary display
- If you see the Make this main display greyed out, it probably means that the current monitor which you are trying to set as the primary display is set already.
Note: If you have graphics hardware installed on your computer, it is likely that the graphical application’s settings are overriding the system’s default display settings. In that case, open the application and select the primary display from there in the settings.
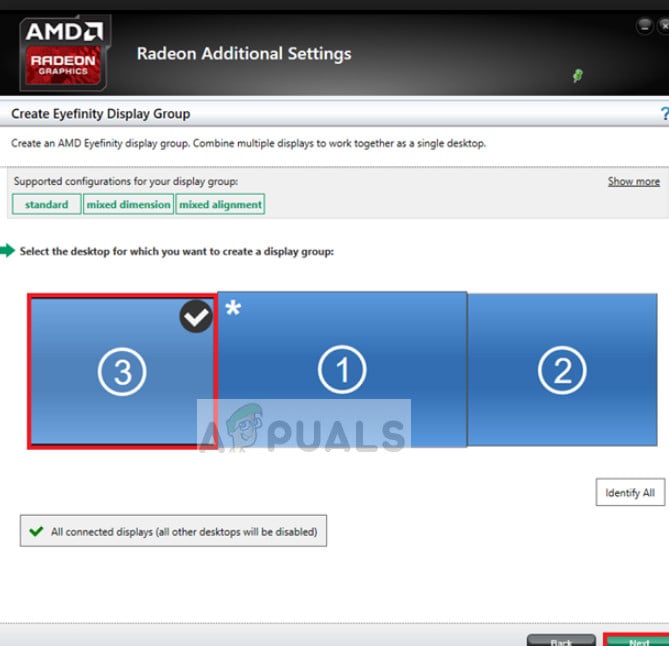 Primary display in graphic settings – AMD
Furthermore, you should also make sure that the displays are extended. If you have not extended the displays, there will be no option of making a primary monitor as all monitors will be treated alike. You can change the setting to Extend these displays from the display settings in Windows 10.
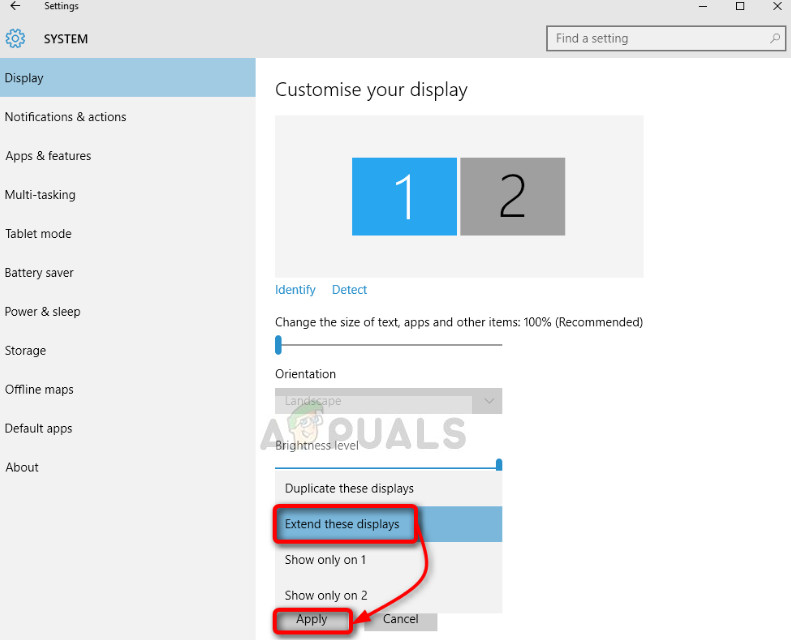 Extending screen – Win 10 settings
Note: Try to Connect your HDMI cable to the monitor which you want to use as primary because some users have reported that the monitor that is connected using the HDMI cables is actually recognized as the primary monitor. This might not be the case with all of you but it might still help some people.


