- Windows 10: Enable or Disable Fast User Switching
- Option 1 – Group Policy
- Option 2 – Registry
- You Might Also Like
- Reader Interactions
- Comments
- Did this help? Let us know! Cancel reply
- Primary Sidebar
- Recent Posts
- Who’s Behind Technipages?
- Windows 7 Switch User Disabled or Greyed Out?
- Method 1 – Registry Hack
- Method 2 – Edit Group Policy
- Method 3 – Download Switch User Tool
- Windows switch user disabled
- Users who read this also read:
Windows 10: Enable or Disable Fast User Switching
By Mitch Bartlett 23 Comments
The Fast User Switching feature in Microsoft Windows 10 allows users to login to a PC while keeping other users logged in and their applications running. This allows multiple users to use the computer without interrupting what other users are working on.
You can enable or disable fast user switching using these steps.
Option 1 – Group Policy
- Hold the Windows Key and press “R” to bring up the Run dialog box.
- Type “gpedit.msc” then press “Enter“.
- The Local Group Policy Editor appears. Expand the following:
- Local Computer Policy
- Computer Configuration
- Administrative Templates
- System
- Logon
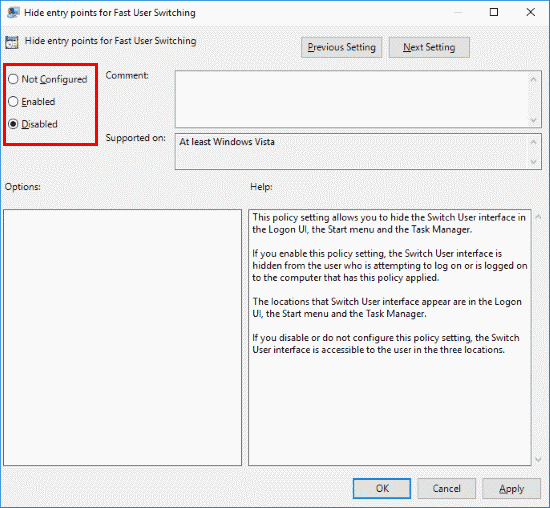
- Open “Hide Entry Points for Fast User Switching“.
- Select “Enabled” to turn Fast User Switching off. Set it to “Disable” to turn it on.

Option 2 – Registry
- Hold the Windows Key and press “R” to bring up the Run dialog box.
- Type “regedit” then press “Enter“.
- Expand the following:
- HKEY_LOCAL_MACHINE
- SOFTWARE
- Microsoft
- Windows
- CurrentVersion
- Policies
- System
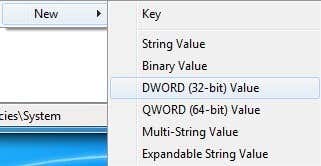
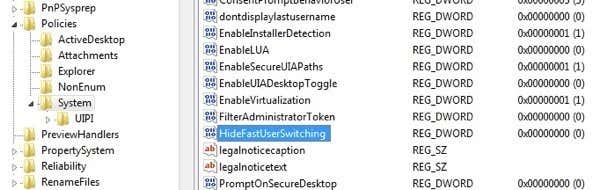
- Look for a value called “HideFastUserSwitching“. If it does not exist, right-click the “System” folder, select “New DWORD 32-bit value“, then type a name of “HideFastUserSwitching“. Press “Enter” to create the value.
- Double-click “HideFastUserSwitching“. Change the “Value data” to “1” to disable Fast User Switching, set it to “0” to enable it.
You Might Also Like
Filed Under: Windows Tagged With: Windows 10
Reader Interactions
Comments
@R Torbert
The 32 bit vs 64 bit has to do with the length of the value, nothing to do with the OS.
if you need a 32 bit value you would still use 32-bit.
In the regedit option, if your system is 64-bit… would you still select “New DWORD 32-bit value“?
There is a “New DWORD 64-bit value“ … which seems more appropriate for a 64-bit system.
I tried both options and it’s still not working. It only worked once, which was a few days ago, but after I ran some registry cleaner it stopped working. I guess the registry cleaner has deleted some other keys that might be related somehow.
Thank you so much, worked a treat.
Enoch Ideal says
thanks a lot you helped me. God bless you
this worked, thanks.
Thanks Mitch. I always forget where to find and change this setting. Love the photo of you and the kid. 🙂
Karen Jones says
Thank you so very much … was looking for this answer for hours!
I am using Pro but neither option makes a difference, nor the ore the suggested in the comments.
never had a problem with this until recently…. “helpful” update must have sabotaged my setup…. wish they’d just quit screwing with things without notice
Here is the fix
gpedit.msc
computer configuration > administrative templates > system > Logon
Always use classic logon set to enabled.
the switch user icon will now show on lock screen.
Works as described. Thanks!
I try option 2 and found the value called “HideFastUserSwitching”. But it will not allow me to set it to “0” to enable it.
I get the message “Cannot edit HideFastUserSwitching: Error writing the value’s new contents.”
John Vekich says
Thanks for publishing such a clear solution! Few things more frustrating than knowing something is there but not being able to find it. Puzzled by finding no “switch user” ability in Win 10 out of the box. Problem solved. Finding this in policy menus is last place I would have looked with my limited Win 10 experience. Went from Win 7 to Win 10 and found I was not in Kansas anymore.
Biswajit Gorai says
The first option won’t work if you have the free Windows 10, you’ll need the “Pro” one because that is the only one that has the file gpedit.msc, the registry editor (regedit) is in almost all (if not all, I don’t know) Windows, so that includes all Windows 10 and makes the second option always work.
Thank you very much
You need the Pro version in Windows 10 to get gpedit.msc
Hi I have no option to “Hide Entry Points for Fast User Switching“.
Looked for half an hour before finding this which worked! (I used the regedit option)
Using Option 1, I get an error message that Windows can’t find “gpedit.msc”. The 2nd option seems to have worked (though I don’t know how I’ll know!). I just exited from the regedit box since I didn’t see a “save” or any other way to leave.
Did this help? Let us know! Cancel reply
This site uses Akismet to reduce spam. Learn how your comment data is processed.
Primary Sidebar
Recent Posts
Who’s Behind Technipages?
 My name is Mitch Bartlett. I’ve been working in technology for over 20 years in a wide range of tech jobs from Tech Support to Software Testing. I started this site as a technical guide for myself and it has grown into what I hope is a useful reference for all.
Follow me on Twitter, or visit my personal blog.
Windows 7 Switch User Disabled or Greyed Out?
We’ll give you a registry hack to make it work
A client of mine recently had a strange problem in Windows 7 where he could not switch between users using the normal procedure. By default, if you click Start, then click on the little arrow next to shutdown, you can choose Switch User as shown below:

If this option is disabled or greyed out on your Windows 7 system, there are a couple of things you can do to fix it. If you are on a domain and want to be able to use fast user switching, you can, but you have to edit Group Policy. Depending on your company, you may or may not be able to do that.
Also note that you cannot edit this fast user switching option via the GUI anymore in Windows 7. In Windows XP, there was an option, but not in Windows 7 for some reason. So you have to edit the registry or group policy to get it to work. I’ve also mentioned a small utility you can use in case you don’t like editing the registry.
Method 1 – Registry Hack
You can re-enable the Switch User option by navigating to the following registry key:
You should see a value called HideFastUserSwitching with a value of 1. A value of 1 means that user switching is disabled. To enable it, change that value to 0. Note that if you don’t have the HideFastUserSwitching key at all, you can create one by right-clicking in the empty space on the right pane and choose New – DWORD (32-bit) Value.
Set it to 0 and then exit the registry. You will have to log off and then log back on for the changes to take effect. When you click on the arrow next to shutdown now, it should be enabled.
Method 2 – Edit Group Policy
If you are on a domain, you will have to edit the local security policy. You can do this by clicking on Start and typing in gpedit.msc to open the Group Policy Editor. Once open, navigate to the following section:
Here you will see an option called Hide entry points for Fast User Switching. You want to make sure that is Disabled in order for fast user switching to work.
Restart the computer and see if you are able to switch users now. If you see that the group policy setting automatically changed back to what it was before, that means your IT department has set it up and you won’t be able to change the setting yourself. Or you can try disconnecting your computer from the network before you restart. That way, the policies from your company can’t be applied to your computer on bootup if it’s coming from a server.
Method 3 – Download Switch User Tool
Update: This tool is no longer avaiable from the developer and has been removed from their site.
A Microsoft MVP has created a small little tool that simply switches users whenever it is run. You can download it here:
Once you extract it, just copy the file to some location on your hard drive and then create a shortcut on your desktop or wherever you like. Then just run the shortcut and it’ll automatically bring you to the switch user screen where you can click on the account you want to log into.
So that should be everything you need to get user switching enabled on a Windows 7 machine. If you are having problems, post a comment here and I’ll try to help! Enjoy!
Founder of Help Desk Geek and managing editor. He began blogging in 2007 and quit his job in 2010 to blog full-time. He has over 15 years of industry experience in IT and holds several technical certifications. Read Aseem’s Full Bio
Windows switch user disabled
Table of Contents
Introduction
Fast User Switching is a useful feature in Windows that allows you to quickly switch between different accounts on your machine. If it’s not used properly, though, it can lead to problems as your computer becomes slow due to the amount of programs that are running at the same time. With this said, many people feel its better to disable Fast User Switching altogether and require people to log off of their accounts before another person can log in. This way only the programs currently being used by the logged in user are running and will have more resources available to them.
This tutorial will explain how to disable Fast User Switching in Windows. As the settings are different in Windows XP than they are in future version, we have broken this tutorial up into two different sections.
How to disable Fast User Switching in Windows XP
To disable Fast User Switching in Windows XP, you first need to enter your Control Panel. To do this, click on the Start Button and then select the Control Panel menu option. When the Control Panel opens, you should double-click on the User Accounts icon. This will open up the User Accounts settings screen as shown in the image below.
Registry Tip: You can also disable and enable Fast User Switching by adding the AllowMultipleTSSessions DWORD value to the HKEY_LOCAL_MACHINE\SOFTWARE\Microsoft\Windows NT\CurrentVersion\Winlogon key. If you set AllowMultipleTSSessions to 0 Fast User Switching will be disabled. To enable it again set it to 1.
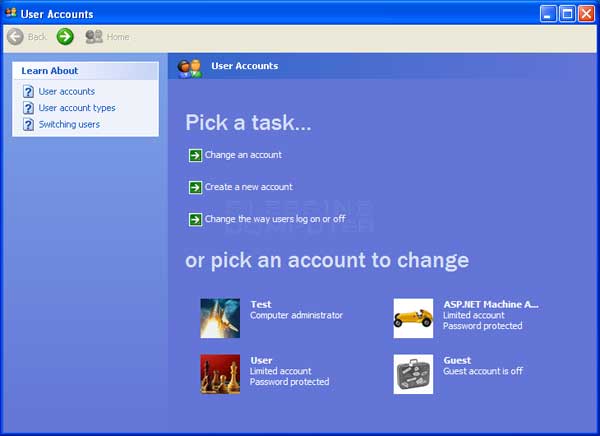
You should now click on the Change the way users log on or off option. This will bring you to another screen that is similar to the one below.
To disable Fast User Switching, uncheck the checkbox labeled Use Fast User Switch and then click on the Apply Options button. To enable Fast User Switching again, you can repeat these steps but this time put a checkbox in that setting.
How to disable Fast User Switching in Windows 7, Windows 8, and Windows Vista
If you are using Windows Premium or Starter, then you need to click here to see the instructions on how to disable Fast User Switching.
If you are using Windows Pro or Ultimate then you can disable Fast User Switching through the Group Policy Editor. To access the Group Policy Editor in Windows Vista and Windows 7, click on the Start button and type in Group Policy. You should then see an option called Edit Group Policy. In Windows 8, you should type Group Policy in the Start Screen and then click on the Settings category. The option for Edit Group Policy should now appear.
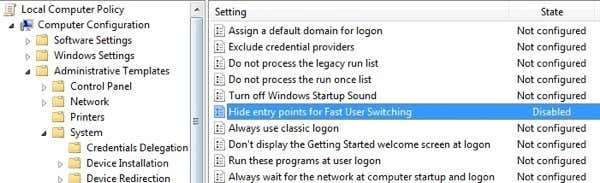
Click on the Edit Group Policy option and the Group Policy editor will open. Under the Local Computer Policy, expand the tree to the following path:
Computer Configuration\Administrative Templates\System\Logon
When you see Logon, left click on it to select it as shown in the image below.
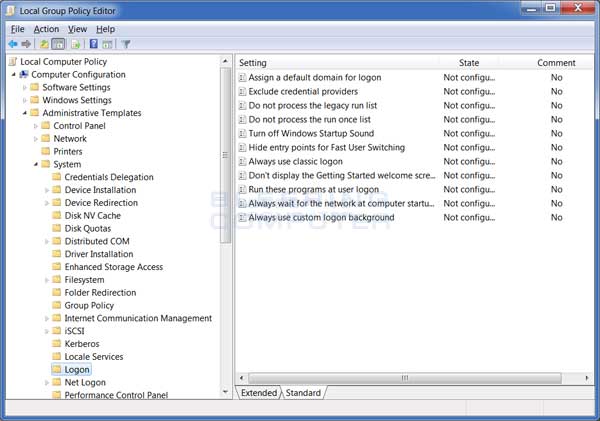
In the right-hand pane you should now see a variety of settings. Double-click on the Hide entry points for Fast User Switching setting and its properties screen will open.
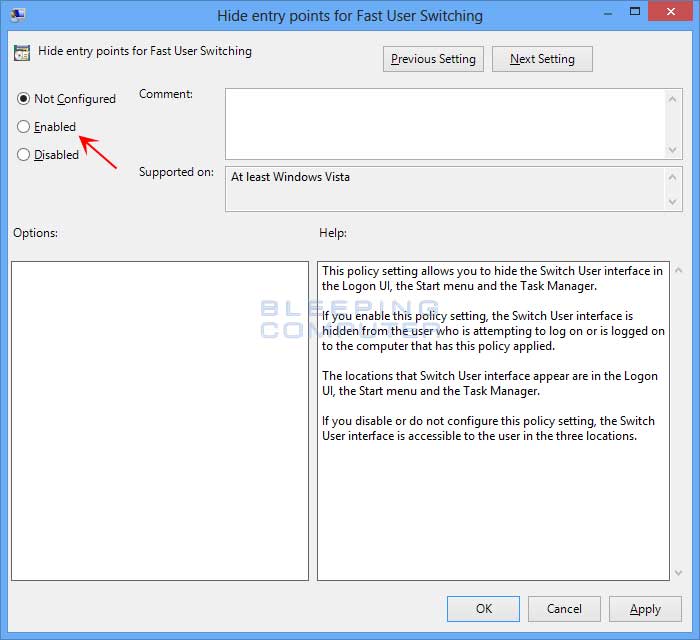
Select the Enabled radio button and then click on the Apply button. Finally click on the OK button and close the Group Policy Editor. Fast User Switching should now be disabled. If you want to enable this feature in the future, just go back to the same setting and change it to Not Configured.
If you are using Windows Starter Edition or Windows Premium, then you will not have access to the Group Policy Editor. Instead you will need to enable the setting through the Windows Registry. This setting can be enabled by creating the HideFastUserSwitching REG_DWORD value under the HKEY_LOCAL_MACHINE\SOFTWARE\Microsoft\Windows\CurrentVersion\Policies\System Registry key and setting it to 1.
If you do not feel comfortable editing the Registry, you can download this Registry file that will make the changes for you:
Just download the above Registry file and double-click on it. When it asks if you wish to merge the data, click on the Yes button.
If you want to enable it again in the future you can download and run this Registry file:
Users who read this also read:
How to switch between accounts in Windows
Fast user switching is a feature in Windows that allows you to switch to another user account on the same computer without logging off. This allows multiple users to use the same computer while keeping each account’s programs and files open and running in the background. As you can imagine, this can be useful when someone wants to use their computer but another account is logged in with open .
How to remove the Lock option from the Ctrl+Alt+Delete screen in Windows
If you do not want users on a computer to be able to have the Lock option when they enter the Ctrl+Alt+Delete keyboard combination, you can disable it via a policy in the Group Policy Editor or via a Registry key.
How to log off Windows
To achieve the best performance on your computer, it is suggested that you log off an account instead of switching to another one using Fast User Switching. By logging off an account, all the previous user’s programs and files will be closed. This will allow the new account to have access to all of the computer’s resources, which will allow it to be faster.
How to lock your screen in Windows
Windows allows you to lock your screen so that others cannot access your computer without entering your password. This is very useful when you need to be away from your computer and do not want other people to use it or access your documents. This tutorial will walk you through locking your screen in all versions of Windows as well as a method of automatically locking your screen when your .


