- Страна Админа
- Популярно об информационных системах и технологиях
- admin@adminland.ru
- Вы здесь
- Поддержите adminland
- Системный и загрузочный разделы.
- Текст:
- Системный и загрузочный раздел — System partition and boot partition
- Содержание
- Общее определение
- Определение Microsoft
- Как установить Windows 10
- Создание загрузчика Windows 10 заново. Удаляем шифрованный (EFI) системный раздел 99 Мб, а также раздел MSR 16 Мб и создаём их заново
- Создание загрузчика Windows 10 заново. Удаляем шифрованный (EFI) системный раздел 99 Мб, а также раздел MSR 16 Мб и создаём их заново
- UEFI/GPT-based hard drive partitions
- Partition Requirements
- System partition
- Microsoft reserved partition (MSR)
- Other utility partitions
- To set partitions as utility partitions
- To verify that system and utility partitions exist
- Windows partition
- Recovery tools partition
- Data partitions
- Partition layout
- Sample files: configure drive partitions by using WindowsВ PE and DiskPart scripts
- To partition hard drives and prepare to apply images
- Next steps
Страна Админа
Популярно об информационных системах и технологиях
admin@adminland.ru
Вы здесь
- Блог
- » Системный и загрузочный разделы.
Поддержите adminland
За 2020 год из пары десятков тысяч посетителей, набралось всего пару десятков перечислений от 50 до 300 рублей.
Пустяк в денежном выражении, но большая ценность для автора. Посмотрим что год грядущий нам готовит ))
Сумма абсолютно не важна — главное участие.
Системный и загрузочный разделы.
Текст:
Путаница получилась с этими разделами, вернее с их названиями. Тот который системный (system) на самом деле используется для загрузки, а на (boot) загрузочном располагаются файлы операционной системы.
Теперь по порядку.
Системный раздел помечен как активный (active), загрузка начинается с него. На нем также расположен каталог boot содержащий Boot Configuration Data (BCD) . В BCD хранится расположение Windows Boot Manager (bootmgr), по умолчанию он находится на этом же разделе. Также в BCD указан Windows Boot Loader (winload.exe) по умолчанию находящийся уже на загрузочном разделе в \Windows\System32
Теперь о подводном камне, который поджидает пользователей. Мы не рассматриваем сложные случаи установки нескольких ОС. Самый простой, представьте себе.
Компьютер с одним жестким диском и XP, вы покупаете второй HDD и заодно решаете установить Windows 7 или даже 8, а может быть и server 2008, 2012. Первый HDD уже разбит на два раздела, а второй пока неразмечен.
Установка проходит без сучка и задоринки. Все работает отлично и ничто не предвещает беды. Новый терабайтный диск легко вмещает все накопленное и даже больше. Но, как полагают некоторые, чем больше емкость диска, тем больше вероятность возникновения ошибок на нем. А может дело в том, что производители все больше и больше экономят на производственном процессе, доводя его до границы за которой начинается откровенный брак.
В общем, новый диск начинает сбоить и его быстренько меняют по гарантии. Но после этой невинной операции Windows перестает загружаться.
Дело в том, что Windows по умолчанию избегает, чтобы системный и загрузочный разделы были объединены. Не найдя на первом, размеченном HDD свободного места для создания раздела, она создала системный раздел на втором. Для этого раздела в целях безопасности буква не назначается и обычно внимания на него не обращаешь. Пока что-нибудь не приключиться.
Для восстановления загрузки нам надо пересоздать каталог boot c BCD и bootmgr.
Загружаемся с установочного образа, выбираем режим восстановления и командную строку. Допустим загрузочным разделом содержащим каталог Windows у нас является C:
bcdboot c:\windows /s c:
Команда запишет на раздел C: bootmgr и каталог boot с BCD по умолчанию, используя установочные файлы из c:\windows
Теперь необходимо сделать раздел C: активным: diskpart -> select partition -> active
Выбираем первый HDD в BIOS как загрузочный и вперед!
Системный и загрузочный раздел — System partition and boot partition
Системный раздел и загрузочный раздел (также известный как объем системы и объем загрузки ) являются вычисление условия для дисковых разделов одного жесткого диска или твердотельного накопителя , который должен существовать и быть правильно сконфигурирован для компьютера , чтобы работать. Есть два разных определения этих терминов: общее определение и определение Microsoft .
Содержание
Общее определение
В контексте каждой операционной системы, за исключением тех, что были разработаны Microsoft , системный раздел и загрузочный раздел определяются следующим образом:
- Загрузочный раздел является основным разделом , который содержит загрузчик , часть программного обеспечения , отвечающую за загрузку в операционной системе . Например, в стандартной структуре каталогов Linux ( Стандарт иерархии файловой системы ) загрузочные файлы (такие как ядро , initrd и загрузчик GRUB ) монтируются в /boot/ . Несмотря на радикально иное определение Microsoft (см. Ниже), служебное приложение «Информация о системе», входящее в семейство операционных систем Windows NT , называет его «загрузочным устройством».
- Системный раздел является разделом диска , который содержит операционную системную папку, известную как корневая систему . По умолчанию в Linux файлы операционной системы монтируются в / ( корневой каталог ).
В Linux один раздел может быть как загрузочным, так и системным, если оба раздела /boot/ и корневой каталог находятся в одном разделе.
Определение Microsoft
Начиная с Windows NT 3.1 (первая версия Windows NT), Microsoft определяет термины следующим образом:
- Системный раздел (или объем системы) является основным разделом , который содержит загрузчик, часть программного обеспечения , ответственную за загрузку операционной системы. Этот раздел содержит загрузочный сектор и помечен как активный.
- Загрузочный раздел (или загрузочный) является раздел диска , который содержит операционную системную папку, известный как корневой системы или %systemroot% в Windows NT .
Один раздел может быть как системным, так и загрузочным. Однако, если они разделены, загрузочный раздел не содержит загрузчика, а системный раздел не имеет корня системы.
До Windows 7 системный и загрузочный разделы по умолчанию были одинаковыми, и им была присвоена буква диска «C:» . Однако, начиная с Windows 7, программа установки Windows по умолчанию создает отдельный системный раздел, которому не присвоен идентификатор и поэтому он скрыт. Загрузочному разделу по-прежнему присваивается идентификатор «C:». Эта конфигурация подходит для запуска BitLocker , который требует для загрузки отдельного незашифрованного системного раздела.
Как установить Windows 10

- Просмотров: 85 157
- Автор: admin
- Дата: 5-02-2019
Создание загрузчика Windows 10 заново. Удаляем шифрованный (EFI) системный раздел 99 Мб, а также раздел MSR 16 Мб и создаём их заново
Создание загрузчика Windows 10 заново. Удаляем шифрованный (EFI) системный раздел 99 Мб, а также раздел MSR 16 Мб и создаём их заново
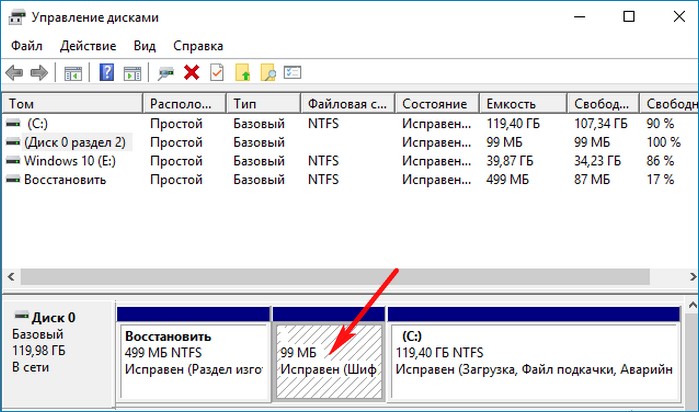
Ещё мы создадим заново не отображаемый в Управлении дисками служебный раздел MSR, обязателен для разметки GPT в системах UEFI (размер 16 Мб).
Итак, перед работой ещё раз уточним, какие именно разделы мы б удем удалять и затем создавать заново:
1. Раздел (499 Мб) содержащий среду восстановления Windows 10 (от данного раздела можно избавиться и пользоваться при необходимости средой восстановления, находящейся на загрузочном носителе с Win 10).
2. Раздел (99 Мб), шифрованный (EFI) системный раздел, содержащий все файлы загрузчика Windows 10.
3. Служебный раздел MSR (Microsoft System Reserved) 16 Мб, обязательный для разметки дисков GPT.
Загружаем ноутбук с загрузочной флешки с Windows 10 и в начальном окне установки системы жмём клавиатурное сочетание Shift + F10,
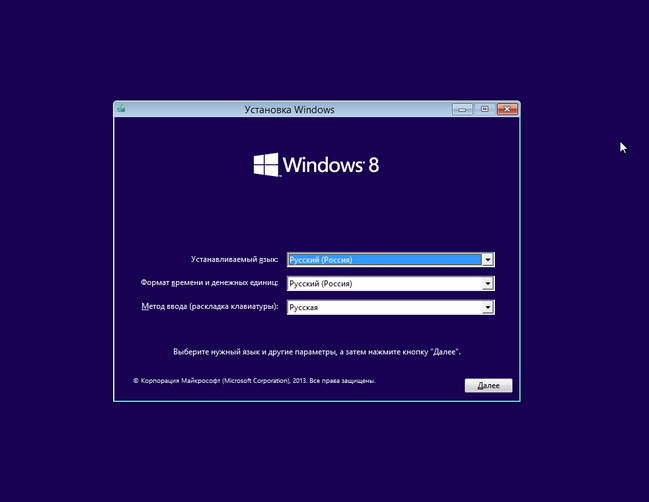
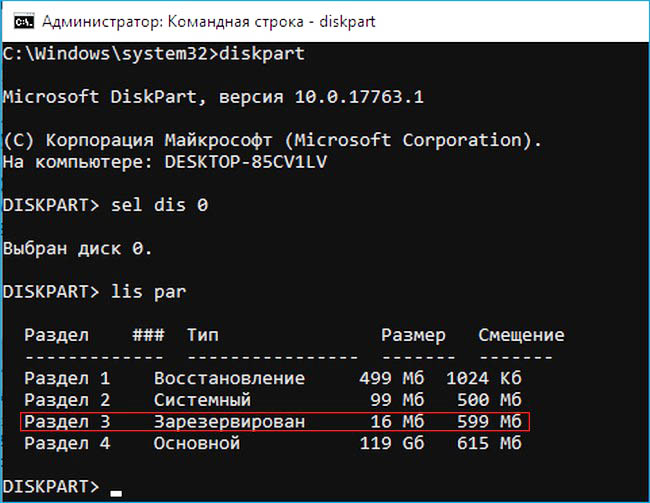
открывается окно командной строки, вводим команды:
lis dis (выводит список физических дисков).
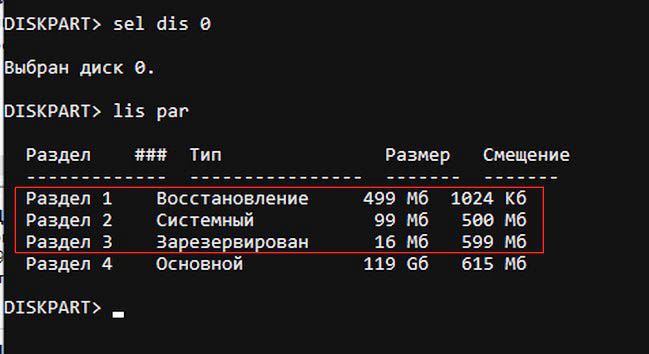
sel dis 0 (выбираем жёсткий диск ноутбука 120 Гб).
lis par (показ всех разделов выбранного диска, первые три раздела будем удалять).
sel par 1 (выбираем первый раздел
del par override (удаляем раздел, для удаления раздела ESP и MSR или раздела OEM-изготовителя ноутбука, необходимо указать параметр override)
UEFI/GPT-based hard drive partitions
Create custom partition layouts for your hard disk drives (HDDs), solid-state drives (SSDs), and other drives when deploying Windows to Unified Extensible Firmware Interface (UEFI)–based devices.
If you use a custom partition layout on WindowsВ 10 for desktop editions (Home, Pro, Enterprise, and Education), update the push-button recovery script so the recovery tools can recreate the custom partition layout when needed.
Partition Requirements
When you deploy Windows to a UEFI-based device, you must format the hard drive that includes the Windows partition by using a GUID partition table (GPT) file system. Additional drives may use either the GPT or the master boot record (MBR) file format.
A GPT drive may have up to 128 partitions.
Each partition can have a maximum of 18 exabytes (
18.8 million terabytes) of space.
System partition
The device must contain a system partition. On GPT drives, this is known as the EFI System Partition, or the ESP. This partition is usually stored on the primary hard drive. The device boots to this partition.
The minimum size of this partition is 100 MB, and must be formatted using the FAT32 file format.
This partition is managed by the operating system, and should not contain any other files, including Windows RE tools.
For Advanced Format 4K Native drives (4-KB-per-sector) drives, the minimum size is 260 MB, due to a limitation of the FAT32 file format. The minimum partition size of FAT32 drives is calculated as sector size (4KB) x 65527 = 256 MB.
Advanced Format 512e drives are not affected by this limitation, because their emulated sector size is 512 bytes. 512 bytes x 65527 = 32 MB, which is less than the 100 MB minimum size for this partition.
Microsoft reserved partition (MSR)
In WindowsВ 10, the size of the MSR is 16 MB.
Add an MSR to each GPT drive to help with partition management. The MSR is a reserved partition that does not receive a partition ID. It cannot store user data.
Other utility partitions
Any other utility partitions not managed by Windows must be located before the Windows, data, and recovery image partitions. This allows end users to perform actions such as resizing the Windows partition without affecting system utilities.
Protect end users from accidentally modifying utility partitions by identifying them using a GPT attribute. This prevents these partitions from appearing in File Explorer.
To set partitions as utility partitions
- When you’re deploying Windows by using DiskPart, use the attributes volume set GPT_ATTRIBUTE_PLATFORM_REQUIRED command after you create the partition to identify the partition as a utility partition. For more information, see the MSDN topic: PARTITION_INFORMATION_GPT structure.
To verify that system and utility partitions exist
- Click Start, right-click This PC, and then click Manage. The Computer Management window opens.
- Click Disk Management. The list of available drives and partitions appears.
- In the list of drives and partitions, confirm that the system and utility partitions are present and are not assigned a drive letter.
Windows partition
- The partition must have at least 20 gigabytes (GB) of drive space for 64-bit versions, or 16 GB for 32-bit versions.
- The Windows partition must be formatted using the NTFS file format.
- The Windows partition must have 16 GB of free space after the user has completed the Out Of Box Experience (OOBE) and Automatic Maintenance has completed.
Recovery tools partition
This partition must be at least 300 MB.
The Windows Recovery Environment (Windows RE) tools require additional free space:
- A minimum of 52 MB is required but 250 MB is recommended, to accomodate future updates, especially with custom partition layouts.
When calculating free space, note:
- The recovery image, winre.wim, is typically between 250-300MB, depending on what drivers, languages, and customizations you add.
- The file system itself can take up additional space. For example, NTFS may reserve 5-15MB or more on a 750MB partition.
This partition must use the Type ID: DE94BBA4-06D1-4D40-A16A-BFD50179D6AC.
The recovery tools should be in a separate partition than the Windows partition to support automatic failover and to support booting partitions encrypted with WindowsВ BitLocker Drive Encryption.
We recommend that you place this partition immediately after the Windows partition. This allows Windows to modify and recreate the partition later if future updates require a larger recovery image.
Data partitions
The recommended partition layout for WindowsВ 10 does not include data partitions. However, if data partitions are required, they should be placed after the Windows RE partition. This allows future updates to Windows RE to grow the Windows RE partition by shrinking the Windows partition.
This layout makes it more difficult for end users to remove the data partition and merge the space with the Windows partition. To do so, the Windows RE partition must be moved to the end of the unused space reclaimed from the data partition, so that the Windows partition can be extended.
WindowsВ 10 does not include functionality or utility to facilitate this process. However, manufacturers can develop and provide such a utility if PCs are shipped with data partitions.
Partition layout
The default partition layout for UEFI-based PCs is: a system partition, an MSR, a Windows partition, and a recovery tools partition.

This layout lets you use WindowsВ BitLocker Drive Encryption through both Windows and through the Windows Recovery Environment.
Sample files: configure drive partitions by using WindowsВ PE and DiskPart scripts
For image-based deployment, boot the PC to Windows PE, and then use the DiskPart tool to create the partition structures on your destination PCs.
In these DiskPart examples, the partitions are assigned the letters: System=S, Windows=W, and Recovery=R. The MSR partition does not receive a drive letter.
Change the Windows drive letter to a letter that’s near the end of the alphabet, such as W, to avoid drive letter conflicts. Do not use X, because this drive letter is reserved for Windows PE. After the device reboots, the Windows partition is assigned the letter C, and the other partitions don’t receive drive letters.
If you reboot, WindowsВ PE reassigns disk letters alphabetically, starting with the letter C, without regard to the configuration in Windows Setup. This configuration can change based on the presence of different drives, such as USB flash drives.
The following steps describe how to partition your hard drives and prepare to apply images. You can use the code in the sections that follow to complete these steps.
To partition hard drives and prepare to apply images
Copy and save the CreatePartitions-UEFI.txt file to a USB flash drive.
Use WindowsВ PE to boot the destination PC.
Clean and partition the drive. In this example, F is the letter of the USB flash drive.
- If you use a custom partition layout on WindowsВ 10 for desktop editions, update the push-button recovery script so the recovery tools can recreate the custom partition layout when needed.
To avoid bare metal recovery boot issues due to partition size, manufacturers should allow the bare metal recovery feature’s auto generation script to create the partition used for the recovery WIM. If manufacturer’s want to use a custom DISKPART script to create partitions, the recommended minimum partition size is 990MB with a minimum of 250MB of free space.
Next steps
Use a deployment script to apply the Windows images on the newly created partitions. For more information, see Capture and Apply Windows, System, and Recovery Partitions.


