- How to change partition size in Windows 10
- Change partition size with Windows 10 Disk Management
- How to decrease partition size in Windows 10:
- How to increase partition size in Windows 10:
- Adjust partition size with partition editor
- Take care of data while resizing disk partition
- UEFI/GPT-based hard drive partitions
- Partition Requirements
- System partition
- Microsoft reserved partition (MSR)
- Other utility partitions
- To set partitions as utility partitions
- To verify that system and utility partitions exist
- Windows partition
- Recovery tools partition
- Data partitions
- Partition layout
- Sample files: configure drive partitions by using WindowsВ PE and DiskPart scripts
- To partition hard drives and prepare to apply images
- Next steps
How to change partition size in Windows 10
by Andy, Updated on: March 1, 2021
This article introduces how to change partition size for Windows 10 computer without losing data. Resize disk partition with native Disk Management and partition editor software.
When system C drive is running out of space, nobody wants to start from scratch, so many people search by Google to find a better way. In technical forums, many people have similar questions such as:
- Is it possible to change partition size in Windows 10 without reinstalling OS.
- Is it safe to re-size partition and which tool is better to change allocated partition size.
The answer is definitely yes. To change volume size in Windows 10 laptop and desktop, there are 2 options: Windows built-in Disk Management and third party partition editor software. Because of many shortages, Disk Management is not the best tool to change partition size.
Change partition size with Windows 10 Disk Management
Windows 10 Disk Management inherited Shrink Volume and Extend Volume functions from previous version. Shrink Volume can decrease the size of both system C drive and data volumes. Extend Volume can increase size of a drive when there is adjacent Unallocated space. Both functions are safe to change partition size in Windows 10 (32 & 64 bit).
However, if you want to extend a volume by shrinking another one, Disk Management cannot help you, learn why.
How to decrease partition size in Windows 10:
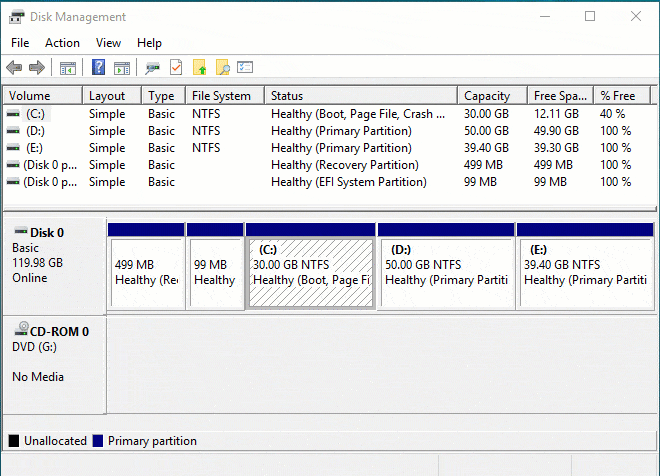
- Press Windows and X on the keyboard and select Disk Management from the list.
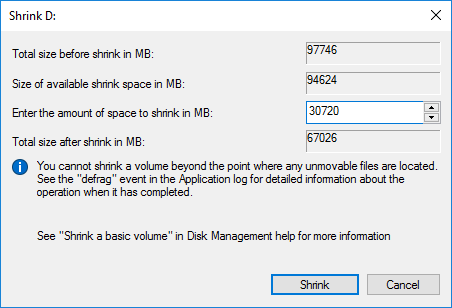
- Right click the drive you want to decrease and select Shrink Volume.
- Enter the amount of space (1024MB=1GB) and click Shrink to execute.
This drive will be shrunk within a short time in most cases.
Restrictions of Shrink Volume function:
- Only NTFS partition can be shrank, FAT32 and other types of volumes are not supported.
- Unallocated space can only be generated on the right side.
- Sometimes you can only shrink little space because of some unmovable files are located, even though there is large amount of free space in this drive.
How to increase partition size in Windows 10:
Only when your disk drive configuration meet the requirements below, Extend Volume is workable to increase partition size.
- There must be adjacent Unallocated space on the right side of the drive that you want to extend. If there’s no such Unallocated space, you must delete the right contiguous partition.
- The drive that you want to extend must be formatted with NTFS, FAT32 and other types of partitions are not supported.
- On MBR disk, the partitions to be deleted and extended must be the same Primary or Logical drive. Otherwise, you still cannot extend partition after deleting the right contiguous one.
To increase volume size with Disk Management:
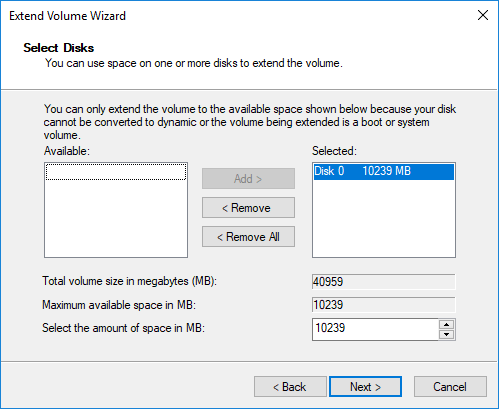
- Right click the NTFS partition that has right adjacent Unallocated space and select Extend Volume.
- Simply click Next in the pop-up Extend Volume Wizard window.
- Click Next to use default selected disk and space, or change manually.
- Click Finish to execute.
Adjust partition size with partition editor
Comparing with Windows 10 Disk Management, NIUBI Partition Editor has advantages while resizing partition, for example:
- Both NTFS and FAT32 partitions are supported to shrink and extend.
- Unallocated space can be made on either left or right when shrinking a drive.
- Partitions can be extended via 1 step with adjacent Unallocated space on either side.
- Unallocated space can be moved and combined to any nonadjacent partition on the same disk.
- If there is not plenty of space in the same disk, NIUBI can copy to a larger one and extend partition with extra space.
How to change partition size in Windows 10 with NIUBI Partition Editor:
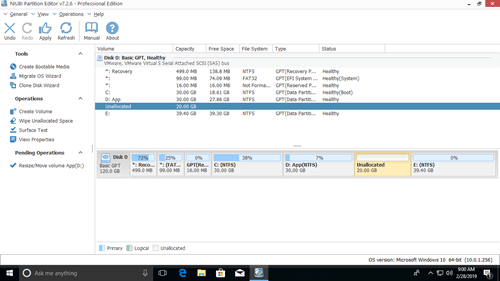
Download this program and you’ll see all disk partitions with structure and other information. In my test computer, there are drive C, D, E and system reserved partitions.
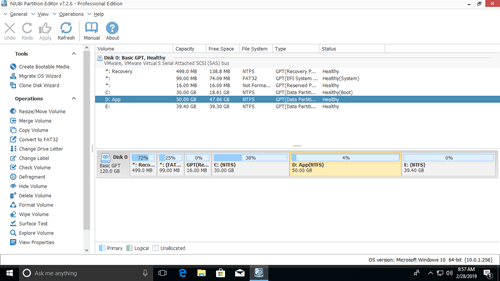
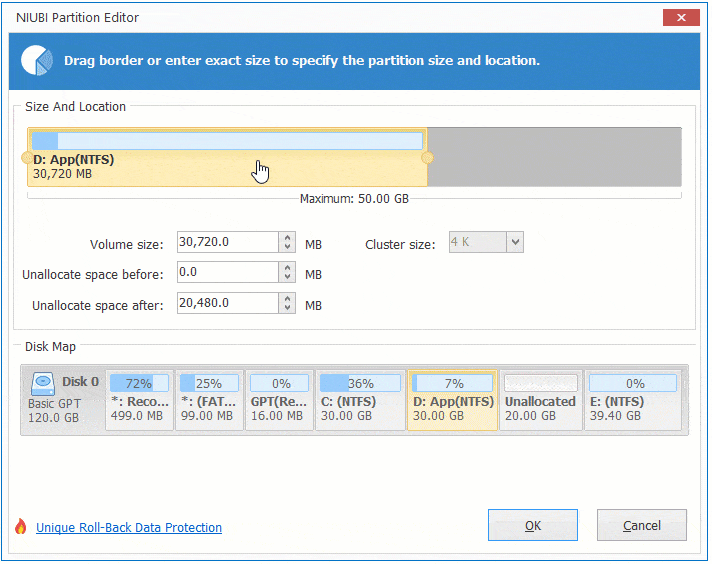
There are two options when decrease partition size, right click this partition (here is D:) and select «Resize/Move Volume».
Option 1: If you drag left border towards right in the pop-up window,
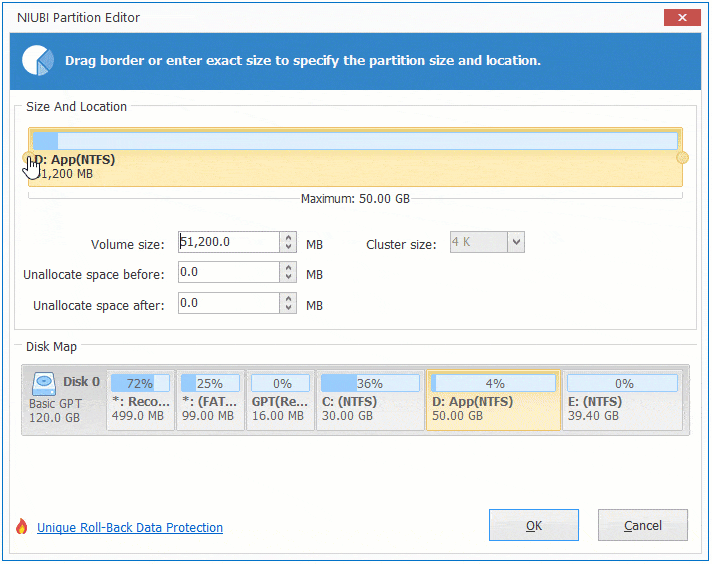
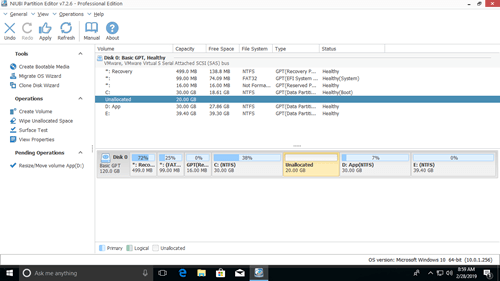
Then Unallocated space will be produced on the left side.
Option 2: If you drag right border towards left in the pop-up window,
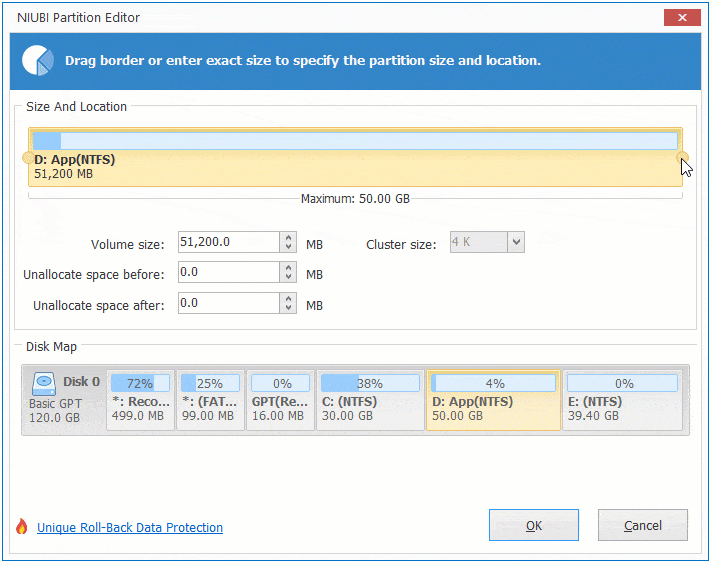
Then Unallocated space will be produced on the right side.
These Unallocated space can be used to create new volume or combine to other partition.
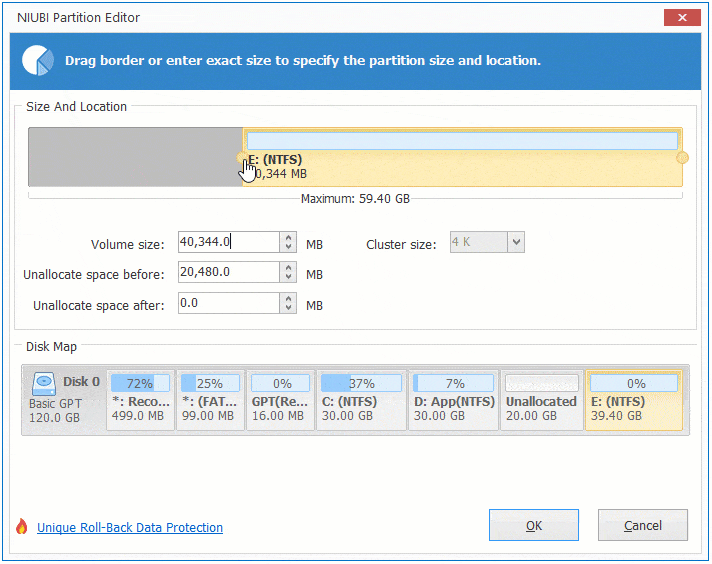
To increase size of partition C:
Right click C and select «Resize/Move Volume» again, drag right border rightwards to combine Unallocated space.
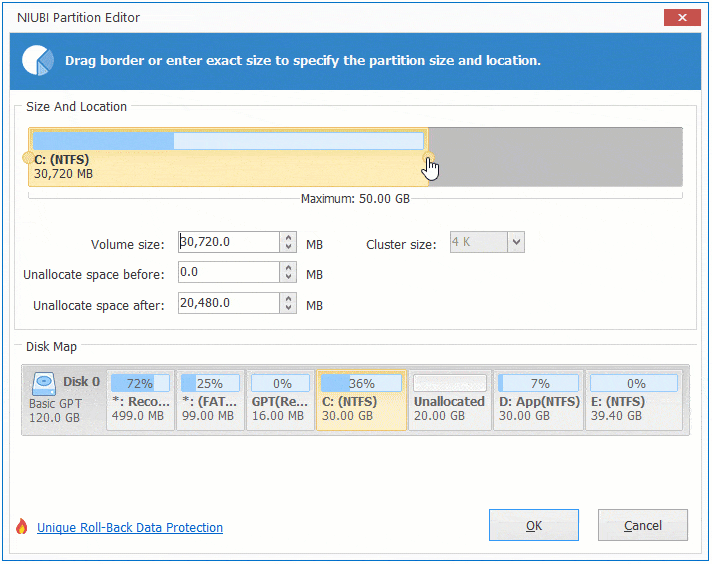
To increase size of partition E:
Right click E and select «Resize/Move Volume» again, drag left border leftwards to combine Unallocated space.
If you want to decrease E to increase C, follow Option 1 to make Unallocated space on the left side of E. Before adding Unallocated space to C drive, there is an additional step to move Unallocated space to left side of D. To do this, right click drive D and select «Resize/Move Volume», drag middle position towards right in the pop-up window.
Take care of data while resizing disk partition
There is potential system and data damage risk while change partition size for Windows 10 computer. So you’d better back up first and use safe partitioning software. Better than other software, NIUBI Partition Editor provides powerful 1 Second Rollback, Virtual Mode and Cancel-at-well technologies to protect system and data.
Besides changing partition size, it helps you do many other operations such as: merge, convert, defrag, copy, hide, wipe and scan partition. Initialize, convert, set read-only attribute to disk, etc.
UEFI/GPT-based hard drive partitions
Create custom partition layouts for your hard disk drives (HDDs), solid-state drives (SSDs), and other drives when deploying Windows to Unified Extensible Firmware Interface (UEFI)–based devices.
If you use a custom partition layout on WindowsВ 10 for desktop editions (Home, Pro, Enterprise, and Education), update the push-button recovery script so the recovery tools can recreate the custom partition layout when needed.
Partition Requirements
When you deploy Windows to a UEFI-based device, you must format the hard drive that includes the Windows partition by using a GUID partition table (GPT) file system. Additional drives may use either the GPT or the master boot record (MBR) file format.
A GPT drive may have up to 128 partitions.
Each partition can have a maximum of 18 exabytes (
18.8 million terabytes) of space.
System partition
The device must contain a system partition. On GPT drives, this is known as the EFI System Partition, or the ESP. This partition is usually stored on the primary hard drive. The device boots to this partition.
The minimum size of this partition is 100 MB, and must be formatted using the FAT32 file format.
This partition is managed by the operating system, and should not contain any other files, including Windows RE tools.
For Advanced Format 4K Native drives (4-KB-per-sector) drives, the minimum size is 260 MB, due to a limitation of the FAT32 file format. The minimum partition size of FAT32 drives is calculated as sector size (4KB) x 65527 = 256 MB.
Advanced Format 512e drives are not affected by this limitation, because their emulated sector size is 512 bytes. 512 bytes x 65527 = 32 MB, which is less than the 100 MB minimum size for this partition.
Microsoft reserved partition (MSR)
In WindowsВ 10, the size of the MSR is 16 MB.
Add an MSR to each GPT drive to help with partition management. The MSR is a reserved partition that does not receive a partition ID. It cannot store user data.
Other utility partitions
Any other utility partitions not managed by Windows must be located before the Windows, data, and recovery image partitions. This allows end users to perform actions such as resizing the Windows partition without affecting system utilities.
Protect end users from accidentally modifying utility partitions by identifying them using a GPT attribute. This prevents these partitions from appearing in File Explorer.
To set partitions as utility partitions
- When you’re deploying Windows by using DiskPart, use the attributes volume set GPT_ATTRIBUTE_PLATFORM_REQUIRED command after you create the partition to identify the partition as a utility partition. For more information, see the MSDN topic: PARTITION_INFORMATION_GPT structure.
To verify that system and utility partitions exist
- Click Start, right-click This PC, and then click Manage. The Computer Management window opens.
- Click Disk Management. The list of available drives and partitions appears.
- In the list of drives and partitions, confirm that the system and utility partitions are present and are not assigned a drive letter.
Windows partition
- The partition must have at least 20 gigabytes (GB) of drive space for 64-bit versions, or 16 GB for 32-bit versions.
- The Windows partition must be formatted using the NTFS file format.
- The Windows partition must have 16 GB of free space after the user has completed the Out Of Box Experience (OOBE) and Automatic Maintenance has completed.
Recovery tools partition
This partition must be at least 300 MB.
The Windows Recovery Environment (Windows RE) tools require additional free space:
- A minimum of 52 MB is required but 250 MB is recommended, to accomodate future updates, especially with custom partition layouts.
When calculating free space, note:
- The recovery image, winre.wim, is typically between 250-300MB, depending on what drivers, languages, and customizations you add.
- The file system itself can take up additional space. For example, NTFS may reserve 5-15MB or more on a 750MB partition.
This partition must use the Type ID: DE94BBA4-06D1-4D40-A16A-BFD50179D6AC.
The recovery tools should be in a separate partition than the Windows partition to support automatic failover and to support booting partitions encrypted with WindowsВ BitLocker Drive Encryption.
We recommend that you place this partition immediately after the Windows partition. This allows Windows to modify and recreate the partition later if future updates require a larger recovery image.
Data partitions
The recommended partition layout for WindowsВ 10 does not include data partitions. However, if data partitions are required, they should be placed after the Windows RE partition. This allows future updates to Windows RE to grow the Windows RE partition by shrinking the Windows partition.
This layout makes it more difficult for end users to remove the data partition and merge the space with the Windows partition. To do so, the Windows RE partition must be moved to the end of the unused space reclaimed from the data partition, so that the Windows partition can be extended.
WindowsВ 10 does not include functionality or utility to facilitate this process. However, manufacturers can develop and provide such a utility if PCs are shipped with data partitions.
Partition layout
The default partition layout for UEFI-based PCs is: a system partition, an MSR, a Windows partition, and a recovery tools partition.

This layout lets you use WindowsВ BitLocker Drive Encryption through both Windows and through the Windows Recovery Environment.
Sample files: configure drive partitions by using WindowsВ PE and DiskPart scripts
For image-based deployment, boot the PC to Windows PE, and then use the DiskPart tool to create the partition structures on your destination PCs.
In these DiskPart examples, the partitions are assigned the letters: System=S, Windows=W, and Recovery=R. The MSR partition does not receive a drive letter.
Change the Windows drive letter to a letter that’s near the end of the alphabet, such as W, to avoid drive letter conflicts. Do not use X, because this drive letter is reserved for Windows PE. After the device reboots, the Windows partition is assigned the letter C, and the other partitions don’t receive drive letters.
If you reboot, WindowsВ PE reassigns disk letters alphabetically, starting with the letter C, without regard to the configuration in Windows Setup. This configuration can change based on the presence of different drives, such as USB flash drives.
The following steps describe how to partition your hard drives and prepare to apply images. You can use the code in the sections that follow to complete these steps.
To partition hard drives and prepare to apply images
Copy and save the CreatePartitions-UEFI.txt file to a USB flash drive.
Use WindowsВ PE to boot the destination PC.
Clean and partition the drive. In this example, F is the letter of the USB flash drive.
- If you use a custom partition layout on WindowsВ 10 for desktop editions, update the push-button recovery script so the recovery tools can recreate the custom partition layout when needed.
To avoid bare metal recovery boot issues due to partition size, manufacturers should allow the bare metal recovery feature’s auto generation script to create the partition used for the recovery WIM. If manufacturer’s want to use a custom DISKPART script to create partitions, the recommended minimum partition size is 990MB with a minimum of 250MB of free space.
Next steps
Use a deployment script to apply the Windows images on the newly created partitions. For more information, see Capture and Apply Windows, System, and Recovery Partitions.


