- What are the system recovery options in Windows?
- What each recovery option does
- To open the System Recovery Options menu on your computer
- To open the System Recovery Options menu using the Windows 7 installation disc or a USB flash drive, or a system repair disc
- How to Repair Windows 10 Using Command Prompt (5 Ways)?
- How do I repair Windows 10 with command prompt?
- Method 1. How to repair Windows 10 using SFC?
- Method 2. How to repair Windows 10 using DISM?
- Method 3. How to reset Windows 10 with command line?
- Method 4. How to run system restore with command prompt?
- Method 5. How to repair Windows 10 with AOMEI.exe?
- How to Run System Restore from Command Prompt Windows 7?
- When do you need to restore Windows 7?
- Launch System Restore from Command Prompt in System Recovery Options
- Launch System Restore via Safe Mode with Command Prompt
- Restore Windows 7 with AOMEI Backupper.exe
- Conclusion
What are the system recovery options in Windows?
Support for Windows 7 ended on January 14, 2020
We recommend you move to a Windows 10 PC to continue to receive security updates from Microsoft.
The System Recovery Options menu contains several tools, such as Startup Repair, that can help you recover Windows from a serious error. This set of tools is on your computer’s hard disk and on the Windows installation disc.
Note: You can also create a system repair disc that contains the System Recovery Options menu. For more information, see Create a system repair disc. If you use a Tablet PC or other computer with a touchscreen, you might need to connect a keyboard and mouse in order to use Startup Repair and the other tools in the System Recovery Options menu.
What each recovery option does
System recovery option
Fixes certain problems, such as missing or damaged system files, that might prevent Windows from starting correctly.
Restores your computer’s system files to an earlier point in time without affecting your files, such as e‑mail, documents, or photos.
If you use System Restore from the System Recovery Options menu, you cannot undo the restore operation. However, you can run System Restore again and choose a different restore point, if one exists.
System Image Recovery
You need to have created a system image beforehand to use this option. A system image is a personalized backup of the partition that contains Windows, and includes programs and user data, like documents, pictures, and music.
Windows Memory Diagnostic Tool
Scans your computer’s memory for errors.
Advanced users can use Command Prompt to perform recovery-related operations and also run other command line tools for diagnosing and troubleshooting problems.
Note: Some computer manufacturers might customize the menu by adding or removing recovery tools, or including their own tools.
To open the System Recovery Options menu on your computer
Remove all floppy disks, CDs, and DVDs from your computer, and then restart your computer using the computer’s power button.
Do one of the following:
If your computer has a single operating system installed, press and hold the F8 key as your computer restarts. You need to press F8 before the Windows logo appears. If the Windows logo appears, you need to try again by waiting until the Windows logon prompt appears, and then shutting down and restarting your computer.
If your computer has more than one operating system, use the arrow keys to highlight the operating system you want to repair, and then press and hold F8.
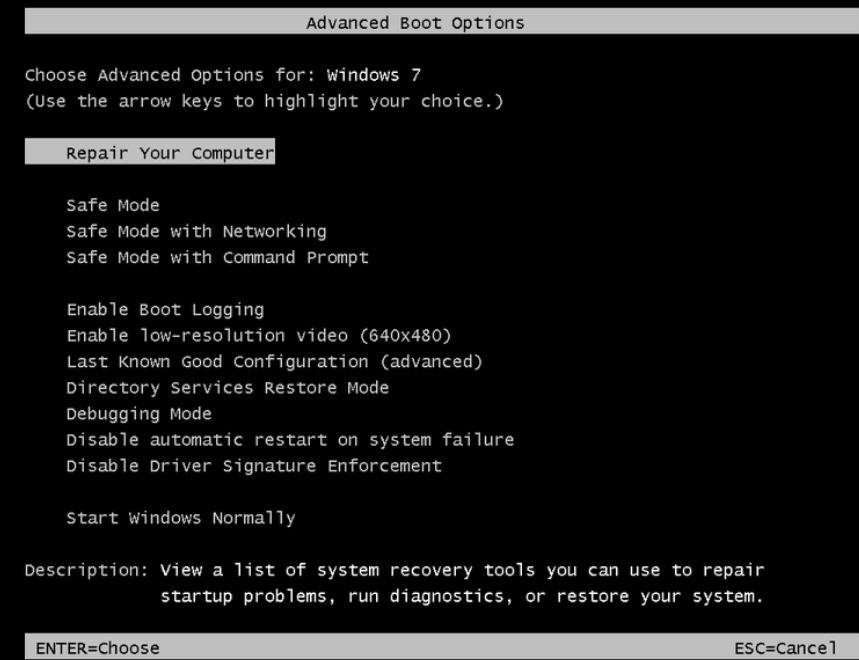
On the Advanced Boot Options screen, use the arrow keys to highlight Repair your computer, and then press Enter. (If Repair your computer isn’t listed as an option, then your computer doesn’t include preinstalled recovery options, or your network administrator has turned them off.)
Select a keyboard layout, and then click Next.
On the System Recovery Options menu, click a tool to open it.
To open the System Recovery Options menu using the Windows 7 installation disc or a USB flash drive, or a system repair disc
If your computer’s system is severely damaged and you can’t access the System Recovery Options menu on your computer, you can access it using the Windows 7 installation disc or a USB flash drive, or using a system repair disc if you created one earlier.
To use this method, you need to restart (boot) your computer using the disc or USB flash drive.
Insert the Windows 7 installation disc or USB flash drive, or a system repair disc, and then shut down your computer.
Restart your computer using the computer’s power button.
When prompted, press any key, and then follow the instructions that appear.
On the Install Windows page, or on the System Recovery Options page, choose your language and other preferences, and then click Next.
If neither the Install Windows page nor the System Recovery Options page appear, and you’re not asked to press any key, you might need to change some system settings.
If you’re using the Windows installation disc or USB flash drive, click Repair your computer.
Select the Windows installation you want to repair, and then click Next.
On the System Recovery Options menu, click a tool to open it.
How to Repair Windows 10 Using Command Prompt (5 Ways)?
When your computer won’t work properly, you can learn how to repair Windows 10 using command prompt from this article.

By AOMEI  / Last Updated March 9, 2021
How do I repair Windows 10 with command prompt?
When there is some problem happens to Windows, you can repair your windows with some basic repair like Windows directory repair, boot directory repair. When the error is too serious, you can run advanced repair like system restore. For Windows 10, you can also use DISM command line utility to repair Windows 10 image. Next, this article will introduce you how to repair Windows 10 using command prompt with five methods.
Method 1. How to repair Windows 10 using SFC?
SFC (System File Checker) is a command-line utility that can scan for corruption in Windows system files and replace any corrupted or missing protected system files with a known good version. When you feel buggy with your computer or notice problems during boot, you can use SFC to diagnose problems and repair it.В
To repair Windows 10 using SFC with detailed steps:
1. Open «Start», search for the Command Prompt, select it and run as administrator.
2. Then type the command: «sfc /scannow» and press «Enter».
If SFC is unable to fix the problem, probably the utility cannot get the necessary files from the Windows image, which might have become broken. In this situation, you can use DISM to repair the Windows image.
Method 2. How to repair Windows 10 using DISM?
Windows 10 includes a command-line utility known as DISM (Deployment Image Servicing and Management). DISM command Windows 10 can be used to repair and prepare Windows images, including, Windows Setup, Windows Recovery Environment, and Windows PE. Also, DISM can be used to fix the recovery image within an installation of the operating system.
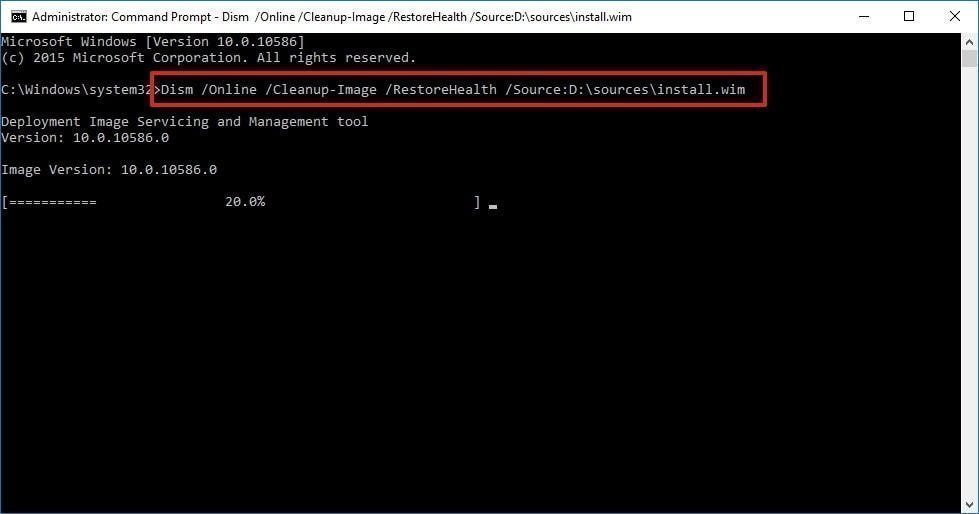
To repair Windows 10 using DISM commands:
To check whether there is any corruption, Run command line as administrator, then type the following syntaxВ and press «Enter».
DISM /Online /Cleanup-Image /CheckHealth
To scan the Windows image for any corruption, type below command and hit «Enter».
DISM /Online /Cleanup-Image /ScanHealth
To fix Windows image, type the following command and hit «Enter».
DISM /Online /Cleanup-Image /RestoreHealth /Source:repairSource\install.wim
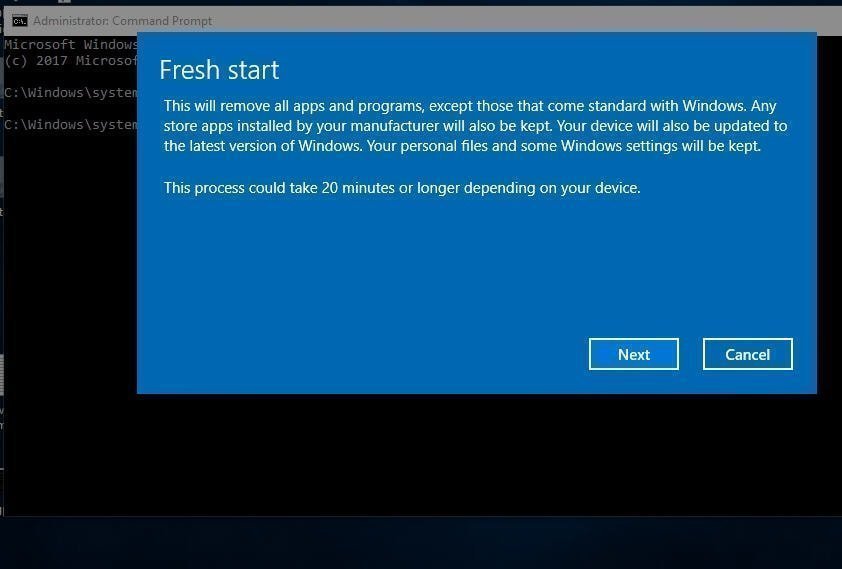
Method 3. How to reset Windows 10 with command line?
To reset Windows 10 with «Reset this PC», follow the instructions below:
Type “systemreset -cleanpc” in an elevated command prompt and press «Enter».В (If your computer cannot boot, you can boot into recovery mode and select «Troubleshoot», and then choose «Reset this PC».)
Method 4. How to run system restore with command prompt?
If the problem is too severe, you can try to restore your Windows 10 to the previous state as long as you have enabled system restore. But, it willВ notВ restoreВ documents, music, emails, or personal files of any kind. If this is what you need, see below.
To run system restore in safe mode, follow the steps below:
1. Start your computer and press «F8» repeatedly until the Windows advanced options menu appears.
2. Click «Safe Mode with command prompt» and press «Enter». If your computer can boot normally, type «cmd» in the search box and click «Command Prompt» to continue.
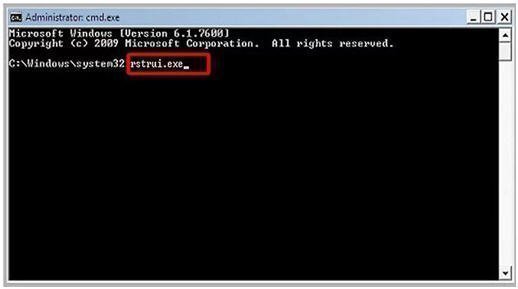
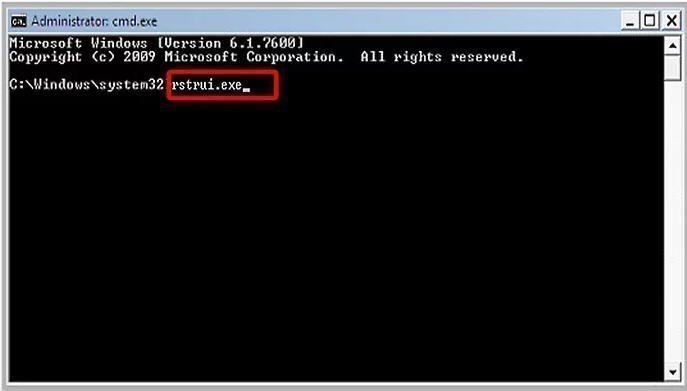
3. Sign in using an administrator account if needed. Once the command prompt is showing, enterВ «rstrui.exe» at first in the Command Prompt Window andВ press «Enter» to continue.
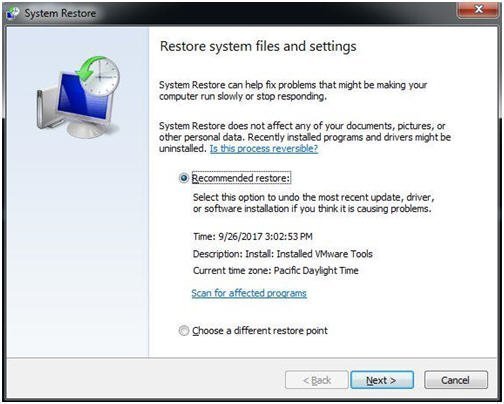
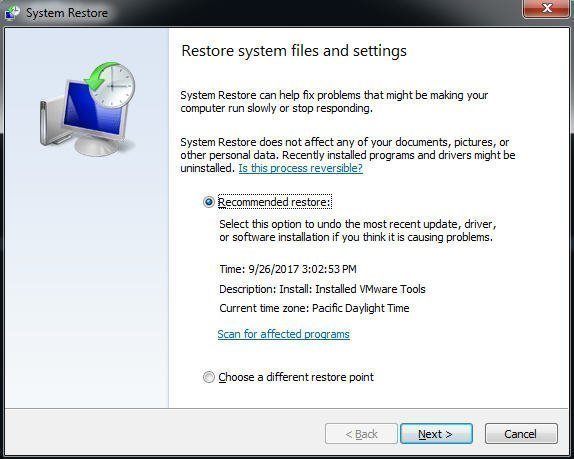
4. This command will bring you to the interface of System Restore. You can either use the recommended restore point or click «Next» to choose an available restore point. Then, follow the instruction to complete system restore.
Method 5. How to repair Windows 10 with AOMEI.exe?
Besides system restore, you can also repair Windows 10 with AOMEI.exe. AOMEI Backupper is a reliable backup and restore software which is designed for Windows 10/8/7/XP/Visa. You can either backup and restore from graphic users interface or command line. It has some features that Windows built-in tool does not have. For example, you can use AOMEI Backupper to create incremental backup, and you can restore to a dissimilar hardware.
Suppose you have created system image backup with AOMEI Backupper. Before restoring system, you can use a utility named Check Image to check if system image backup is intact and without error.В
Then, use the following steps to restore windows 10 with AOMEI.exe:
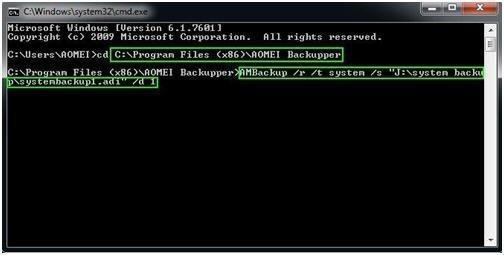
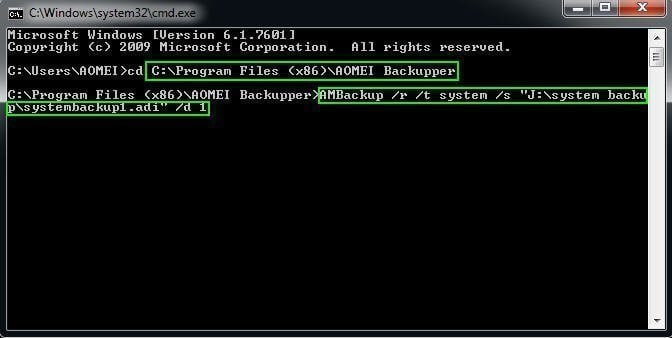
1. Navigate to AOMEI Backupper installation directory by typing the following command in command line and press «Enter». For example: cd C:\Program Files (x86)\AOMEI Backupper.
Note: If you run this command under Windows PE environment, the drive letters might change.
2. Run the following command to start restore: AMBackup /r /t [backup type] /s «[backup location path]» /d [destination location]. For example: To restore the system backup saved in J:\systembackup1 to disk 1. You should type the command: AMBackup /r /t system /s “J:\system backup\systembackup1.adi” /d 1
Tip: If you need to restore to another computer, AOMEI Backupper «Universal Restore» feature can make this very easy. For example: Run system restore in the image named «systembackup1.adi» to the partition 0 on disk 0 and perform a universal restore. AMBackup /r /t system /s «D:\system backup\systembackup1.adi» /d 0:0 /x
Now you have learned how to repair Windows 10 using command line with five methods. You can choose one based on your preference. It is also suggested to keep backup software AOMEI Backupper installed on your computer to provide continuous protection (try 30-day free trial).В
Also, you can find «Recovery Environment» utility in «Tools» toВ enable the boot option of AOMEI Backupper recovery environment. When system crashes, it enables you to perform backup/restore from boot easily.
If you want to protect unlimited computers within your company, you can pick AOMEI Backupper Technician. With the inbuilt AOMEI Image Deploy tool, you are also allowed to deploy/restore system image file on server-side computer to multiple client-side computers over network.
How to Run System Restore from Command Prompt Windows 7?
How to run system restore from command prompt in Windows 7? Go ahead to read this article, and it will introduce you an easy way to restore Windows 7 from CMD.
By AOMEI / Last Updated September 11, 2020
When do you need to restore Windows 7?
System restore from Command Prompt in Windows 7 is a quite useful action when your system has crashed or cannot boot. Most users would like to restore system from a system backup instead of reinstalling Windows.
Reinstalling system is a time-consuming process, for it wipes all your files and programs. In comparison, system restore requires less time, for it just withdraws unwanted changes and reverts Windows to an earlier date when everything was working fine.
In addition, when you buy a new computer and want to keep the old system, you can restore the old system to the new computer. In this way, you can transfer everything from the old system to the new computer. There’s no need for you to reinstall your frequently-used applications.
There are three methods to perform System Restore from Command Prompt in Windows 7:
Launch System Restore from Command Prompt in System Recovery Options
When it comes to system restore with command line when Windows cannot boot, what comes to mind first is System Recovery Options Command Prompt in Windows 7. It is true. However, if you use “wbadmin start recovery” command, you will get the following error:
“Warning: The START RECOVERY command is not supported in this version of Windows.”
That is because some of the sub-commands of Wbadmin are only available for server, and “wbadmin start recovery” is one of them. This command is used to restore files/volumes/applications that were backed up using Windows Server Backup.
Luckily, you can open System Restore by another command:
1. Open CMD in System Recovery Options, type rstrui.exe and press Enter. This command will open System Restore wizard immediately.
2. Choose a restore point and click Next. Follow the instruction to complete system restore.
Launch System Restore via Safe Mode with Command Prompt
There is still another way to launch System Restore. You can go to Safe Mode with Command Prompt:
1. Restart your computer. During the start process, repeatedly press F8 until Windows Advanced Boot Options appears. Select Safe Mode with Command Prompt and press Enter.
2. When you get into the Command Prompt window, type cd restore and press Enter. Then type rstrui.exe and press Enter. Then you will launch the System Restore wizard and you can follow the wizard to complete restore process.
Restore Windows 7 with AOMEI Backupper.exe
AOMEI Backupper Professional is trustable backup and restore software. It enables you to backup and restore the system either from graphic user interface or command line. The best part is you can restore system to dissimilar hardware using the Universal Restore feature. Besides, it supports both 32 bit and 64 bit of Windows 10/8.1/8/7/Vista/XP.
Some required parameters:
в—Џ : restore the backup of system, disk, partition or dynamic volume.
в—Џ
в—Џ
в—Џ : specify universal restore to restore system to dissimilar hardware. It has to be used with «/t system» and «/t disk».
AOMEI Backupper restore is based on AOMEI Backupper backup. That is to say, if you want to perform system restore with AOMEI Backupper, you must create a system image backup by AOMEI Backupper in advance. To make the restore process smooth, you can check if system image backup is intact and without error by using the Check Image feature.
Let’s see the detailed steps to run system restore from Command Prompt in Windows 7 with AOMEI Backupper.
Step 1. Click «Start» and type CMD to open the Command Prompt. Right click «cmd» and select «Run as administrator».
Step 2. Navigate to AOMEI Backupper installation directory by typing the following command and press Enter:
cd [installation path of AOMEI Backupper] (e.g., cd C:\Program Files (x86)\AOMEI Backupper)
Step 3. Type the following command and press Enter to start restore:
AMBackup /r /t [backup type] /s «[backup location path]» /d [destination location]
①To restore the system image “systembackup1.adi” saved in J:\systembackup to disk 1. The command should be: AMBackup /r /t system /s “J:\system backup\systembackup1.adi” /d 1.
в‘Ў To restore the system image “systembackup1.adi” saved in D:\system backup to partition 0 on disk 0 and perform universal restore. The command should be: AMBackup /r /t system /s «D:\system backup\systembackup1.adi» /d 0:0 /x.
Notes:
в—Џ To run system restore when Windows fails to boot, you should create bootable media with AOMEI Backupper to boot your machine. It will bring you to the main interface of AOMEI Backupper. You can open Command Prompt from Tools > Windows shell command and then type the commands mentioned above to perform system restore.
в—Џ If you run the commands under Windows PE, the drive letters might change.
Restore with AOMEI Backupper GUI
If there is nothing wrong with your Windows 7, you just want to restore it to a specific point to uninstall some programs or migrate system to another disk, like SSD or something alike. You do not have to run system restore from Command Prompt in Windows 7, you can also carry out the operations by directly launch this software’s graphic user interface in Windows:
Click Restore and Select Task > Choose the system backup task from the list > Select to restore the entire system or a partition > (Optional) Choose a destination path to restore the system image to > Click Start Restore. It is quite easy and you can make it with only a few clicks.

Conclusion
Now you know how to run system restore from Command Prompt in Windows 7. AOMEI Backupper offers you both command line operations and GUI operations. You can also use it to run system restore via command lines in Windows 10. Besides system backup & recovery, AOMEI Backupper is also excellent disk clone software. With it, you can clone hard drives and migrate Windows 7 to SSD easily.
If you want to protect unlimited computers within your company, you can pick AOMEI Backupper Technician. With the inbuilt AOMEI Image Deploy tool, you are also allowed to deploy/restore system image file on server-side computer to multiple client-side computers over network.


