- system restore error 0x80042315. HELP.
- System Restore Encountered an Error 0x81000203 (Property Page) Windows 10
- System Restore Encountered an Error 0x81000203 Windows 10 Solutions
- Uninstall TuneUp Utilities & Disable Turbo Mode
- Disable Turbo Mode
- Turn on Microsoft Software Shadow Copy Provider Service
- Use Group Policy Editor to Enable System Restore
- Perform a Registry Tweak
- Wrapping up
- One thought on “ System Restore Encountered an Error 0x81000203 (Property Page) Windows 10 ”
- Full Fix: System Restore error 0x80070091 on Windows 10, 7
- System Restore error 0x80070091
- Solution 1 – Rename WindowsApp folder from Safe Mode
- Solution 2 – Check your antivirus
- Solution 3 – Use third-party tools
- Solution 4 – Use Linux Live CD
- Solution 5 – Run chkdsk scan
- Solution 6 – Keep your system up to date
- Solution 7 – Remove problematic updates
- Solution 8 – Remove problematic applications
system restore error 0x80042315. HELP.
I was having some computer issues so I thought I would try a system restore. I then got (and continue to get) a message that says «No restore points have been created on your computer’s system disk. To create a restore point open System Protection»
I do so. However when I click «create» i get an error window that reads:
The restore point could not be created for the following reason:
VSS encountered problems while sending events to writers. (0x80042315)
Please try again.
HOW DO I FIX THIS.
Welcome to Windows 7 Answers Forums!
I would first suggest you to check if the Volume Shadow Copy service is running.
1. Click on Start , type Services in Start Search. When the Services page is open, check for Volume Shadow Copy service .
2. Right click on Volume Shadow Copy service (VSS) and Check if it is started.
3. If it is stopped select Start or Restart.
Check whether you can try creating the restore points after starting the service
For more information, refer the following link:
If you have installed any security software, then try to disable the Security Software temporarily and check.
You may also refer the following link and perform an online scan on your computer to check whether your computer is been infected by any virus.
Hope this information is useful.
Microsoft Answers Support Engineer
Visit our Microsoft Answers Feedback Forum and let us know what you think.
System Restore Encountered an Error 0x81000203 (Property Page) Windows 10
System Restore Encountered an Error 0x81000203 is one of the nagging problems on Windows 10. This stop code generally occurs when you make an attempt to turn on or off System Restore. Basically, there are two possible reasons that stop this utility from working. Firstly, the TuneUp Utilities 2009 / 2010 / 2011 are causing this specific issue. The TuneUp Turbo mode disables certain components so that System Restore cannot be used. Moreover, a service called Microsoft Software Shadow Copy Provider may not be running on the system.
This System Restore Encountered an Error 0x81000203 is not new to the Windows family. The bugs and problems in the OS also lead to some similar issues such as System Restore Error 80042308 or Error 0x8000ffff Catastrophic Failure While System Restore.
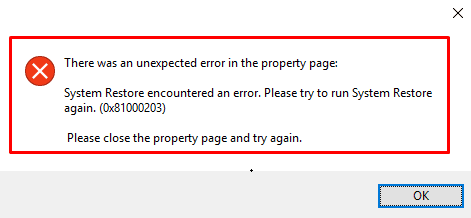
The full error message is -“There was an unexpected error in the property page
System Restore encountered an error. Please try to run System Restore
again. (0x81000203)
Please close the property page and try again.”
However, if you are also unable to use this important utility of Windows, then try out the following solutions.
System Restore Encountered an Error 0x81000203 Windows 10 Solutions
Here is how to fix System Restore Encountered an Error 0x81000203 (Property Page) Windows 10 –
Uninstall TuneUp Utilities & Disable Turbo Mode
Step-1: Perform a right-click Start Menu and select Apps and Features option when the Win+X menu shows up. This will immediately open the Apps & Features settings page.

Step-2: Move to the right pane, locate and select the TuneUp Utilities or its related programs in the list here.
Step-3: When the program expands, click the Uninstall button. Now the uninstaller wizard of the program will appear, do a hit on the Uninstall button to completely wipe it out from PC.
Step-4: After the uninstallation gets over, restart Windows 10 and thereafter try performing a system restore.
Check if the Error 0x81000203 has been fixed, if not try the next tool.
Disable Turbo Mode
Sometimes, Turbo Mode disables a component or element which is accountable for System Restore. In case, you prefer to keep TuneUp, you can turn off the “Turbo Mode” and then proceed to use System Restore.
First of all, get access to the TuneUp Utilities Start Center.
At the bottom left of the window, you’ll notice PC Optimization Mode section. Here, select either Economy or Standard.
See the Windows optimization tool which is either “Economy” or “Standard”. Moreover, you can also click on the small wrench icon below Turbo and disable the options present here.
Now give an attempt to System Restore again and check if the error 0x81000203 shows up or not. Most probably the problem will not appear this time.
If your PC has another version of “TuneUp utilities”, you need to make a hit on the Turbo icon at the lower left and switch it OFF.
Turn on Microsoft Software Shadow Copy Provider Service
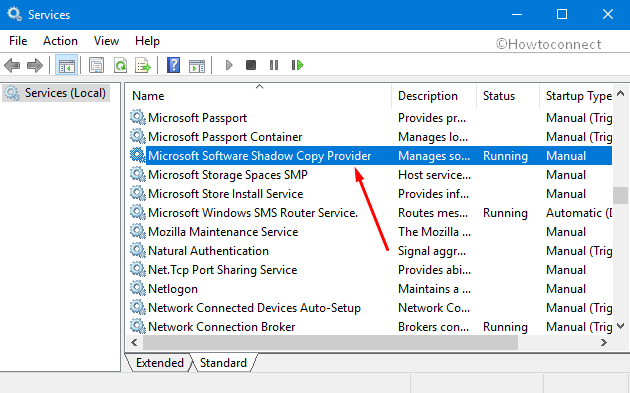
If the TuneUp or other tuning related utilities are not installed, then there are possible chances that a service namely Microsoft Software Shadow Copy Provider is not running on the system. So you need to first activate this service by following the below-written steps.
Press Win + S hotkey and type services in Cortana text box. When the Best match displays Services Desktop app, click on it.
Moving ahead, locate the service namely Microsoft Software Shadow Copy Provider and double-click on it.
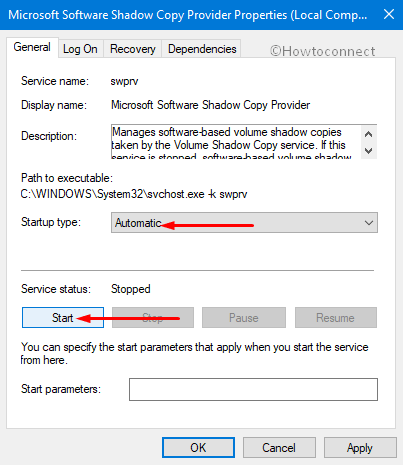
Now click the drop-down against Start type and choose Automatic. Next, click the Start button under Service status.
Next, open Control Panel and navigate to System and Security => System => System Protection. Here, under the “System Protection” tab, select a particular drive and henceforth click “Configure“.

Make sure the checkbox Turn on System Protection is active. Use the Max Usage slider and then set Maximum Disk Space usage.
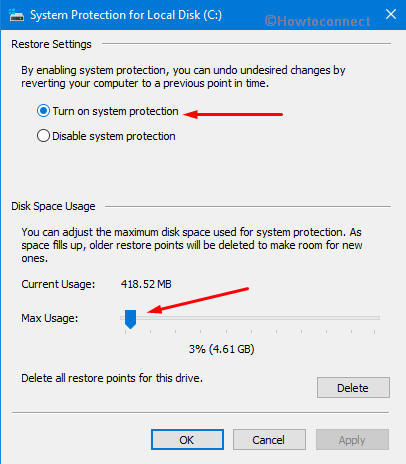
Note: The size should be more than zero and it depends upon the number of restore points you prefer.
Finally, click OK and reboot the system. Now, check whether this issue still persists. If appears, then follow the next workaround to solve System Restore Encountered an Error 0x81000203.
Use Group Policy Editor to Enable System Restore
With a modification in a Policy, the setting will help you to resolve System Restore Encountered an Error 0x81000203. Enabling System Restore might be a solution to solve this bug on Windows.
Open Run dialog box by hitting “Windows logo + R” keys in one go. Type “gpedit.msc” in the text field and hit OK to access Group Policy Editor console.
Now go to this specific location on the left side of Group Policy.
Computer Configuration => Administrative Template => System => System Restore
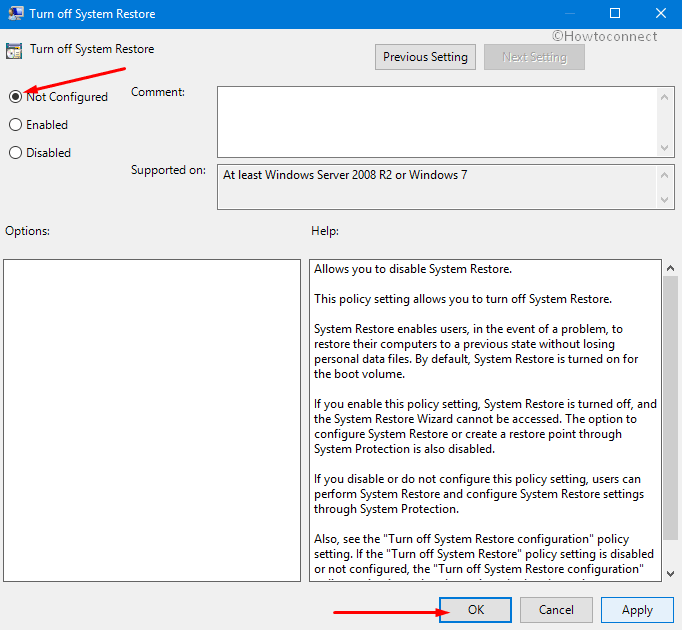
Switch to the right pane and double-click the policy namely Turn off System Restore.
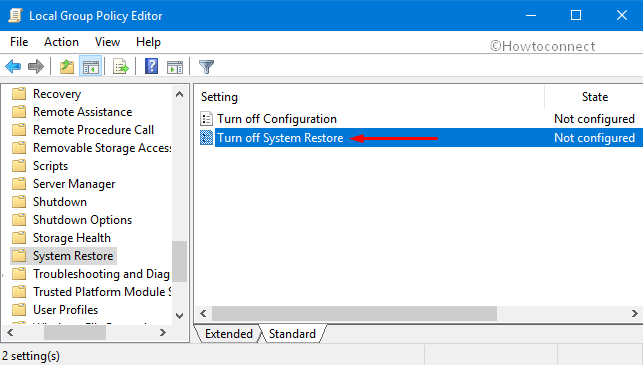
Select the Not Configured option and click OK to implement the changes in the policy.
Close Group Policy and restart Windows to see if the system restore is working smoothly without showing any error messages.
Perform a Registry Tweak
Sometimes, Group Policy Editor might be not that useful as it works for Windows Pro as well as Enterprise editions only. Windows Home doesn’t have gpedit.msc. If that’s the case with you too, you can use Registry Editor to bypass System Restore Encountered an Error 0x81000203.
Hold the Win & S hotkey to launch Cortana. Type “regedit.exe” under blank area, hit OK to proceed.
If UAC prompts, press the “Yes “button.
Now navigate to the below-given path on the left pane of the Registry.
Here, find the subentry namely SystemRestore.
Note: In case, you cannot see the SystemRestore key, create a new one.
Switch to the corresponding right side and see if it contains the DWORD DisableConfig. If the DWORD is present and its value data is 1, it means System Restore is blocked. So, double-click on it and set the value as 0. Alternatively, you can delete DisableConfig also to enable System Restore.
Finally, Reboot Windows 10 and try System Restore again.
Wrapping up
Hopefully, the above-described workarounds will help you in bypassing System Restore Encountered an Error 0x81000203 in Windows 10. They will definitely get back the System Protection Tab on your screen. If you are aware of more solutions about this issue, then please do drop them in the comments form below.
One thought on “ System Restore Encountered an Error 0x81000203 (Property Page) Windows 10 ”
Four days ago when I went to System Properties to use System Protection, I would get this message “There was an unexpected error in the property page:
System Restore encountered an error. Please try to run System Restore again. (0x81000203)”
This is while running Win 10 Pro 1803.
Searching the internet I found this was not an unusual happening. Another check showed that Volume Shadow Copy was not working.
I followed all the suggestions that I found and nothing changed. I thought that maybe some recent MS update and stepped in (or on) something. Tried to run chkdsk but it failed to run. Went to Settings, Uninstall Updates and was surprised that it worked. Used it to back out all updates that had been installed since April 1. System Properties and Volume Shadow Copy were still not working.
Next used Settings to reinstall the April updates that had just been removed. To my surprise, MS had decided to install Win 10 1809 build 17763.475. I let it run. After it restarted five times and killed a few hours, it seemed to be hung at 75% completion. Not knowing for sure, I left it running overnight. The next morning (nine hours later) it was still at the same place.
Even though it said do not reboot until finished, what do you do when it will not finish? I rebooted! A message was posted saying it was backing out the changes. When rebooted, System Restore was still not operational. I started System Update again and this time, to my surprise, it finished after only a few hours. I ran System Update again, and it had more five more updates to install (KB4480056, KB4493478, KB4486553, KB4483452, and KB4462930).
Surprisingly, everything now seems to work. It only took four days!
Now to see if I can prevent future MS updates. I would like to keep a working copy.
Full Fix: System Restore error 0x80070091 on Windows 10, 7

Windows 10 is a reliable OS, but this doesn’t mean that it’s never affected by any issues. Sometimes, due to severe issues, users are left with no option but to perform a system restore. In this manner, the PC is taken back to an earlier point in time, called a system restore point, when the OS worked perfectly fine.
Many Windows 10 users have recently reported that the system restore process fails to complete. More specifically, the process launches, but then suddenly freezes and an error message appears on the screen.
Many first thought that this error was caused by the latest Patch Tuesday updates, but this is not the case. The first wave of reports arrived in February.
System Restore error 0x80070091
Here’s how one user describes the issue:
I tried SysRes from two points, both with same failure.
System Restore did not complete successfully. Your computer’s system files and
settings were not changed.
Details:
System Restore failed while restoring the directory from the restore point.
Source: AppxStaging
Destination: %ProgramFiles%WindowsApps
An unspecified error occurred during System Restore. (0x80070091)
The two attempts were from: choose a different restore point>show more restore points type Backup. I really need this function to work. Any solutions out there?
The good news is that Microsoft has recently acknowledged this issue. The company promised it would roll out a hotfix as soon as possible.
At the same time, it has also offered a temporary workaround that advanced users can use to fix error 0x80070091.
System Restore error 0x80070091 can prevent you from fixing certain issues on your PC. Speaking of this error, here are some similar issues that users reported:
- Windows 10 System Restore did not complete successfully – This message usually appears if there’s an issue with System Restore. However, you should be able to fix this problem with one of our solutions.
- 0x80070091 Windows 7 – This error can appear on older versions of Windows as well. Even if you don’t use Windows 10, you should know that almost all of our solutions can be applied to Windows 7 and 8 alike.
- System Restore encountered error, unexpected error, unknown error – Sometimes you might encounter certain errors while trying to perform System Restore. In most cases these issues are caused by corrupted system files, so be sure to check for file corruption.
- System Restore failed due to antivirus – In some cases, this issue can appear due to your antivirus. Antivirus can interfere with your operating system and cause this issue to appear, so be sure to disable it and check if that solves the problem.
Solution 1 – Rename WindowsApp folder from Safe Mode
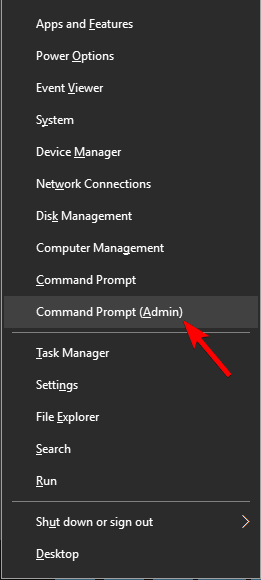
- Boot into Safe Mode.
- Right click on Start and click on Command Prompt (Admin).

- Type these commands below one by one:
- cd C:Program Files
- takeown /f WindowsApps /r /d Y
- icacls WindowsApps /grant “%USERDOMAIN%%USERNAME%”:(F) /t
- attrib WindowsApps -h
- rename WindowsApps WindowsApps.old
- Reboot back into Windows.
- Run System Restore.
- READ ALSO: How to fix the Event 1000 Application Error on Windows 10
Solution 2 – Check your antivirus
Using an antivirus is rather important if you want to protect your PC from online threats, however, sometimes your antivirus can interfere with your system and cause this error to occur. If you’re having error 0x80070091 on your PC, you might want to try disabling certain antivirus features. Sometimes your antivirus can block other applications from accessing certain directories, and that can lead to this issue.
If the problem is still present, you might have to completely disable your antivirus. In worst case scenario, you might even have to uninstall your antivirus. Once your antivirus is removed, check if the problem is resolved.
If your antivirus was the issue, it might be a good time to consider switching to a different antivirus software. There are many great antivirus tools on the market, but the best is Bitdefender, so feel free to try it.
Solution 3 – Use third-party tools
According to users, 0x80070091 error can appear due to problems with your WindowsApps folder. However, you might be able to solve the issue by using a third-party tool such as Unlocker. To fix the issue, you need to do the following:
- Download and install Unlocker.
- Now navigate to C:Program Files. Right-click WindowsApps folder and choose Unlocker from the menu.
- Select Rename from the dropdown menu and change the name of the directory to WindowsApps.old. Click OK to save changes.
- If you get a message asking you to rename the object at boot, choose Yes.
After doing that, you should be able to perform System Restore without any problems. As you can see, this solution is rather simple, and if you’re not too fond of the command line, you might want to try this solution out.
Solution 4 – Use Linux Live CD
If you’re having problems with System Restore and error 0x80070091, you might be able to fix the problem using Linux Live CD. To do that, simply download any version of Linux and create a bootable media.
Once you boot from the bootable media, choose the option to Try Linux without installing. Now go to C:Program Files and rename WindowsApps directory to WindowsApps.old.
After doing that, restart your PC and boot to Windows. Take ownership of WindowsApps.old directory and try to perform System Restore again.
Solution 5 – Run chkdsk scan
According to users, sometimes file corruption can cause error 0x80070091 to appear while performing System Restore. To fix the problem, you need to perform chkdsk scan. This is rather simple and you can do it by following these steps:
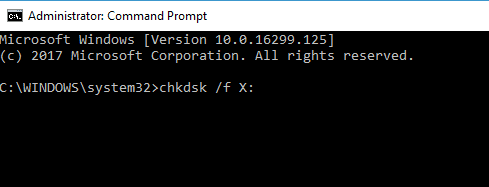
- Open Command Prompt as administrator.
- Now enter chkdsk /f X: command. Be sure to replace X with your system drive. In most cases that would be C. Now press Enter to run the command.
- You’ll be asked to schedule a disk scan at next reboot. Enter Y and press Enter to confirm.
- Restart your PC.
Chkdsk scan will now start. The scan can take about 15 minutes or more depending on the size of your system drive. Once the scan is finished, check if the problem still appears.
Solution 6 – Keep your system up to date
According to users, this issue can appear if your system is out of date. However, you can easily solve this issue by updating your operating system. In most cases, Windows automatically installs the missing updates, but sometimes you might miss an update or two due to certain issues.
However, you can always check for missing updates by manually. To do that, just follow these steps:
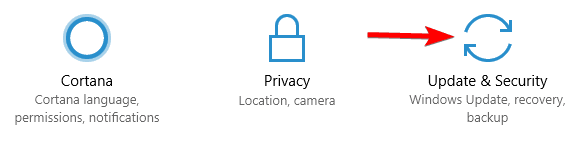
- Press Windows Key + I to open the Settings app.
- Now go to Update & Security section.
- Click Check for updates button.
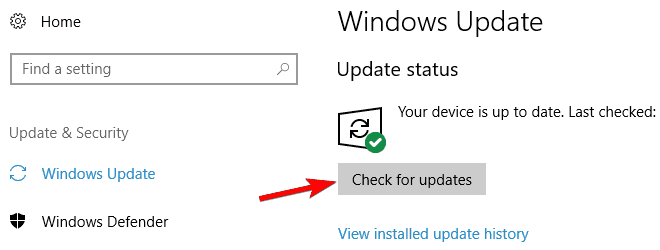
Windows will now check for available updates. If any updates are available, they will be downloaded in the background. Once the updates are downloaded, you just need to restart your PC to install them. After updating your PC to the latest version, check if the issue is resolved.
Solution 7 – Remove problematic updates
If this issue started appearing recently, it’s rather likely that an update caused it. Windows 10 installs updates automatically, and sometimes certain updates can lead to issues such as this one. If you suspect that an update caused this issue, we recommend to remove problematic updates.
Removing installed updates is rather simple, and you can do it by following these steps:
- Open the Settings app and navigate to Update & Security section.
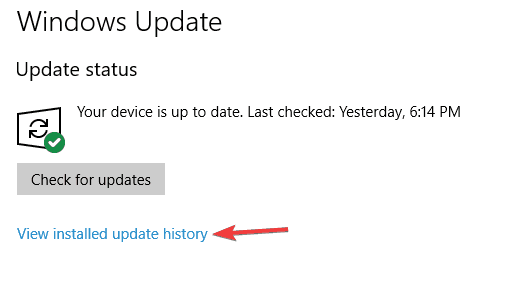
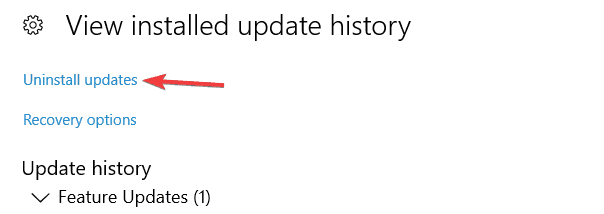
- Now select View installed update history.
- Now you should see the names of recent updates. Memorize their names or write them down. Select Uninstall updates.
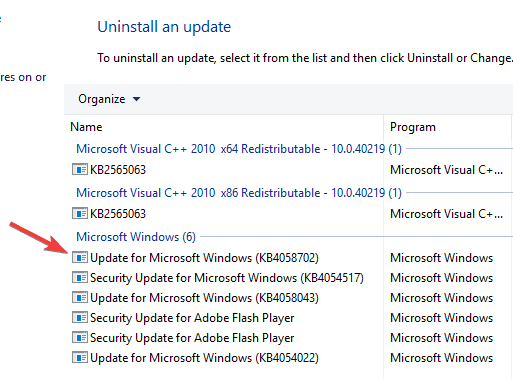
- List of updates will now appear. Double-click the update you want to remove and follow the instructions on the screen.
Once you remove the update, the problem should be resolved. Keep in mind that Windows 10 automatically installs the missing updates, so the update will be installed again and cause the issue to reappear.
To prevent that from happening, we advise you to block automatic Windows updates. By doing that, you’ll stop this update from installing and the issue won’t appear anymore.
Solution 8 – Remove problematic applications
Sometimes this problem can occur due to certain applications. If you installed any new applications recently, it might be a good idea to remove them and check if that solves the problem.
There are many ways to uninstall an application, but the best way is to use uninstaller software. These applications are specially designed to remove all files and registry entries associated with the application you want to remove, so be sure to try them out.
If you’re looking for a good uninstaller software, be sure to consider IOBit Uninstaller.
And this should help you to get rid of error 0x80070091.
RELATED STORIES YOU NEED TO CHECK OUT:


