- Sign in to your Microsoft account with Windows Hello or a security key
- What is Windows Hello?
- What is a security key?
- How to sign in with Windows Hello
- How to sign in with a security key
- Manage your keys
- Key Security Concepts
- Type safety and security
- Principal
- Authentication
- Example
- Authorization
- Настройка SSH аутентификации по ключам в Windows 10 / 2019
- Генерация RSA ключей на клиенте Windows
- Настройка OpenSSH в Windows для авторизации по ключам
- Вход по SSH ключу для локальных администраторов Windows
Sign in to your Microsoft account with Windows Hello or a security key
If you’re tired of having to remember or reset your password, try using Windows Hello or a FIDO 2–compliant security key to sign in to your Microsoft account instead. All you’ll need is a device running Windows 10 Version 1809 or later and the Microsoft Edge browser. (This functionality is not available yet on Xbox or phones.)
What is Windows Hello?
Windows Hello is a more personal way to sign in, using your face, fingerprint, or a PIN. You can use Windows Hello to sign in to your device on the lock screen and sign in to your account on the web.
What is a security key?
A security key is a physical device that you can use instead of your user name and password to sign in. It may be a USB key that you could keep on your keychain, or an NFC device like a smartphone or access card. Since it’s used in addition to a fingerprint or PIN, even if someone has your security key, they won’t be able to sign in without your PIN or fingerprint.
Security keys are usually available for purchase from retailers that sell computer accessories.
How to sign in with Windows Hello
Follow these steps to set up Windows Hello and then sign in to your Microsoft account in Microsoft Edge:
Go to the Start menu and select Settings .
Go to Accounts > Sign-in options.
Under Manage how you sign in to your device, select a Windows Hello item to add.
To add Windows Hello as a sign in method for your Microsoft account:
Go to the Microsoft account page and sign in as you normally would.
Select Security > More security options
Select Add a new way to sign in for verify
Select Use your Windows PC
Follow the dialogs to set up Windows Hello as a method for signing in.
How to sign in with a security key
There are different types of security keys that you can use, like a USB key that you plug in to your device or an NFC key that you tap on an NFC reader. Make sure to familiarize yourself with the type of security key you have by reading the instruction manual from the manufacturer.
Go to the Microsoft account page and sign in as you normally would.
Select Security > More security options
Select Add a new way to sign in or verify
Identify what type of key you have (USB or NFC) and select Next.
You will be redirected to the setup experience where you will insert or tap your key.
Create a PIN (or enter an existing PIN if you have already created one).
Take the follow-up action by touching either the button or gold disk if your key has one (or read the instruction manual to figure out what else it might be).
Name your security key so that you can distinguish it from other keys.
Sign out and open Microsoft Edge, select Use Windows Hello or security key instead, and sign in by inserting or tapping your key.
Note: Your security key manufacturer might provide software that can help you manage your key, such as by changing the PIN or creating a fingerprint.
Manage your keys
Follow these steps to delete keys that you have set up for your account:
Go to the Microsoft account page and sign in as you normally would.
Select Security > More security options and under Windows Hello and security keys, select Manage your sign-in methods.
Key Security Concepts
This article applies to Windows.
For information about ASP.NET Core, see Overview of ASP.NET Core Security.
.NET offers role-based security to help address security concerns about mobile code and to provide support that enables components to determine what users are authorized to do.
Type safety and security
Type-safe code accesses only the memory locations it is authorized to access. (For this discussion, type safety specifically refers to memory type safety and should not be confused with type safety in a broader respect.) For example, type-safe code cannot read values from another object’s private fields. It accesses types only in well-defined, allowable ways.
During just-in-time (JIT) compilation, an optional verification process examines the metadata and Microsoft intermediate language (MSIL) of a method to be JIT-compiled into native machine code to verify that they are type safe. This process is skipped if the code has permission to bypass verification. For more information about verification, see Managed Execution Process.
Although verification of type safety is not mandatory to run managed code, type safety plays a crucial role in assembly isolation and security enforcement. When code is type safe, the common language runtime can completely isolate assemblies from each other. This isolation helps ensure that assemblies cannot adversely affect each other and it increases application reliability. Type-safe components can execute safely in the same process even if they are trusted at different levels. When code is not type safe, unwanted side effects can occur. For example, the runtime cannot prevent managed code from calling into native (unmanaged) code and performing malicious operations. When code is type safe, the runtime’s security enforcement mechanism ensures that it does not access native code unless it has permission to do so. All code that is not type safe must have been granted SecurityPermission with the passed enum member SkipVerification to run.
Principal
A principal represents the identity and role of a user and acts on the user’s behalf. Role-based security in .NET supports three kinds of principals:
Generic principals represent users and roles that exist independent of Windows users and roles.
Windows principals represent Windows users and their roles (or their Windows groups). A Windows principal can impersonate another user, which means that the principal can access a resource on a user’s behalf while presenting the identity that belongs to that user.
Custom principals can be defined by an application in any way that is needed for that particular application. They can extend the basic notion of the principal’s identity and roles.
Authentication
Authentication is the process of discovering and verifying the identity of a principal by examining the user’s credentials and validating those credentials against some authority. The information obtained during authentication is directly usable by your code. You can also use .NET role-based security to authenticate the current user and to determine whether to allow that principal to access your code. See the overloads of the WindowsPrincipal.IsInRole method for examples of how to authenticate the principal for specific roles. For example, you can use the WindowsPrincipal.IsInRole(String) overload to determine if the current user is a member of the Administrators group.
A variety of authentication mechanisms are used today, many of which can be used with .NET role-based security. Some of the most commonly used mechanisms are basic, digest, Passport, operating system (such as NTLM or Kerberos), or application-defined mechanisms.
Example
The following example requires that the active principal be an administrator. The name parameter is null , which allows any user who is an administrator to pass the demand.
In Windows Vista, User Account Control (UAC) determines the privileges of a user. If you are a member of the Built-in Administrators group, you are assigned two run-time access tokens: a standard user access token and an administrator access token. By default, you are in the standard user role. To execute the code that requires you to be an administrator, you must first elevate your privileges from standard user to administrator. You can do this when you start an application by right-clicking the application icon and indicating that you want to run as an administrator.
The following example demonstrates how to determine the identity of the principal and the roles available to the principal. An application of this example might be to confirm that the current user is in a role you allow for using your application.
Authorization
Authorization is the process of determining whether a principal is allowed to perform a requested action. Authorization occurs after authentication and uses information about the principal’s identity and roles to determine what resources the principal can access. You can use .NET role-based security to implement authorization.
Настройка SSH аутентификации по ключам в Windows 10 / 2019
В этой статье мы настроим SSH аутентификацию в Windows по RSA-ключам для безопасного доступа к удаленным системам. Мы покажем, как сгенерировать RSA-ключи (сертификаты) в Windows и настроить сервер OpenSSH в Windows 10/Windows Server 2019 для авторизации по ключам (без паролей).
Аутентификация по в SSH ключам широко используется в мире Linux, а в Windows этот функционал появился относительно недавно. Идея заключается в том, что на SSH сервере добавляется открытый ключ клиента и при подключении сервер проверяет наличие соответствующего закрытого ключа у клиента.
Генерация RSA ключей на клиенте Windows
На клиентском, компьютере, с которого вы будет подключаетесь к удалённому серверу Windows с OpenSSH, вам нужно сгенерировать пару RSA-ключей (открытый и закрытый). Закрытый ключ хранится на клиенте (не отдавайте его никому!), а открытый ключ помещается на SSH сервер в файл authorized_keys. Чтобы на клиенте Windows сгенерировать RSA ключи, вы должны установить клиент OpenSSH.
В Windows 10 1809 и Windows Server 2019 клиент OpenSSH устанавливается как отдельный встроенный компонент:
Add-WindowsCapability -Online -Name OpenSSH.Client
Запустите обычную (непривилегированную сессию PowerShell) и сгенерируйте пару RSA 2048 ключей с помощью команды:
Утилита попросит вас указать пароль для защиты закрытого ключа. Если вы укажете пароль, то каждый раз при использовании этого ключа для SSH авторизации, вы должны будете вводить этот пароль. Я не стал указывать пароль для ключа (не рекомендуется).
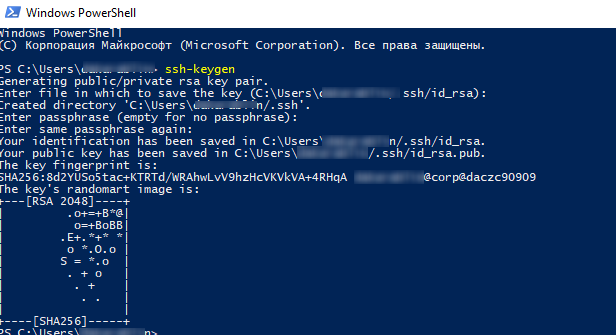
Утилита ssh-keygen создаст каталог .ssh в профиле текущего пользователя Windows (C:\Users\your_username) и поместит в него 2 файла:
- id_rsa – закрытый ключ
- id_rsa.pub – публичный ключ
После того, как ключи созданы, вы можете добавить закрытый ключ в службу SSH Agent, которая позволяет удобно управлять закрытыми ключами и использовать их для аутентификации.
SSH Agent может хранить закрытые ключи и предоставлять их в контексте безопасности текущего пользователя. Запустите службу ssh-agent и настройте автоматический запуск с помощью PowerShell команд управления службами:
set-service ssh-agent StartupType ‘Automatic’
Start-Service ssh-agent
Добавьте ваш закрытый ключ в базу ssh-agent:
Настройка OpenSSH в Windows для авторизации по ключам
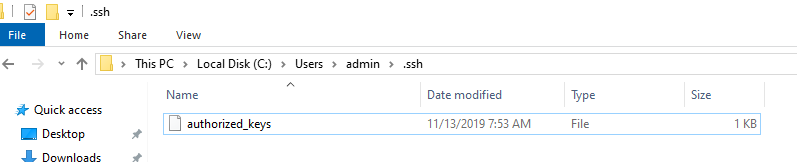
Теперь открытый ключ, который вы сгенерировали на клиенте, нужно скопировать на ваш SSH сервер (в этом примере это удаленный компьютер с Windows 10 1903 и настроенной службой OpenSSH).
Скопируйте файл id_rsa.pub в каталог .ssh профиля пользователя, под которым вы будете подключаться к SSH серверу. Например, у меня в Windows 10 создан пользователь admin, значит я должен скопировать ключ в файл C:\Users\admin\.ssh\authorized_keys.
Можно скопировать ключ на SSH сервер с клиента с помощью SCP:
scp C:\Users\youruser\.ssh\id_rsa.pub admin@192.168.1.90:c:\users\admin\.ssh\authorized_keys
Теперь вы можете подключиться к SSH серверу без ввода пароля пользователя. А если вы не задали пароль (passphrase) для закрытого ключа, вы сразу автоматически подключитесь к вашему удаленному серверу Windows.
Для подключения через SSH к удаленному хосту используется следующая команда:
ssh (username)@(имя или IP адрес SSH сервера)
Это означает, что вы хотите подключиться к удаленному SSH серверу с адресом 192.168.1.90 под учетной записью admin. Служба SSH Agent автоматически попытается использовать для авторизации сохраненный ранее закрытый ключ.
ssh admin@192.168.1.90 -i «C:\Users\youruser\.ssh\id_rsa»

Если вы не смогли подключиться к вашему SSH серверу по RSA ключу, и у вас все равно запрашивается пароль, скорее всего пользователь, под которым вы подключаетесь, входит в группу локальных администраторов сервера (SID группы S-1-5-32-544). Об этом далее.

Вход по SSH ключу для локальных администраторов Windows
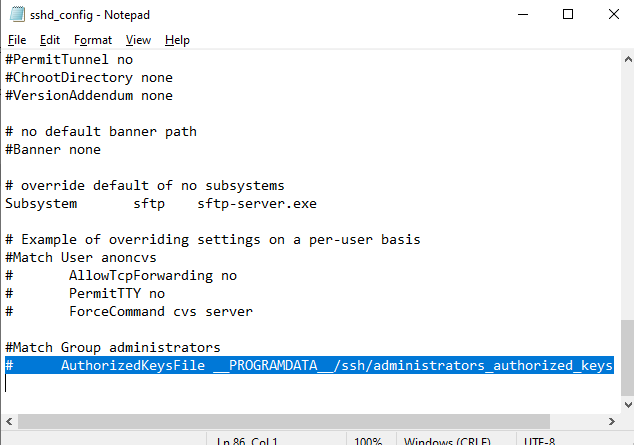
В OpenSSH используются особые настройки доступа по ключам для пользователей с правами локального администратора Windows.
В первую очередь, вместо ключа authorized_keys в профиле пользователя нужно использовать файл с ключами C:\ProgramData\ssh\administrators_authorized_keys. Вам нужно добавить ваш ключ в этот текстовый файл (в целях безопасности права на этот файл должны быть только у группы Administrators и SYSTEM).
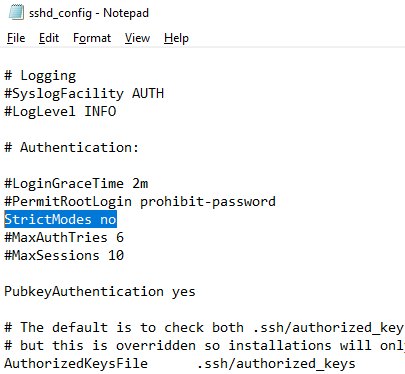
Чтобы использовать ключ authorized_keys из профиля пользователя, и не переносить данные открытого ключа в файл administrators_authorized_keys, вы можете закомментировать строку в файле конфигурации OpenSSH («C:\ProgramData\ssh\sshd_config«).
Дополнительно в файле sshd_config вы можете разрешить вход по RSA ключам:
И запретить доступ по паролю:
После сохранения изменений в файле sshd_config не забудьте перезапустить службу sshd.
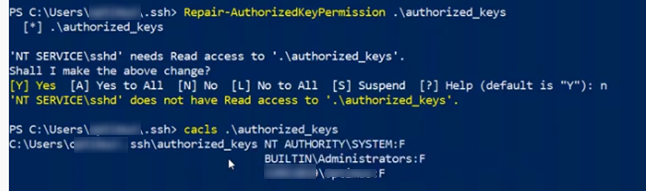
Еще один небольшой нюанс. В старых версиях OpenSSH нужно было предоставить права службе NT Service\sshd на чтение ключа authorized_keys.
Для этого нужно выполнить одно из следующих действий:
- Установить модуль OpenSSHUtils: Install-Module -Force OpenSSHUtils -Scope AllUsers . Для изменения прав на файл нужно выполнить команду: Repair-AuthorizedKeyPermission -FilePath C:\Users\admin\.ssh\authorized_keys ;

- Измените NTFS права на файл с помощью модуля NTFSSecurity или icacls;
- Либо вы можете в конфигурационном файле sshd_config отключить режим StrictModes. По умолчанию этот режим включен и запрещает аутентификацию по ключам, если закрытый и открытый ключ недостаточно защищены. Раскомментируйте строку #StrictModes yes , измените на StrictModes no .
Итак, вы настроили SSH аутентификацию в Windows по открытому RSA-ключу (сертификату). Теперь вы можете использовать такой способ аутентификации для безопасного доступа к удаленным северам, автоматического поднятия проброса портов в SSH туннеле, запуска скриптов и других задачах автоматизации.


Спасибо! Первая рабочая статья -_ stackoverflow.com уже весь на эту тему перечитал).

debug1: Found key in C:\\Users\\\320\237\320\276\320\273\321\214\320\267\320\276\320\262\320\260\321\202\320\265\320\273\321\214/.ssh/known_hosts:9
debug2: set_newkeys: mode 1
debug1: rekey after 134217728 blocks
debug1: SSH2_MSG_NEWKEYS sent
debug1: expecting SSH2_MSG_NEWKEYS
debug1: SSH2_MSG_NEWKEYS received
debug2: set_newkeys: mode 0
debug1: rekey after 134217728 blocks
debug2: key: C:\\Users\\\320\237\320\276\320\273\321\214\320\267\320\276\320\262\320\260\321\202\320\265\320\273\321\214/.ssh/id_rsa (000002372A7B17D0), agent
debug2: key: C:\\Users\\\320\237\320\276\320\273\321\214\320\267\320\276\320\262\320\260\321\202\320\265\320\273\321\214/.ssh/id_dsa (0000000000000000)
debug2: key: C:\\Users\\\320\237\320\276\320\273\321\214\320\267\320\276\320\262\320\260\321\202\320\265\320\273\321\214/.ssh/id_ecdsa (0000000000000000)
debug2: key: C:\\Users\\\320\237\320\276\320\273\321\214\320\267\320\276\320\262\320\260\321\202\320\265\320\273\321\214/.ssh/id_ed25519 (0000000000000000)
debug2: key: C:\\Users\\\320\237\320\276\320\273\321\214\320\267\320\276\320\262\320\260\321\202\320\265\320\273\321\214/.ssh/id_xmss (0000000000000000)
debug1: SSH2_MSG_EXT_INFO received
debug1: kex_input_ext_info: server-sig-algs=
debug2: service_accept: ssh-userauth
debug1: SSH2_MSG_SERVICE_ACCEPT received
debug1: Authentications that can continue: publickey,password,keyboard-interactive
debug1: Next authentication method: publickey
debug1: Offering public key: RSA SHA256:5U76PQzmZJ7xce9TDvyt1P/sqNCX/GHOZSLk3TR3x1o C:\\Users\\\320\237\320\276\320\273\321\214\320\267\320\276\320\262\320\260\321\202\320\265\320\273\321\214/.ssh/id_rsa
debug2: we sent a publickey packet, wait for reply
debug1: Authentications that can continue: publickey,password,keyboard-interactive
debug1: Trying private key: C:\\Users\\\320\237\320\276\320\273\321\214\320\267\320\276\320\262\320\260\321\202\320\265\320\273\321\214/.ssh/id_dsa
Можете подсказать что не так?

Какую команду используете для SSH подключения? Ключ добавлен в ssh-agent?
Попробуйте указать путь к вашему файлу с закрытым ключом вручную:
ssh root@192.168.1.90 -i «C:\Users\user1\.ssh\id_rsa»
При генерации ключа не нашел файлы в профиле пользователя. Они были в «C:\Windows\System32»
Скорее всего вы запускали cmd\powershell.exe в режиме administrator, поэтому путь по-умолчанию был c:\windows\system32
А как это работает, если сервер на Linux, а клиент на Windows?
Да, все аналогично. Только в linux другое место хранения ключей (в зависимости от дистрибутива)

Ну наконец то получилось по ssh ключу подключиться. Мне нужно было настроить SFTP на Windows 10. Имеются 3 компа, на первом Windows 10 с openssh server и запущенным процессом sftp-server.exe, на втором компе клиенте тоже Windows 10 установил openssh client, сгенерировал публичный и приватный ключ, публичный скопировал на первый комп с Windows 10 где установлен openssh server, переименовал его из id_rsa.pub в authorized_keys. Затем на втором компе клиенте нужно установить PuTTY Key Generator и сконвертировать приватный ключ id_rsa в id_rsa.ppk это нужно чтобы подключиться по SFTP через WinSCP или FileZilla client к серверу openssh. Проблема была в том что всё равно просил пароль от учётной записи администратора от первого компа на сервере. После того как прописал «PubkeyAuthentication yes» и «PasswordAuthentication no» затем «StrictModes no» и закомментировал «# AuthorizedKeysFile __PROGRAMDATA__/ssh/administrators_authorized_keys» стало заходить без пароля. Есть ещё вопрос. Третий комп это ноутбук с Kubuntu, установил FileZilla client, уже имеется каталог по адресу /home/sergei/.ssh/ в этот каталог скопировал файл id_rsa.ppk со второго компа, то есть с Windows 10. При подключении FileZilla client выбираю протокол SFTP всё как положено, указываю файл с приватным ключом /home/sergei/.ssh/id_rsa.ppk и подключаюсь без ввода пароля, всё работает. Но я так понимаю что это неправильно? На Kubuntu тоже надо генерировать ключи приватный и публичный? И где тогда размещать новый публичный ключ на сервере, если на нём уже есть C:\Users\Sergei\.ssh\authorized_keys
В файле authorized_keys можно указывать несколько ключей. Просто скопируйте значение второго ключа с новой строки и сохраните файл.


