- Беспроводной дисплей Miracast (WiDi) в Windows 10
- Подключение к беспроводному дисплею (телевизору) в Windows 10 по Miracast
- Подключение через добавление нового устройства в параметрах
- Управление звуком при подключении по Miracast
- Не работает Miracast и нет пункта «Подключение к беспроводному дисплею»
- Не удалось подключиться к беспроводному дисплею
- 11 screen-mirroring devices for presenting wirelessly
- Wirelessly sending presentations and videos from your laptop, phone, or tablet to the big screen is a breeze with one of these mirroring devices.
- Apple TV 4K / Apple TV HD
- Apple TV 4K at a glance
- Apple TV HD at a glance
- Google Chromecast / Google Chromecast with Google TV
- Chromecast at a glance
- Chromecast with Google TV at a glance
- IOGear Wireless Mobile and PC to HDTV Screen Sharing Receiver (GWAVRC)
- IOGear GWAVRC at a glance
- Microsoft 4K Wireless Display Adapter
- Microsoft 4K Wireless Display Adapter at a glance
Беспроводной дисплей Miracast (WiDi) в Windows 10
Наконец-то я разобрался с функцией беспроводного дисплея в Windows 10. Пол дня все подключал и проверял, чтобы подготовить для вас статью с проверенной информацией. Ну и конечно же с фото и скриншотами.
Есть две основные технологии: Miracast и Intel WiDi (компания Intel прекратила разработку этой технологии) , с помощью которых можно выводить изображение и звук с компьютера, ноутбука или мобильных устройств по Wi-Fi. Проще говоря, использовать телевизор (проектор, монитор) , как беспроводной дисплей. Фишка в том, что с помощью этих технологий можно не просто вывести на экран «по воздуху» фильм, или фото (как в случае с DLNA) , а транслировать все, что происходит на основном мониторе компьютера, или экране ноутбука.

Беспроводной дисплей, в роли которого чаще всего выступает телевизор, работает так, как будто он подключен по HDMI кабелю. Можно дублировать изображение, расширить экран и т. д. И все это без проводов. Есть так же мониторы с поддержкой Miracast.
Функция «Беспроводной дисплей» в Windows 10 выводит изображение по технологии Miracast. Но, почему-то при подключении, на телевизоре у была надпись «Intel’s WiDi». Как оказалось (прочитал на сайте Intel) , они прекратили разработку и поддержку технологии Intel® WiDi. И сообщают о том, что в Windows 8.1 и Windows 10 уже изначально есть поддержка Miracast, которую можно использовать для подключения беспроводных дисплеев без дополнительных программ.
Я проверял на таком оборудовании:
- ПК с процессором Intel Core i3-6098P и видеокартой GeForce GTX 750Ti. Wi-Fi адаптер TP-Link TL-WN725N V2.
- Ноутбук со старым процессором Intel Core i3 третьего поколения и встроенным видео Intel HD Graphics 4000. Видеокарта NVIDIA GeForce GT 635M. Wi-Fi адаптер тот же TP-Link TL-WN725N V2. Так как через встроенный в ноутбук адаптер не работает.
- В качестве беспроводного дисплея использовал телевизор LG. Модель еще 2012 года, но с поддержкой Miracast и Intel WiDi. Как оказалось, в новом и навороченном телевизоре Philips нет встроенной поддержки Miracast. Если в вашем телевизоре так же нет поддержки этой технологии, то можно использовать Miracast адаптер.
В этой статье я сначала покажу, как включить Miracast в Windows 10 и как подключиться к беспроводному дисплею. Затем, рассмотрим решения возможных проблем и ошибок.
Подключение к беспроводному дисплею (телевизору) в Windows 10 по Miracast
Нажмите на клавиатуре сочетание клавиш Win + P (английская) . Справа должно появится окно с разными вариантами вывода изображения. И там должен быть пункт «Подключение к беспроводному дисплею». Нажимаем на него. Если такого пункта нет, то скорее ваше железо или драйвер не поддерживает эту функцию. В конце статьи напишу об этом более подробно, и покажу, как выполнить проверку.

Начнется поиск беспроводных дисплеев и аудиоустройств.
Скорее всего, нужно включить функцию Miracast/Intel WiDi на телевизоре. В старых моделях LG, это делается в меню, в разделе «Сеть». Вот так:
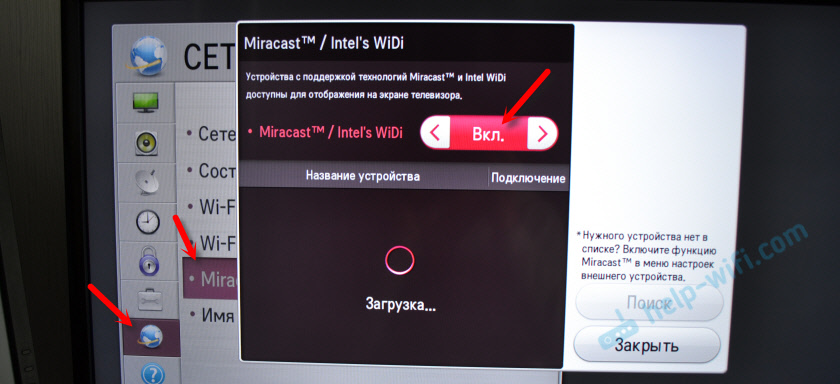
На новых моделях LG, скорее всего эти настройки выглядят иначе. На телевизорах Samsung, в меню выбора источника сигнала нужно выбрать «Screen Mirroring» (возможно, не на всех моделях) . На ТВ от Sony – «Дублирование экрана» в источниках сигнала (отдельная кнопка на пульте) . На телевизорах Philips: в разделе «Настройки» — «Параметры сети» — «Wi-Fi Miracast». Но на моем, который с Android TV такого пункта нет.
Телевизор должен появится в результатах поиска. Просто выбираем его и пойдет процесс подключения.

Там будет надпись «Выполните инструкции на экране устройства». В моем случае, на телевизоре нужно подтвердить подключение компьютера.


Можно изменить режим проекции. Например, расширить экраны, или использовать только второй (телевизор, который по Miracast подключен) . Или же дублировать изображение на оба экрана.

Там же можно отключиться от беспроводного дисплея.
Подключение через добавление нового устройства в параметрах
Есть еще один способ. В параметрах перейдите в раздел «Устройства» и выберите пункт «Добавление Bluetooth или другого устройства». Затем нажмите на «Беспроводной дисплей или док-станция».

Включите Миракаст на телевизоре и он должен появится в списке. Выбираем свой телевизор и устанавливаем подключение.

Может кому-то этот способ больше подойдет.
Управление звуком при подключении по Miracast
Как и по HDMI кабелю, по Miracast так же передается звук. У меня, сразу после подключения, звук с компьютера выводился через динамики телевизора. По умолчанию было устройство «Digital Output». И это не всегда удобно. Поэтому, чтобы звук воспроизводителя через динамики ноутбука, или колонки, нужно просто поменять устройство воспроизведения по умолчанию.

После этого, звук будет воспроизводится через динамики компьютера. Если понадобится, то можно обратно сделать «Digital Output» устройством по умолчанию.
Не работает Miracast и нет пункта «Подключение к беспроводному дисплею»
В более старых версиях Windows 10, когда система «понимала», что нет поддержки Miracast, то выводилось сообщение «ПК или мобильное устройство не поддерживает Miracast, поэтому беспроводное проецирование с него невозможно».
В новых версиях, просто нет пункта «Подключение к беспроводному дисплею» в меню «Проецировать», которое открывается сочетанием клавиш Win + P.

Скорее всего, нет поддержки Miracast на уровне Wi-Fi адаптера. Вот у меня, например, через встроенный в ноутбуке Wi-Fi модуль нет возможности подключится к беспроводному дисплею. Ноутбук, правда, не новый. Где-то 2012-13 года. А после подключения Wi-Fi адаптера TP-Link TL-WN725N V2 все работает.
Чтобы данная функция работала, нужна поддержка на стороне Wi-Fi адаптера и графического адаптера (видеокарты) . Как на уровне железа, так и драйвера. Это легко проверить.
Запустите командную строку и выполните команду netsh wlan show driver.
В результатах будет строчка «Поддерживается беспроводной дисплей:» С заводским (старым) Wi-Fi модулем на ноутбуке у меня такой результат:

Как видите, нет поддержки. Графический драйвер поддерживает, а Wi-Fi – нет.
А вот уже результат проверки с другим Wi-Fi адаптером:

И при такой конфигурации все отлично работает.
Что можно сделать:
- Обновить драйвер Wi-Fi адаптера. Маловероятно, но вдруг сработает. Вот инструкция: обновление (установка) драйвера на Wi-Fi в Windows 10.
- Если по результатам проверки проблема только в Wi-Fi, то можно заменить сам Wi-Fi адаптер. Но я заметил, что в характеристиках просто не указывают, есть ли поддержка беспроводного дисплея, или нет. На TP-Link TL-WN725N второй аппаратной версии (V2) все работает. Но я уверен, что есть большое количество других адаптеров с поддержкой Miracast. Нужно искать.
- Возможно, вам будет проще подключить телевизор по HDMI кабелю.
Рассмотрим еще одну проблему.
Не удалось подключиться к беспроводному дисплею
Компьютер находит телевизор, выбираем его, долго идет подключение и появляется ошибка «Не удалось подключиться». Или компьютер не видит телевизор и он не отображается в списке доступных устройств.

У меня тоже несколько раз появлялась эта ошибка. Сложно сказать, с чем это связано. Обязательно попробуйте установить подключение еще раз.
- Перезагрузите компьютер и отключите на пару минут питание телевизора.
- Возможно, это из-за плохого сигнала. Если есть возможность, сократите расстояние между компьютером и телевизором. Проверьте, активна ли функция Miracast (или что-то в этом роде) на телевизоре.
- Обновите драйвер Wi-Fi адаптера. Ссылку на инструкцию я давал выше.
- Если есть возможность, попробуйте подключиться к другому телевизору, который так же может работать как беспроводной дисплей.
Обновление: Евгений в комментариях поделился решением, которое, как оказалось, помогло не только ему. Проблема была следующая: компьютер находил телевизор, как показано в инструкции выше. Но при попытке подключится на телевизоре мигал экран и появлялась ошибка: «Запрос на подключение от . завершился неудачно. Можно повторить попытку с мобильного устройства».
Помогло отключение дискретной видеокарты в диспетчере устройств. Не знаю, насколько это правильное решение, ведь мы по сути отключаем производительный видеоадаптер. Но похоже, это работает. Можете попробовать. Заходим в диспетчер устройств и отключаем дискретную видеокарту, оставив работать интегрированную.

Не забудьте потом включить ее обратно. Когда перестанете использовать беспроводной дисплей, или окажется, что это решение не помогло в вашем случае.
Обновление: отключаем антивирус и брандмауэр
Уже появилось несколько комментариев, что Miracast в Windows 10 начал работать после отключения антивируса или брандмауэра.

Попробуйте отключить на время установленный у вас антивирус. Так же можно попробовать отключить брандмауэр защитника Windows. Если вы знаете какое правило в настройках брандмауэра блокирует работу беспроводного дисплея и как добавить его в исключения – напишите пожалуйста в комментариях.
Много времени и сил я потратил на эту статью. Надеюсь, не зря. Если вам есть что добавить, или хотите задать вопрос, то жду вас в комментариях. Всего хорошего!
11 screen-mirroring devices for presenting wirelessly
Wirelessly sending presentations and videos from your laptop, phone, or tablet to the big screen is a breeze with one of these mirroring devices.


Contributing Writer, Computerworld |
Whether you’re leading a sales call, a training session, or that hoped-for breakthrough presentation to the higher-ups, why not wow them by wirelessly connecting your laptop, tablet, or phone to the room’s projector or large display? With the right gear, it’s easier than you might think.
What’s that? No one at your company has been to the office in the past 10 months because of a global pandemic? The good news is that some of the same inexpensive devices that stream entertainment media over a home Wi-Fi network — Chromecast, Apple TV, Roku, and others — can also be used in the boardroom. You can practice now while you’re working from home, then be ready to hit the ground running later on when vaccines finish rolling out, the pandemic recedes, and offices reopen.
These 11 devices plug into a projector, large monitor, or TV to mirror the display of a laptop, tablet, or smartphone so you can make presentations from your own device — and from anywhere in the room. Some use an HDMI cable for connecting to the display or projector, while others resemble a large thumb drive that plugs directly into the screen’s HDMI port.
Even the largest can travel with you or be permanently (and unobtrusively) installed to a display in a conference room, or even a TV in the den for the work-at-home crowd. Then, all you need do is walk in, tap the device or a few keys, and you’re on the big screen. (See some typical setup instructions.)
All of the mirroring devices in this roundup support HD resolution of at least 1920 x 1080 pixels, the standard for business graphics, and some of the newer listed here can handle 4K resolution of up to 3820 x 2160 pixels, showing four times as much detail. To many this will seem like overkill, but it’s perfect for a company for going over the architectural renderings of a new factory, previewing a UHD commercial, or zooming in on a high-resolution image.
The bad news: Most of these devices do not fit all business situations. Consider:
That said, a few newer devices do mirror a broader range of systems. If you’re really serious about accommodating all types of laptops and mobile devices, you should consider getting a device with broader support. Otherwise, choose the one that best suits your needs based on what people use at your office. After all, with a multitude of choices, there’s never been a better time to present wirelessly.
Apple TV 4K / Apple TV HD
Based on Apple’s AirPlay 2 technology, Apple TV 4K wirelessly mirrors material on a Mac, iPhone, or iPad in super-sharp 3840 x 2160 resolution. Unfortunately, you have to stay within the Apple ecosystem to use it, so forget about Androids, Chromebooks, and Windows devices.
They may look the same, but the Apple TV 4K (left) supports super-sharp 3840 x 2160 resolution, while Apple TV HD (right) tops out at 1920 x 1080 pixels. (Click any image in this story to enlarge it.)
With hardware similar to an iPad, the Apple TV 4K has an A10X Fusion processor and either 32GB ($179) or 64GB ($199) of storage for presentations, videos, and the occasional movie or game. It uses the 2.4GHz and 5GHz Wi-Fi bands or a wired Ethernet LAN, has an HDMI port, and is powered by an AC cord.
The Apple TV can be controlled from across the room with its Siri Remote, which listens for commands. At 3.9 x 3.9 x 1.4 in., the Apple TV 4K is likely too big for the back of a TV, but third parties, such as Innovelis, make wall-mounting brackets.
If the Apple TV 4K’s price tag is out of reach or you don’t have a display or projector that supports 4K, the company’s $149 Apple TV HD is a step down with 1920 x 1080 resolution, an older A8 CPU,
Apple TV 4K at a glance
Price: $179 (32GB), $199 (64GB)
Compatibility: Macs, iPads, iPhones
Resolution: 3840 x 2160 pixels
Size: 3.9 x 3.9 x 1.4 in.
Pros: 4K resolution; includes voice remote control
Cons: Not compatible with Windows, Android, or Chrome OS; big device; expensive
Who it’s best for: Offices full of Mac and iOS users who demand 4K-resolution video
Apple TV HD at a glance
Price: $149
Compatibility: Macs, iPads, iPhones
Resolution: 1920 x 1080 pixels
Size: 3.9 x 3.9 x 1.4 in.
Pros: Comes with remote control; includes voice remote control; HD resolution
Cons: Not compatible with Windows, Android, or Chrome OS; big device; pricey; older tech
Who it’s best for: Apple shops that need HD-resolution imaging
Google Chromecast / Google Chromecast with Google TV
Rather than mirroring the screens of every computing platform, the third-generation Chromecast and newer Chromecast with Google TV take a different approach. They allow Android phones and tablets to wirelessly share their screens, but Windows PCs, Macs, Chromebooks, iPhones, and iPads need to use one of the thousands of Chromecast apps available to “cast” to the big screen. The range of supported Chromecast apps includes the ubiquitous Chrome browser, YouTube, and Google Slides but ignores corporate mainstays like PowerPoint and Keynote.
The Chromecast (left) and Chromecast with Google TV (right) mirror Android devices and “cast” from other platforms via Chromecast apps.
Both Chromecast devices are small with flat HDMI cables for plugging into a display and take advantage of the 2.4 and 5GHz bands of a Wi-Fi network. The USB port of a newer display or TV should be able to power either device, but they each include an AC adapter, just in case.
The two Chromecast devices diverge when it comes to resolution, with the Chromecast putting out 1920 x 1080 pixels and the Chromecast with Google TV showing the ultra-sharp resolution of 3840 x 2160 pixels. Instead of the basic black Chromecast device, the Chromecast with Google TV is available in white (a.k.a. Snow), light blue (Sky), or salmon (Sunrise) and includes a voice-activated remote control.
The HD-based Chromecast sells for $30, while the UHD Chromecast with Google TV costs $50, making them screen-sharing bargains.
Chromecast at a glance
Price: $30
Compatibility: Android devices, plus Windows PCs, Macs, Chromebooks, iOS devices via Chromecast apps
Resolution: 1920 x 1080 pixels
Size: 6.4 x 2.0 x 0.5 in.
Pros: Tiny device; HD imaging; inexpensive; can be display-powered
Cons: Only mirrors screens on Android devices; Chromecast apps are needed for other platforms
Who it’s best for: Offices with lots of Android devices
Chromecast with Google TV at a glance
Price: $50
Compatibility: Android devices, plus Windows PCs, Macs, Chromebooks, iOS devices via Chromecast apps
Resolution: 3840 x 2160 pixels
Size: 6.4 x 2.4 x 0.5 in.
Pros: Small; 4K resolution; can be display-powered
Cons: Can only mirror Android devices, others require Chromecast apps
Who it’s best for: Setups that use Android systems and those willing to put up with Chromecast apps
IOGear Wireless Mobile and PC to HDTV Screen Sharing Receiver (GWAVRC)
IOGear’s Wireless Mobile and PC to HDTV Screen Sharing Receiver is a mouthful, but thanks to the use of a high-power proprietary chipset and high-gain antenna design, it offers the bonus of being able to stay connected from up to 50 feet away, according to the company. Better known as the GWAVRC, the IOGear receiver is for those who have large rooms to fill with wireless presentations and video.
IOGear’s GWAVRC can stream content from Android and Windows devices from up to 50 feet away.
Based on Miracast technology, the GWAVRC can share the screens of Windows PCs as well as Android phones and tablets over a Wi-Fi network using either the 2.4GHz or 5GHz band. It can’t connect with Chromebooks, Macs, iPhones, or iPads and tops out at 1920 x 1080 resolution.
At 3.4 x 2.6 x 0.6 in., the GWAVRC device can sit next to or behind the TV or display. It comes with a USB AC adapter, but recent TVs and displays should be able to provide enough power for its operation. With the ability to send signals across more space, the IOGear GWAVRC could be the long-distance mirroring champ for your office.
IOGear GWAVRC at a glance
Price: $50
Compatibility: Windows PCs, Android devices
Resolution: 1920 x 1080 pixels
Size: 3.4 x 2.6 x 0.6 in.
Pros: Has a long range; can be display-powered
Cons: Large size; doesn’t work with Macs, iPhones, or iPads
Who it’s best for: Businesses that use Android and Windows devices with a large room to fill
Microsoft 4K Wireless Display Adapter
The third-generation Microsoft 4K Wireless Display Adapter picks up where the company’s earlier mirroring devices left off, allowing 4K-resolution screen sharing in a small package.
The Microsoft 4K Wireless Display Adapter can be powered from a display via its USB plug.
Happily, it retains the unique design of its predecessor, featuring a 21-inch cable with an HDMI plug at one end and a USB connector at the other. In between is a small box of electronics. This design lets you plug both ends into the back of a TV or display, so the display is both receiving a signal via the HDMI plug and supplying power through the USB plug. The device doesn’t include an AC adapter for displays without a USB port.
Officially, it can mirror a variety of Microsoft Surface devices, but it should work with just about any recent Miracast-enabled system, like Windows 10 PCs or Android phones and tablets. It ignores Apple gear and Chromebooks, though.
Capable of wirelessly mirroring up to a 3840 x 2160 resolution stream, the 4K Wireless Display Adapter uses the 2.4GHz and 5GHz Wi-Fi bands. Easy to set up, the device makes it a snap to quickly put a 4K presentation or video in front of your colleagues without a cable in sight. The device lists for $60, but we’ve seen it for about $20 less at online retailers.
Microsoft 4K Wireless Display Adapter at a glance
Price: $60
Compatibility: Windows 10 PCs, Android devices
Resolution: 3840 x 2160 pixels
Size: 3.5 x 0.8 x 0.4 in.
Pros: Small; easy setup; can be display-powered
Cons: Doesn’t work with Macs, iOS devices, or Chromebooks
Who it’s best for: Windows-based offices that also have Android users


