- Install and set up Windows Terminal
- Installation
- First run
- Dynamic profiles
- Open a new tab
- Invoke the command palette
- Open a new pane
- Configuration
- Command line arguments
- Troubleshooting
- Установка и настройка Терминала Windows Install and set up Windows Terminal
- Установка Installation
- Первый запуск First run
- Динамические профили Dynamic profiles
- Открытие новой вкладки Open a new tab
- Открытие новой панели Open a new pane
- Конфигурация Configuration
- Аргументы командной строки Command line arguments
- Диагностика Troubleshooting
- Как установить Windows Terminal на Windows 10
- Системные требования
- Установка через Microsoft Store
- Установка с помощью Chocolatey
- Сборка из исходников
- How To Install & Use The New Windows 10 Terminal
- Installing The New Windows Terminal
- Using The New Windows Terminal
- Preparing To Configure Windows Terminal
- The Windows Terminal Configuration File
- Adding Custom Windows Terminal Backgrounds
- Changing The New Windows Terminal Color Scheme
Install and set up Windows Terminal
Installation
You can install Windows Terminal from the Microsoft Store.
If you don’t have access to the Microsoft Store, the builds are published on the GitHub releases page. If you install from GitHub, the terminal will not automatically update with new versions.
First run
After installation, when you open the terminal, it will start with PowerShell as the default profile in the open tab.

Dynamic profiles
The terminal will automatically create profiles for you if you have WSL distros or multiple versions of PowerShell installed. Learn more about dynamic profiles on the Dynamic profiles page.
Open a new tab
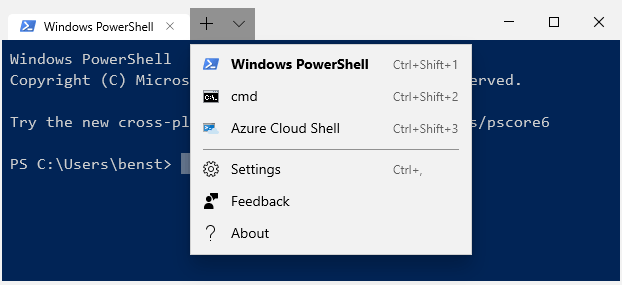
You can open a new tab of the default profile by pressing Ctrl + Shift + T or by selecting the + (plus) button. To open a different profile, select the Л… (arrow) next to the + button to open the dropdown menu. From there, you can select which profile to open.
Invoke the command palette
You can invoke most features of Windows Terminal through the command palette. The default key combination to invoke it is Ctrl + Shift + P .
Open a new pane
You can run multiple shells side-by-side using panes. To open a pane, you can use Alt + Shift + + for a vertical pane or Alt + Shift + — for a horizontal one. You can also use Alt + Shift + D to open a duplicate pane of your focused profile. Learn more about panes on the Panes page.
Configuration
To customize the settings of your Windows Terminal, select Settings in the dropdown menu. This will open the settings.json file in your default text editor. (The default text editor is defined in your Windows settings.)
The terminal supports customization of global properties that affect the whole application, profile properties that affect the settings of each profile, and actions that allow you to interact with the terminal using your keyboard or the command palette.
You can also use the settings UI to configure your settings if you are using Windows Terminal Preview. You can learn how to open the settings UI on the Actions page.
Command line arguments
You can launch the terminal in a specific configuration using command line arguments. These arguments let you open the terminal with specific tabs and panes with custom profile settings. Learn more about command line arguments on the Command line arguments page.
Troubleshooting
If you encounter any difficulties using the terminal, reference the Troubleshooting page. If you find any bugs or have a feature request, you can select the feedback link in the About menu of the terminal to go to the GitHub page where you can file a new issue.
Установка и настройка Терминала Windows Install and set up Windows Terminal
Установка Installation
Терминал Windows можно установить из Microsoft Store. You can install Windows Terminal from the Microsoft Store.
Если у вас нет доступа к Microsoft Store, можно скачать сборки, опубликованные на странице выпусков GitHub. If you don’t have access to the Microsoft Store, the builds are published on the GitHub releases page. При установке из GitHub терминал не будет автоматически обновляться с установкой новых версий. If you install from GitHub, the terminal will not automatically update with new versions.
Первый запуск First run
После установки при открытии терминала он запустится с помощью PowerShell в качестве профиля по умолчанию в открытой вкладке. After installation, when you open the terminal, it will start with PowerShell as the default profile in the open tab.

Динамические профили Dynamic profiles
Если у вас установлены дистрибутивы WSL или несколько версий PowerShell, терминал автоматически создаст профили. The terminal will automatically create profiles for you if you have WSL distros or multiple versions of PowerShell installed. Дополнительные сведения о динамических профилях см. на этой странице. Learn more about dynamic profiles on the Dynamic profiles page.
Открытие новой вкладки Open a new tab
Новую вкладку профиля по умолчанию можно открыть, нажав сочетание клавиш Ctrl+Shift+T или кнопку «+» (плюс). You can open a new tab of the default profile by pressing ctrl+shift+t or by selecting the + (plus) button. Открыть другой профиль можно с помощью раскрывающегося меню. Для этого щелкните «˅» (стрелка) рядом с кнопкой «+». To open a different profile, select the ˅ (arrow) next to the + button to open the dropdown menu. Из этого меню можно выбрать, какой профиль следует открыть. From there, you can select which profile to open.
Открытие новой панели Open a new pane
Вы можете параллельно запустить несколько оболочек с помощью панелей. You can run multiple shells side-by-side using panes. Чтобы открыть панель, нажмите сочетание клавиш ALT+SHIFT+D . To open a pane, you can use alt+shift+d . С помощью этого настраиваемого сочетания клавиш можно открыть еще одну панель выделенного профиля. This key binding will open a duplicate pane of your focused profile. Дополнительные сведения о панелях см. на этой странице. Learn more about panes on the Panes page.
Конфигурация Configuration
Чтобы выполнить настройку параметров Терминала Windows, в раскрывающемся меню выберите Параметры. To customize the settings of your Windows Terminal, select Settings in the dropdown menu. В текстовом редакторе по умолчанию откроется файл settings.json . This will open the settings.json file in your default text editor. (Текстовый редактор по умолчанию определяется в параметрах Windows.) (The default text editor is defined in your Windows settings.)
Терминал поддерживает настройку глобальных свойств, влияющих на все приложение, свойств профиля, влияющих на параметры каждого профиля, а также сочетания клавиш, позволяющих взаимодействовать с терминалом с помощью клавиатуры. The terminal supports customization of global properties that affect the whole application, profile properties that affect the settings of each profile, and key bindings that allow you to interact with the terminal using your keyboard.
Аргументы командной строки Command line arguments
Вы можете запустить терминал в определенной конфигурации с помощью аргументов командной строки. You can launch the terminal in a specific configuration using command-line arguments. С помощью этих аргументов можно открыть терминал с конкретными вкладками и панелями, применяя параметры настраиваемого профиля. These arguments let you open the terminal with specific tabs and panes with custom profile settings. Дополнительные сведения об аргументах командной строки см. на этой странице. Learn more about command-line arguments on the Command line arguments page.
Диагностика Troubleshooting
В случае возникновения каких-либо проблем при использовании терминала посетите страницу устранения неполадок. If you encounter any difficulties using the terminal, reference the Troubleshooting page. Если вы заметите какие-либо ошибки или захотите отправить запрос функции, щелкните в меню терминала О программе ссылку «Отзыв», чтобы перейти на страницу GitHub и сообщить об ошибке. If you find any bugs or have a feature request, you can select the feedback link in the About menu of the terminal to go to the GitHub page where you can file a new issue.
Как установить Windows Terminal на Windows 10
Windows Terminal – это новое приложение от Microsoft с интерфейсом командной строки, которое предназначено для работы с командной строкой (CMD), сценариями PowerShell, подключениями SSH и системой WSL. С помощью данного приложения можно запускать сразу несколько разных приложений терминала в разных вкладках и работать с ними параллельно.
На данный момент приложение Windows Terminal находится на стадии разработки и не включено в состав Windows 10, но при желании его можно установить самостоятельно. В данной инструкции мы рассмотрим именно этот вопрос, здесь вы узнаете сразу три способа, как установить Windows Terminal на Windows 10.
Системные требования
Чтобы установить Windows Terminal (любым из описанных ниже способов) ваша система должна соответствовать минимальным системным требованиям. Во-первых, для работы данного приложения требуется операционная система Windows 10 (старые ОС не поддерживаются). А во-вторых, она должна быть обновлена до версии 18362 .
Для того чтобы узнать, какая версия Windows 10 у вас установлена нажмите комбинацию Win-R и выполните команду « winver ».
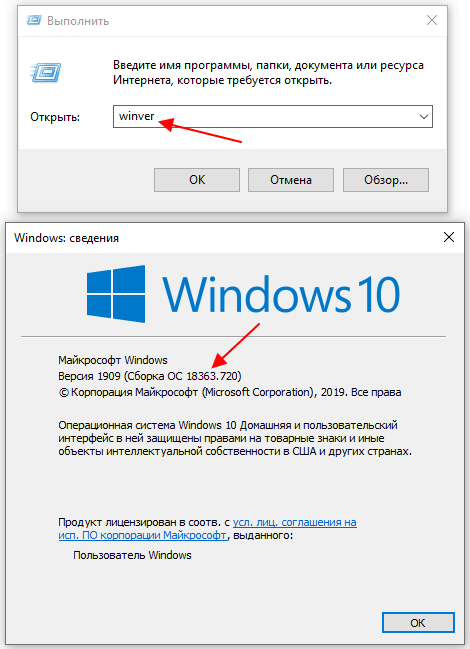
В открывшемся окне будет указана версия сборки ОС. Если ваша версия 18362 или выше, то можно приступать к установке Windows Terminal.
Установка через Microsoft Store
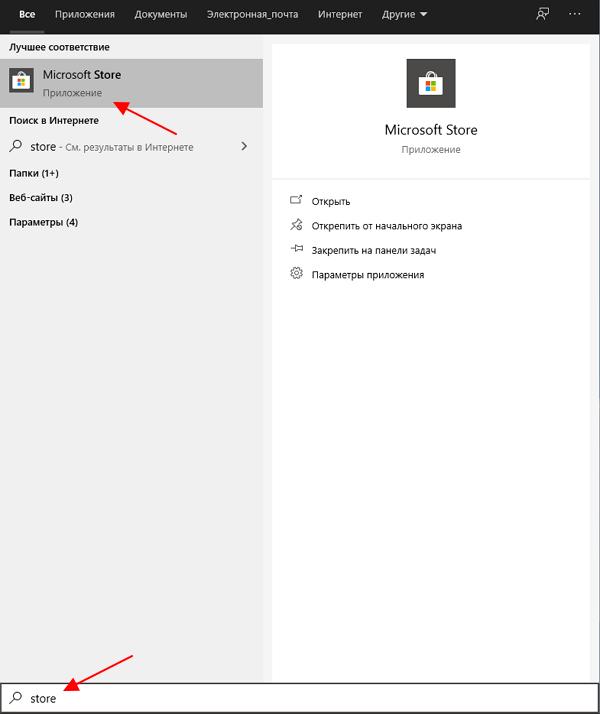
На данный момент Windows Terminal уже можно установить через магазин приложений Microsoft Store. Чтобы запустить данный магазин откройте меню « Пуск », введите в поиск слово « store » и запустите найденную программу.
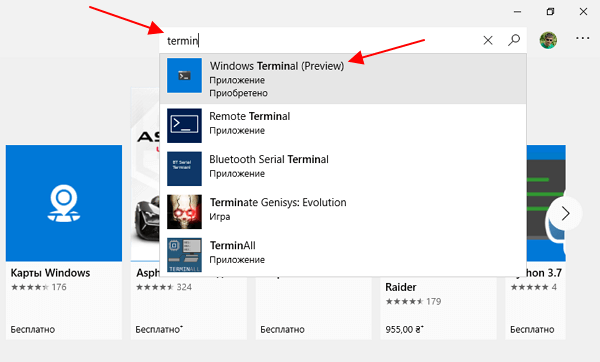
После запуска Microsoft Store, в нем нужно найти приложение Windows Terminal (Preview). Для этого можно воспользоваться поиском по магазину приложений. Введите в поисковую строку слово «terminal» и нажмите на верхнее приложение.
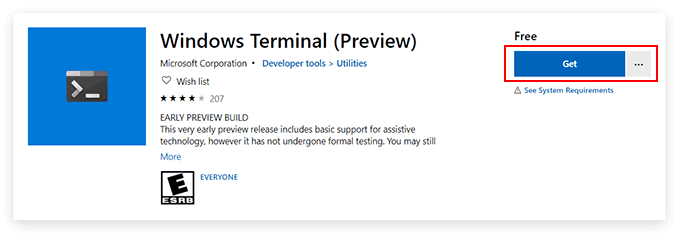
Если с поиском возникают трудности, то можете воспользоваться этой ссылкой. Кликнув по ссылке, вы попадете на веб-версию магазина Microsoft Store. Здесь нужно будет нажать на кнопку « Получить » и подтвердить переход в приложение.

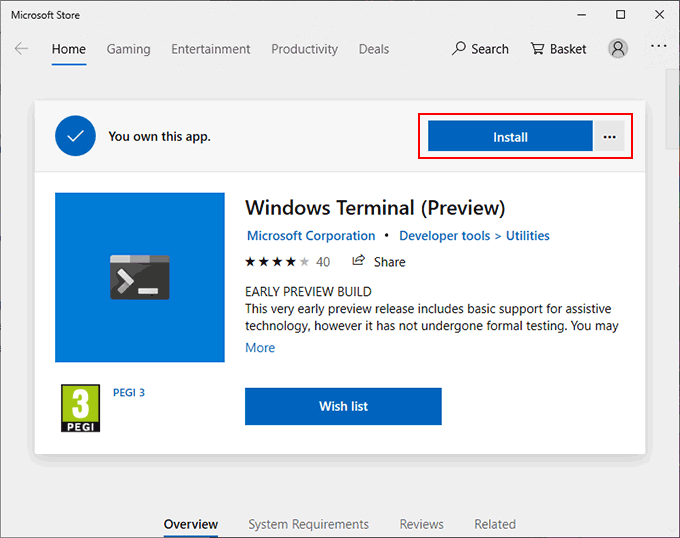
Так или иначе, вы попадете в Microsoft Store на страницу приложения Windows Terminal (Preview). Здесь нужно нажать на кнопку « Install » и дождаться завершения установки приложения.
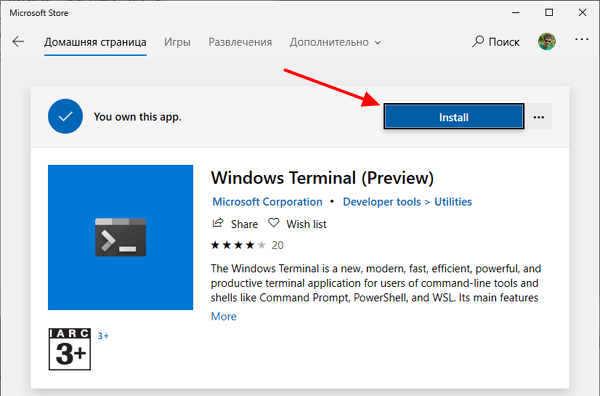
После установки можно сразу начинать пользоваться Windows Terminal, перезагрузка компьютера не требуется. Чтобы запустить приложение нужно нажать на кнопку « Launch » в Microsoft Store или воспользоваться поиском в меню « Пуск ».
Установка с помощью Chocolatey
Также вы можете установить Windows Terminal с помощью Chocolatey. Программа Chocolatey – это менеджер пакетов в стиле Linux для операционной системы Windows.
Для того чтобы установить Windows Terminal с помощью Chocolatey нужно сначала установить непосредственно сам Chocolatey. Для этого запустите PowerShell с правами администратора и выполните указанную ниже команду.

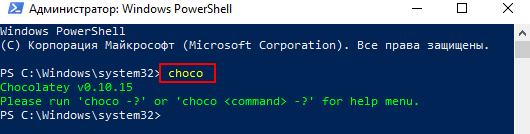
После установки перезапускаем командную строку (с правами администратора) и вводим команду « choco ». Если все нормально, то вы должны получить сообщение как на скриншоте внизу.
После установки Chocolatey можно запускать установку терминала. Для этого в PowerShell (с правами администратора) нужно выполнить следующую команду:
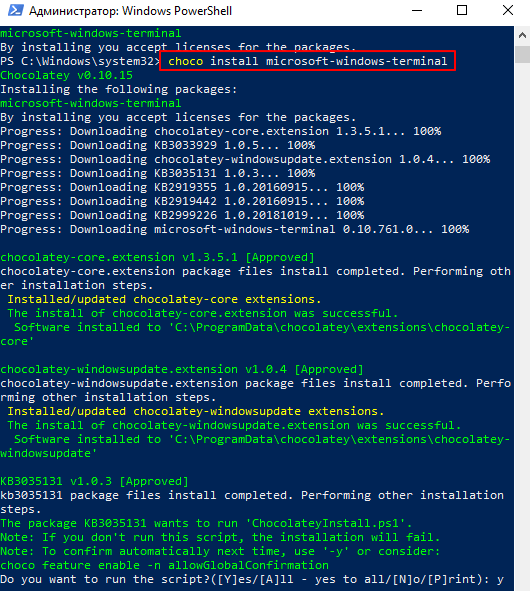
В процессе установки нужно несколько раз нажать клавишу « Y » для подтверждения установки требуемых компонентов. После завершения работы команды Windows Terminal будет установлен.
Сборка из исходников
Некоторое время этот способ был единственным вариантом получить приложение Windows Terminal, но сейчас он уже не так актуален, поскольку приложение стало доступно в Microsoft Store.
Для того чтобы собрать Windows Terminal из исходников вам необходимо выполнить следующие действия:
- Установить Visual Studio 2017 или Visual Studio 2019 с SDK 1903, а также следующие пакеты:
- Desktop Development with C++
- Universal Windows Platform Development.
- v141 Toolset and Visual C++ ATL for x86 and x64. (Visual Studio 2019 only).
- Включить режим разработчика в Windows 10.
- Скачать и распаковать исходники из официального репозитория на GitHub.

После этого нужно открыть распакованный проект в Visual Studio IDE, выбрать тип релиза « Release » и скомпилировать исполняемый файл.
How To Install & Use The New Windows 10 Terminal
A deep dive into all its key features
Windows Terminal is Microsoft’s combined replacement for the command line and Windows PowerShell, letting you run more powerful administrative commands and tools on Windows than you’d otherwise able to use from a graphical user interface.
Rather than switch from one tool to another, the new Windows Terminal brings these tools together. You can run Windows bash scripts, connect to Azure virtual machines, and open a Windows Subsystem for Linux terminal—all within a single window.
Installing The New Windows Terminal
The new Windows Terminal app is still in active development. Rather than test it internally, Microsoft has made a “preview” release available as a download in the Microsoft Store.
It brings support for tabbed windows, improved text display, and advanced configuration, letting you customize individual user profiles for your various apps. It’s also open-source, meaning you can poke around and contribute to the project yourself.
You can also download and compile the latest release yourself from the Github repository. For the best chance of stability, however, it’s best to use Microsoft’s pre-built version. It’s still in testing, so you may still experience some bugs during use.
- To start, head to the Windows Terminal (Preview) listing on the Microsoft Store website, then click Get. If you’re using Chrome, allow it to open the Microsoft Store by clicking the Open Microsoft Store button in the pop-up dialog box. Alternatively, search for Windows Terminal in the Microsoft Store app directly.
- Follow the same instructions as above in the Microsoft Store app. Click Get to link the app to your Microsoft account, then Install to begin the installation.
- Once installed, click Launch, or access it from your Windows Start menu.
Using The New Windows Terminal
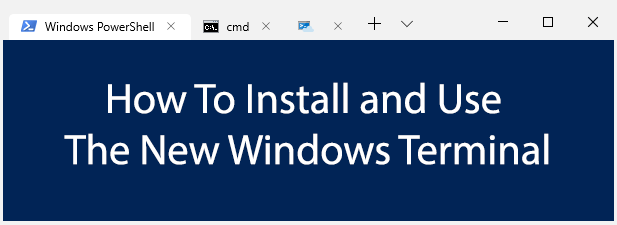
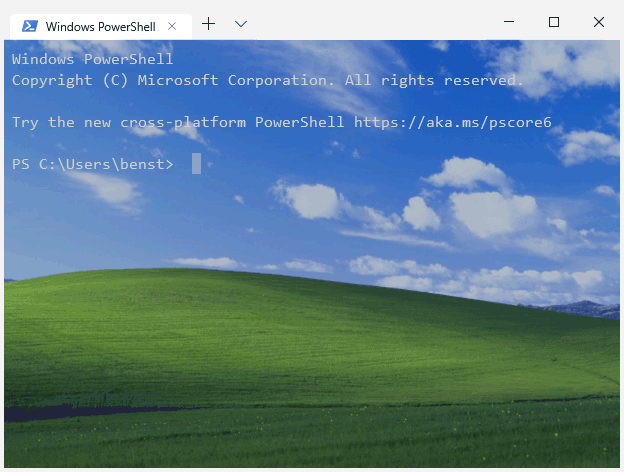
The interface to the New Windows Terminal app is incredibly simple. By default, it’ll look a lot like a typical Windows PowerShell window.
That’s because, by default, the first tab it opens will be a PowerShell terminal. You can use Windows PowerShell to perform system administration tasks, with the added advantage that you can open multiple PowerShell tabs in a single window.
This is the real benefit of New Windows Terminal, allowing you to switch between different apps and terminal shells within the same window. You can open an old-school command line in a second Windows Terminal tab, as well as an Azure Cloud Shell to remotely manage your Microsoft Azure virtual machines.
If you have a Windows Subsystem for Linux distributions installed, these will be displayed, too, giving you easy access to a Linux terminal in Windows.
- To open a new PowerShell window, click the plus button to the right of your last tab. To open other types of tabs, click the downward arrow button and select one from the list of available options.
Preparing To Configure Windows Terminal
The new Windows Terminal is extremely customizable. You can change its appearance, including modifying the background, text color and font. Microsoft also includes pre-set themes for you to switch to, but you can create your own using the JSON configuration file.
You can create custom settings for each of the types of terminals and apps that the Windows Terminal supports.
- You can edit a JSON file using Notepad, but it’s best to use a third-party Windows app called Notepad++, which offers better formatting for JSON files, making it easier to edit. Download and install Notepad++ before you begin.
With Notepad++ installed, you’ll need to configure Windows to open JSON files using it.
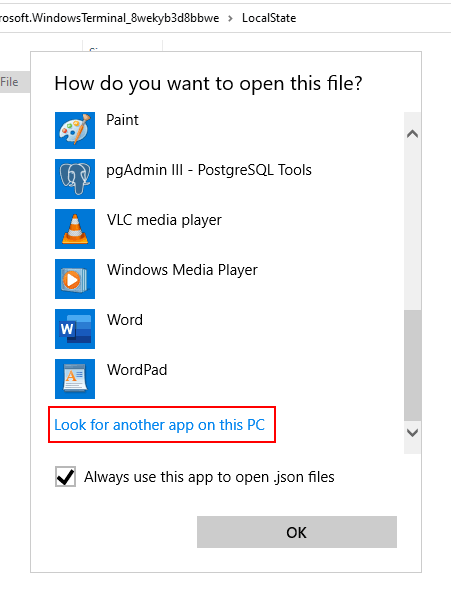
- Head to your default Windows Terminal settings folder. Open up Windows File Explorer, then type %LOCALAPPDATA%\Packages\Microsoft.WindowsTerminal_8wekyb3d8bbwe\LocalState. The folder should have a profiles.json file. Right-click the file, then click Open with.
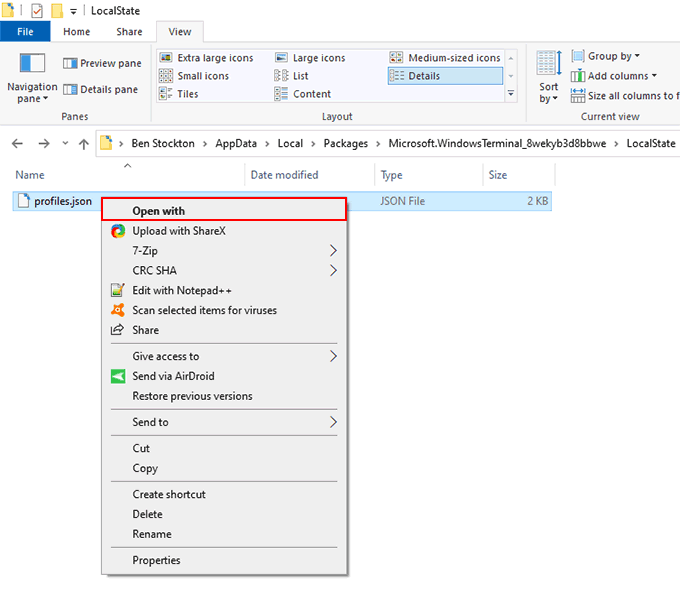
- In the app selection menu, click More apps, then click Look for another app on this PC.
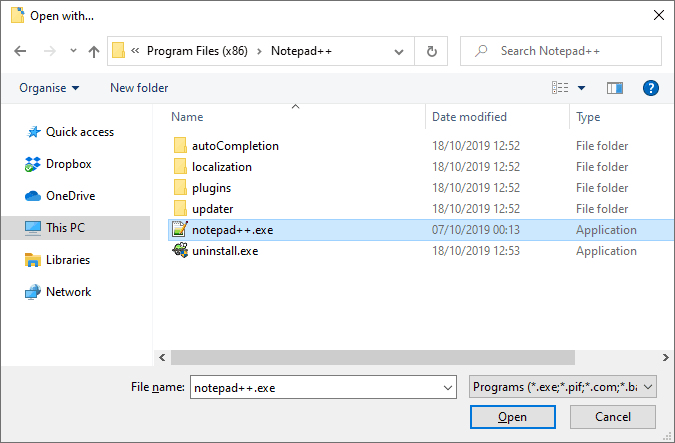
- In the app selection dialog box, head to the default installation location for Notepad++. For most users, this can be found at C:\Program Files (x86)\Notepad++. Select Notepad++.exe then click Open.
After this, the profiles.json configuration file will always open in Notepad++. You can begin customizing your Windows Terminal experience from here.
The Windows Terminal Configuration File
JSON files are a little complicated, but the profiles.json file is pretty easy to work through. With Notepad++ now configured to automatically open JSON files, you can access your settings file within Windows Terminal at any point.
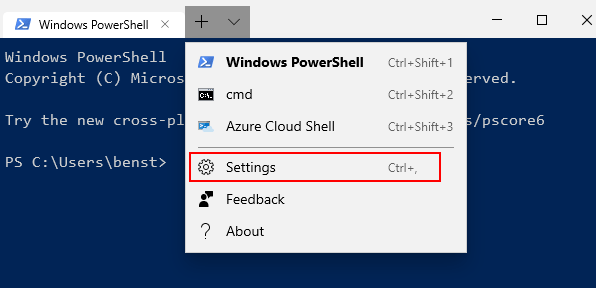
- To open the settings file, click the downward arrow button next to your Windows Terminal tabs, then click Settings. This will open the profiles.json file for you to edit.
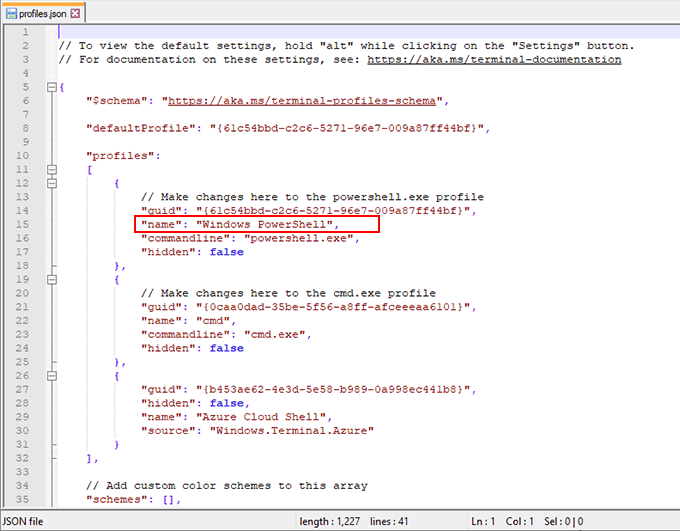
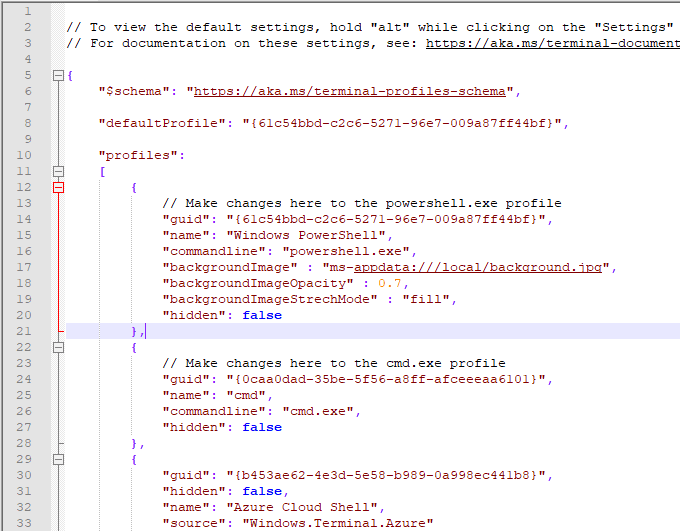
The JSON file has separate “profiles” sections that allow you to edit the profiles for each type of app and terminal shell. If you wanted to change how Windows Terminal looks in a PowerShell app, for instance, look for the PowerShell section. Use the “name” or “commandline” lines to find each profile.
Adding Custom Windows Terminal Backgrounds
If you want to add a custom background, copy a suitable PNG, JPEG or GIF file to your settings folder first.
- Open your settings file and, under each profile section, add the following underneath the “commandline” line:
“backgroundImage” : “ms-appdata:///local/yourimagefile.jpg”,
“backgroundImageOpacity” : 0.7,
“backgroundImageStrechMode” : “fill”,
- Replace “yourimagefile.jpg” with the filename for your image, and press Ctrl + S to save afterward. You can also customize the “backgroundImageOpacity” and “backgroundImageStretchMode” settings to your own requirements.
- Once saved, your Windows Terminal background will immediately change to match the background image you’ve specified.
Changing The New Windows Terminal Color Scheme
To allow you to quickly change your new Windows Terminal color scheme, you can use one of five default themes. The method for changing this is similar to the method listed above to change your background.
- Start by opening your settings file and, under each profile section, add the following line:
“colorScheme” : “Campbell”,

- Press Ctrl + S to save, and Windows Terminal will immediately update to show the new scheme.

This will change your color scheme for your chosen app profile to the “Campbell” color scheme, a scheme originating from Microsoft Console Colortool. You can change this to “One Half Dark”, “One Half Light”, “Solarized Dark” or “Solarized Light” as an alternative.
For more information on the Windows Terminal configuration file, take a look at the documentation file available at the Github repository.
Ben Stockton is a freelance technology writer based in the United Kingdom. In a past life, Ben was a college lecturer in the UK, training teens and adults. Since leaving the classroom, Ben has taken his teaching experience and applied it to writing tech how-to guides and tutorials, specialising in Linux, Windows, and Android. He has a degree in History and a postgraduate qualification in Computing. Read Ben’s Full Bio


