- 4 Ways to Transfer Photos from iPhone to Windows 10/8/7
- Part 1: Transfer photos from iPhone to Windows using Dr.Fone — Phone Manager (iOS)
- Dr.Fone — Phone Manager (iOS)
- Transfer Photos from iPhone to Windows 10 PC
- Three Solutions to Transfer Photos from iPhone to Windows 10 PC
- Solution 1. How to Transfer Photos from iPhone to Windows 10 Photos App.
- Solution 2. How to Use Windows Explorer Transfer Photos from iPhone to Windows 10.
- Solution 3. How to Transfer Photos from iPhone to Windows 10 with Syncios Manager.
- Conclusion
- How to Transfer Photos from iPhone to Computer using iTunes
- Part 1: How to Transfer Photos from iPhone to Windows or Mac Computer with iTunes
- Part 2: Other Ways to Get Photos from iPhone to Computer
- Way 1: Use Tenorshare iCareFone (Support for both Windows and Mac)
- Way 2: Use USB Connection
- Way 3: Use iCloud Photo Library
- Conclusion
4 Ways to Transfer Photos from iPhone to Windows 10/8/7

Alice MJ
Jan 07, 2021 • Filed to: iPhone Data Transfer Solutions • Proven solutions
You all would agree that photos are a big part of life. It gives you the power to preserve and pause your lovely moments for a lifetime. These photos then eventually become the essence of our memories. The most revolutionary part of photo history was the advent of digital photos. Now, people are capable of clicking 100s of photos and keep a copy of all possible electronic devices. Isn’t that just amazing? Apart from photos, you may have other files that you want to transfer from iPhone to the laptop.
With so many devices coming into life, it has become difficult to transfer the photos from one media to another. One such case is to transfer photos from iPhone to Windows. It is only natural for users to search for the answer of how to transfer photos from iPhone to Windows. Therefore, this article is here to present you with some of the most viable and reliable solutions to the above-stated problem.
Read on to learn about some of the great software and how you can use them to import photos from iPhone to Windows 7 or higher versions.
Part 1: Transfer photos from iPhone to Windows using Dr.Fone — Phone Manager (iOS)
While there are many methods available in the market to transfer photos from iPhone, but only a few stand up to the mark. One such majestic software is Dr.Fone — Phone Manager (iOS) by Wondershare. Dr.Fone has been the source of pride and confidence for many iPhone users. It comes with tightly knit and highly functional features. This makes Dr.Fone one of the most reputed brands when it comes to handling the problems related to iPhone photos transfer.
![]()
Dr.Fone — Phone Manager (iOS)
Transfer MP3 to iPhone/iPad/iPod without iTunes
- Transfer, manage, export/import your music, photos, videos, contacts, SMS, Apps, etc.
- Backup your music, photos, videos, contacts, SMS, Apps, etc. to computer and restore them easily.
- Transfer music, photos, videos, contacts, messages, etc from one smartphone to another.
- Transfer media files between iOS devices and iTunes.
- Fully compatible with iOS 7, iOS 8, iOS 9, iOS 10, iOS 11,iOS 12, iOS 13 and iPod.
Transfer Photos from iPhone to Windows 10 PC
 > How-tos > iPhone > How to Transfer Photos from iPhone to Windows 10 PC
Three Solutions to Transfer Photos from iPhone to Windows 10 PC
If you have an iPhone and Windows 10 PC, you probably would like to transfer photos from the iPhone to the computer. With Windows 10, there are several ways to quickly copy files to the PC, and we’ll show you three best approaches suing the Windows 10 Photos app to directly import photos to the PC, the more hands-on method of using Windows Explorer to copy photos to Windows 10 via the file system, and the most convenient way with the Syncios Manager.
Before beginning, be sure that you have installed iTunes onto the Windows 10 PC, this insures that iPhone can properly communicate with the Windows 10 computer. Aside from that, you just need a USB cable to transfer the photos over from the iPhone. And no, you won’t be using iTunes here to copy or transfer any pictures, but installing iTunes allows the Windows 10 PC to easily communicate with iPhone.
Solution 1. How to Transfer Photos from iPhone to Windows 10 Photos App.
Perhaps the way to transfer photos from an iPhone to Windows 10 on a PC with the Windows Photos app may be very easy. This allows for easy bulk transfer of pictures from the iPhone onto the PC with little effort.
1. Connect the iPhone to the Windows 10 PC using a USB cable.
2. Go to the Start menu in Windows and choose «Photos» app, if you don’t have it in the Start menu you can use the search bar and type «Photo» instead.

3. When Photos in Windows opens, click the import button in the upper right corner (Import looks like a downward facing arrow).
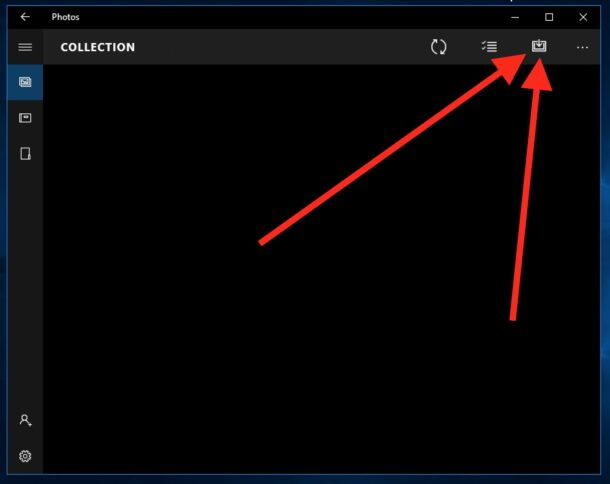
4. Select the pictures you want to import to Windows 10, then click on the «Import button to start the process.
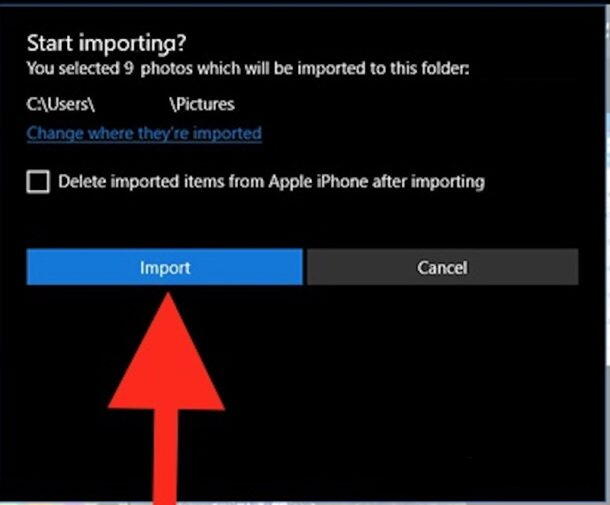
Importing photos into Photos on Windows 10 is pretty fast thanks to high speed USB transfer. Once the pictures have been imported into Windows 10, you can browse them on the PC trough Photo app.
The Photos app in Windows offers probably a simple way to copy pictures from iPhone to a PC with Windows 10 but there are other methods available as well.
Solution 2. How to Use Windows Explorer Transfer Photos from iPhone to Windows 10.
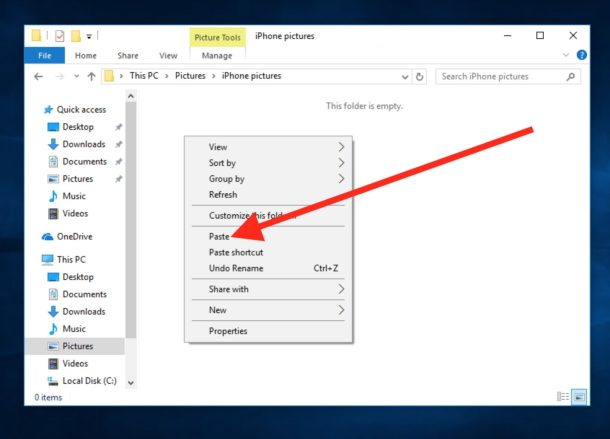
If you don’t want to use the Windows Photos app, you can also use Windows Explorer to manually copy pictures over to your computer just like you would from a memory card or other disk.
1. Open Windows Explorer and navigate to «This PC» in the sidebar.
2. Choose the name of your iPhone from the sidebar menu.
3. Open the «internal Storage» directory, and then open «DCIM» to access photos.
4. Select all folders and files if you want to copy all pictures, then right-click and choose Copy (ore use the toolbar Copy).
5. Next, navigate to a folder like a «Picture» ore » Documents» and, optionally create a new sub folder, then use the «Paste» command to import the pictures from iPhone to the Windows 10 PC via Windows Explorer file system.
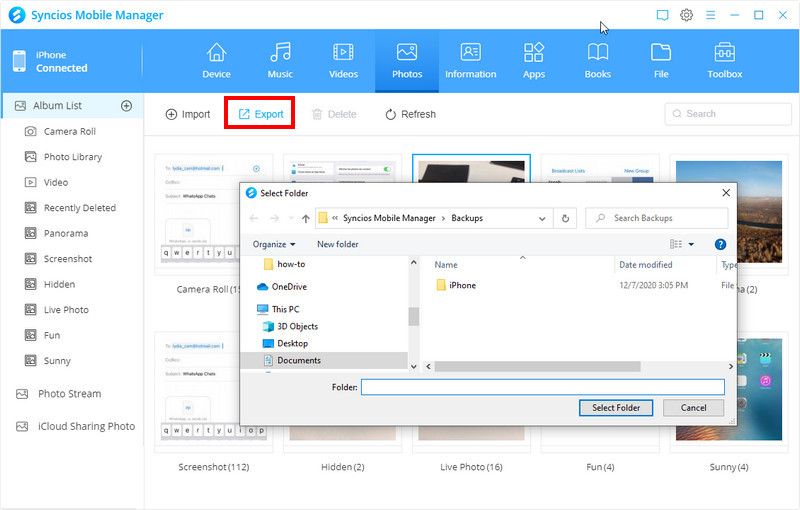
Solution 3. How to Transfer Photos from iPhone to Windows 10 with Syncios Manager.
Syncios Mobile Manager is a free and helpful application, which makes it easy to help you sync all types of files to your computer from your iPhone 7/iPhone 8/iPhone X/iPhone 11/iPhone SE 2020. The best advantage of this approach is that with visual interface, you are able to preview, edit, manage photos on computer, besides, you can choose and transfer certain picture from iPhone to PC. Whatever systems your computer are running, Win 7, Win 8 or Win 10. Tips as follows:
Step 1 Download and install Syncios Toolkit on your computer and run it. And click into ‘Mobile Manager’ on Syncios Toolkit interface to intiate the Syncios Mobile Manager. If you are on Mac computer, directly click the download button to get into it. After that, connect your iPhone to it.
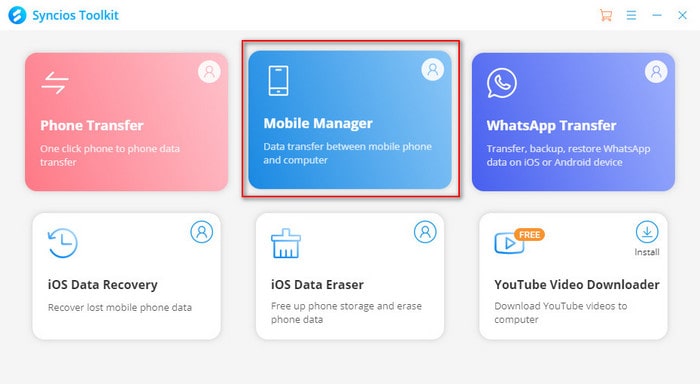
Step 2 Click on «Photos» tab among the menu options on the top. Wait for Syncios to load your data.
Step 3 Select photo(s) what you’d like to transfer to your computer. You can choose the whole photo folder or certain photo files. Double click certain photo folder to select specific photo files to backup.
Step 4 Click on «Export» on menu bar and choose your backup path on PC.
Conclusion
Above are three practical methods for transferring photos from iPhone to Windows 10. Within all these three methods, Syncios Manager can be the most convenient and efficient way to sync photos from iPhone to Windows, no matter you are using Windows 10 or Windows 8,7, batches of photos can be transferred from iPhone to Windows pc rapidly.
How to Transfer Photos from iPhone to Computer using iTunes
More than a tool with which users can listen to music and podcasts, watch movies and tv shows, iTunes helps iPhone users manage data by backing it up so that they can restore should they lose it at a later time. Users would love to know how to transfer photos from iPhone to computer with iTunes. The reasons behind this are a no-brainer: our computers offer more storage space than our iPhones. Secondly, iPhones don’t have slots for expandable memory. Third, Apple offers a paltry 5GB of free data on iCloud. So let’s get started.
Part 1: How to Transfer Photos from iPhone to Windows or Mac Computer with iTunes
Many users ask, “Can I transfer photos from iPhone to computer via Bluetooth?” iTunes allows users to sync photos between their iPhone and their computers: both Mac and PC. Wondering how to transfer photos from iphone to laptop using iTunes? Follow the procedure below. (Updating iTunes to the latest version is recommended.)
Step 1: Connect your iPhone to your computer using a USB cable and launch iTunes.
Step 2: Click iPhone’s device icon located on the left bar of the main interface and click Back Up Now to begin backing up your device.

All your photos will be backed up on iTunes. iTunes back up file can be located in C:\Users\username\AppData\Roaming\Apple Computer\MobileSync\Backup. However, you should know that the photos are just backup files and cannot be read directly unless you resort to third-party iTunes backup extractor. So, if you want to view photos after transferring, keep reading.
Part 2: Other Ways to Get Photos from iPhone to Computer
Since transferring photos from iPhone to computer using iTunes has some restrictions, it is only judicious to know how to do the same using other methods. This section details a number of methods to do so.
Way 1: Use Tenorshare iCareFone (Support for both Windows and Mac)
Tenorshare iCareFone is a great tool that allows users to transfer photos from iPhone to their Mac or PCs with simple straight-forward steps.


To transfer photos using Tenorshare iCareFone, follow the procedure below.
Step 1: Download, install and run Tenorshare iCareFone on your Windows 10/8.1/8/7 run PC or a Mac.
Step 2: Connect your iPhone to your computer using a USB cable.
Step 3: The File Manager tab is the default tab of iCareFone. Click the File Manager tab on the home page and click Photos.
Step 4: Tenorshare iCareFone automatically detects all photos and sorts each according to its respective folder so that you can easily locate it. Browse then select the photos you wish to transfer, click the Export button and select a file location to save the photos. (The default location is the desktop.)
Way 2: Use USB Connection
Thinking of another alternative of how to transfer photos from iPhone to laptop through iTunes? You can transfer photos to your Mac or PC using a USB cable. On Windows, as long as iTunes is preinstalled, users can use one of either AutoPlay feature or Windows Files Explorer. On the Mac, users can transfer photos directly using the Photos app.
If you are Windows users:
To transfer photos on Windows using Windows File Explorer, follow the procedure below.
Step 1: Connect your iPhone to your computer using a USB cable.
Step 2: Hit Win + E on your keyboard and navigate to your iPhone under This PC/ My Computer.
Step 3: Right-click your iPhone and select Import pictures and videos.
(Alternatively, click “Open device to view files” from the dialog box that will be automatically displayed. Then under This PC, click your iPhone > DCIM
Alternatively, you can use AutoPlay. Follow the procedure below.
Step 1: To Enable AutoPlay, click the Start Button > Control Panel > Hardware and Sound > AutoPlay. Check the “Use AutoPlay for all media and devices” window checkbox. It is located in the top left corner of the interface and Click Save.
Step 2: Connect your iPhone to your computer using a USB cable and launch the Camera on your iPhone.
Step 3: The AutoPlay dialog box will be displayed automatically. Click the Import pictures and videos using Windows option.
Step 4: Select the photos you wish to import and click Import.
If you are Mac users:
To transfer photos on the Mac using the Photos app, follow the procedure below.
Step 1: Connect your iPhone using a USB cable to your Mac. (Unlock your device by entering your passcode and tap Trust when prompted to do so.)
Step 2: Launch the Photos app if it doesn’t open automatically.
Step 3: Click Import located at the top of the Photos app tab.
Step 4: Select the ones you wish to import and click Import Selected.
Way 3: Use iCloud Photo Library
To use iCloud Photo Library, you’ll need to enable it on your iPhone then download them on their computers. Follow the procedure below.
Step 1: Navigate to Settings > Photos & Camera and toggling on the iCloud Photo Library button to enable iCloud Photo Library on your iPhone.
Step 2: On Windows, Download iCloud for Windows install and run it by following the prompts. If you are using Mac, directly launch iCloud.
Step 3: Sign in to iCloud using the same Apple ID credentials you used to set up iCloud on your iPhone.
Step 4: Click Options and check the iCloud Photo Library checkbox plus any other options such as My Photo Stream, iCloud Photo Sharing etc. and click Done. All your photos will be synced to your computer.
Your synced photos are located in iCloud Photo under favorites which is accessed using File Explorer.
On the Mac, your photos will automatically appear in the Photos App.
Conclusion
While transferring photos via iTunes is simple, we recommend using Tenorshare iCareFone since it allows users to locate and transfer photos from all folders, it is user-friendly, allows selective preview and transfer of photos and supports iPhone 11/XR/X/8/8+/7/7 Plus/6s/6s/6/5S/SE.
Updated on 2020-05-12 / Update for iOS File Transfer


