- Error legacy boot of uefi media — как исправить?
- Что означает ошибка «Error legacy boot of uefi media»?
- Каким образом исправить проблему активацией режима BIOS «UEFI»
- Переформатирование флеш-накопителя с FAT 32 в NTFS (MBR)
- Использование командной строки для устранения ошибки «Error legacy boot…»
- Заключение
- Fix UEFI Boot: Fix for Windows 7, 8, 8.1, 10
- Fix UEFI Boot with Easy Recovery Essentials
- Fix UEFI Boot in Windows 7
- Prerequisites
- Fix #1: Use bootrec
- Fix #2: Use bootsect
- Fix UEFI Boot in Windows 8, 8.1 or 10
- Fix #1: Use diskpart
- Fix #2: Use Automatic Repair
- More Information
- Linked Entries
- Support Links
- Applicable Systems
Error legacy boot of uefi media — как исправить?
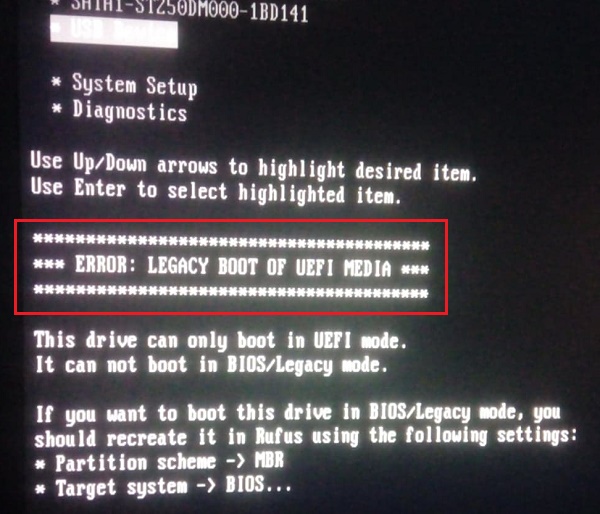
При попытке установить новую операционную систему (обычно Windows 10) с флеш-накопителя мы можем столкнуться с сообщением « Error legacy boot of uefi media ». Обычно это означает, что упомянутый flash-носитель отформатирован в схеме разделов UEFI (файловая система FAT32). В то же время как компьютер работает на основе схемы разделов MBR, и ориентирован на накопители с файловой системой NTFS. Давайте подробно разберёмся, в чём суть данной ошибки и как её исправить.
Что означает ошибка «Error legacy boot of uefi media»?
В переводе текст данного сообщения звучит как « Ошибка использования BOOT «Legacy» для накопителя UEFI ». Обычно она возникает при попытке установки новой операционной системе с помощью флеш-накопителя, который отформатирован как UEFI с файловой системой FAT 32. При этом в БИОСе такого PC выставлен режим «Legacy». Соответственно, компьютер ориентирован на накопители со схемой разделов MBR и файловой системой NTFS.
Таким образом, несовпадение режимов файловой системы FAT32 (GPT-UEFI) и NTFS (MBR) будет вызывать указанную проблему с появлением сообщения об ошибке. Перезагрузка же PC никак не решает возникшую дисфункцию.
Давайте разберёмся, как исправить ошибку с уведомлением «Error legacy boot of uefi media» на ваших PC.
Каким образом исправить проблему активацией режима BIOS «UEFI»
Наиболее простым способом избавиться от ошибки с флеш-накопителем является переключение загрузки ПК в БИОСе с режима «Legacy» на режим «UEFI».
Для этого выполните следующее:
- Перейдите в BIOS (при включении системы быстро жмите на F2 или Delete);
- При запуске БИОС найдите опцию « UEFI/BIOS Boot Mode » (Boot List Option или аналог) и вместо режима «Legacy» выберите режим «UEFI»;
 Активируйте режим «UEFI» в настройках вашего BOOT
После выполнения данных операций попробуйте вновь выполнить инсталляцию системы с флеш-накопителя. Обычно последняя проходит без каких-либо проблем, и ошибка «Error legacy boot of uefi media» будет устранена.
Переформатирование флеш-накопителя с FAT 32 в NTFS (MBR)
Другим вариантом решения проблемы будет переформатирование вашего flash-носителя в файловую системы NTFS со схемой разделов MBR, которую хорошо поддерживает BOOT Legacy. Вам помогут программы уровня «Rufus», в настройках которых необходимо выбрать схему разделов «MBR» и файловую систему NTFS.
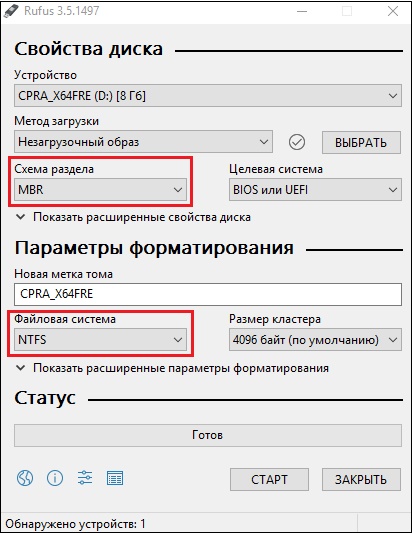 Переформатируйте ваш флеш-накопитель указанным образом
Использование командной строки для устранения ошибки «Error legacy boot…»
Для устранения уведомления «Error legacy boot of uefi media» можно использовать функционал командной строки (при возможности загрузки ОС с флеш-накопителя). С её помощью можно будет попытаться восстановить загрузчик на жёстком диске в случае, если он повреждён.
- Создайте флеш-накопитель с инсталляционной версией Windows (лучше Win 10);
- Выставьте в БИОСе загрузку с flash-носителя;
- Загрузитесь с флеш-накопителя;
- В базовом меню выберите русские язык и клавитуру, и нажмите на «Далее»;
- На следующем экране нажмите на «Восстановление системы» слева снизу;
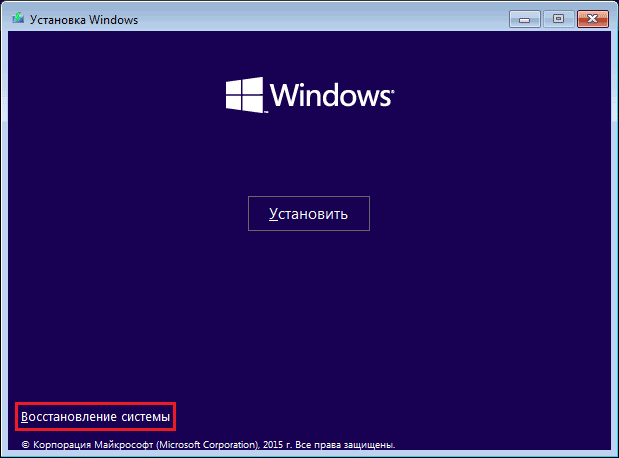 Выберите опцию «Восстановление системы»
Далее выбираем «Диагностика», затем «Дополнительные параметры», и там «Командная строка»;
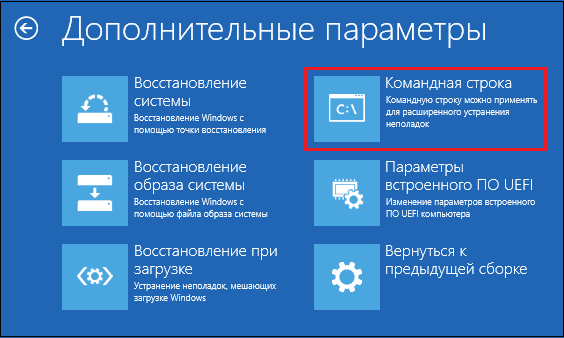 Выберите в перечне опцию «Командная строка»
select partition 1
Далее закройте командную строку и перезагрузите PC. Загрузка операционной системы может быть восстановлена.
Заключение
В нашем материале мы разобрали, почему возникает ошибка «Error legacy boot of uefi media» и каким образом можно её исправить. Наиболее простым способом решения проблемы будет переключение режима БИОСа на UEFI, после чего проблема обычно исчезает. Если же данный способ не помог, попробуйте другие перечисленные способы, позволяющие устранить указанную дисфункцию на вашем PC.
Fix UEFI Boot: Fix for Windows 7, 8, 8.1, 10
This article explains step-by-step solutions that you can use to fix your computer’s UEFI boot for these Windows versions: Windows 7, Windows 8, Windows 8.1andWindows 10.
This how-to article is applicable for PCs with UEFI/EFI that have either Windows 7, Windows 8, Windows 8.1 or Windows 10 installed.
UEFI (EFI) is the updated version of BIOS, which is commonly found on older models of computers. Major PC manufacturers – Dell, HP, Acer, Asus and so on – no longer ship PCs with BIOS, but with UEFI/EFI instead.
Most computers with UEFI/EFI can provide legacy support for BIOS. In this kind of example, if you enable legacy support, you could install Windows 7, Windows Vista or Windows XP on a computer that has UEFI/EFI and not BIOS.

ThinkPad UEFI-Legacy Boot Priority
PCs with Windows 8 and Windows 8.1 usually have UEFI/EFI installed and not BIOS, but PCs with Windows 7 will use the UEFI/EFI set with Legacy mode active.
Fix UEFI Boot with Easy Recovery Essentials
Easy Recovery Essentials is our EFI and UEFI repair CD/DVD/USB for Windows that can be used to fix your computer.
Easy Recovery Essentials can correct errors in the UEFI/EFI firmware configuration.
Easy Recovery Essentials can fix many errors such as this automatically using its built-in Automated Repair option. EasyRE is currently available for Windows XP, Vista, 7 and 8 and can be downloaded and created on any PC.
- Download Easy Recovery Essentials. Make sure to note your Windows version (XP, Vista, 7 or 8) before you download EasyRE. This guide can help you identify what version of Windows you have installed.
- Burn the image. Follow these instructions on how to burn the bootable ISO image very carefully, as making a bootable CD can be tricky! Alternatively, these instructions explain how to create a bootable EasyRE recovery USB stick/drive.
- Boot up your PC from the Easy Recovery Essentials CD or USB you created.
- Once EasyRE is running, choose the “Automated Repair” option and click Continue .

Choose “Automated Repair” in Easy Recovery Essentials

Choose the drive associated with the Windows installation you’re trying to repair.

Easy Recovery Essentials searches for errors and makes corrections to the selected Windows installation.

Windows, booting up successfully.
You can download Easy Recovery Essentials from here.
Fix UEFI Boot in Windows 7
The step-by-step instructions for fixing the UEFI/EFI boot on a Windows 7 system are very similar to those of Windows 8/8.1:
Windows 7 can’t be installed if your computer’s UEFI/EFI mode is set as active and not in Legacy mode. Legacy mode allows your computer to boot Windows 7.
If your computer model is new and has UEFI/EFI installed, but you have Windows 7 installed, it’s most likely that you’re running UEFI/EFI as Legacy.
Follow the instructions from prerequisites below before you start.
Prerequisites
Before you start using the bootrec or the diskpart command to fix the bootloader of your Windows 7 system, first you must determine that UEFI/EFI loads with the Legacy mode active.
Follow these steps:
- Restart your computer
- Press the necessary key to open UEFI/EFI. The key depends on your PC manufacturer and PC model.Most common keys are: F2 , F8 , F12 , Del . Esc is also an option.
- Once inside the UEFI/EFI setup menu, search for Secure Boot.This is usually found at any of the following tabs: Boot, Authentication or Security.
- Make sure Secure Boot is either Disabled or Off
- Save these settings and exit the UEFI/EFI setup menu

Secure Boot [Enabled] on a Dell computer

Secure Boot [Enabled] on a HP computer
Fix #1: Use bootrec
To use the bootrec utility and fix the boot error of your Windows 7 system, follow these steps:
If you don’t have the Windows 7 installation CD/DVD to run Command Prompt, go to Fix UEFI Boot with Easy Recovery Essentials.
- Insert the original Windows 7 installation CD/DVD and boot from it
- Select a language, keyboard and click Next
- Select the operating list (Windows 7) from the list and click Next
- At the System Recovery Options screen, click Command Prompt

Windows 7 System Recovery Options Screen

Windows 7 bootrec utility results screen
If the bootrec utility doesn’t fix the boot error, follow Fix #2: Use diskpart.
Fix #2: Use bootsect
Windows Setup CD/DVD Required!
Some of the solutions below require the use of the Microsoft Windows setup CD or DVD. If your PC did not come with a Windows installation disc or if you no longer have your Windows setup media, you can use Easy Recovery Essentials for Windows instead. EasyRE will automatically find and fix many problems, and can also be used to solve this problem with the directions below.
Follow these steps to run diskpart to repair the boot sector code of the Windows 7 installation:
- Follow the steps from Fix #1: Use bootrec until you reach Command Prompt
- Type:
- Press Enter
- Remove the Windows 7 installation CD/DVD from the disc tray, type exit in Command Prompt and press Enter
- Restart your computer

Windows 7 bootsect utility results screen
Fix UEFI Boot in Windows 8, 8.1 or 10
To fix the UEFI bootloader on a Windows 8, Windows 8.1 or Windows 10 system, you can follow these options:
- Use diskpart to check if the UEFI partition has a drive letter assigned (if not, it must be assigned)
- Use Automatic Repair if diskpart doesn’t work
- Use Easy Recovery Essentials to automatically fix the UEFI bootloader
Fix #1: Use diskpart
If the UEFI partition on your computer doesn’t have a drive letter assigned, this may be the primary cause of your computer’s boot error.
A common is to use the diskpart utility (available on the Windows 8/8.1/10 recovery disc/USB) to make sure the UEFI partition has a letter assigned to it. If it doesn’t, you’ll assign it a letter.
Windows Setup CD/DVD Required!
Some of the solutions below require the use of the Microsoft Windows setup CD or DVD. If your PC did not come with a Windows installation disc or if you no longer have your Windows setup media, you can use Easy Recovery Essentials for Windows instead. EasyRE will automatically find and fix many problems, and can also be used to solve this problem with the directions below.
The instructions you need to follow are:
- Insert your original Windows 8/8.1/10 installation disc or installation USB
- Boot from the disc or the USB
- At the Install now screen, click Repair your computer or press R

Windows 8 Repair Your Computer Menu
Where G: should be a unique drive letter. It can’t be already used, e.g. C:\, D:\
Where G: is the drive letter you’ve assigned to your UEFI partition a few steps back. If the \EFI\Microsoft\Boot\ folder doesn’t exist (the error message will be “The system cannot find the path specified”), you can run the same command on alternative paths:
Remember to replace G: with the UEFI’s partition letter.
Type the bootrec command:
NOTE: on newer Windows 10 installs this command may return with an “ Access Denied ” error. On those versions the following command should be run:
Where C:\ is the letter of the drive where Windows 8, Windows 8.1 or Windows 10 is installed on. The /l en-us parameter is used for localization: US. You can use ln /en-gb for UK localization.

Windows 8 bootrec utility results screen
Fix #2: Use Automatic Repair
The built-in Automatic Repair utility, available on the Windows 8, Windows 8.1 or Windows 10 disc, might fix errors with the UEFI bootloader of your computer.
In most cases, Fix #1: Use diskpart works better than Fix #2.
Windows Setup CD/DVD Required!
Some of the solutions below require the use of the Microsoft Windows setup CD or DVD. If your PC did not come with a Windows installation disc or if you no longer have your Windows setup media, you can use Easy Recovery Essentials for Windows instead. EasyRE will automatically find and fix many problems, and can also be used to solve this problem with the directions below.
The instructions to run Automatic Repair are:
- Insert the Windows 8/8.1/10 installation disc or USB
- Restart your computer and boot from disc/USB
- At the Install Now screen, click Repair your computer
- At the Choose an option screen, click Troubleshoot
- Click Automatic Repair
- Choose an account from the list to continue, at the Automatic Repair screen
- Wait for the process to finish

Windows 8 recovery options screen
More Information
Linked Entries
Support Links
It’s an easy-to-use and automated diagnostics disk. It’s available for Windows 8, Windows 7 and Windows Vista. It’s also available for Windows XP and Windows Server.
Read more at Windows Recovery Disks.
Applicable Systems
This Windows-related knowledgebase article applies to the following operating systems:
- Windows 7 (all editions)
- Windows 8 (all editions)
- Windows 8.1 (all editions)
- Windows 10 (all editions)


