- Начало работы с библиотекой пользовательского интерфейса Windows 2.x Getting started with the Windows UI 2.x Library
- Загрузка и установка библиотеки пользовательского интерфейса Windows Download and install the Windows UI Library
- Дополнительные шаги для проекта C++/WinRT Additional steps for a C++/WinRT project
- Дополнение к библиотеке пользовательского интерфейса Windows Contributing to the Windows UI Library
- Другие ресурсы Other resources
- Getting started with the Windows UI 2.x Library
- Download and install the Windows UI Library
- Additional steps for a C++/WinRT project
- Contributing to the Windows UI Library
- Other resources
- Использование команд в приложениях Windows с помощью классов StandardUICommand, XamlUICommand и ICommand Commanding in Windows apps using StandardUICommand, XamlUICommand, and ICommand
- Важные API Important APIs
- Обзор Overview
- Взаимодействие команд Command interactions
- Команды в приложениях Windows Commands in Windows applications
- Интерфейсы команд с использованием класса StandardUICommand Command experiences using the StandardUICommand class
- Пример Example
- Интерфейсы команд с использованием класса XamlUICommand Command experiences using the XamlUICommand class
- Пример Example
- Интерфейсы команд с использованием интерфейса ICommand Command experiences using the ICommand interface
- Пример Example
- Сводка Summary
- Дальнейшие действия Next steps
Начало работы с библиотекой пользовательского интерфейса Windows 2.x Getting started with the Windows UI 2.x Library
WinUI 2.5 — это последняя стабильная версия WinUI, ее следует использовать для приложений в рабочей среде. WinUI 2.5 is the latest stable version of WinUI and should be used for apps in production.
Эта библиотека доступна в виде пакета NuGet, который можно добавить в любой новый или существующий проект Visual Studio. The library is available as a NuGet package that can be added to any new or existing Visual Studio project.
Дополнительные сведения о возможности ознакомления с предварительными версиями WinUI 3 см. в статье Библиотека пользовательского интерфейса Windows 3, предварительная версия 4 (февраль 2021 г.). For more information on trying out early previews of WinUI 3, see Windows UI Library 3 Preview 4 (February 2021).
Загрузка и установка библиотеки пользовательского интерфейса Windows Download and install the Windows UI Library
Скачайте Visual Studio 2019 и убедитесь, что в установщике Visual Studio выбрана рабочая нагрузка Разработка приложений для универсальной платформы Windows. Download Visual Studio 2019 and ensure you choose the Universal Windows Platform development Workload in the Visual Studio installer.
Откройте существующий проект или создайте новый проект с помощью шаблона «Пустое приложение» в Visual C# -> Windows -> Универсальный, или соответствующий шаблон для вашей языковой проекции. Open an existing project, or create a new project using the Blank App template under Visual C# -> Windows -> Universal, or the appropriate template for your language projection.
Чтобы использовать WinUI 2.5, в свойствах проекта нужно задать TargetPlatformVersion >= 10.0.18362.0 и TargetPlatformMinVersion >= 10.0.15063.0. To use WinUI 2.5, you must set TargetPlatformVersion >= 10.0.18362.0 and TargetPlatformMinVersion >= 10.0.15063.0 in the project properties.
На панели обозревателя решений щелкните название проекта правой кнопкой мыши и выберите Управление пакетами NuGet. In the Solution Explorer panel, right click on your project name and select Manage NuGet Packages.
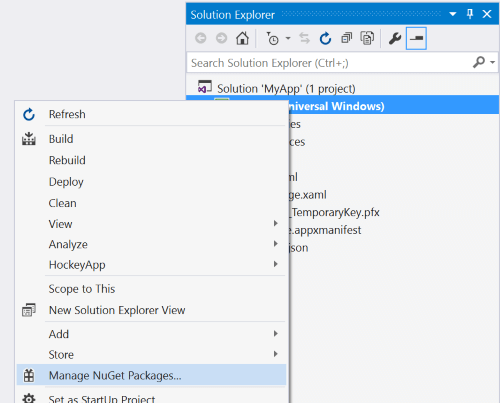
Панель Обозревателя решений с открытым с помощью щелчка правой кнопкой проектом и выделенным параметром «Управление пакетами NuGet». The Solution Explorer panel with the project right-clicked and the Manage NuGet Packages option highlighted.
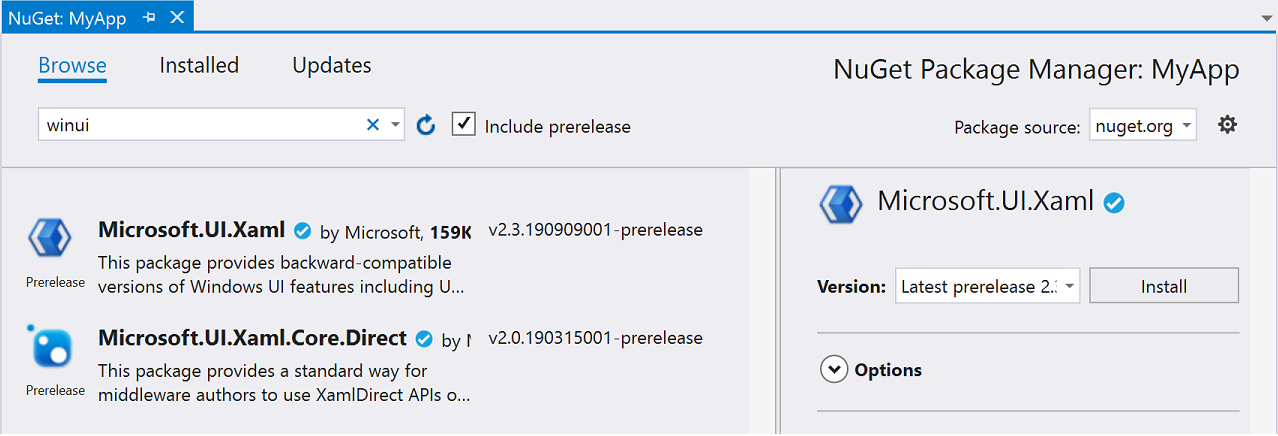
В диспетчере пакетов NuGet перейдите на вкладку Обзор и выполните поиск по запросу Microsoft.UI.Xaml или WinUI. In the NuGet Package Manager, select the Browse tab and search for Microsoft.UI.Xaml or WinUI. Выберите нужные пакеты NuGet для библиотеки пользовательского интерфейса Windows (пакет Microsoft.UI.Xaml содержит элементы управления и функции, которые подходят для любых приложений). Select which Windows UI Library NuGet Packages you want to use (the Microsoft.UI.Xaml package contains Fluent controls and features suitable for all apps). Нажмите кнопку «Установить». Click Install.
Установите флажок «Включить предварительные выпуски», чтобы просмотреть последние предварительные версии, включающие экспериментальные новые функции. Check the «Include prerelease» checkbox to see the latest prerelease versions that include experimental new features.

Диалоговое окно диспетчера пакетов NuGet с открытой вкладкой «Обзор», в поле поиска которой отображается запись «winui», и флажком «Включить предварительные выпуски». The NuGet Package Manager dialog box showing the Browse tab with winui in the search field and Include prerelease checked.
Добавьте ресурсы темы пользовательского интерфейса Windows (WinUI) в файл App.xaml. Add the Windows UI (WinUI) Theme Resources to your App.xaml file.
Это можно сделать двумя способами, в зависимости от наличия дополнительных ресурсов приложения. There are two ways to do this, depending on whether you have additional application resources.
a. a. Если вам не нужны другие ресурсы приложений, добавьте элемент ресурсов WinUI как показано в следующем примере: If you don’t need other application resources, add the WinUI resources element as shown in the following example:
b. b. Если нужны несколько ресурсов приложения, добавьте элемент ресурсов WinUI в , как показано ниже: If you need more than one application resource, add the WinUI resources element in a as shown here:
Порядок, в котором ресурсы добавляются в ResourceDictionary, влияет на порядок, в котором они применяются. The order of resources added to a ResourceDictionary affects the order in which they are applied. Словарь XamlControlsResources переопределяет множество ключей ресурсов по умолчанию и поэтому должен быть добавлен к Application.Resources , чтобы не переопределять другие пользовательские стили или ресурсы в приложении. The XamlControlsResources dictionary overrides many default resource keys and should therefore be added to Application.Resources first so that it doesn’t override any other custom styles or resources in your app. Дополнительные сведения о загрузке ресурсов см. в статье Ссылки на ресурсы ResourceDictionary и XAML. For more information on resource loading, see ResourceDictionary and XAML resource references.
Добавьте ссылку на пакет WinUI на страницы XAML и (или) страницы кода программной части. Add a reference to the WinUI package to both XAML pages and/or code-behind pages.
На странице XAML добавьте ссылку в верхней части страницы. In your XAML page, add a reference at the top of your page
В коде (если вы хотите использовать имена типов без их уточнения), можно добавить директиву using. In your code (if you want to use the type names without qualifying them), you can add a using directive.
Дополнительные шаги для проекта C++/WinRT Additional steps for a C++/WinRT project
Когда вы добавляете пакет NuGet в проект C++/WinRT, средство создает набор заголовков проекции в папке проекта \Generated Files\winrt . When you add a NuGet package to a C++/WinRT project, the tooling generates a set of projection headers in your project’s \Generated Files\winrt folder. Чтобы поместить эти файлы с заголовками в свой проект и чтобы ссылки на эти новые типы работали, можно перейти к предварительно откомпилированному файлу заголовка (обычно pch.h ) и включить их в файл проекта. To bring those headers files into your project, so that references to those new types resolve, you can go into your precompiled header file (typically pch.h ) and include them. Ниже приведен пример, включающий созданные файлы заголовков для пакета Microsoft.UI.Xaml. Below is an example that includes the generated header files for the Microsoft.UI.Xaml package.
Полное пошаговое руководство по добавлению простой поддержки библиотеки пользовательского интерфейса Windows в проект C++/WinRT см. в статье Простой пример библиотеки пользовательского интерфейса Windows для C++/WinRT. For a full, step-by-step walkthrough of adding simple support for the Windows UI Library to a C++/WinRT project, see A simple C++/WinRT Windows UI Library example.
Дополнение к библиотеке пользовательского интерфейса Windows Contributing to the Windows UI Library
WinUI — проект с открытым кодом, размещенный на сайте GitHub. WinUI is an open source project hosted on GitHub.
Мы рады любым сообщениям об ошибках, запросам на добавление функций и вкладам сообщества в создание кода, вносимым в репозиторий библиотеки пользовательского интерфейса Windows. We welcome bug reports, feature requests and community code contributions in the Windows UI Library repo.
Другие ресурсы Other resources
Если вы не знакомы с UWP, рекомендуем ознакомится со статьей Приступая к работе с приложениями для Windows 10 на портале разработчика. If you’re new to UWP, then we recommend that you visit the Getting Started with UWP Development pages on the Developer portal.
Getting started with the Windows UI 2.x Library
WinUI 2.5 is the latest stable version of WinUI and should be used for apps in production.
The library is available as a NuGet package that can be added to any new or existing Visual Studio project.
For more information on trying out early previews of WinUI 3, see Windows UI Library 3 Preview 4 (February 2021).
Download and install the Windows UI Library
Download Visual Studio 2019 and ensure you choose the Universal Windows Platform development Workload in the Visual Studio installer.
Open an existing project, or create a new project using the Blank App template under Visual C# -> Windows -> Universal, or the appropriate template for your language projection.
To use WinUI 2.5, you must set TargetPlatformVersion >= 10.0.18362.0 and TargetPlatformMinVersion >= 10.0.15063.0 in the project properties.
In the Solution Explorer panel, right click on your project name and select Manage NuGet Packages.

The Solution Explorer panel with the project right-clicked and the Manage NuGet Packages option highlighted.
In the NuGet Package Manager, select the Browse tab and search for Microsoft.UI.Xaml or WinUI. Select which Windows UI Library NuGet Packages you want to use (the Microsoft.UI.Xaml package contains Fluent controls and features suitable for all apps). Click Install.
Check the «Include prerelease» checkbox to see the latest prerelease versions that include experimental new features.
The NuGet Package Manager dialog box showing the Browse tab with winui in the search field and Include prerelease checked.
Add the Windows UI (WinUI) Theme Resources to your App.xaml file.
There are two ways to do this, depending on whether you have additional application resources.
a. If you don’t need other application resources, add the WinUI resources element as shown in the following example:
b. If you need more than one application resource, add the WinUI resources element in a as shown here:
The order of resources added to a ResourceDictionary affects the order in which they are applied. The XamlControlsResources dictionary overrides many default resource keys and should therefore be added to Application.Resources first so that it doesn’t override any other custom styles or resources in your app. For more information on resource loading, see ResourceDictionary and XAML resource references.
Add a reference to the WinUI package to both XAML pages and/or code-behind pages.
In your XAML page, add a reference at the top of your page
In your code (if you want to use the type names without qualifying them), you can add a using directive.
Additional steps for a C++/WinRT project
When you add a NuGet package to a C++/WinRT project, the tooling generates a set of projection headers in your project’s \Generated Files\winrt folder. To bring those headers files into your project, so that references to those new types resolve, you can go into your precompiled header file (typically pch.h ) and include them. Below is an example that includes the generated header files for the Microsoft.UI.Xaml package.
For a full, step-by-step walkthrough of adding simple support for the Windows UI Library to a C++/WinRT project, see A simple C++/WinRT Windows UI Library example.
Contributing to the Windows UI Library
WinUI is an open source project hosted on GitHub.
We welcome bug reports, feature requests and community code contributions in the Windows UI Library repo.
Other resources
If you’re new to UWP, then we recommend that you visit the Getting Started with UWP Development pages on the Developer portal.
Использование команд в приложениях Windows с помощью классов StandardUICommand, XamlUICommand и ICommand Commanding in Windows apps using StandardUICommand, XamlUICommand, and ICommand
В этой статье рассматриваются команды в приложениях Windows. In this topic, we describe commanding in Windows applications. В частности, мы обсудим, как с помощью классов XamlUICommand и StandardUICommand (вместе с интерфейсом ICommand) можно совместно использовать команды и управлять ими для различных типов элементов управления, независимо от устройства и типа используемого ввода. Specifically, we discuss how you can use the XamlUICommand and StandardUICommand classes (along with the ICommand interface) to share and manage commands across various control types, regardless of the device and input type being used.

Обмен командами между различными элементами управления, независимо от устройства и типа ввода Share commands across various controls, regardless of device and input type
Важные API Important APIs
Обзор Overview
Команды можно вызвать непосредственно с помощью взаимодействия с пользовательским интерфейсом, например, нажав кнопку или выбрав элемент из контекстного меню. Commands can be invoked directly through UI interactions like clicking a button or selecting an item from a context menu. Их также можно вызвать косвенно с помощью устройства ввода, такого как ускоритель клавиатуры, жест, распознавание речи либо средство автоматизации или специальных возможностей. They can also be invoked indirectly through an input device such as a keyboard accelerator, gesture, speech recognition, or an automation/accessibility tool. После вызова команда может быть обработана элементом управления (текстовая навигация в элементе управления редактирования), окном (обратная навигация) или приложением (выход). Once invoked, the command can then be handled by a control (text navigation in an edit control), a window (back navigation), or the application (exit).
Команды могут работать с определенным контекстом в вашем приложении, таким как удаление текста или отмена действия, или не зависеть от контекста, например отключение звука или регулировка яркости. Commands can operate on a specific context within your app, such as deleting text or undoing an action, or they can be context-free, such as muting audio or adjusting brightness.
На следующем изображении показаны два интерфейса команд (CommandBar и плавающий контекстный интерфейс CommandBarFlyout), которые совместно используют некоторые команды. The following image shows two command interfaces (a CommandBar and a floating contextual CommandBarFlyout) that share some of the same commands.

Панель команд Command bar

Контекстное меню в коллекции Фотографий (Майкрософт) Context menu in the Microsoft Photos gallery
Взаимодействие команд Command interactions
Из-за разнообразия устройств, типов ввода и поверхностей пользовательского интерфейса, которые могут влиять на способ вызова команды, рекомендуется предоставлять ваши команды через как можно большее число командных поверхностей. Due to the variety of devices, input types, and UI surfaces that can affect how a command is invoked, we recommend exposing your commands through as many commanding surfaces as possible. Это может быть комбинация элементов Swipe, MenuBar, CommandBar, CommandBarFlyout и традиционного контекстного меню. These can include a combination of Swipe, MenuBar, CommandBar, CommandBarFlyout, and traditional context menu.
Для критически важных команд используйте специальные ускорители ввода. For critical commands, use input-specific accelerators. Ускорители ввода позволяют пользователю выполнять действия быстрее в зависимости от используемого устройства ввода. Input accelerators let a user perform actions more quickly depending on the input device they’re using.
Ниже приведены некоторые распространенные ускорители ввода для различных типов ввода: Here are some common input accelerators for various input types:
- Указатель — кнопки мыши и пера при наведении. Pointer — Mouse & Pen hover buttons
- Клавиатура — сочетания клавиш (клавиши доступа и сочетания клавиш). Keyboard — Shortcuts (access keys and accelerator keys)
- Сенсорный ввод — прокрутка. Touch — Swipe
- Сенсорный ввод — обновление путем оттягивания. Touch — Pull to refresh data
Следует учитывать тип ввода и взаимодействие с пользователем, чтобы у вашего приложения были универсально доступные функции. You must consider the input type and user experiences to make your application’s functionality universally accessible. Например, коллекции (особенно редактируемые пользователем) обычно включают в себя множество определенных команд, которые выполняются совершенно по-разному в зависимости от устройства ввода. For example, collections (especially user editable ones) typically include a variety of specific commands that are performed quite differently depending on the input device.
В этой таблице показаны некоторые стандартные команды коллекции и способы их отображения. The following table shows some typical collection commands and ways to expose those commands.
| Команда Command | Не зависит от ввода Input-agnostic | Ускоритель мыши Mouse accelerator | Ускоритель клавиатуры Keyboard accelerator | Ускоритель сенсорного ввода Touch accelerator |
|---|---|---|---|---|
| Удалить элемент Delete item | Контекстное меню Context menu | Кнопка при наведении Hover button | Клавиша DEL DEL key | Провести, чтобы удалить Swipe to delete |
| Отметить элемент Flag item | Контекстное меню Context menu | Кнопка при наведении Hover button | CTRL+SHIFT+G Ctrl+Shift+G | Провести пальцем, чтобы пометить Swipe to flag |
| Обновить данные Refresh data | Контекстное меню Context menu | Н/Д N/A | Клавиша F5 F5 key | Обновление путем оттягивания Pull to refresh |
| Добавить элемент в избранное Favorite an item | Контекстное меню Context menu | Кнопка при наведении Hover button | F, CTRL+S F, Ctrl+S | Провести, чтобы добавить к избранному Swipe to favorite |
Всегда предоставляйте контекстное меню. Мы рекомендуем включать все соответствующие контекстные команды в традиционное контекстное меню или меню CommandBarFlyout, так как они поддерживают все типы ввода. Always provide a context menu We recommend including all relevant contextual commands in a traditional context menu or CommandBarFlyout, as both are supported for all input types. Например, если команда отображается только во время события наведения указателя, ее нельзя использовать на устройстве, работающем только с помощью сенсорного ввода. For example, if a command is exposed only during a pointer hover event, it cannot be used on a touch-only device.
Команды в приложениях Windows Commands in Windows applications
Есть несколько способов, с помощью которых можно совместно использовать команды и управлять их выполнением в приложении Windows. There are a few ways you can share and manage commanding experiences in a Windows application. Вы можете определить обработчики событий для стандартных взаимодействий, таких как щелчок, в коде программной части (это может быть довольно неэффективно, в зависимости от сложности пользовательского интерфейса), привязать прослушиватель событий для стандартных взаимодействий к совместно используемому обработчику или привязать свойство Command элемента управления к реализации ICommand, которая описывает логику команды. You can define event handlers for standard interactions, such as Click, in code-behind (this can be quite inefficient, depending on the complexity of your UI), you can bind event listener for standard interactions to a shared handler, or you can bind the control’s Command property to an ICommand implementation that describes the command logic.
Для обеспечения эффективного всестороннего взаимодействия пользователей с поверхностями команд с минимальным дублированием кода рекомендуется использовать функции привязки команд, описанные в этой статье (стандартную обработку событий см. в отдельных разделах о событиях). To provide rich and comprehensive user experiences across command surfaces efficiently and with minimal code duplication, we recommend using the command binding features described in this topic(for standard event handling, see the individual event topics).
Чтобы привязать элемент управления к общему ресурсу команд, можно самостоятельно реализовать интерфейсы ICommand или создать свою команду из базового класса XamlUICommand или из одной из команд платформы, определенной производным классом StandardUICommand. To bind a control to a shared command resource, you can implement the ICommand interfaces yourself, or you can build your command from either the XamlUICommand base class or one of the platform commands defined by the StandardUICommand derived class.
- Интерфейс ICommand (Windows.UI.Xaml.Input.ICommand или System.Windows.Input.ICommand) позволяет создавать в приложении полностью настраиваемые, многократно используемые команды. The ICommand interface (Windows.UI.Xaml.Input.ICommand or System.Windows.Input.ICommand) lets you create fully customized, reusable commands across your app.
- XamlUICommand также предоставляет эту возможность, но упрощает разработку, предоставляя набор встроенных свойств команды, таких как поведение команды, сочетания клавиш (клавиша доступа и клавиша ускорителя), значок, метка и описание. XamlUICommand also provides this capability but simplifies development by exposing a set of built-in command properties such as the command behavior, keyboard shortcuts (access key and accelerator key), icon, label, and description.
- StandardUICommand еще больше упрощает ситуацию, позволяя выбирать из набора стандартных команд платформы с предопределенными свойствами. StandardUICommand simplifies things further by letting you choose from a set of standard platform commands with predefined properties.
В приложениях UWP команды являются реализациями интерфейсов Windows.UI.Xaml.Input.ICommand (C++) или System.Windows.Input.ICommand (C#), в зависимости от выбранной языковой платформы. In UWP applications, commands are implementations of either the Windows.UI.Xaml.Input.ICommand (C++) or the System.Windows.Input.ICommand (C#) interface, depending on your chosen language framework.
Интерфейсы команд с использованием класса StandardUICommand Command experiences using the StandardUICommand class
Производный от XamlUiCommand (производный от Windows.UI.Xaml.Input.ICommand для C++ или System.Windows.Input.ICommand для C#), класс StandardUICommand предоставляет набор стандартных команд платформы с предопределенными свойствами, например значок, ускоритель клавиатуры и описание. Derived from XamlUiCommand (derived from Windows.UI.Xaml.Input.ICommand for C++ or System.Windows.Input.ICommand for C#), the StandardUICommand class exposes a set of standard platform commands with pre-defined properties such as icon, keyboard accelerator, and description.
StandardUICommand обеспечивает быстрый согласованный способ определения часто используемых команд, например Save или Delete . A StandardUICommand provides a quick and consistent way to define common commands such as Save or Delete . Нужно лишь предоставить функции execute и canExecute. All you have to do is provide the execute and canExecute functions.
Пример Example

| Скачайте код для этого примера. Download the code for this example |
|---|
| Пример использования команд UWP (StandardUICommand) UWP commanding sample (StandardUICommand) |
В этом примере мы покажем, как улучшить базовый класс ListView с помощью команды удаления элемента, реализованной классом StandardUICommand. При этом будет оптимизировано взаимодействие с пользователем для различных типов ввода с использованием MenuBar, элемента управления прокрутки, кнопок при наведении и контекстного меню. In this example, we show how to enhance a basic ListView with a Delete item command implemented through the StandardUICommand class, while optimizing the user experience for a variety of input types using a MenuBar, Swipe control, hover buttons, and context menu.
Для этого примера требуется пакет NuGet Microsoft.UI.Xaml.Controls, входящий в библиотеку пользовательских интерфейсов Microsoft Windows. This sample requires the Microsoft.UI.Xaml.Controls NuGet package, a part of the Microsoft Windows UI Library.
XAML. Xaml:
Пример пользовательского интерфейса включает в себя класс ListView из пяти элементов. The sample UI includes a ListView of five items. Команда удаления StandardUICommand привязана к классам MenuBarItem, SwipeItem, AppBarButton и меню ContextFlyout. The Delete StandardUICommand is bound to a MenuBarItem, a SwipeItem, an AppBarButton, and ContextFlyout menu.
Поддерживающий код Code-behind
- Сначала мы определяем класс ListItemData , который содержит текстовую строку и команду ICommand для каждого элемента ListViewItem в классе ListView. First, we define a ListItemData class that contains a text string and ICommand for each ListViewItem in our ListView.
- В классе MainPage мы определяем коллекцию объектов ListItemData для элементов DataTemplate из ItemTemplate типа ListView. In the MainPage class, we define a collection of ListItemData objects for the DataTemplate of the ListViewItemTemplate. Затем заполним ее начальным набором из пяти элементов (с текстом и связанной командой удаления типа StandardUICommand). We then populate it with an initial collection of five items (with text and associated StandardUICommand Delete).
- Далее мы определяем обработчик ICommand ExecuteRequested, в котором реализуем команду удаления элемента. Next, we define the ICommand ExecuteRequested handler where we implement the item delete command.
- Наконец, мы определяем обработчики для различных событий ListView, включая PointerEntered, PointerExited и SelectionChanged. Finally, we define handlers for various ListView events, including PointerEntered, PointerExited, and SelectionChanged events. Обработчики событий указателя используются для отображения или скрытия кнопки «Удалить» для каждого элемента. The pointer event handlers are used to show or hide the Delete button for each item.
Интерфейсы команд с использованием класса XamlUICommand Command experiences using the XamlUICommand class
Если вам нужно создать команду, которая не определена классом StandardUICommand, или вы хотите больше контролировать внешний вид команды, используйте класс XamlUiCommand, который является производным от интерфейса ICommand. Он добавляет различные свойства пользовательского интерфейса (например, значок, метку, описание и сочетания клавиш), методы и события для быстрого определения пользовательского интерфейса и поведения настраиваемой команды. If you need to create a command that isn’t defined by the StandardUICommand class, or you’d like more control over the command appearance, the XamlUiCommand class derives from the ICommand interface, adding various UI properties (such as an icon, label, description, and keyboard shortcuts), methods, and events to quickly define the UI and behavior of a custom command.
XamlUICommand позволяет указать пользовательский интерфейс через привязку элемента управления, например значок, метку, описание и сочетания клавиш (клавиша доступа и ускоритель клавиатуры) без настройки отдельных свойств. XamlUICommand lets you specify UI through the control binding, such as an icon, label, description, and keyboard shortcuts (both an access key and a keyboard accelerator), without setting the individual properties.
Пример Example

| Скачайте код для этого примера. Download the code for this example |
|---|
| Пример использования команд UWP (XamlUICommand) UWP commanding sample (XamlUICommand) |
В этом примере используются общие функции команды Delete из предыдущего примера StandardUICommand, но показано, как класс XamlUICommand позволяет определить пользовательскую команду удаления с помощью собственного значка шрифта, метки, ускорителя клавиатуры и описания. This example shares the Delete functionality of the previous StandardUICommand example, but shows how the XamlUICommand class lets you define a custom delete command with your own font icon, label, keyboard accelerator, and description. Как и в примере StandardUICommand, мы улучшим базовый класс ListView с помощью команды удаления элемента, реализованной классом XamlUICommand. При этом будет оптимизировано взаимодействие с пользователем для различных типов ввода с использованием MenuBar, элемента управления прокрутки, кнопок при наведении и контекстного меню. Like the StandardUICommand example, we enhance a basic ListView with a Delete item command implemented through the XamlUICommand class, while optimizing the user experience for a variety of input types using a MenuBar, Swipe control, hover buttons, and context menu.
Многие элементы управления платформы используют свойства XamlUICommand во внутреннем механизме, как и наш пример StandardUICommand в предыдущем разделе. Many platform controls use the XamlUICommand properties under the covers, just like our StandardUICommand example in the previous section.
Для этого примера требуется пакет NuGet Microsoft.UI.Xaml.Controls, входящий в библиотеку пользовательских интерфейсов Microsoft Windows. This sample requires the Microsoft.UI.Xaml.Controls NuGet package, a part of the Microsoft Windows UI Library.
XAML. Xaml:
Пример пользовательского интерфейса включает в себя класс ListView из пяти элементов. The sample UI includes a ListView of five items. Настраиваемая команда удаления XamlUICommand привязана к классам MenuBarItem, SwipeItem, AppBarButton и меню ContextFlyout. The custom XamlUICommand Delete is bound to a MenuBarItem, a SwipeItem, an AppBarButton, and ContextFlyout menu.
Поддерживающий код Code-behind
- Сначала мы определяем класс ListItemData , который содержит текстовую строку и команду ICommand для каждого элемента ListViewItem в классе ListView. First, we define a ListItemData class that contains a text string and ICommand for each ListViewItem in our ListView.
- В классе MainPage мы определяем коллекцию объектов ListItemData для элементов DataTemplate из ItemTemplate типа ListView. In the MainPage class, we define a collection of ListItemData objects for the DataTemplate of the ListViewItemTemplate. Затем заполним ее начальным набором из пяти элементов (с текстом и связанной командой XamlUICommand). We then populate it with an initial collection of five items (with text and associated XamlUICommand).
- Далее мы определяем обработчик ICommand ExecuteRequested, в котором реализуем команду удаления элемента. Next, we define the ICommand ExecuteRequested handler where we implement the item delete command.
- Наконец, мы определяем обработчики для различных событий ListView, включая PointerEntered, PointerExited и SelectionChanged. Finally, we define handlers for various ListView events, including PointerEntered, PointerExited, and SelectionChanged events. Обработчики событий указателя используются для отображения или скрытия кнопки «Удалить» для каждого элемента. The pointer event handlers are used to show or hide the Delete button for each item.
Интерфейсы команд с использованием интерфейса ICommand Command experiences using the ICommand interface
Стандартные элементы управления UWP (кнопка, список, выбор, календарь, прогнозируемый текст) обеспечивают основу для многих часто используемых интерфейсов команд. Standard UWP controls (button, list, selection, calendar, predictive text) provide the basis for many common command experiences. Полный список типов элементов управления см. в статье Элементы управления и шаблоны для приложений Windows. For a complete list of control types, see Controls and patterns for Windows apps.
Основным способом поддержки структурированного интерфейса команд является определение реализации интерфейса ICommand (Windows.UI.Xaml.Input.ICommand для C++ или System.Windows.Input.ICommand для C#). The most basic way to support a structured commanding experience is to define an implementation of the ICommand interface (Windows.UI.Xaml.Input.ICommand for C++ or System.Windows.Input.ICommand for C#). Затем этот экземпляр ICommand можно связать с такими элементами управления, как кнопки. This ICommand instance can then be bound to controls such as buttons.
В некоторых случаях такой же эффективной будет привязка метода к событию нажатия кнопки, а свойства — к свойству IsEnabled. In some cases, it might be just as efficient to bind a method to the Click event and a property to the IsEnabled property.
Пример Example

Пример ICommand ICommand example
| Скачайте код для этого примера. Download the code for this example |
|---|
| Пример использования команд UWP (ICommand) UWP commanding sample (ICommand) |
В этом базовом примере мы покажем, как можно вызывать одну команду с помощью нажатия кнопки, ускорителя клавиатуры и вращения колесика мыши. In this basic example, we demonstrate how a single command can be invoked with a button click, a keyboard accelerator, and rotating a mouse wheel.
Мы используем два класса ListViews, один из которых заполнен пятью элементами, а другой пустой, и две кнопки — одна для перемещения элементов из ListView слева в ListView справа, а другая для перемещения элементов справа налево. We use two ListViews, one populated with five items and the other empty, and two buttons, one for moving items from the ListView on the left to the ListView on the right, and the other for moving items from the right to the left. Каждая кнопка связана с соответствующей командой (ViewModel.MoveRightCommand и ViewModel.MoveLeftCommand соответственно) и включается и отключается автоматически, в зависимости от количества элементов в классе ListView, связанном с кнопкой. Each button is bound to a corresponding command (ViewModel.MoveRightCommand and ViewModel.MoveLeftCommand, respectively), and are enabled and disabled automatically based on the number of items in their associated ListView.
Следующий код XAML определяет пользовательский интерфейс для нашего примера. The following XAML code defines the UI for our example.
Ниже приведен поддерживающий код для предыдущего интерфейса. Here’s the code-behind for the preceding UI.
В коде мы подключаемся к нашей модели представления, которая содержит код нашей команды. In code-behind, we connect to our view model that contains our command code. Кроме того, мы определяем обработчик для ввода с колесика мыши, который также связывает наш командный код. In addition, we define a handler for input from the mouse wheel, which also connects our command code.
Так выглядит код из нашей модели представления. Here’s the code from our view model
Наша модель представления — это то, где мы определяем подробности выполнения для двух команд в нашем приложении, заполняем один класс ListView и предоставляем преобразователь значений непрозрачности для скрытия или отображения определенного дополнительного пользовательского интерфейса на основе количества элементов каждого класса ListView. Our view model is where we define the execution details for the two commands in our app, populate one ListView, and provide an opacity value converter for hiding or displaying some additional UI based on the item count of each ListView.
Наконец, вот наша реализация интерфейса ICommand. Finally, here’s our implementation of the ICommand interface
Здесь мы определяем команду, которая реализует интерфейс ICommand и просто передает ее функции другим объектам. Here, we define a command that implements the ICommand interface and simply relays its functionality to other objects.
Сводка Summary
Универсальная платформа Windows предоставляет надежную и гибкую систему управления для создания приложений, которые совместно используют команды и управляют ими для разных типов элементов управления, устройств и типов ввода. The Universal Windows Platform provides a robust and flexible commanding system that lets you build apps that share and manage commands across control types, devices, and input types.
Используйте следующие подходы при создании команд для ваших приложений Windows: Use the following approaches when building commands for your Windows apps:
- Прослушивайте и обрабатывайте события в коде XAML или поддерживающем коде. Listen for and handle events in XAML/code-behind
- Выполняйте привязку к методу обработки событий, например к нажатию кнопки. Bind to an event handling method such as Click
- Определяйте свою собственную реализацию ICommand. Define your own ICommand implementation
- Создавайте объекты XamlUICommand со своими собственными значениями для предварительно определенного набора свойств. Create XamlUICommand objects with your own values for a pre-defined set of properties
- Создавайте объекты StandardUICommand с набором предопределенных свойств и значений платформы. Create StandardUICommand objects with a set of pre-defined platform properties and values
Дальнейшие действия Next steps
Полный пример, демонстрирующий реализацию XamlUICommand и StandardUICommand, приведен в коллекции элементов управления XAML. For a complete example that demonstrates a XamlUICommand and StandardUICommand implementation, see the XAML Controls Gallery sample.


