- Как настроить работу Windows Update через прокси-сервер
- Windows Server 2016 не скачивает обновления через прокси
- Записки IT специалиста
- Устраняем ошибки Windows Update при работе через прокси-сервер Squid
- Squid
- Дополнительные материалы:
- How the Windows Update client determines which proxy server to use to connect to the Windows Update Web site
- INTRODUCTION
- More Information
- The Automatic Updates service is configured to download and install updates from the Microsoft Windows Update Web site
- Internet Explorer is used to access the Windows Update Web site
- Method 1: Internet Explorer is configured to automatically detect settings
- Method 2: Internet Explorer is configured to use an automatic configuration script
- Method 3: Internet Explorer is configured by using a user-defined proxy server value
- Method 4: A proxy server is not specified in Internet Explorer
- Method 5: No proxy server is configured
- A description of the Web Proxy Auto Detect (WPAD) feature
- A description of the Proxycfg.exe tool
- Settings where no proxy server is configured
- Settings where a proxy server is configured
- To configure a proxy server by using the Proxycfg.exe tool
- To remove a proxy server by using the Proxycfg.exe tool
- To configure a proxy server by using the Netsh.exe tool
- To remove a proxy server by using the Netsh.exe tool
- To verify the current proxy configuration by using the Netsh.exe tool
- Supported .pac files
Как настроить работу Windows Update через прокси-сервер
Ни для кого не секрет, что в том случае, если Ваш ПК с ОС Microsoft выходит в интернет с помощью прокси-сервера, то служба обновления системы Windows Update по-умолчанию не работает. Эта заметка о том, как можно настроить работу системы обновлений Windows на ПК, находящимся за прокси-сервером.

Служба обновлений Windows Update может использовать HTTP прокси-сервер. Однако указания прокси-сервера в настройках Windows Internet Explorer недостаточно для работы службы обновления через проксю. Дело в том, что Windows Update использует Windows HTTP Services (WinHTTP) для поиска обновления, а для загрузки обновлений используется BITS. Служба Windows Update по-умолчанию настроена так, что всегда пытается попасть на сервер обновлений Microsoft напрямую, не используя прокси-сервер, даже если в настройках Internet Explorer он указан.
Однако данная проблема решаема, достаточно настроить системный WinHttp прокси. В ОС Windows XP/2003 WinHttp прокси задавался с помощью утилиты proxycfg.exe. В новых ОС Windows Vista/7/2008 данная утилита упразднена и настройка WinHttp прокси выполняется при помощи команды netsh.
Настройка выполняется при помощи следующей команды: netsh winhttp set proxy : .
После того, как вы выполните данную команду, ваша ОС Windows 7 будет обновляться, даже находясь за прокси-сервером.
Как вариант, если вы хотите взять настройки прокси из Internet Explorer, можно воспользоваться командой:
Как вариант возможна также ситуация, когда необходимо перенаправить весь трафик, кроме трафика на Microsoft (системные обновления, активация) на прокси-сервер, тогда можно воспользоваться следующей командой обхода прокси для обновлений Windows.
Сделайте обход прокси для активации и обновлений вот так:
Текущие настройки WinHttp можно посмотреть командой:
Сбросить же настройки прокси сервера можно при помощи команды:
Windows Server 2016 не скачивает обновления через прокси
Обнаружил одну интересную особенность в службе обновлений Windows Server 2016. В том случае, если у вас не используется внутренний WSUS сервер, и ОС должна обновляться напрямую с серверов Windows Update в Интернет, то при использовании прокси-сервера для доступа наружу, при попытке загрузить обновления через центр обновлений, в Windows Server 2016 процесс загрузки зависает на этапе скачивания апдейтов на 0% (Downloading Updates 0%).
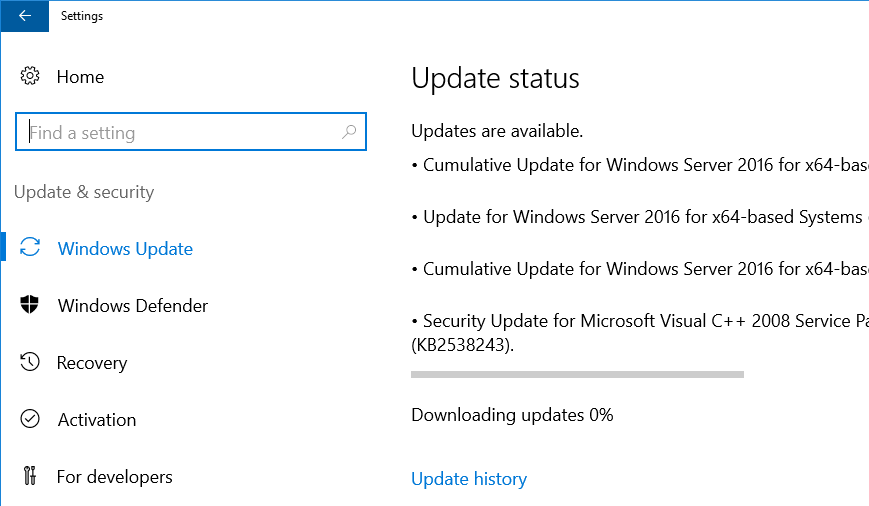
Что интересно, клиенту Windows Update удалось отправить/загрузить метаданные обновлений (список необходимых обновлений успешно сформировался), но ни одно из них не загружается.
Сформируем и откроем журнал WindowsUpdate.log с помощью командлета Get-WindowsUpdateLog.
Как вы видите, BITS не может закачать файлы с ошибкой 80246008.
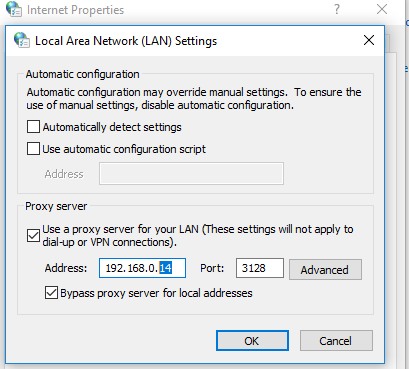
Как оказалось, простая установка параметров прокси-сервера для Internet Explorer в Windows Server 2016 RTM (10.0.14393) не работает так, как в предыдущих версиях Windows. Чтобы клиент Windows Update в Windows Server 2016 мог получать доступ в Интернет через прокси, нужно принудительно указать системный прокси для winhttp.
Выведем текущие настройки прокси-сервера для WinHTTP:
netsh winhttp show proxy
Direct access (no proxy server).
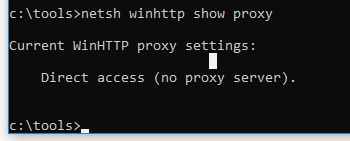
Как вы видите, параметры прокси-сервера для WinHTTP не заданы указаны.
Задать настройки системного прокси для WinHTTP можно так:
netsh winhttp set proxy proxy-server=»192.168.0.14:3128″ bypass-list=»*.winitpro.ru»

Или так, импортировав настройки из IE (настройки прокси в Internet Explorer нужно предварительно задать вручную или настроить через GPO):
netsh winhttp import proxy source=ie
После изменения настроек прокси службу Windows Update нужно перезапустить:

После того, как были указан прокси для WinHTTP, Windows Server 2016 начал закачивать обновления с узлов Windows Update.
Аналогичной проблеме подвержена RTM версия Windows 10.
Также не забудьте, что вы не сможете получать обновления через прокси сервер с авторизацией, т.к. клиент Windows Update не поддерживает возможность авторизации на прокси (в отличии от PowerShell). Чтобы корректно работала служба обновлений Windows, нужно на прокси сервере разрешить анонимный доступ к серверам обновлений Microsoft. Список URL указан ниже:
- update.microsoft.com
- * .update.microsoft.com
- download.windowsupdate.com
- * .download.windowsupdate.com
- download.microsoft.com
- * .download.microsoft.com
- windowsupdate.com
- * .windowsupdate.com
- ntservicepack.microsoft.com
- wustat.windows.com
- mp.microsoft.com
- * .mp.microsoft.com


Чтобы корректно работала служба обвинений (последнее слово точно должно быть таким?)

А то! Вы обвиняетесь в том, что давно не обновляетесь!
Скорее так:
Вы обвиняетесь в том, что используете процессор не последнего поколения и приговариваетесь к отключению от обновлений!
На самом деле это довольно логично. Ведь если на машине не залогинен никакой пользователь, то откуда брать настройки прокси? Если же мы говорим о сервере, то чаще всего там ситуация именно такая. Следовательно если настроить автоматическое получение обновлений, то работать оно не сможет т.к. нет залогиненого пользователя и нет настроек прокси. Другое дело, что я бы не стал на серверах настраивать автоматическое обновление, но это уже каждый сам решает.
По поводу списка доменов. После _долгих_ экспериментов я пришел к такому списку:
*.microsoft.com
microsoft.com
*.windowsupdate.com
windowsupdate.com
*.trafficmanager.net
trafficmanager.net
Открывать более детально по поддоменам не вижу смысла. Во-первых их там реально много. Во-вторых ну нет ничего страшного если будет доступ к *.microsoft.com, а вот жизнь сисадмину упростит сильно. Я прошу учесть, что такой список родился не на пустом месте, а в результате мониторинга сетевой активности. Дело в том, что система помимо собственно обновлений обращается еще к различным ресурсам (например проверяет списки отозванных сертификатов — CRL). Это тоже важные ресурсы наряду с обновлениями. И я рекомендую открыть анонимный доступ к этим доменам не только с серверов но и с рабочих станций.
И в догонку (хотя это уже не относится к обновлениям). Касаемо загрузки CRL. На машинах с которых идёт активная работа с интернетом (как правило это юзерские машины) системный компонент MicrosoftCryptoAPI постоянно обращается к различным доменам для скачивания CRL. Так вот если используется выход в интернет через прокси, то для корректной работы этого механизма тоже должен быть прописан системный прокси, это во-первых. Во-вторых MicrosoftCryptoAPI обращается к прокси тоже анонимно (за редким исключением). И в-третьих всё это усугубляется тем, что доменов куда он может обратится множество. Таким образом если прокся не выпустит анонимные обращения от MicrosoftCryptoAPI, то система проверки отзыва сертификатов функционировать не будет. Причём это не вызывает никаких видимых эффектов. Просто тихо не работает и всё. Чем это грозит и насколько критично каждый пусть сам додумает.
Грозит это «разными тупняками системы» при работе с сетью, локальной в том числе. Сам видел как ОС призадумываются, ожидая получения CRL или отбоя по таймауту. Причем пути по которым скачиваются эти списки, не только мракософтовские. По внутренним правилам службы ИБ к примеру эти компы вообще не должны иметь выход в инет, а работать (нормально, без тормозов) то надо. И это еще цветочки, бывает, что без этих списков , не работают какие-либо сервисы, что логично в принципе.
Записки IT специалиста
Технический блог специалистов ООО»Интерфейс»
- Главная
- Устраняем ошибки Windows Update при работе через прокси-сервер Squid
Устраняем ошибки Windows Update при работе через прокси-сервер Squid
 При работе с прокси-сервером Squid вы можете столкнуться с ситуацией, когда служба Windows Update или WSUS перестанут получать обновления. Ситуация действительно неприятная и проявляется она чаще всего уже «по факту», когда клиентские машины перестают получать обновления и нужно срочно принимать меры. Однако такое поведение службы обновления давно известно и отражено в документации. Сегодня мы разберем подробно причину возникновения ошибки и покажем возможные действия по ее устранению.
Внешнее проявление неисправности сводится к тому, что служба Windows Update не может загрузить обновления и сопровождается одним из кодов ошибки:
- 0x80244017
- 0x80244018
- 0x80244019
- 0x8024401B
- 0x80244021
Для ее возникновения требуется сочетание нескольких факторов: наличия в сети прокси-сервера с аутентификацией пользователей и службы WPAD. Неподготовленного администратора данная ошибка застает врасплох, однако существует статья KB896226, которая подробно проливает свет на проблему и способы ее решения:
Чтобы устранить эту проблему, убедитесь, что прокси-сервер или брандмауэр настроены для анонимного доступа к веб-сайту Центра обновления Windows.
Если коротко, то суть происходящих событий следующая: для доступа к серверам Центра обновлений система использует службу Windows HTTP (WinHTTP), которая в свою очередь поддерживает автоматическое получение настроек прокси через WPAD. Т.е. все запросы к серверам обновлений будут автоматически направлены на прокси, это не доставляет проблем до тех пор, пока прокси-сервер не начинает требовать аутентификации клиентов. Службы Windows Update не могут пройти аутентификацию и возникает проблема с получением обновлений.
Чтобы избавиться от этой ошибки следует выполнить рекомендации Microsoft и обеспечить анонимный доступ к серверам обновлений. Сделать это можно достаточно просто и несколькими способами. Рассмотрим их подробнее.
Squid
Система контроля доступа Squid дает в руки администратора мощный инструмент управления и этим следует пользоваться. Тем более что стоящая перед нами задача ничем не отличается от URL-фильтрации по спискам, о которой мы рассказывали ранее.
Создадим отдельный список для служб Windows Update:
и внесем в него следующие записи:
За его основу мы взяли список из KB896226 который актуализировали и дополнили исходя из собственного опыта и наработок коллег.
Теперь создадим элемент ACL для работы со списком:
Для того, чтобы обеспечить анонимный доступ к указанным ресурсам следует создать список доступа и разместить его раньше списков, требующих аутентификацию или производящих авторизацию, лучше всего сделать его одним из первых.
После чего перезапустите прокси-сервер и проверьте доступ к серверам обновлений, он должен восстановиться.
Существует также еще один вариант — направить трафик к серверам обновлений минуя прокси-сервер. В этом нам поможет протокол WPAD, точнее специальные правила в PAC-файле. На наш взгляд этот метод менее предпочтителен, но вполне имеет право на существование.
Для его реализации добавьте в файл wpad.dat следующие инструкции:
Изменения вступают в силу сразу, перезапускать службы не требуется.
При использовании данного метода следует принять во внимание еще один момент — если вы принимали меры по запрету обхода прокси, например, при помощи iptables, то следует явно разрешить соединения к серверам обновлений. На текущий момент указанным серверам соответствуют следующие IP-адреса:
Собственно, поэтому не рекомендуем данный способ, так как поддерживать один список доменных имен для Squid проще, чем два, тем более что соответствие доменных имен IP-адресам может меняться. В любом случае теперь вы понимаете источник проблемы и можете самостоятельно выбрать наиболее предпочтительный способ ее решения.
Дополнительные материалы:
Помогла статья? Поддержи автора и новые статьи будут выходить чаще:
Или подпишись на наш Телеграм-канал: 
How the Windows Update client determines which proxy server to use to connect to the Windows Update Web site
INTRODUCTION
The Microsoft Windows Update client program requires Microsoft Windows HTTP Services (WinHTTP) to scan for available updates. Additionally, the Windows Update client uses the Background Intelligent Transfer Service (BITS) to download these updates. Microsoft Windows HTTP Services and BITS run independently of Microsoft Internet Explorer. Both these services must be able to detect the proxy server or proxy servers that are available in your particular environment. This article describes the various proxy server detection methods that are available. Additionally, this article describes the situations where Windows Update uses a particular proxy server detection method.
More Information
The Automatic Updates service is configured to download and install updates from the Microsoft Windows Update Web site
The Automatic Updates service can automatically download and install updates from the Windows Update Web site. The Automatic Updates service does not require user interaction because this service runs in the context of the Local System account. The Automatic Updates service does not have access to the user-specific proxy server settings that may be configured in Internet Explorer. WinHTTP has been employed, instead of WinInet in Internet Explorer, as the Automatic Updates service affects system wide level configuration and should require administrator level control. WinHTTP is considered as more appropriate in this type of usage scenario. The Automatic Updates service can only discover a proxy server by using one of the following methods:
The proxy server is manually configured by using the Proxycfg.exe tool for Windows XP and Windows Server 2003. For Windows Vista and newer OS, Netsh command is available to manually configure the proxy server. For more information about how to use the Proxycfg.exe tool, click the following article number to view the article in the Microsoft Knowledge Base:
289481 You may need to run the Proxycfg tool for ServerXMLHTTP to work
Web Proxy Auto Detect (WPAD) settings are configured in either of the following locations in the network environment:
The Domain Name System (DNS) options
The Dynamic Host Configuration Protocol (DHCP) options
For more information about a related topic, click the following article number to view the article in the Microsoft Knowledge Base:
816320 How to configure firewall and Web proxy client Autodiscovery in Windows Server 2003
Internet Explorer is used to access the Windows Update Web site
If you use Internet Explorer to access the Windows Update Web site, the Windows Update client program discovers a proxy server by using the following methods in the order that they appear in.
Method 1: Internet Explorer is configured to automatically detect settings
If the Automatically detect settings check box is selected in Internet Explorer, the Windows Update client uses the WPAD feature to locate a proxy server. To view the Automatically detect settings check box, follow these steps:
Start Internet Explorer.
On the Tools menu, click Internet Options.
Click the Connections tab.
If you connect to the Internet by using a proxy server on the local area network, click LAN Settings. If you connect to the Internet by using a proxy server for a dial-up connection or a VPN connection, click that connection, and then click Settings.
For more information about a related topic, click the following article number to view the article in the Microsoft Knowledge Base:
816320 How to configure firewall and Web proxy client Autodiscovery in Windows Server 2003
Method 2: Internet Explorer is configured to use an automatic configuration script
If the following conditions are true, the Windows Update client locates the proxy server by processing the automatic configuration script:
Internet Explorer cannot discover the proxy server by using Method 1.
The Use automatic configuration script check box is selected in Internet Explorer.
To view the Use automatic configuration script check box, follow these steps:
Start Internet Explorer.
On the Tools menu, click Internet Options.
Click the Connections tab.
If you connect to the Internet by using a proxy server on the local area network, click LAN Settings. If you connect to the Internet by using a proxy server for a dial-up or VPN connection, click that connection, and then click Settings.
Method 3: Internet Explorer is configured by using a user-defined proxy server value
If the following conditions are true, the Windows Update client uses the user-defined proxy server to connect to the Internet:
The Windows Update client cannot locate a proxy server by using automatic detection or by using an automatic configuration script.
A proxy server is defined in Internet Explorer.
To view the user-defined proxy server value, follow these steps:
Start Internet Explorer.
On the Tools menu, click Internet Options.
Click the Connections tab.
If you connect to the Internet by using a proxy server on the local area network, click LAN Settings. If you connect to the Internet by using a proxy server for a dial-up or VPN connection, click that connection, and then click Settings.
Note the value that appears in the Address box under Proxy server.
Method 4: A proxy server is not specified in Internet Explorer
If no proxy server is defined in Internet Explorer, the Windows Update client uses the proxy server that was configured by using the Proxycfg.exe tool. For more information about how to use the Proxycfg.exe tool, click the following article number to view the article in the Microsoft Knowledge Base:
289481 You may need to run the Proxycfg tool for ServerXMLHTTP to work
Method 5: No proxy server is configured
If the following conditions are true, the Windows Update client tries to connect to the Windows Update Web site directly:
No proxy server is configured by using the Proxycfg.exe tool.
No proxy server is manually defined in Internet Explorer.
In this scenario, if a proxy server is required to connect to the Internet, the Windows Update client cannot successfully connect to the Windows Update Web site.
A description of the Web Proxy Auto Detect (WPAD) feature
The WPAD feature lets services locate an available proxy server by querying a DHCP option or by locating a particular DNS record. For more information about the advantages and disadvantages of using DNS instead of DHCP for WPAD, click the following article number to view the article in the Microsoft Knowledge Base:
816320 How to configure firewall and Web proxy client Autodiscovery in Windows Server 2003
A description of the Proxycfg.exe tool
The Proxycfg.exe tool configures WinHTTP to use a specific proxy server by modifying the following registry entry:
HKEY_LOCAL_MACHINE\ SOFTWARE\Microsoft\Windows\CurrentVersion\Internet Settings\Connections\WinHttpSettingsThe Proxycfg.exe tool is useful if you cannot implement WPAD. Additionally, you can use this tool to help you troubleshoot proxy server discovery problems in the network. In this situation, you can use this tool to help verify that an issue occurs because of a failure to discover a proxy server by using the other discovery methods, such as WPAD. For more information about a related topic, click the following article number to view the article in the Microsoft Knowledge Base:
289481 You may need to run the Proxycfg tool for ServerXMLHTTP to work
To view the command-line parameters that the Proxycfg.exe tool supports, type proxycfg.exe /? at a command prompt, and then press ENTER. If you run the proxycfg.exe command by using no command-line parameters, the current settings are displayed. In this situation, you receive results that are similar to one of the following results.
Settings where no proxy server is configured
Settings where a proxy server is configured
To configure a proxy server by using the Proxycfg.exe tool
To use the Proxycfg.exe tool to configure a proxy server, follow these steps:
Click Start, click Run, type cmd, and then click OK.
At the command prompt, type proxycfg -p proxyservername: portnumber, and then press ENTER. In this command, replace proxyservername with the fully qualified domain name of the proxy server. Replace portnumber with the port number for which you want to configure the proxy server. For example, replace proxyservername with proxy. domain. example. com and replace portnumber with 80.
If the proxy server is successfully configured, the following results appear:
To remove a proxy server by using the Proxycfg.exe tool
To use the Proxycfg.exe tool to remove a proxy server and to configure «direct access» to the Internet, follow these steps:
Click Start, click Run, type cmd, and then click OK.
At the command prompt, type proxycfg -D, and then press ENTER.
Note If one of the following conditions is true, a proxy server does not appear in the results of the proxycfg.exe command:
The proxy server is manually configured in Internet Explorer.
The proxy server is configured by using a configuration script.
The proxycfg.exe command is only used to manually configure the proxy server that WinHTTP uses. If you use WPAD to specify a proxy server, or if you use Internet Explorer to specify a proxy server, the results of the proxycfg.exe command should indicate a value of Direct access (no proxy server).
To configure a proxy server by using the Netsh.exe tool
For Windows Vista and above, Netsh.exe tool is available in place of proxycfg.exe.
To use the Netsh.exe tool to configure a proxy server, follow these steps:
Click Start, click Run, type cmd, and then click OK.
At the command prompt, type netsh winhttp set proxy proxyservername:portnumber, and then press ENTER. In this command, replace proxyservername with the fully qualified domain name of the proxy server. Replace portnumber with the port number for which you want to configure the proxy server. For example, replace proxyservername with proxy.domain.example.com and replace portnumber with 80.
To remove a proxy server by using the Netsh.exe tool
To use the Netsh.exe tool to remove a proxy server and to configure «direct access» to the Internet, follow these steps:
Click Start, click Run, type cmd, and then click OK.
At the command prompt, type netsh winhttp reset proxy, and then press ENTER.
To verify the current proxy configuration by using the Netsh.exe tool
To use the Netsh.exe tool to verify the current proxy configuration, follow these steps:
Click Start, click Run, type cmd, and then click OK.
At the command prompt, type netsh winhttp show proxy, and then press ENTER.
Supported .pac files
For more information about the supported types of .pac files, visit the following Microsoft Web site:


