- Sysprep (Generalize) a Windows installation
- Generalize a Windows installation
- Prevent Sysprep from removing installed devices
- Limits on how many times you can run Sysprep
- Microsoft Store apps
- Generalize an image
- Generalize from Audit Mode
- Generalize using unattend
- Sysprep fails after you remove or update Microsoft Store apps that include built-in Windows images
- Introduction
- Symptoms
- Cause
- Resolution
- More information
- Как запустить SysPrep после апгрейда Windows
Sysprep (Generalize) a Windows installation
To deploy a Windows image to different PCs, you have to first generalize the image to remove computer-specific information such as installed drivers and the computer security identifier (SID). You can either use Sysprep by itself or Sysprep with an unattend answer file to generalize your image and make it ready for deployment.
Generalize a Windows installation
When you generalize a Windows image, Windows Setup processes settings in the generalize configuration pass. Even if you’re capturing an image that’s going to be deployed to a PC with similar hardware, you still have to generalize the Windows installation to remove unique PC-specific information from a Windows installation, which allows you to safely reuse your image.
When you generalize an image, Windows replaces the computer SID only on the operating system volume where you ran Sysprep. If a single computer has multiple operating systems, you must run Sysprep on each image individually.
If you’re generalizing a Windows Server installation that has Remote Authentication Dial-In User Service (RADIUS) clients or remote RADIUS server groups defined in the Network Policy Server (NPS) configuration, you should remove this information before you deploy it to a different computer. For more information, see Prepare a Network Policy Server (NPS) for Imaging.
Prevent Sysprep from removing installed devices
When you set up a Windows PC, Windows Setup configures all detected devices. Generalizing a Windows installation uninstalls configured devices, but does not remove device drivers from the PC.
If you’re deploying an image to computers that have identical hardware and devices as the original PC, you can keep devices installed on the computer during system generalization by using an unattend file with Microsoft-Windows-PnpSysprep | PersistAllDeviceInstalls set to true. For more information about Sysprep-related Windows unattend components, see the Unattended Windows Setup Reference for Microsoft-Windows-PnpSysprep.
Limits on how many times you can run Sysprep
You can run the Sysprep command up to 1001 times on a single Windows image. After running Sysprep 1001 times, you must recreate your Windows image. Refer the following table:
| Operating System Version | Sysprep Count Limit |
|---|---|
| Windows 10, version 1803 | 1001 |
| Windows 10, version 1709 | 1001 |
| Windows 10, version 1703 | 1001 |
| Windows 10, version 1607 and Windows Server 2016 | 1001 |
| Windows 10, version 1511 | 1001 |
| Windows 10, version 1507 | 1001 |
| Windows 8.1 and Windows Server 2012 R2 | 1001 |
| Windows Server 2012 | 1001 |
| Windows 7 and Windows Server 2008 R2 | 3 |
| Windows Server 2008 | 3 |
In previous versions of Windows, you could use the SkipRearm answer file setting to reset the Windows Product Activation clock when running Sysprep. If you are using a volume licensing key or a retail product key, you don’t have to use SkipRearm because Windows is automatically activated.
Microsoft Store apps
Installing new Microsoft Store apps or updating your existing Microsoft Store apps before generalizing a Windows image will cause Sysprep to fail. Sysprep /generalize requires that all apps are provisioned for all users; however, when you update an app from the Microsoft Store, that app becomes tied to the logged in user account. The following error appears in the Sysprep log files (located at %WINDIR%\System32\Sysprep\Panther):
was installed for a user, but not provisioned for all users. This package will not function properly in the sysprep image.
Instead of using the Microsoft Store to update your apps, you should sideload updates to your line-of-business apps, provision offline-licensed Microsoft Store for Business apps for all users, or have end-users update their apps by using the Microsoft Store on their destination PCs. If Microsoft Store access in a managed environment is disabled by an IT administrator, end-users will not be able to update the Microsoft Store apps.
For more information about sideloading line-of-business Microsoft Store apps, see Sideload Apps with DISM and Customize the Start Screen.
Generalize an image
Generalize from Audit Mode
To generalize an image, you have to first boot into Audit Mode. You can boot into Audit Mode using an unattend file or from the Out-Of-Box Experience (OOBE) screen. You can read about the different ways of booting into Audit Mode at Boot Windows to Audit Mode or OOBE.
Boot a PC into Audit Mode. When Windows boots into Audit Mode, System Preparation Tool will appear on the desktop. You can choose to either close the System Preparation Tool window or allow it to remain open.
Customize Windows by adding drivers, changing settings, and installing programs. Do not install any Microsoft Store apps using the Microsoft Store.
If the System Preparation Tool window is still open, click Generalize, click Shutdown, and then click OK to generalize the image and shut down the PC.
Use Sysprep from Command Prompt. Run %WINDIR%\system32\sysprep\sysprep.exe to open the System Preparation Window. You can also use the Sysprep command together with the /generalize, /shutdown, and /oobe options. See Sysprep command-line options to see available options.
If you are generalizing a VHD that will be deployed as a VHD on the same virtual machine or hypervisor, use the /mode:vm option with the Sysprep command-line.
The computer generalizes the image and shuts down.
After the computer shuts down, capture your image with DISM.
Deploy this image to a reference computer. When the reference computer boots, it displays the OOBE screen.
Generalize using unattend
If you use multiple unattend files during your computer deployment, you can add the following settings to your each of your unattend files so Windows Setup will generalize the PC after processing the unattend file.
- To automatically generalize the image and shut down, use the Microsoft-Windows-Deployment | Generalize setting. Set Mode to OOBE or Audit, and set ForceShutdownNow to true.
- To generalize the system, and have it boot into Audit Mode, use the Microsoft-Windows-Deployment | Reseal setting to the oobeSystem configuration pass. Set Mode to Audit.
Sysprep fails after you remove or update Microsoft Store apps that include built-in Windows images
This article discusses an issue that occurs when you remove or update a provisioned Microsoft Store app by using the Microsoft Store and then running sysprep on the computer.
Original product version: В Windows 10 — all editions
Original KB number: В 2769827
Introduction
Sysprep is a tool for IT administrators who want to prepare an installation of Windows for duplication, auditing, and customer delivery. The guidance in this article is intended for use by support agents and IT professionals. If you are a home user who is encountering issues while using Microsoft Store apps, see Fix problems with apps from Microsoft Store in Windows 10.
Several Microsoft Store apps include built-in Windows 10 and Windows 8 images. These apps include the Mail, Maps, Messaging, Bing, Travel, and News apps, among others. These apps are known as provisioned apps. Provisioned apps are staged in the image and are scheduled to be installed for every user of the Windows image at first logon. In addition to the built-in apps, you can side-load your own line-of-business Microsoft Store apps into the Windows image without having to publish them to the Microsoft Store. You can side-load Appx packages by using online or offline servicing commands that are available in DISM.exe or through the DISM PowerShell module.
Symptoms
Consider the following scenarios:
- You are creating a custom Windows 10 reference computer that you want to sysprep and capture.
- You want to remove some of the provisioned Microsoft Store apps ( Appx packages) from this reference computer.
- You run dism -online /Remove-ProvisionedAppxPackage /PackageName:\
to deprovision the Appx packages.
When you run sysprep operation in this scenario, the operation may fail with the following error:
System Preparation Tool 3.14
A fatal error occurred while trying to sysprep the machine
- You have an existing Windows image, and several Microsoft Store apps are side-loaded in the image.
- You want to remove some of the side-loaded Appx packages from your image and customize it further.
- You boot into the reference computer and run one of the following PowerShell commands to remove the provisioning of the Appx package:
- Remove-AppxProvisionedPackage -PackageName
When you run sysprep operation in this scenario, the operation may fail with the following error:
System Preparation Tool 3.14
A fatal error occurred while trying to sysprep the machine- You are creating a Windows 10 reference image.
- You connect to the Windows 10 Store, and then you update the built-in Microsoft Store apps by using the Microsoft Store.
When you run sysprep operation in this scenario, the operation may fail with the following error:
System Preparation tool 3.14 A fatal error occurred while trying to sysprep the machine
Additionally, in the SetupErr.log, you may notice the following error entries:
was installed for a user, but not provisioned for all users. This package will not function properly in the sysprep image.
, Error SYSPRP Failed to remove apps for the current user: 0x80073cf2.
, Error SYSPRP Exit code of RemoveAllApps thread was 0x3cf2.
, Error [0x0f0082] SYSPRP ActionPlatform::LaunchModule: Failure occurred while executing ‘SysprepGeneralize’ from C:\Windows\System32\AppxSysprep.dll; dwRet = 0x3cf2
, Error SYSPRP ActionPlatform::ExecuteAction: Error in executing action; dwRet = 0x3cf2
, Error SYSPRP ActionPlatform::ExecuteActionList: Error in execute actions; dwRet = 0x3cf2
, Error SYSPRP SysprepSession::Execute: Error in executing actions from C:\Windows\System32\Sysprep\ActionFiles\Generalize.xml; dwRet = 0x3cf2
, Error SYSPRP RunPlatformActions:Failed while executing SysprepSession actions; dwRet = 0x3cf2
, Error [0x0f0070] SYSPRP RunExternalDlls:An error occurred while running registry sysprep DLLs, halting sysprep execution. dwRet = 0x3cf2
, Error [0x0f00a8] SYSPRP WinMain:Hit failure while processing sysprep generalize internal providers; hr = 0x80073cf2Cause
Sysprep has an additional provider that’s added in Windows 10 to clean Appx packages and to generalize the image. The provider works only if the Appx package is a per-user package or an all-user provisioned package.
- Per-user package means that the Appx package is installed for a particular user account and is not available for other users of the computer.
- All-user package means that the Appx has been provisioned into the image so that all users who use this image can access the app.
If an all-user package that’s provisioned into the image was manually deprovisioned from the image but not removed for a particular user, the provider will encounter an error while cleaning out this package during sysprep. The provider will also fail if an all-user package that’s provisioned into the image was updated by one of the users on this reference computer.
Resolution
To resolve this issue, remove the package for the user who’s running sysprep, and also remove the provisioning. To do this, follow these steps.
To prevent Microsoft Store from updating apps, unplug the Internet connection or disable Automatic Updates in Audit mode before you create the image.
Run the Import-Module Appx PowerShell cmdlet.
Run Import-Module Dism.
Run Get-AppxPackage -AllUser | Where PublisherId -eq 8wekyb3d8bbwe | Format-List -Property PackageFullName,PackageUserInformation .
- In the output of this last cmdlet, check the users for whom the package is showing up as Installed. Delete these user accounts from the reference computer, or log on to the computer by using these user accounts. Then, run the cmdlet in step 4 to remove the Appx package.
- This command lists all packages that were published by Microsoft and installed by any user of that reference computer. Because the computer is to be sysprepped, we assume that these user profiles no longer require the package.
- If you have manually provisioned apps that belong to other publishers, run the following command to list them:
Get-AppxPackage -AllUser | Format-List -Property PackageFullName,PackageUserInformation
Run Remove-AppxPackage -Package \
Remove the provisioning by running the following cmdlet:
Remove-AppxProvisionedPackage -Online -PackageName
If you try to recover from an update issue, you can reprovision the app after you follow these steps.
The issue does not occur if you are servicing an offline image. In that scenario, the provisioning is automatically cleared for all users. This includes the user who runs the command.
More information
For more information about how to add and remove apps, see:
Как запустить SysPrep после апгрейда Windows
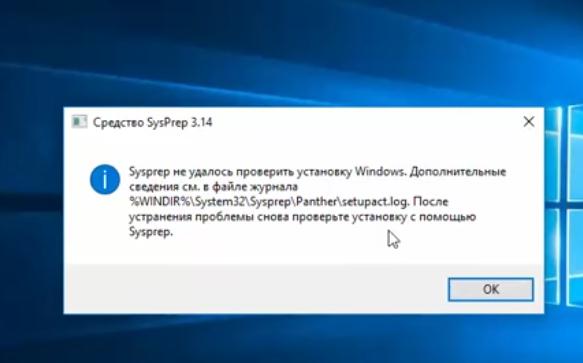
Столкнулся со странной ошибкой при попытке выполнить SysPrep на уже установленной системе, которую планировались использовать для создания эталонного образа для развертывания Windows 10 средствами System Center Configuration Manager 2012 R2. При запуске SysPrep неожиданно появляется ошибка:
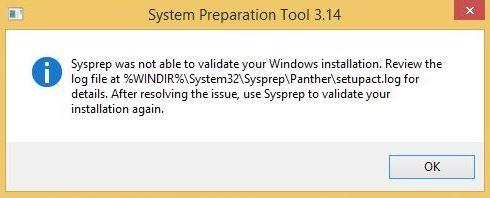
В английской версии Windows 10 ошибка аналогичная:
Откроем и проанализируем ошибки в файле журнала утилиты Sysprep setupact.log. В глаза сразу бросается следующая строка:
Т.е. ошибка явно сообщает, что запрещено выполнять Sysprep на системах, которые были обновлены с предыдущей версии Windows. В нашем случае это как раз так: одна система была получена путем апгрейда с Windows 7 до Windows 10, вторая через обновление с Windows 8.1. И действительно, согласно статье в базе знаний KB828287: Microsoft не поддерживает использование Sysprep для создания образов для инсталляций Windows, которые были обновлены через режим апгрейда (установка SP при этом не считается апгрейдом). Windows разрешает выполнять только sysprep на системах, полученных в результате «чистой установки». Неужели в таком случае придется переустанавливать систему с нуля?
Мне удалось найти более простое решение. С помощью Process Monitor с фильтром для процесса sysprep.exe и сравнения чистой и «обновленной» Windows 10 удалось получить список ключей реестра, которые проверяются Sysprep при запуске на предмет определения чистая ли эта система или «обновленная». Итак, что нужно сделать, чтобы сбросить маркер «обновленной» системы для Windows 10, который проверяется утилитой Sysprep (для других версий ОС все аналогично):
- Открыть редактор реестра (regedit.exe)
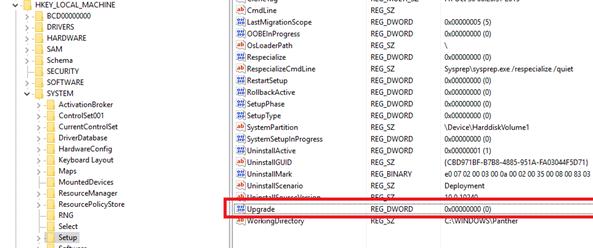
- Перейди в ветку HKEY_LOCAL_MACHINE\SYSTEM\Setup\
- Удалить вложенную ветку Upgrade (если есть) и параметр с именем Upgrade
- В ветке HKEY_LOCAL_MACHINE\SYSTEM\Setup\Status\SysprepStatus установить значений ключа CleanupState равным 7
- Осталось перезагрузить компьютер и попробовать выполнить SysPrep еще раз
Совет. В случае с Windows 10, чтобы SysPrep заработал, дополнительно пришлось удалить все нестандартные Modern приложения, которые индивидуально (не в режиме provision) были установлены из Microsoft Store пользователями системы.
Это можно сделать, удалив все профили пользователей (если применимо), полностью удалив все Metro приложения для всех пользователей (не рекомендуемы способ), либо удалив такие приложения вручную. Последний вариант реализуется так:
- Получим список всех установленных Metro приложений в профилях всех пользователей (нас интересуют только пакеты со статусом Installed): Get-AppxPackage -AllUser | Format-List -Property PackageFullName,PackageUserInformation
- И последовательно удалив их таким образом: Remove-AppxPackage -Package
. Или так: Remove-AppxProvisionedPackage -Online -PackageName


