- Windows Server Update Services best practices
- Capacity limits
- Disable recycling and configure memory limits
- Check whether compression is enabled (if you want to conserve bandwidth)
- Configure products and categories
- Disable Itanium updates and other unnecessary updates
- Decline superseded updates and run maintenance
- WSUS with SSL setup
- Configure Antivirus Exclusions
- About Cumulative Updates and Monthly Rollups
- Using PowerShell to connect to a WSUS server
- Manage additional Windows Update settings
- Summary of Windows Update settings
- Scanning for updates
- Specify Intranet Microsoft update service location
- Automatic Updates detection frequency
- Remove access to use all Windows Update features
- Do not connect to any Windows Update Internet locations
- Enable client-side targeting
- Allow signed updates from an intranet Microsoft update service location
- Installing updates
- Do not include drivers with Windows Updates
- Configure Automatic Updates
- Configuring Automatic Updates by using Group Policy
- Configuring Automatic Updates by editing the registry
Windows Server Update Services best practices
This article provides tips for avoiding configurations that experience poor performance because of design or configuration limitations in WSUS.
Original product version: В Configuration Manager (current branch), Windows Server Update Services
Original KB number: В 4490414
Capacity limits
Although WSUS can support 100,000 clients per server (150,000 clients when you use Configuration Manager), we don’t recommend approaching this limit.
Instead, consider using a configuration of 2-4 servers sharing the same SQL Server database. This way you have safety in numbers. If one server goes down, it won’t immediately spoil your weekend because no client can update while you must be updated against the latest zero-day exploit.
The shared database scenario also prevents a scan storm.
A scan storm can occur when many clients change WSUS servers and the servers don’t share a database. WSUS tracks activity in the database, so that both know what has changed since a client last scanned and will only send metadata that’s updated since then.
If clients change to a different WSUS server that uses a different database, they must do a full scan. A full scan can cause large metadata transfers. Transfers of greater than 1 GB per client may occur in these scenarios, especially if the WSUS server isn’t maintained correctly. It can generate enough load to cause errors when clients communicate with a WSUS instance. And clients retry repeatedly in this case.
Sharing a database means when a client switches to another WSUS instance that uses the same DB, the scan penalty isn’t incurred. The load increases aren’t the large penalty you pay for switching databases.
Configuration Manager client scans put more demand on WSUS than the stand-alone Automatic Updates. Configuration Manager, because it includes compliance checking, requests scans with criteria that will return all updates that are in any status except declined.
When the Automatic Updates Agent scans, or you select Check for Updates in Control Panel, the agent sends criteria to retrieve only those updates Approved for Install. The metadata returned will usually be less than when the scan is initiated by Configuration Manager. The Update Agent does cache the data, and the next scan requests will return the data from the client cache.
Disable recycling and configure memory limits
WSUS implements an internal cache that retrieves the update metadata from the database. This operation is expensive and very memory intensive. It can cause the IIS application pool that hosts WSUS (known as WSUSPool) to recycle when WSUSPool overruns the default private and virtual memory limits.
When the pool recycles, the cache is removed and must be rebuilt. It isn’t a large problem when clients are undergoing delta scans. But if you end up in a scan storm scenario, the pool will recycle constantly. And clients will receive errors when you make scan requests, such as HTTP 503 errors.
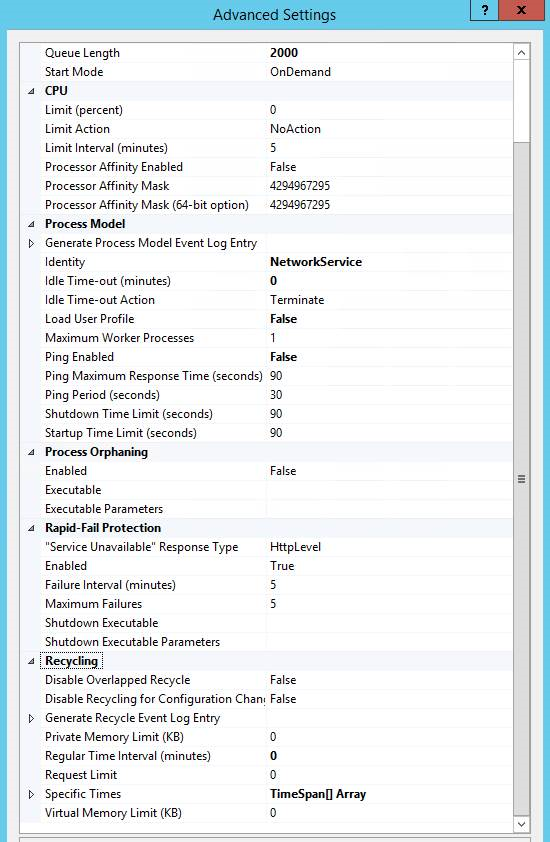
We recommend that you increase the default Queue Length, and disable both the Virtual and Private Memory Limit by setting them to 0. IIS implements an automatic recycling of the application pool every 29 hours, Ping, and Idle Time-outs, all which should be disabled. These settings are found in IIS Manager > Application Pools > choose WsusPool and then click the Advanced Settings link in the right side pane of IIS manager.
Here’s a summary of recommended changes, and a related screenshot. For more information, see Plan for software updates in Configuration Manager.
| Setting name | Value |
|---|---|
| Queue Length | 2000 (up from default of 1000) |
| Idle Time-out (minutes) | 0 (down from the default of 20) |
| Ping Enabled | False (from default of True) |
| Private Memory Limit (KB) | 0 (unlimited, up from the default of 1,843,200 KB) |
| Regular Time Interval (minutes) | 0 (to prevent a recycle, and modified from the default of 1740) |
In an environment that has around 17,000 updates cached, more than 24 GB of memory may be needed as the cache is built until it stabilizes (at around 14 GB).
Check whether compression is enabled (if you want to conserve bandwidth)
WSUS uses a compression type calls Xpress encoding. It implements compression on update metadata, and can result in significant bandwidth savings.
Xpress encoding is enabled in IIS ApplicationHost.config with this line under the element and a registry setting:
ApplicationHost.Config
Registry key
If both aren’t present, it can be enabled by running this command and then restarting the WsusPool application pool in IIS.
Xpress encoding will add some CPU overhead, and can be disabled if bandwidth isn’t a concern, but CPU usage is. The following command will turn it off.
Configure products and categories
When you configure WSUS, choose only the products and categories that you plan to deploy. You can always synchronize categories and products that you must have later. Adding them when you don’t plan to deploy them increases metadata size and overhead on the WSUS servers.
Disable Itanium updates and other unnecessary updates
It shouldn’t be an issue for much longer, because Windows Server 2008 R2 was the last version to support Itanium. But it bears mentioning.
Customize and use this script in your environment to decline Itanium architecture updates. The script can also decline updates that contain Preview or Beta in the update title.
It leads to the WSUS console being more responsive, but doesn’t affect the client scan.
Decline superseded updates and run maintenance
One of the most important things that you can do to help WSUS run better. Keeping updates around that are superseded longer than needed (for example, after you’re no longer deploying them) is the leading cause of WSUS performance problems. It’s ok to keep them around if you’re still deploying them. Remove them after you’re done with them.
For information about declining superseded updates and other WSUS maintenance items, see the Complete guide to Microsoft WSUS and Configuration Manager SUP maintenance article.
WSUS with SSL setup
By default, WSUS isn’t configured to use SSL for client communication. The first post-install step should be to configured SSL on WSUS to make sure security between server-client communications.
You must take one the following actions:
- Create a self-signed certificate. It isn’t ideal because every client would have to trust this certificate.
- Obtain one from a third-party certificate provider.
- Obtain one from your internal certificate infrastructure.
Your certificate must have the short server name, FQDN, and SAN names (aliases) that it goes by.
After you have the certificate installed, upgrade the Group Policy (or Client Configuration settings for software updates in Configuration Manager) to use the address and SSL port of the WSUS server. The port is typically 8531 or 443.
For example, configure GPO Specify intranet Microsoft update service location to https://wsus.contoso.com:8531 >.
Configure Antivirus Exclusions
About Cumulative Updates and Monthly Rollups
You may see the terms Monthly Rollups and Cumulative Update used for Windows OS updates. They may be used interchangeably. Rollups refer to the updates published for Windows 7, Windows 8.1, Windows Server 2008 R2, and Windows Server 2012 R2 that are only partly cumulative.
For more information, see the following blog posts:
With Windows 10 and Windows Server 2016, the updates were cumulative from the beginning:
Cumulative means that: you install the release version of the OS, and only have to apply the latest Cumulative Update to be fully patched. For the older operating systems, we don’t have such updates yet, although it’s the direction we’re heading in.
For Windows 7 and Windows 8.1, it means that after you install the latest monthly rollup, more updates will still be needed. Here’s an example for Windows 7 and Windows Server 2008 R2 on what it takes to have an almost fully patched system.
The following table contains the list of Windows Monthly Rollups and Cumulative Updates. You can also find them by searching for Windows update History.
| Windows version | Update |
|---|---|
| Windows 7 SP1 and Windows Server 2008 R2 SP1 | Windows 7 SP1 and Windows Server 2008 R2 SP1 update history |
| Windows 8.1 and Windows Server 2012 R2 | Windows 8.1 and Windows Server 2012 R2 update history |
| Windows 10 and Windows Server 2016 | Windows 10 and Windows Server update history |
| Windows Server 2019 | Windows 10 and Windows Server 2019 update history |
Another point to consider is that not all updates are published so that they sync automatically to WSUS. For example, C and D week Cumulative Updates are preview updates and won’t synchronize to WSUS, but must be manually imported instead. See the Monthly quality updates section of Windows 10 update servicing cadence.
Using PowerShell to connect to a WSUS server
Here’s just a code example to get you started with PowerShell and the WSUS API. It can be executed where the WSUS Administration Console is installed.
Manage additional Windows Update settings
Applies to
Looking for consumer information? See Windows Update: FAQ
You can use Group Policy settings or mobile device management (MDM) to configure the behavior of Windows Update (WU) on your Windows 10 devices. You can configure the update detection frequency, select when updates are received, specify the update service location and more.
Summary of Windows Update settings
| Group Policy setting | MDM setting | Supported from version |
|---|---|---|
| Specify Intranet Microsoft update service location | UpdateServiceUrl and UpdateServiceUrlAlternate | All |
| Automatic Updates Detection Frequency | DetectionFrequency | 1703 |
| Remove access to use all Windows Update features | Update/SetDisableUXWUAccess | All |
| Do not connect to any Windows Update Internet locations | All | |
| Enable client-side targeting | All | |
| Allow signed updates from an intranet Microsoft update service location | AllowNonMicrosoftSignedUpdate | All |
| Do not include drivers with Windows Updates | ExcludeWUDriversInQualityUpdate | 1607 |
| Configure Automatic Updates | AllowAutoUpdate | All |
Additional information about settings to manage device restarts and restart notifications for updates is available on Manage device restarts after updates.
Additional settings that configure when Feature and Quality updates are received are detailed on Configure Windows Update for Business.
Scanning for updates
With Windows 10, admins have a lot of flexibility in configuring how their devices scan and receive updates.
Specify Intranet Microsoft update service location allows admins to point devices to an internal Microsoft update service location, while Do not connect to any Windows Update Internet locations gives them to option to restrict devices to just that internal update service. Automatic Updates Detection Frequency controls how frequently devices scan for updates.
You can make custom device groups that’ll work with your internal Microsoft update service by using Enable client-side targeting. You can also make sure your devices receive updates that were not signed by Microsoft from your internal Microsoft update service, through Allow signed updates from an intranet Microsoft update service location.
Finally, to make sure the updating experience is fully controlled by the admins, you can Remove access to use all Windows Update features for users.
For additional settings that configure when Feature and Quality updates are received, see Configure Windows Update for Business.
Specify Intranet Microsoft update service location
Specifies an intranet server to host updates from Microsoft Update. You can then use this update service to automatically update computers on your network. This setting lets you specify a server on your network to function as an internal update service. The Automatic Updates client will search this service for updates that apply to the computers on your network.
To use this setting in Group Policy, go to Computer Configuration\Administrative Templates\Windows Components\Windows Update\Specify Intranet Microsoft update service location. You must set two server name values: the server from which the Automatic Updates client detects and downloads updates, and the server to which updated workstations upload statistics. You can set both values to be the same server. An optional server name value can be specified to configure Windows Update Agent to download updates from an alternate download server instead of the intranet update service.
If the setting is set to Enabled, the Automatic Updates client connects to the specified intranet Microsoft update service (or alternate download server), instead of Windows Update, to search for and download updates. Enabling this setting means that end users in your organization don’t have to go through a firewall to get updates, and it gives you the opportunity to test updates after deploying them. If the setting is set to Disabled or Not Configured, and if Automatic Updates is not disabled by policy or user preference, the Automatic Updates client connects directly to the Windows Update site on the Internet.
The alternate download server configures the Windows Update Agent to download files from an alternative download server instead of the intranet update service. The option to download files with missing Urls allows content to be downloaded from the Alternate Download Server when there are no download Urls for files in the update metadata. This option should only be used when the intranet update service does not provide download Urls in the update metadata for files which are present on the alternate download server.
If the «Configure Automatic Updates» policy is disabled, then this policy has no effect.
If the «Alternate Download Server» is not set, it will use the intranet update service by default to download updates.
The option to «Download files with no Url. » is only used if the «Alternate Download Server» is set.
To configure this policy with MDM, use UpdateServiceUrl and UpdateServiceUrlAlternate.
Automatic Updates detection frequency
Specifies the hours that Windows will use to determine how long to wait before checking for available updates. The exact wait time is determined by using the hours specified here minus zero to twenty percent of the hours specified. For example, if this policy is used to specify a 20-hour detection frequency, then all clients to which this policy is applied will check for updates anywhere between 16 to 20 hours.
To set this setting with Group Policy, navigate to Computer Configuration\Administrative Templates\Windows Components\Windows Update\Automatic Updates detection frequency.
If the setting is set to Enabled, Windows will check for available updates at the specified interval. If the setting is set to Disabled or Not Configured, Windows will check for available updates at the default interval of 22 hours.
The «Specify intranet Microsoft update service location» setting must be enabled for this policy to have effect.
If the «Configure Automatic Updates» policy is disabled, this policy has no effect.
To configure this policy with MDM, use DetectionFrequency.
Remove access to use all Windows Update features
By enabling the Group Policy setting under Computer Configuration\Administrative Templates\Windows Components\Windows update\Remove access to use all Windows update features, administrators can disable the «Check for updates» option for users. Any background update scans, downloads and installations will continue to work as configured.
Do not connect to any Windows Update Internet locations
Even when Windows Update is configured to receive updates from an intranet update service, it will periodically retrieve information from the public Windows Update service to enable future connections to Windows Update, and other services like Microsoft Update or the Microsoft Store.
Use Computer Configuration\Administrative Templates\Windows Components\Windows update\Do not connect to any Windows Update Internet locations to enable this policy. When enabled, this policy will disable the functionality described above, and may cause connection to public services such as the Microsoft Store, Windows Update for Business and Delivery Optimization to stop working.
This policy applies only when the device is configured to connect to an intranet update service using the «Specify intranet Microsoft update service location» policy.
Enable client-side targeting
Specifies the target group name or names that should be used to receive updates from an intranet Microsoft update service. This allows admins to configure device groups that will receive different updates from sources like WSUS or Configuration Manager.
This Group Policy setting can be found under Computer Configuration\Administrative Templates\Windows Components\Windows update\Enable client-side targeting. If the setting is set to Enabled, the specified target group information is sent to the intranet Microsoft update service which uses it to determine which updates should be deployed to this computer. If the setting is set to Disabled or Not Configured, no target group information will be sent to the intranet Microsoft update service.
If the intranet Microsoft update service supports multiple target groups, this policy can specify multiple group names separated by semicolons. Otherwise, a single group must be specified.
This policy applies only when the intranet Microsoft update service the device is directed to is configured to support client-side targeting. If the «Specify intranet Microsoft update service location» policy is disabled or not configured, this policy has no effect.
Allow signed updates from an intranet Microsoft update service location
This policy setting allows you to manage whether Automatic Updates accepts updates signed by entities other than Microsoft when the update is found on an intranet Microsoft update service location.
To configure this setting in Group Policy, go to Computer Configuration\Administrative Templates\Windows Components\Windows update\Allow signed updates from an intranet Microsoft update service location.
If you enable this policy setting, Automatic Updates accepts updates received through an intranet Microsoft update service location, as specified by Specify Intranet Microsoft update service location, if they are signed by a certificate found in the «Trusted Publishers» certificate store of the local computer. If you disable or do not configure this policy setting, updates from an intranet Microsoft update service location must be signed by Microsoft.
Updates from a service other than an intranet Microsoft update service must always be signed by Microsoft and are not affected by this policy setting.
To configure this policy with MDM, use AllowNonMicrosoftSignedUpdate.
Installing updates
To add more flexibility to the update process, settings are available to control update installation.
Configure Automatic Updates offers 4 different options for automatic update installation, while Do not include drivers with Windows Updates makes sure drivers are not installed with the rest of the received updates.
Do not include drivers with Windows Updates
Allows admins to exclude Windows Update (WU) drivers during updates.
To configure this setting in Group Policy, use Computer Configuration\Administrative Templates\Windows Components\Windows update\Do not include drivers with Windows Updates. Enable this policy to not include drivers with Windows quality updates. If you disable or do not configure this policy, Windows Update will include updates that have a Driver classification.
Configure Automatic Updates
Enables the IT admin to manage automatic update behavior to scan, download, and install updates.
Configuring Automatic Updates by using Group Policy
Under Computer Configuration\Administrative Templates\Windows Components\Windows update\Configure Automatic Updates, you must select one of the four options:
2 — Notify for download and auto install — When Windows finds updates that apply to this device, users will be notified that updates are ready to be downloaded. After going to Settings > Update & security > Windows Update, users can download and install any available updates.
3 — Auto download and notify for Install — Windows finds updates that apply to the device and downloads them in the background (the user is not notified or interrupted during this process). When the downloads are complete, users will be notified that they are ready to install. After going to Settings > Update & security > Windows Update, users can install them.
4 — Auto download and schedule the install — Specify the schedule using the options in the Group Policy Setting. For more information about this setting, see Schedule update installation.
5 — Allow local admin to choose setting — With this option, local administrators will be allowed to use the settings app to select a configuration option of their choice. Local administrators will not be allowed to disable the configuration for Automatic Updates.
If this setting is set to Disabled, any updates that are available on Windows Update must be downloaded and installed manually. To do this, users must go to Settings > Update & security > Windows Update.
If this setting is set to Not Configured, an administrator can still configure Automatic Updates through the settings app, under Settings > Update & security > Windows Update > Advanced options.
Configuring Automatic Updates by editing the registry
Serious problems might occur if you modify the registry incorrectly by using Registry Editor or by using another method. These problems might require you to reinstall the operating system. Microsoft cannot guarantee that these problems can be resolved. Modify the registry at your own risk.
In an environment that does not have Active Directory deployed, you can edit registry settings to configure group policies for Automatic Update.
To do this, follow these steps:
Select Start, search for «regedit», and then open Registry Editor.
Open the following registry key:
Add one of the following registry values to configure Automatic Update.
0: Automatic Updates is enabled (default).
1: Automatic Updates is disabled.
1: Keep my computer up to date is disabled in Automatic Updates.
2: Notify of download and installation.
3: Automatically download and notify of installation.
4: Automatically download and scheduled installation.
0: Every day.
1 through 7: The days of the week from Sunday (1) to Saturday (7).
n, where n equals the time of day in a 24-hour format (0-23).
Set this value to 1 to configure Automatic Updates to use a server that is running Software Update Services instead of Windows Update.
m, where m equals the time period to wait between the time Automatic Updates starts and the time that it begins installations where the scheduled times have passed. The time is set in minutes from 1 to 60, representing 1 minute to 60 minutes)
This setting only affects client behavior after the clients have updated to the SUS SP1 client version or later versions.
0 (false) or 1 (true). If set to 1, Automatic Updates does not automatically restart a computer while users are logged on.
This setting affects client behavior after the clients have updated to the SUS SP1 client version or later versions.
To use Automatic Updates with a server that is running Software Update Services, see the Deploying Microsoft Windows Server Update Services 2.0 guidance.
When you configure Automatic Updates directly by using the policy registry keys, the policy overrides the preferences that are set by the local administrative user to configure the client. If an administrator removes the registry keys at a later date, the preferences that were set by the local administrative user are used again.
To determine the WSUS server that the client computers and servers connect to for updates, add the following registry values to the registry:


