- Troubleshoot problems updating Windows 10
- Have issues installing Windows updates? Start here.
- Still stuck?
- Fix Windows Update errors
- Windows 7 Update Failed [SOLVED]
- Try these fixes:
- Fix 1: Run the Windows Update troubleshooter
- Fix 2: Reset Windows Update components
- Fix 3: Install the updates for your system manually
- Windows Update fails to install or will not download in Windows 10
- Windows Update failed to install
- 1] Try again
- 2] Delete Temporary Files and Browser Cache
- 3] Disable your Firewall and Anti-virus software
- 4] Run SFC and DISM
- 5] Run Windows Update Troubleshooter
- 6] Manually Reset Windows Update Components to default
- 7] Use FixWU
- 8] Flush the Software Distribution Folder
- 9] Reset the Catroot folder
- 10] Check Windows Update Services status
- 11] Check Windows Update log file
- 12] Clear pending.xml file
- 13] Clear the BITS queue
- 14] Delete incorrect Registry values
- 15] Run Windows Module Installer
- 16] Run Background Intelligent Transfer Service Troubleshooter
- 17] Download its stand-alone installer
- 18] Run Windows Update in Clean Boot State
- 19] Take the help of Microsoft Virtual Agent
- 20] Contact Microsoft Support
Troubleshoot problems updating Windows 10
In Windows 10, you decide when and how to get the latest updates to keep your device running smoothly and securely. This article will help you answer questions and troubleshoot common problems with your Windows 10 update.
If you’re looking for info on how to activate Windows 10 or to verify that your installation of Windows 10 is activated, see Activate Windows 10.
Have issues installing Windows updates? Start here.
Your device may not be able to update to the latest version of Windows 10 for a few reasons. The following tips can help you pinpoint the issue affecting your device.
Before you begin, make sure your device is plugged into a power source and connected to the internet. Then, try the steps listed below to get your PC to update.
Some updates require administrator access. If your account doesn’t have administrator access, see Create a local user or administrator account in Windows 10. Or if someone else at home or in your office has an administrator account on your device, try asking them to install the updates.
Before trying any of the solutions below, make sure you back up your personal files. You can use File History to back up your files to another drive, or insert a USB drive and use File Explorer to drag and copy important files to the USB drive. If you’re signing into Windows with a Microsoft account, your system settings will be automatically restored after updating, once you’re connected to the internet.
You can also back up your files with OneDrive. For more info, go to Back up your Documents, Pictures, and Desktop folders with OneDrive.
Make sure that your device has enough space. Your device requires at least 16 GB of free space to upgrade a 32-bit OS, or 20 GB for a 64-bit OS. If your device has a small hard drive, you may need to insert a USB drive to update it.
If your PC is running low on storage, try the techniques at Free up drive space in Windows 10.
Many updates require you to restart your device. Save your work and close all open applications. Then, select Start > Power , and select either Update and restart or Update and shut down.
Even if you have downloaded some updates, there may be more available. After trying the preceding steps, run Windows Update again by selecting Start > Settings > Update & Security > Windows Update > Check for updates. Download and install any new updates.
Remove any external storage devices and drives, docks, and other hardware plugged into your device that aren’t needed for basic functionality. Then try to run updates again and see if this resolved your issue. If it didn’t, continue to the next tip.
If you’ve added hardware to your device, check for third-party driver updates and installation instructions on the hardware manufacturer’s website. Update any drivers, then try to run updates again and see if this resolved your issue. If it didn’t, continue to the next tip.
In the search box on the taskbar, type device manager, then select Device Manager from the list of results.
In the window that appears, look for any device with a yellow exclamation mark next to it. (You may have to select each category to view the list of devices.) Select the device name.
Select Action, and then choose either Update driver or Uninstall to correct the errors.
Common troubleshooting questions
If you are receiving an error message with a specific error code, try running the Windows Update Troubleshooter. If that doesn’t resolve the issue, see Fix Windows Update errors and follow the instructions to help resolve common update issues.
The time required to download and install updates depends on connection speed, network settings, and the size of the update. If the installation remains stuck at the same percentage, try checking for updates again or running the Windows Update Troubleshooter.
To check for updates, select Start > Settings > Update & Security > Windows Update > Check for updates.
To get help, in the search box on the task bar, type get help, then select Get Help from the list of results. To leave feedback if you run into further problems, in the search box on the taskbar, type feedback hub, then select Feedback Hub from the list of results.
Windows 10 is the most secure Windows ever, and we recommend you stay updated to protect your PC from security risks and to keep it running smoothly. However, you can temporarily pause updates as well as schedule a restart to install updates at a time that’s convenient for you.
Learn how to temporarily pause updates
Find out how to schedule a restart to install updates at a convenient time
You will only receive a notification when it’s time to restart your computer to apply the installed updates.
If you need to know where you left off in your work after an update, use Timeline to jump back in.
To get started with Timeline, select Task View on the taskbar, or press the Windows logo key +Tab and select the activity you want to resume.
Monthly quality updates on Windows 10 are quite small and have a minimal impact on data usage. Feature updates typically happen twice per year, and you can control when to install them. They require more data but are less frequent.
If you’re on a metered connection, some updates for Windows won’t be installed automatically. Metered connections in Windows 10
Your computer might be slow for a number of reasons, but updating to the latest version of Windows 10 can improve its performance. For help with a slow computer, see Tips to improve PC performance in Windows 10.
If you’re having trouble finding your files after an upgrade, see Find lost files after the upgrade to Windows 10 for other things to try.
Warning: Microsoft only recommends trying the procedures in this section if you’re comfortable working in the command line. These procedures require administrator permissions on your device.
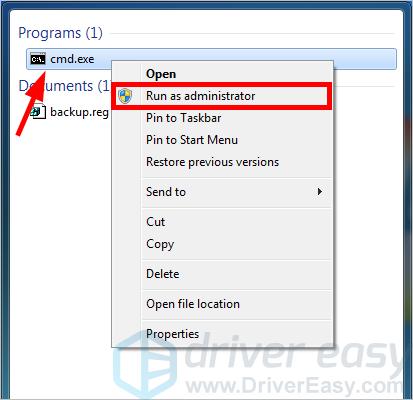
In the search box on the taskbar, type command prompt, then select Run as administrator from the list of options. Select Yes. Next, in the window that appears, type the following commands one at a time, including the spaces as shown. After you type each command, press Enter. Then let each command complete before you type the next command.
net stop wuauserv
ren %systemroot%\softwaredistribution softwaredistribution.bak
ren %systemroot%\system32\catroot2 catroot2.bak
net start wuauserv
After all these commands are completed, close the Command Prompt window and restart your computer.
In some instances, third-party antivirus or security software can cause errors when you try to update to the latest version of Windows 10. You can temporarily uninstall this software, update your PC, and then reinstall the software after your device is up to date. We recommend using third-party antivirus or security software that’s compatible with the latest version of Windows 10. You can check compatibility by visiting the software manufacturer’s website.
Note: Before uninstalling software, make sure you know how to reinstall your programs and that you have any necessary product keys.
In the search box on the taskbar, type command prompt, and then select Run as administrator from the list of options. Select Yes. In the window that appears, type the following command, including the space as shown:
chkdsk/f C:
and then press Enter. Repairs will automatically start on your hard drive, and you’ll be asked to restart your device.
A clean restart starts Windows with a minimal set of drivers and startup programs. This helps eliminate software conflicts that occur when you install a program or an update that may cause issues updating your PC.
Learn how to do a clean restart
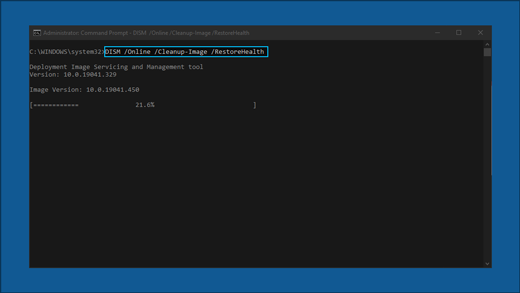
In the search box on the taskbar, type command prompt, then select Run as administrator from the list of options.
In the window that appears, type this command including spaces as shown:
DISM.exe /Online /Cleanup-image /Restorehealth
Press Enter. When the command operation has run successfully, you’ll see a confirmation message from Command Prompt that says, “The restore operation completed successfully” or “The operation completed successfully”.
Note: If you don’t see a confirmation message, retype the command and try again.
Next, type this command, including the space as shown:
sfc /scannow
Press Enter. Wait until the sfc scan verification reaches 100% completion, and then close Command Prompt.
Try running the Windows Update again.
Go to the software download page and select Download tool now to download the clean installation tool. Make sure to carefully read the notes on the software download page before using the tool.
Still stuck?
Contact Microsoft support if you continue to have problems with your Windows updates.
Fix Windows Update errors
What does this guided walk-through do?
This guided walk-through provides steps to fix problems with Windows Updates for Windows 8.1 and 7, such as taking a long time to scan, or error codes while installing updates.
For help with Windows Update issues in Windows 10, see Troubleshoot problems updating Windows 10 instead.
A common cause of errors is inadequate drive space. If you need help freeing up drive space, see Tips to free up drive space on your PC.
Common error codes
The steps in this guided walk-through should help with all Windows Update errors and other issues— you don’t need to search for the specific error to solve it. As an example, here are some commonly seen error codes: 0x0xc1900223223; 0x80240034; 0x8007000E, 0x80242006, 0x80244018, 0x80D02002, 0x80246017, 0x80240438, 0x80070070, 0x8007000D, 0x80246008, 0x80096004, 0x80070020.
The steps provided here should help fix any errors that come up during the Windows Update process.
How does it work?
We’ll begin by asking you questions about the Windows version you’re using and the issue you’re experiencing. Next, we’ll take you through a series of troubleshooting steps that are specific to your situation. At the end of each step, you’ll be asked “Did this resolve the issue?” If it’s resolved, select Yes, and you’re done! If it isn’t resolved, select No and continue with the guided walk-through.
Windows 7 Update Failed [SOLVED]
Last Updated: 1 month ago
Try these fixes:
Fix 1: Run the Windows Update troubleshooter

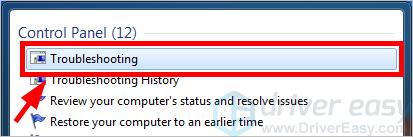
Click Troubleshooting in the search results.
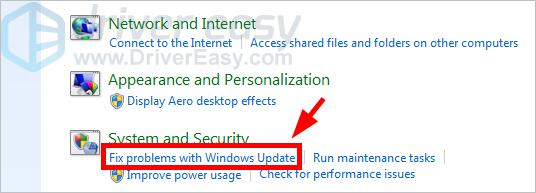
C lick Fix problems with Windows Update .
Click Next.
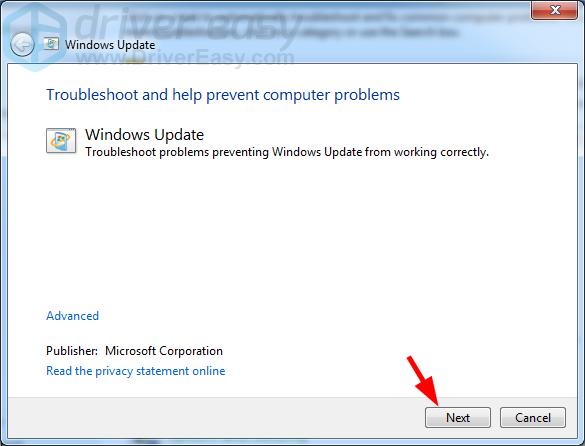
Wait for the detect process to be complete.
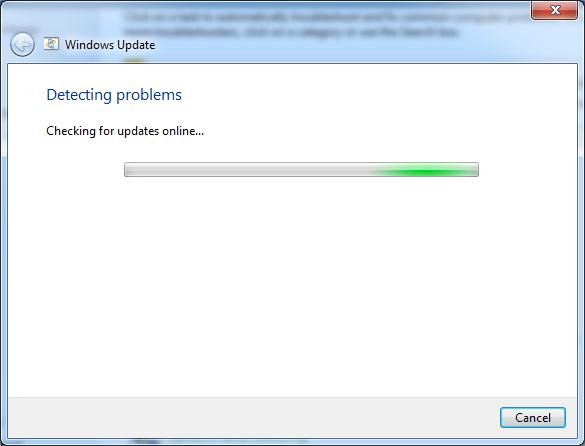
If the troubleshooter fixed your Windows Update problem, great! But if not, there are still two more fixes for you to try…
Fix 2: Reset Windows Update components
At Command Prompt, type the following lines of command and press Enter on your keyboard after typing each:
Fix 3: Install the updates for your system manually
On Windows Update, click View update history.
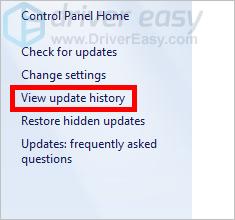
Note down the code of the updates that failed to install.

Go to Microsoft Update Catalog. Then search for the update that failed to install.
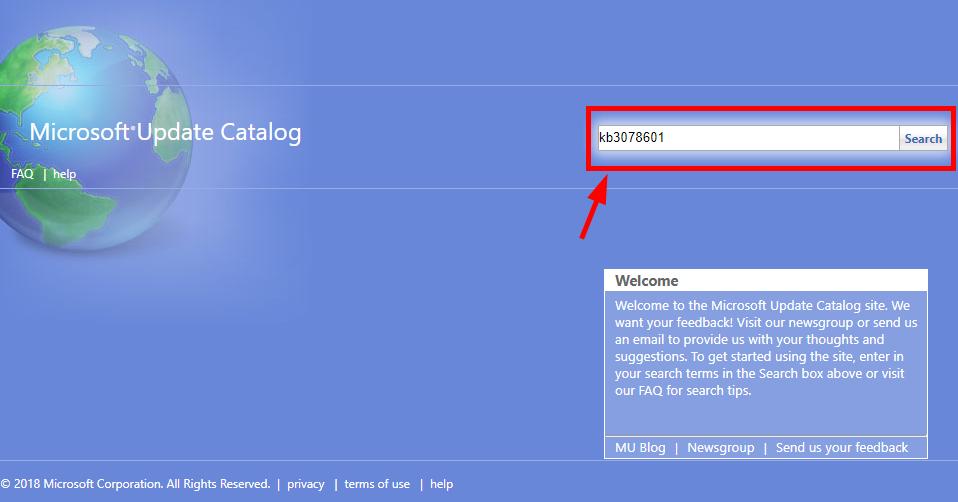
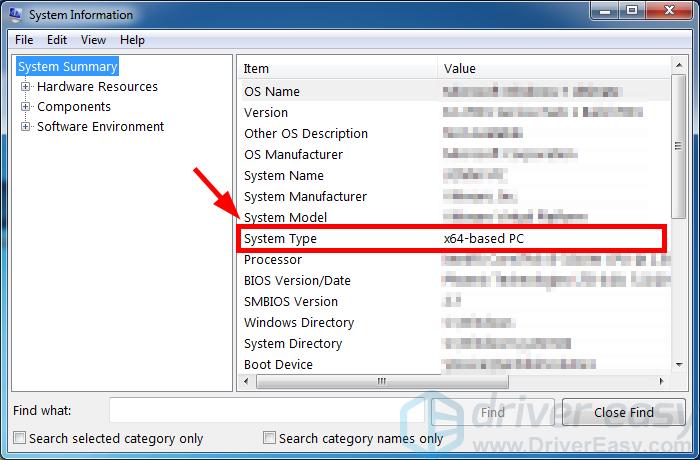
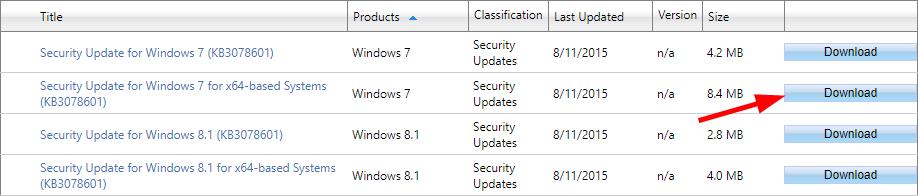
In the search results, find the update that matches your system type (x86-,x64- or ARM64-based). Then click Download next to that update.
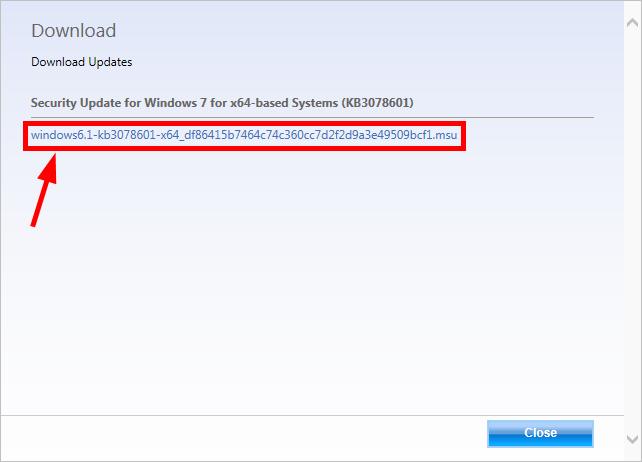
Click the link on the new window to download the update.
Open the file you’ve just downloaded and follow the on-screen instructions to install the update.
Hopefully, one of the fixes above worked for you. If you have any questions or suggestions, feel free to leave us a comment below.
- Windows 7
Windows Update fails to install or will not download in Windows 10
Sometimes, some Windows Update fails to download, or just refuse to get installed on your computer even when you try a couple of times. If you face this problem where Windows Updates will not install or download, then this tutorial will help you identify and troubleshoot the problem.
Windows Update failed to install
If Windows Update fails to install, is not working, updates will not download or keep failing, on your Windows 10/8/7 then these suggestions will help you troubleshoot & fix Windows Updates.
- Try again
- Delete Temporary Files and Browser Cache
- Disable your Firewall and Anti-virus software
- Run SFC and DISM
- Run Windows Update Troubleshooter
- Manually Reset Windows Update Components to default
- Use FixWU
- Flush the SoftwareDistribution Folder
- Reset the Catroot folder
- Check Windows Update Services status
- Check Windows Update log file
- Clear pending.xml file
- Clear the BITS queue
- Delete incorrect Registry values
- Run Windows Module Installer
- Run Background Intelligent Transfer Service Troubleshooter
- Download its stand-alone installer
- Run Windows Update in Clean Boot State
- Take the help of Microsoft Virtual Agent
- Contact Microsoft Support.
Let us see all these potential fixes in detail. Do create a system restore point first. Go through the entire post and then see which of these may apply to your system. You may then try any of these, in no particular order.
1] Try again
As mentioned earlier, many times, an update may fail to install in the first instance, but for some inexplicable reason, succeeds in the 2nd or 3rd try. So try a couple of times.
2] Delete Temporary Files and Browser Cache
If you are unable to install Windows Updates, first clear up your Temporary Files and Browser Cache, reboot, and try again. See if this helps resolve the issue. Best and easy to use the built-in Disk Cleanup utility or CCleaner.
3] Disable your Firewall and Anti-virus software
Temporarily Disable your Firewall and Anti-virus software and try again. Here is a list of Windows files and folders you may exclude from Antivirus scans.
4] Run SFC and DISM
Run System File Checker to replace potentially corrupted system files.
You can also fix corrupted Windows Update system files using DISM Tool. The Dism.exe tool can be used in different situations, and one of them is to repair a corrupted Windows Update files. Do note that you need to run a different command if you want to repair corrupted Windows Update System Files. If you run the usual /RestoreHealth command, it may not necessarily help.
DISM will replace potentially corrupted or missing system files with good ones. However, if your Windows Update client is already broken, you will be prompted to use a running Windows installation as the repair source or use a Windows side-by-side folder from a network share, as the source of the files.
You will then be required to run the following command instead:
Here you have to replace the C:\RepairSource\Windows placeholder with the location of your repair source.
Once the process is complete, DISM will create a log file in %windir%/Logs/CBS/CBS.log and capture any issues that the tool finds or fixes.
These can help fix problems that might prevent Windows Updates from installing.
5] Run Windows Update Troubleshooter
Use the Windows Update Troubleshooter from Microsoft. It resets Windows Updates settings to defaults. You may also run the Online Windows Troubleshooter from Microsoft.
6] Manually Reset Windows Update Components to default
7] Use FixWU
Use our Fix WU tool and see if it helps. It re-registers all the dll , ocx , and ax files required for the proper functioning of Windows Updates.
8] Flush the Software Distribution Folder
Flush the SoftwareDistribution Folder. Run Command Prompt as administrator. In the CMD box that appears on the computer screen, enter the following strings of text, one at a time, and hit Enter.
Now browse to the C:\Windows\SoftwareDistribution folder and delete all the files and folders inside.
If the files are in use, restart your device. After rebooting, run the commands above again. Your Windows Store App needs to be closed, by the way, so do not start it.
Now you will be able to delete the files from the mentioned Software Distribution folder. Now in the Command Prompt windows, type the following commands one at a time, and hit Enter:
Reboot. If you are using Windows Update, try using Microsoft Updates or vice versa.
9] Reset the Catroot folder
Reset the Catroot folder and see. To reset the catroot2 folder do this:
Open an elevated Command Prompt, type the following command one after the other and hit Enter:
Next, delete all the contents of the catroot2 folder.
Having done this, in the CMD windows, type the following and hit Enter:
Your catroot folder will be reset, once you start Windows Update again.
10] Check Windows Update Services status
The default configuration on a standalone Windows 10 PC is as follows:
- Windows Update Service – Manual (Triggered)
- Windows Update Medic Services – Manual
- Cryptographic Services – Automatic
- Background Intelligent Transfer Service – Manual
- DCOM Server Process Launcher – Automatic
- RPC Endpoint Mapper – Automatic
- Windows Installer – Manual.
This will ensure that the required Services are available.
Apart from the direct service, you should find the dependencies of Windows Update service and ensure if they are running or not.
To get started, search for “services” in the Taskbar search box and click on the search result. After opening the Services window, find out Windows Update, DCOM Server Process Launcher, and RPC Endpoint Mapper. Check if they are running or not.
If not, you need to start those services one after one.
11] Check Windows Update log file
If still, you have a problem then, go to C:\Windows\WindowsUpdate.log and look for the most recent entry. This will be present towards the end of the log. Any failed updates will have error code/s written next to them. Note them down. If you find just too many entries too confusing delete this WindowsUpdate.log and try installing the problematic updates again.
Now open the newly re-created WindowsUpdate log file and have a look at its contents.
The warnings will probably appear as -: WARNING: Failed to find updates with error code XXXXXXXX.
Now Right-click Computer > Manage > Event Viewer > Applications and Service Logs > Microsoft > Windows > WindowsUpdateClient > Operational . Check out for any Critical Message or Warning.
Next, refer to the Windows Update Error Codes. This will give you the direction in which you may have to look for the solution. You may also search for the Windows Update error code here and see if a specific solution is available.
12] Clear pending.xml file
Open an elevated command prompt windows, type the following and hit Enter:
This will rename pending.xml file to pending.old. Now try again.
13] Clear the BITS queue
Clear the BITS queue of any current jobs. To do this, type the following in an elevated CMD and hit Enter:
14] Delete incorrect Registry values
Open Registry Editor and navigate to the following key:
Right-click COMPONENTS. Now in the right-pane, delete the following if they exist:
- PendingXmlIdentifier
- NextQueueEntryIndex
- AdvancedInstallersNeedResolving
Restart your computer and try again.
15] Run Windows Module Installer
The Windows Module Installer is a built-in Windows 10 service. It lets you fix the Windows updates which are stuck.
To use this, open a command prompt with admin privileges.
Type the following and hit Enter:
Once successfully executed, you should see [SC] ChangeServiceConfig SUCCESS display within the Command Prompt console.
Exit the command prompt, and check if the buttons are back to normal.
16] Run Background Intelligent Transfer Service Troubleshooter
Run the Background Intelligent Transfer Service Troubleshooter and see if it helps. Background Intelligent Transfer Service or BITS helps in the transfer, download or upload of files between a client and server, and provides progress information related to the transfers. It also plays a role in the download of files from a peer. This Windows Service is essential for Windows Updates to work properly.
17] Download its stand-alone installer
Search on the Microsoft Update Catalog website for the Windows Update patch using the Update KB number, and download its stand-alone installer. Now apply the patch manually. Search for just the number; don’t include KB.
18] Run Windows Update in Clean Boot State
Boot in Clean Boot State and run Windows Update and see if this helps. It works in most cases.
19] Take the help of Microsoft Virtual Agent
If you’re getting an error downloading or installing Windows Updates, you could also take the help of Microsoft Virtual Agent, by clicking here.
20] Contact Microsoft Support
If nothing helps, you can always contact Microsoft Support. They will surely be able to help you.
We hope something here has helped you fix your Windows Updates issues.


