This forum is closed. Thank you for your contributions.
Answered by:
Question
Apologies if this isn’t posted in the correct forum.
I was wondering if anyone knew where the Windows Update files are located in Vista?
They seem to be hidden away pretty good compared to XP/2003 which simply sat in the «Windows» dir.
Answers
Windows Update files are located in windows\SoftwareDistribution\Download folder
while updates are installing their file attributes is set hidden and system you must show hidden and protected files
some updates is removed from this folder
All replies
Windows Vista hides update files so that offline updates can’t be re-used for non genuine copies of Windows Vista.
I think you may have misunderstood.
In previous versions of Windows, when you ran windows update, it backed up files created hidden dir’s in the Windows dir such as » $ NtUninstallKB12345$ » etc. These folders contained rollback information and files incase you wanted to undo the changes that the hotfix applied.
So I need the Vista equivalent location of these rollback files simply so I can delete them and recover some space on the system partition.
Infuriated_Germ wrote:
I think you may have misunderstood.
I told you they hide it. So I know it does exist some where!
How to change the download location in Windows 10, 8, 7
Download Restoro PC Repair Tool that comes with Patented Technologies (patent available here).
Click Start Scan to find Windows issues that could be causing PC problems.
Click Repair All to fix issues affecting your computer’s security and performance
Restoro has been downloaded by 0 readers this month.
Has it ever happened to you that when trying to download a file, folder or perhaps a program in Windows 8, Windows 7 or Windows 10, you didn’t had enough free disk space to do so ?Well, this is mainly because Windows 8, 7 and Windows 10, like any other Microsoft operating systems, have the default download location folder set in your C:/ drive where you also have your operating system. This is the reason why, most probably, you won’t have that much space available.
Tn the tutorial below, you’ll learn how easy it is to change the download location in Windows 8, 7 or Windows 10 in only five minutes of your time. Also, you can change the download location folder even when the message pops up saying that you don’t have enough free disk space on the partition. So, without wasting any more time, let’s begin the tutorial and set our new directory for our downloaded items.
Change default download location on PC
After you power up the Windows 7, 8 or Windows 10 PC, you will have to left click on the desktop icon you will have in the start screen.
Now after you get to your desktop feature right click on the “Windows Explorer” icon presented in the lower left side of the screen.
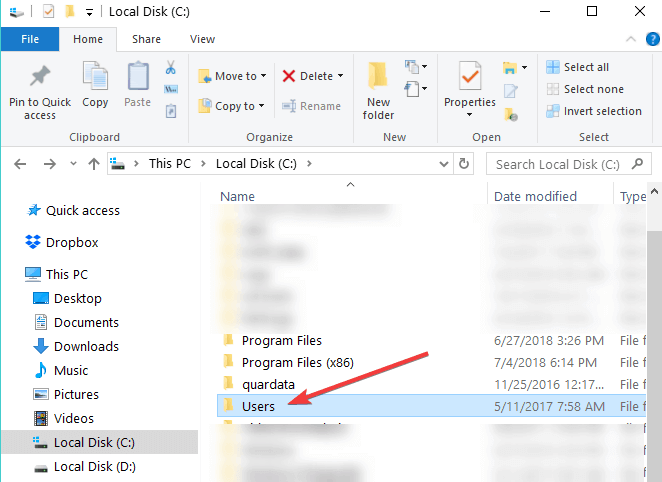
Now from the menu that pops up you will need to left click on the “Desktop” icon. Note: You can also access the “Desktop” by double clicking (left clicking) on My Computer or This PC (depending on your OS version) and after the window with “My Computer” is opened you can left click on the “Desktop” icon in the left side of the screen.
Now, after you selected the “Desktop”, some icons will be shown in the right side of the window and you will need to double click (left click) on the folder with the name of your account.
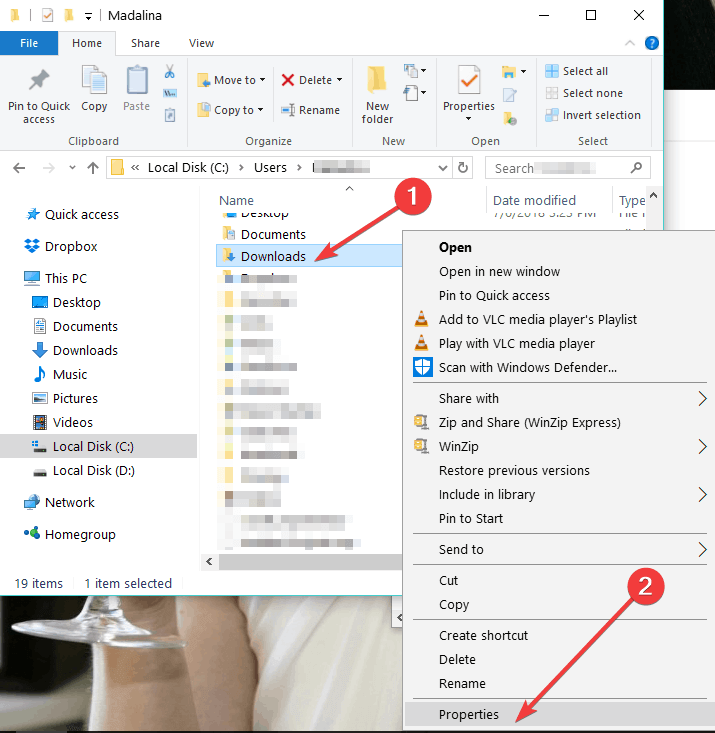
In the folder you opened that had your account name, you will have to right click on “Downloads” folder presented there.
After you right clicked the “Downloads” folder you will need to left click on “Properties”.
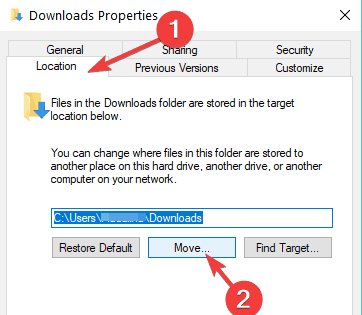
Now that the “Properties” window is open, you will need to left click on the “Location” tab presented in the upper side of that window.
Now that you have selected the “Location” tab you can see the path where the download items are going .
Left click on the “Move…” button you have under the specified path.
Now after you left clicked on “Move…” you will have to write there yourself the drive where you want your items to be downloaded and also in which folder. Note: If the folder you have written does not exist after you left click on the “Apply” button situated in the lower right side of the screen you will be asked if you want to create that download folder and you will left click on “OK” to confirm.
Another “Move folder” window will appear which it will show you the old and the new location where you will have to left click on the “Yes” button situated in the lower right side of the screen.
Now, you will have to left click on the “OK” button in the “Download Properties” window.
Go to your new location where you selected to download your files and check if Windows 7, 8 or Windows 10 system has made a “Downloads” folder there. Note: Reboot your Windows 7, 8 or Windows 10 device if it hasn’t created the “Downloads” folder to the new directory and check again after power up.
RELATED: Can’t rename folders in Windows 10 [Fix]
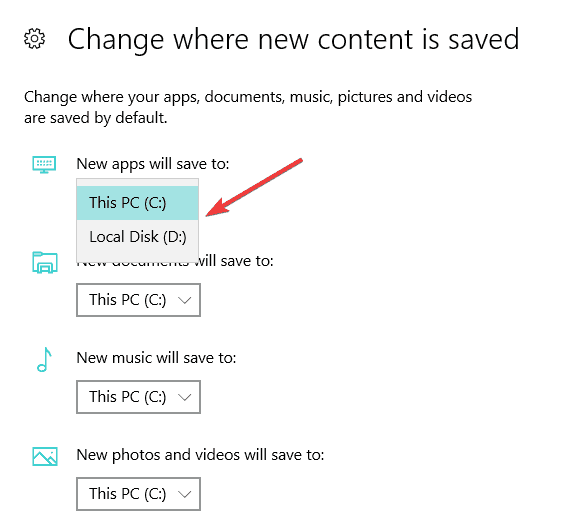
How do I change the default save location in Windows 10?
If Windows 10 is your OS of choice, you can also change the download folder save location from the Settings page:
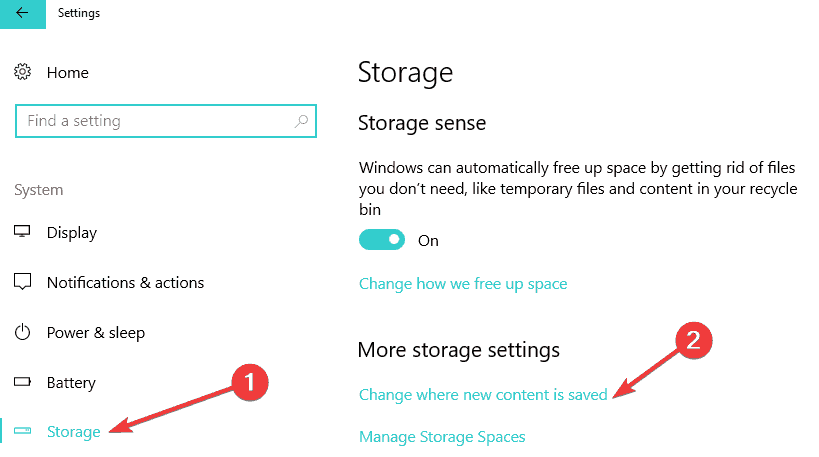
Go to Settings > System > select Storage
Now, click on the option ‘Change where new content is saved’
Set your preferred download location for each item category.
Run a System Scan to discover potential errors
So, now you can go and download your files or programs in Windows 7, 8 or Windows 10 without having to worry about the download location. Share your thoughts on this article in the comments below and feel free to list your suggestions on what we can do to help you further in your Windows 7, 8 or Windows 10 computer.
Also, the location where a Windows 10 update is saved on your computer is tricky, but for that, you can check this fresh guide here on where’s the default download folder for the Windows 10 versions.
RELATED STORIES TO CHECK OUT:
How to change Windows 10 Updates download folder location
Running out of storage space is nothing new. Most of us have access to the internet and keep downloading stuff. Then there are games which can occupy a lot of storage space. The biggest problem arrives when you run of storage space on your Windows Installation drive which is usually the C drive, and the updates stop downloading. Windows OS doesn’t offer you an option to change the download location of the updates. In this post, we will learn to change Windows 10 Updates download location.
Change Windows 10 Updates download location
Before you begin, you should know that you will need to have administrator privileges to complete this. If you have a regular account, it’s a good idea to get in touch who had set up your PC and take his help.
The default location of Windows Update is C:\Windows\SoftwareDistribution. The SoftwareDistribution folder is where everything gets downloaded and later installed.
Prepare a new directory for the system to download the Windows Update
Create a target directory in a drive other than C drive. It can be named as WindowsUpdateDownload for easy reference. Let’s assume that the path is D:\WindowsUpdateDownload
Next, use Ctrl+Alt+Delete to launch the Task Manager and switch to Services tab, and then right-click on wuauserv, and stop it.
Now rename C:\Windows\SoftwareDistribution to C:\Windows\SoftwareDistribution.old
Create Symlink
To create a symlink, in the start menu, search for CMD or command prompt. Right-click on it, and run it as administrator. Then type the below-mentioned command then hit Enter:
This will make Windows Update start the downloading files from zero to this new location.
In case it doesn’t work, you can try to boot Windows 10 in Safe Mode to get this done.
Restart Windows Update Service
After this, you need to start the Windows Update Service. You can either use the Task Manager to start it like we did above or execute the following command in CMD:
Check if Windows Update is working
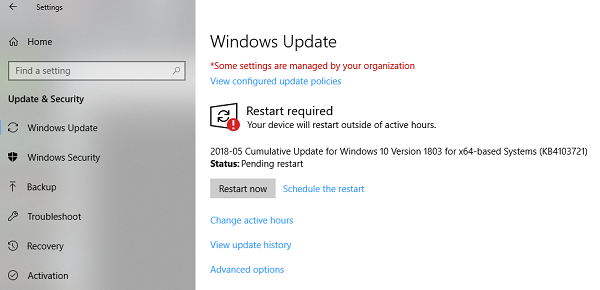
Go to Settings > Update and Security > Windows Update > Check for Update. If it starts downloading an update or does not throw any error, you are all set.
Here is an interesting fact, after downloading the Windows Update, the OS unpacks it in the drive which has the freest space available and installs from there. Windows will clear the content of this directory from time to time.
We recommend you to use a storage space which usually remains empty. While you can choose an SD card (NTFS format) or an external drive, we recommend not to unless it always stays connected to the PC.
Date: May 15, 2018 Tags: Windows Updates
Related Posts
Windows 10 Show Hide Updates Tool wushowhide.diagcab download link broken
One of the update services is not running properly in Windows 10
Windows 10 Feature Update failed to install, Error 0x8007371b
[email protected]
Ashish is a veteran Windows, and Xbox user who excels in writing tips, tricks, and features on it to improve your day to day experience with your devices.
Delete Downloaded Windows Update Files in Windows 10
How to Delete Downloaded Windows Update Files in Windows 10
If you are running into issues with Updates, you can try to delete downloaded Windows Update files. When an update package is damaged or fails to install, Windows 10 may keep the corrupted file on the drive, so it will further cause issues with updates. Here is how to delete the downloaded Windows Update files that Windows 10 doesn’t delete itself.
Windows 10 checks for updates automatically unless you disable this feature manually. The operating system comes with the Windows Update service, which automatically downloads and installs the updates from Microsoft. The downloaded update files are stored on your system drive in the C:\Windows folder.
There are certain reasons for having corrupted Windows Update files. It can be an improper shutdown, OS crash, power failure, or something gone wrong with your Registry. After that, Windows Update may fail to do its job properly. The OS may fail to check for updates, or fail to install them. Sometimes, the Windows Update page in Settings cannot be opened!
To fix most of the Windows Update issues in Windows 10, usually it is enough to run the built-in Windows Update troubleshooter.
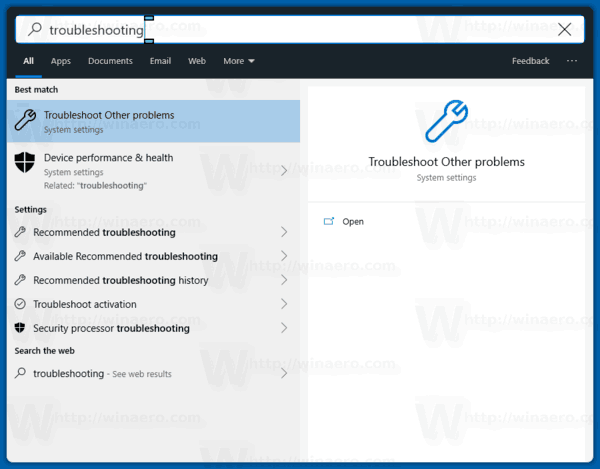
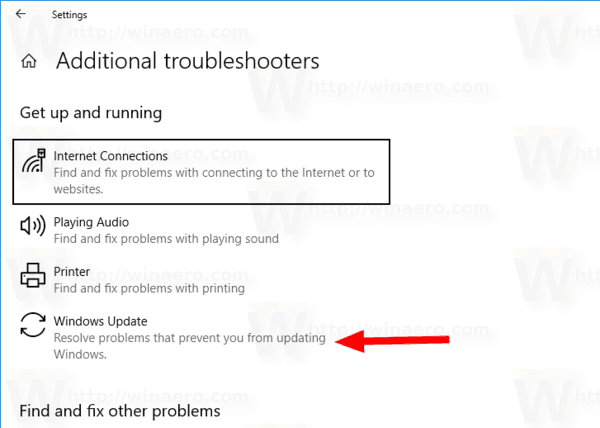
Run the built-in Windows Update troubleshooter.
Open the Start menu and type: troubleshooting and press Enter.
Click «Windows Update».
Click «Run as administrator» in the Troubleshooter’s dialog and complete the Windows Update troubleshooter. See if Windows Update works properly.
When you run into issues though with updates, you may spend hours or even days figuring out what is going wrong. In such case, you can try to delete downloaded Windows Update files to start over. The SoftwareDistribution folder contains files related to updates obtained via Windows Update, it is present on all versions of Windows. It could have a couple of hundreds megabytes of size. But if this folder is much larger, this indicates that some updates are corrupted.
To Delete Downloaded Windows Update Files in Windows 10,
Press Win + R on the keyboard and type services.msc in the Run box.
Stop the service named Windows Update.
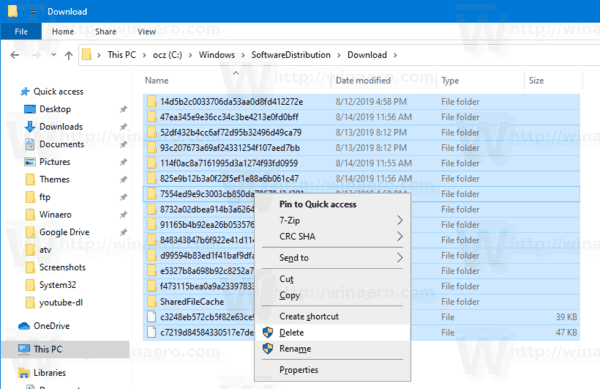
Open File Explorer .
Go to C:\WINDOWS\SoftwareDistribution\Download. Copy-paste this path to the explorer’s address bar.
Select all files of the folder(press the Ctrl-A keys).
Press the Delete key on the keyboard.
Windows may request for administrator privileges to delete those files. Turn on the option «Do this for all current items» in the dialog and click on Continue.
Restart Windows 10 and check for updates. See if this fixed your issues.
Alternatively, you can create a batch file to automate the process.
Delete Downloaded Windows Update Files with a Batch File
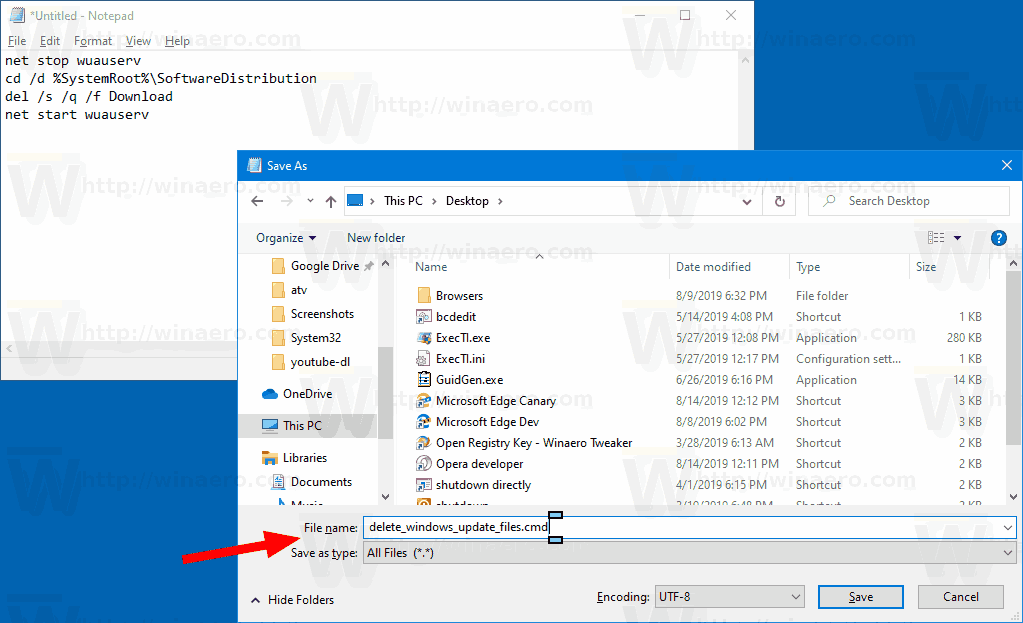
Open Notepad.
Paste the following text: net stop wuauserv cd /d %SystemRoot%\SoftwareDistribution del /s /q /f Download net start wuauserv
Save it to a file with a *.cmd extension. You can place it on the Desktop.
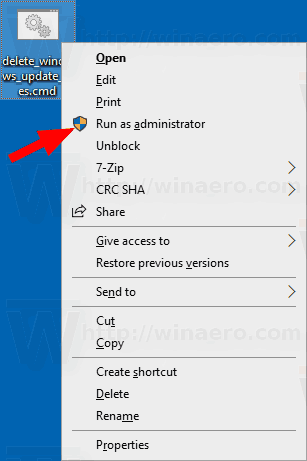
Right-click the file you have created and start it as Administrator from the context menu.
You are done. Now restart the PC and check for available updates.
Here’s how does it work
The command net stop wuauserv stops the Windows Update service. Next, the cd command switches the current folder to C:\Windows\SoftwareDistribution. The del command erases the contents of the Download folder and its subfolders. Finally, the last command, net start wuauserv , starts the Windows Update service again.
To save your time, you can download this ready-to-use batch file.
Articles of interest:
Winaero greatly relies on your support. You can help the site keep bringing you interesting and useful content and software by using these options:
Share this post
About Sergey Tkachenko
Sergey Tkachenko is a software developer from Russia who started Winaero back in 2011. On this blog, Sergey is writing about everything connected to Microsoft, Windows and popular software. Follow him on Telegram, Twitter, and YouTube.
5 thoughts on “ Delete Downloaded Windows Update Files in Windows 10 ”
i haven’t noticed this before but Also disk clean-up has an option to delete update files also,
AFAIK it cleans up WinSxS instead.
Hi Sergey, Is any chance to fix loop booting PC after Windows OS updates without reinstalling OS ?