- PSWindowsUpdate: Managing Windows Updates from PowerShell
- PSWindowsUpdate: Install Windows Update PowerShell Module
- Overview of PSWindowsUpdate Cmdlets
- PowerShell: List All Windows Updates Available for a Computer
- Install-WindowsUpdate: Installing Windows Updates with PowerShell
- Install Windows Update on Remote Computers with PowerShell
- Get-WUHistory: Viewing Windows Update History using PowerShell
- Remove-WindowsUpdate: Uninstalling Windows Updates
- Hide-WindowsUpdate: How to Hide Windows Updates with PowerShell?
- Fix Windows Update errors by using the DISM or System Update Readiness tool
- Symptom
- Resolution for Windows 8.1, Windows 10 and Windows Server 2012 R2
- Resolution for Windows 7 Service Pack 1 (SP1) and Windows Server 2008 R2 SP1
- Resolution — Download the package from Microsoft Update Catalog directly
- Description of the common corruption errors
- What does the System Update Readiness tool do
- Verify the integrity of resources
- Logging
- How to fix errors that are found in the CheckSUR log file
PSWindowsUpdate: Managing Windows Updates from PowerShell
It is very convenient to use the special PSWindowsUpdate module for PowerShell to manage Windows updates from the command line interface. The PSWindowsUpdate is not integrated into Windows and is a third-party module available in Technet Script Gallery. PSWindowsUpdate allows administrators to remotely check, install, remove and hide updates on Windows servers and workstations. The PSWindowsUpdate module is especially valuable to manage updates on Windows Server Core, Hyper-V editions having no graphic interface, as well as when configuring a Windows image in the audit mode.
PSWindowsUpdate: Install Windows Update PowerShell Module
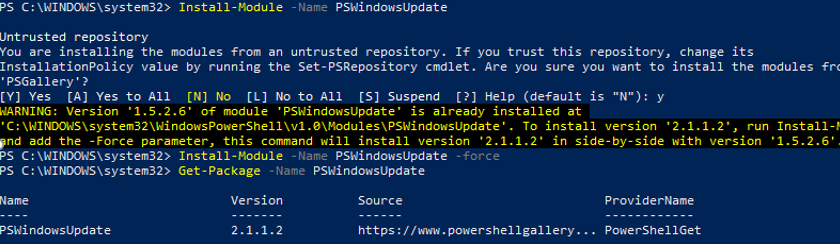
You can install the PSWindowsUpdate module on Windows 10 and Windows Server 2016 from the online repository (PSGallery) using the PackageManagement with a single command:
Install-Module -Name PSWindowsUpdate
In my case, a warning appeared that PSWindowsUpdate 1.5.2.6 was already installed appeared. To install a newer module version, you need to run the command:
Install-Module -Name PSWindowsUpdate –Force
After the installation is complete, you need to check the package:
Get-Package -Name PSWindowsUpdate
If you have an older Windows version (Windows 7/8.1/Windows Server 2008 R2/2012 R2) or you don’t have direct Internet access, you can install PSWindowsUpdate manually.
This module can be installed on any supported Windows versions starting from Vista / Windows Server 2008 with PowerShell 2.0 installed (though, PoSh 3.0 or newer is recommended).
After installing the PSWindowsUpdate module on your computer, you can remotely install it on other computers or servers using the Update-WUModule cmdlet. For example, to copy the PSWindowsUpdate module from your computer to two remote servers, run the commands (you need to access the remote servers via SMB protocol, TCP port 445):
$Targets = «lon-fs02», «lon-db01»
Update-WUModule -ComputerName $Targets –Local
To save (export) the PoSh module to a shared network folder for further importing of the module on other computers, run:
Save-Module -Name PSWindowsUpdate –Path \\lon-fs02\psmodules\
Overview of PSWindowsUpdate Cmdlets
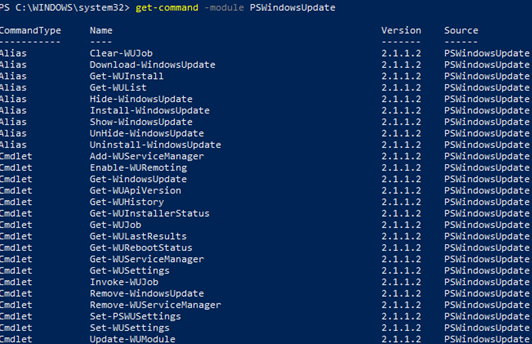
You can display the list of available cmdlets in the PSWindowsUpdate module as follows:
get-command -module PSWindowsUpdate
Let’s describe the usage of the module commands in brief:
- Clear-WUJob – use the Get-WUJob to call the WUJob in Task Scheduler;
- Download-WindowsUpdate (alias for Get-WindowsUpdate –Download ) — get a list of updates and download them;
- Get-WUInstall, Install-WindowsUpdate (alias for Get-WindowsUpdate –Install ) – install updates;
- Hide-WindowsUpdate (alias for Get-WindowsUpdate -Hide:$false ) – hide update;
- Uninstall-WindowsUpdate – remove update using Remove-WindowsUpdate;
- Add-WUServiceManager – register the update server (Windows Update Service Manager) on the computer;
- Enable-WURemoting — enable Windows firewall rules to allow remote use of the PSWindowsUpdate cmdlets;
- Get-WindowsUpdate (Get-WUList) — displays a list of updates that match the specified criteria, allows you to find and install the updates. This is the main cmdlet of the PSWindowsUpdate module. Allows to download and install updates from a WSUS server or Microsoft Update. Allows you to select update categories, specific updates and set the rules of a computer restart when installing the updates;
- Get-WUApiVersion – get the Windows Update Agent version on the computer;
- Get-WUHistory – display a list of installed updates (update history);
- Get-WUInstallerStatus — check the Windows Installer service status;
- Get-WUJob – run WUJob update tasks in the Task Scheduler;
- Get-WULastResults — dates of the last search and installation of updates (LastSearchSuccessDate and LastInstallationSuccessDate);
- Get-WURebootStatus — allows you to check whether a reboot is needed to apply a specific update;
- Get-WUServiceManager – list update sources;
- Get-WUSettings – get Windows Update client settings;
- Invoke-WUJob – remotely call WUJobs jobs in the Task Scheduler to immediately execute PSWindowsUpdate commands;
- Remove-WindowsUpdate – allows to uninstall an update by KB ID;
- Remove-WUServiceManager – disable Windows Update Service Manager;
- Set-PSWUSettings – save PSWindowsUpdate module settings to the XML file;
- Set-WUSettings – configure Windows Update client settings;
- Update-WUModule – update the PSWindowsUpdate module version (you can update the module on a remote computer by copying it from the current one, or updating from PSGallery).
PowerShell: List All Windows Updates Available for a Computer
You can list the updates available for this computer on the update server using the Get-WindowsUpdate or Get-WUList commands.

To check the list of available updates on a remote computer, run this command:
Get-WUList –ComputerName server2
You can check where your Windows should get updates from. Run the following command:

As you can see, the computer is configured to receive updates from the local WSUS server (Windows Server Update Service = True). In this case, you should see a list of updates approved for your computer.
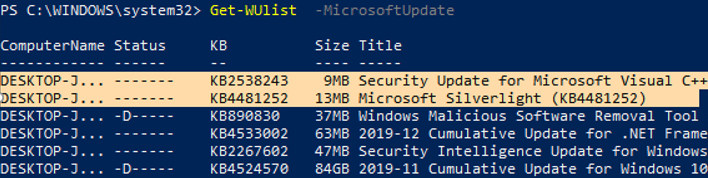
If you want to scan your computer on Microsoft Update servers in the Internet (in addition to Windows updates, these servers contain Office and other Microsoft product updates), run this command:
You will get this warning:
To allow scanning on Microsoft Update, run this command:
Add-WUServiceManager -ServiceID «7971f918-a847-4430-9279-4a52d1efe18d» -AddServiceFlag 7
You can now scan to Microsoft Update. As you can see, in this case, additional updates were found for Microsoft Visual C ++ 2008 and Microsoft Silverlight.
To check the version of the Windows Update Agent on the computer, run the command:

To remove certain products or packages from the list of updates received by your computer, you can exclude them by:
- Category (-NotCategory);
- Title (-NotCategory);
- Update number (-NotKBArticleID).
For example, let’s exclude OneDrive, drivers and the specific KB from the list of updates:
Get-WUlist -NotCategory «Drivers» -NotTitle «OneDrive» -NotKBArticleID KB4489873
Install-WindowsUpdate: Installing Windows Updates with PowerShell
To automatically download and install all available updates for your computer, run the command:
Install-WindowsUpdate -MicrosoftUpdate -AcceptAll -AutoReboot
The AcceptAll key accepts installation of all update packages, and AutoReboot allows Windows to automatically restart after the updates are installed.
You can save the update installation history to the log file (you can use it instead of WindowsUpdate.log file).
Install-WindowsUpdate -AcceptAll -Install -AutoReboot | Out-File «c:\logs\$(get-date -f yyyy-MM-dd)-WindowsUpdate.log» -force
You can install only the specific update packages by KB number:
Get-WindowsUpdate -KBArticleID KB2267602, KB4533002 -Install
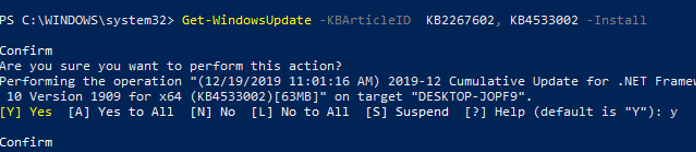
In this case, you need to confirm the installation of each update manually.
If you want to exclude some updates from the installation list, run this command:
Install-WindowsUpdate -NotCategory «Drivers» -NotTitle OneDrive -NotKBArticleID KB4011670 -AcceptAll -IgnoreReboot
Install Windows Update on Remote Computers with PowerShell
The PSWindowsUpdate module allows you to install updates remotely on multiple workstations or servers at once (the PSWindowsUpdate must be installed/imported on these computers). It is very convenient since an administrator doesn’t have to log on manually to all servers when update installation is scheduled.
Almost all PSWindowsUpdate module cmdlets allow you to manage and install updates on remote computers. To do this, use the attribute: -Computername server1, server2, server3
In order to manage updates on remote computers, you need to add host names to your winrm trusted host list:
Install the PSWindowsUpdate module on remote computers and allow to access the process dllhost.exe via dynamic RPC ports in the Windows Defender Firewall.
The following command will install all available updates on three remote servers:
In newer versions of the PSWindowsUpdate module, use the following command to remotely install updates on multiple computers:
You can install updates on a remote computer and send an email report to the administrator:
Install-WindowsUpdate -ComputerName nysrv1 -MicrosoftUpdate -AcceptAll — IgnoreReboot -SendReport –PSWUSettings @
Get-WUHistory: Viewing Windows Update History using PowerShell
Using the Get-WUHistory cmdlet, you can get the list of updates installed on a computer earlier automatically or manually.

You can get the information about the date of installation of a specific update:
Get-WUHistory| Where-Object <$_.Title -match "KB4517389">| Select-Object *|ft

To find out if the update has been installed on multiple remote computers, you can use this PowerShell code:
«server1″,»server2» | Get-WUHistory| Where-Object <$_.Title -match "KB4011634">| Select-Object *|ft
Remove-WindowsUpdate: Uninstalling Windows Updates
To correctly uninstall the updates from PowerShell, you can use the Remove-WindowsUpdate cmdlet. Just specify the KB number as an argument of the KBArticleID parameter. To delay automatic computer restart, add the –NoRestart key:
Remove-WindowsUpdate -KBArticleID KB4489873 -NoRestart
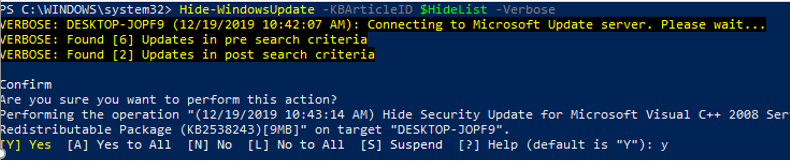
Hide-WindowsUpdate: How to Hide Windows Updates with PowerShell?
You can hide the specific updates so they will be never installed by Windows Update service on your computer (most often you need to hide the driver updates). For example, to hide the KB4489873 and KB4489243 updates, run these commands:
$HideList = «KB4489873», «KB4489243»
Get-WindowsUpdate -KBArticleID $HideList –Hide
Now the next time you scan for updates using the Get-WUInstall command, the hidden updates won’t be displayed in the list of updates available for installation.
This is how you can display the list of updates hidden on this computer:
Notice that the H (Hidden) attribute has appeared in the Status column of hidden updates.

To remove an update from hidden ones, run this command:
Get-WindowsUpdate -KBArticleID $HideList -WithHidden -Hide:$false
Show-WindowsUpdate -KBArticleID $HideList
For those who feel uncomfortable in the PowerShell console, I would recommend a graphic Windows Update MiniTool to manage Windows 10 updates.
Fix Windows Update errors by using the DISM or System Update Readiness tool
Original product version: В Windows 10, version 1809 and later versions, Windows 8.1, Windows Server 2012 R2, Windows 7 Service Pack 1, Windows Server 2008 R2 Service Pack 1
Original KB number: В 947821
Symptom
Windows updates and service packs may fail to install if there are corruption errors. For example, an update might not install if a system file is damaged. The DISM or System Update Readiness tool may help you to fix some Windows corruption errors.
This article is intended for Support agents and IT professionals. If you are home users and looking for more information about fixing Windows update errors, see Fix Windows Update errors.
Resolution for Windows 8.1, Windows 10 and Windows Server 2012 R2
To resolve this problem, use the inbox Deployment Image Servicing and Management (DISM) tool. Then, install the Windows update or service pack again.
Open an elevated command prompt. To do this, open Start menu or Start screen, type Command Prompt, right-select Command Prompt, and then select Run as administrator. If you are prompted for an administrator password or for a confirmation, type the password, or select Allow.
Type the following command, and then press Enter. It may take several minutes for the command operation to be completed.
When you run this command, DISM uses Windows Update to provide the files that are required to fix corruptions. However, if your Windows Update client is already broken, use a running Windows installation as the repair source, or use a Windows side-by-side folder from a network share or from a removable media, such as the Windows DVD, as the source of the files. To do this, run the following command instead:
Replace the C:\RepairSource\Windows placeholder with the location of your repair source. For more information about using the DISM tool to repair Windows, reference Repair a Windows Image.
Type the sfc /scannow command and press Enter. It may take several minutes for the command operation to be completed.
Close the command prompt, and then run Windows Update again.
DISM creates a log file (%windir%/Logs/CBS/CBS.log) that captures any issues that the tool found or fixed. %windir% is the folder in which Windows is installed. For example, the %windir% folder is C:\Windows.
Resolution for Windows 7 Service Pack 1 (SP1) and Windows Server 2008 R2 SP1
To resolve this problem, use the System Update Readiness tool. Then, install the Windows update or service pack again.
Download the System Update Readiness tool.
select the download link in the following table that corresponds to the version of Windows that is running on your computer. For more information about how to find the version of Windows that you installed, see Find out if your computer is running the 32-bit or 64-bit version of Windows.
This tool is updated regularly, we recommend that you always download the latest version. This tool is not available in every supported language. Check the link below to see if it is available in your language.
| Operating system | Download link |
|---|---|
| x86-based (32-bit) versions of Windows 7 SP1 | Download the package now. |
| x64-based (64-bit) versions of Windows 7 SP1 | Download the package now. |
| x64-based (64-bit) versions of Windows Server 2008 R2 SP1 | Download the package now. |
| Itanium-based versions of Windows Server 2008 R2 SP1 | Download the package now. |
Install and run the tool.
Select Download on the Download Center webpage, then do one of the following:
- To install the tool immediately, select Open or Run, and then follow the instructions on your screen.
- To install the tool later, select Save, and then download the installation file to your computer. When you’re ready to install the tool, double-select the file.
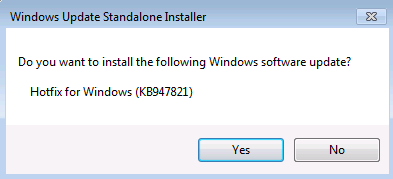
In the Windows Update Standalone Installer dialog box, select Yes.
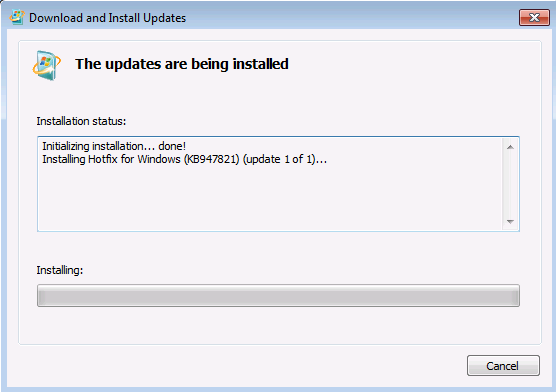
When the tool is being installed, it automatically runs. Although it typically takes less than 15 minutes to run, it might take much longer on some computers. Even if the progress bar seems to stop, the scan is still running, so don’t select Cancel.
When you see Installation complete, select Close.

Reinstall the update or service pack you were trying to install previously.
To manually fix corruption errors that the tool detects but can’t be fixed, see How to fix errors that are found in the CheckSUR log file.
Resolution — Download the package from Microsoft Update Catalog directly
You can also try to directly download the update package from Microsoft Update Catalog, and then install the update package manually.
For example, you may have problems when you try to install updates from Windows Update. In this situation, you can download the update package and try to install the update manually. To do this, follow these steps:
Open Microsoft Update Catalog in Internet Explorer.
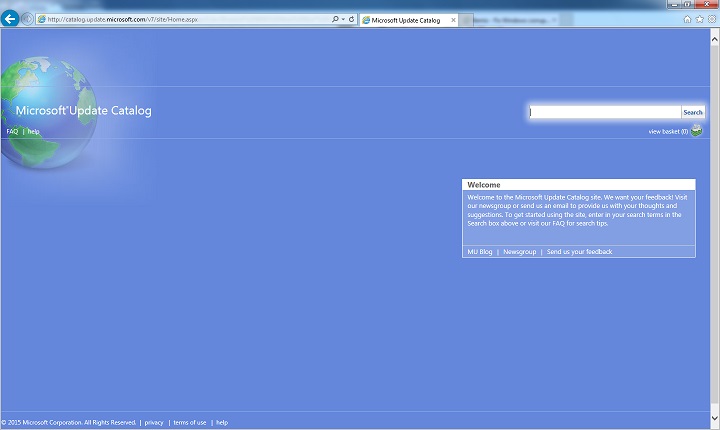
In the search box, input the update number that you want to download. In this example, input 3006137. Then, select Search.

Find the update that applies to your operating system appropriately in the search results, and then select Add to add the update to your basket.

Select view basket to open your basket.

Select Download to download the update in your basket.

Select Browse to choose a location for the update you are downloading, and then select Continue.

Select Close after the download process is done. Then, you can find a folder that contains the update package in the location that you specified.
Open the folder, and then double-select the update package to install the update.
If the Windows update or service pack installed successfully, you are finished. If the problem is not fixed, or if System Update Readiness Tool cannot find the cause, contact us for more help.
Description of the common corruption errors
The following table lists the possible error code with Windows Update for your reference:
| Code | Error | Description |
|---|---|---|
| 0x80070002 | ERROR_FILE_NOT_FOUND | The system cannot find the file specified. |
| 0x8007000D | ERROR_INVALID_DATA | The data is invalid. |
| 0x800F081F | CBS_E_SOURCE_MISSING | The source for the package or file not found. |
| 0x80073712 | ERROR_SXS_COMPONENT_STORE_CORRUPT | The component store is in an inconsistent state. |
| 0x800736CC | ERROR_SXS_FILE_HASH_MISMATCH | A component’s file does not match the verification information present in the component manifest. |
| 0x800705B9 | ERROR_XML_PARSE_ERROR | Unable to parse the requested XML data. |
| 0x80070246 | ERROR_ILLEGAL_CHARACTER | An invalid character was encountered. |
| 0x8007370D | ERROR_SXS_IDENTITY_PARSE_ERROR | An identity string is malformed. |
| 0x8007370B | ERROR_SXS_INVALID_IDENTITY_ATTRIBUTE_NAME | The name of an attribute in an identity is not within the valid range. |
| 0x8007370A | ERROR_SXS_INVALID_IDENTITY_ATTRIBUTE_VALUE | The value of an attribute in an identity is not within the valid range. |
| 0x80070057 | ERROR_INVALID_PARAMETER | The parameter is incorrect. |
| 0x800B0100 | TRUST_E_NOSIGNATURE | No signature was present in the subject. |
| 0x80092003 | CRYPT_E_FILE_ERROR | An error occurred while Windows Update reads or writes to a file. |
| 0x800B0101 | CERT_E_EXPIRED | A required certificate is not within its validity period when verifying against the current system clock or the time stamp in the signed file. |
| 0x8007371B | ERROR_SXS_TRANSACTION_CLOSURE_INCOMPLETE | One or more required members of the transaction are not present. |
| 0x80070490 | ERROR_NOT_FOUND | Windows could not search for new updates. |
| 0x800f0984 | PSFX_E_MATCHING_BINARY_MISSING | Matching component directory exist but binary missing |
| 0x800f0986 | PSFX_E_APPLY_FORWARD_DELTA_FAILED | Applying forward delta failed |
| 0x800f0982 | PSFX_E_MATCHING_COMPONENT_NOT_FOUND | Can’t identify matching component for hydration |
What does the System Update Readiness tool do
Verify the integrity of resources
The System Update Readiness tool verifies the integrity of the following resources:
- Files that are located in the following directories:
- %SYSTEMROOT%\Servicing\Packages
- %SYSTEMROOT%\WinSxS\Manifests
- Registry data that is located under the following registry subkeys:
- HKEY_LOCAL_MACHINE\Components
- HKEY_LOCAL_MACHINE\Schema
- HKEY_LOCAL_MACHINE\Software\Microsoft\Windows\CurrentVersion\Component Based Servicing
This list may be updated at any time.
When the System Update Readiness tool detects incorrect manifests, Cabinets, or registry data, it may replace the incorrect data with a corrected version.
Logging
The System Update Readiness tool creates a log file that captures any issues that the tool found or fixed. The log file is located here:
How to fix errors that are found in the CheckSUR log file
To manually fix corruption errors that the System Update Readiness tool detects but can’t fix, follow these steps:
%SYSTEMROOT% is an environment variable that saves the folder in which Windows is installed. For example, generally the %SYSTEMROOT% folder is C:\Windows.
Identify the packages that the tool can’t fix. For example, you may find the following in the log file:
In this case, the package that is corrupted is KB958690.
Copy the package (.msu) to the %SYSTEMROOT%\CheckSUR\packages directory. By default, this directory doesn’t exist and you need to create the directory.


