- Служба Windows Update не может быть остановлена
- Служба Windows Update не может быть остановлена
- Fix: Windows Update Service could not be Stopped
- What Causes the Windows Update Service to prevent being Stopped?
- Solution 1: Stopping wuauserv Process
- Solution 2: Clearing the Contents of Update Folder
- Solution 3: Perform a Repair Installation
- Сброс настроек службы обновлений Windows Update
- Средство устранения неполадок Центра обновления Windows
- Сброс настроек Windows Update из командной строки
- Скрипт Reset Windows Update Agent
Служба Windows Update не может быть остановлена
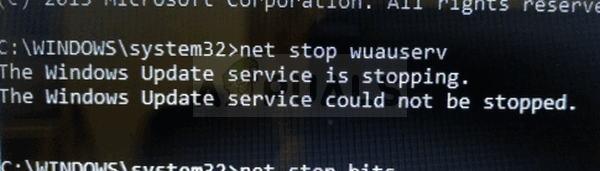
Если вы пытаетесь остановить службу Центра обновления Windows с помощью командной строки, но получаете сообщение Служба Центра обновления Windows не может быть остановлена , вот что вы можете сделать, чтобы остановить Службу. Это сообщение появляется только в том случае, если вы используете командную строку для остановки службы Центра обновления Windows – и если CMD не имеет прав администратора. Многие люди пытаются отключить автоматическое обновление Windows 10, но вы не можете остановить службу по какой-то причине, тогда эта статья поможет вам.

Обычная команда для остановки службы Центра обновления Windows с помощью CMD:
Но это может иногда возвращать сообщение об ошибке. Если вы не можете остановить его даже через диспетчер служб Windows, то читайте дальше.
Служба Windows Update не может быть остановлена
Если служба Windows Update не остановится, то в этом посте будет показано, как остановить эту службу WUAUSERV в Windows 10:
- Остановите службу Центра обновления Windows, используя PID
- Проверьте сервисные зависимости.
1] Остановите службу Центра обновления Windows, используя PID
Каждый запущенный процесс или служба имеет уникальный идентификатор или PID. Вы можете найти его в диспетчере задач, а затем использовать его, чтобы остановить службу.
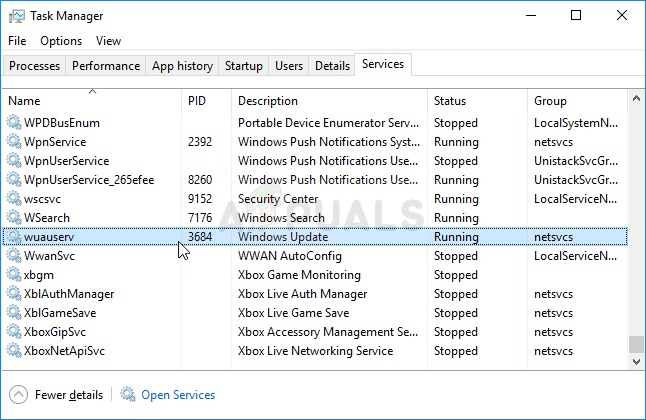
Откройте диспетчер задач и перейдите на вкладку Сервисы . Здесь вы должны найти службу с именем wuauserv . Вам нужно получить PID этого запущенного сервиса.
После этого откройте командную строку с правами администратора и введите эту команду:
Не забудьте заменить на оригинальный PID, который вы ранее скопировали из диспетчера задач – в нашем случае это 6676 . Вас должно встретить сообщение вроде этого:
УСПЕХ: Процесс с PID 6676 был прерван.
Это означает, что вы успешно остановили службу Windows Update.
2] Проверьте сервисные зависимости
Большинство служб Windows зависят от других служб. Иногда эти службы могут вызывать проблемы из-за некоторого внутреннего конфликта. В такие моменты вы должны проверить зависимости. В этом случае вам нужно найти зависимости этой службы Windows. Если какая-либо работающая служба использует службу WU, вам может потребоваться сначала остановить эту службу.
Fix: Windows Update Service could not be Stopped
This problem appears when users are unable to stop the Windows Update Service using the Services tool or Command Prompt. The reasons for trying to stop the service are numerous and many problems regarding Windows Update can be resolved simply by stopping the service and starting it once again.
 Windows Update Service could not be Stopped
This article will feature some modules which may cause this problem to occur as well as some workarounds which can be used to stop the service forcefully. Make sure you follow the instructions carefully and the problem should be resolved in no time.
What Causes the Windows Update Service to prevent being Stopped?
The causes of this problem are often unknown and this problem often needs to be circumvented rather than resolved. Nonetheless, when Windows Update service stops misbehaving, new updates are installed and they often resolve the problem. However, here are some common causes:
- Missing administrator privileges may prevent Windows Update Service from stopping and you should use an elevated Command Prompt in order to stop it.
- Something is wrong with your computer on a more serious note and you should consider an in-place upgrade or a repair installation.
Solution 1: Stopping wuauserv Process
Command Prompt with administrative permissions can be used to circumvent this problem. The command you will use will end the process recognized by its PID and it should be stopped. Note that you will need to use the Services tool to restart the process once you stop it if you wish to use the Windows Update functionality in the future.
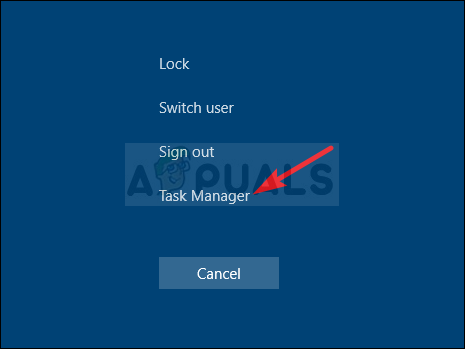
- Use the Ctrl + Shift + Esc key combination by pressing the keys at the same time to open the Task Manager utility.
- Alternatively, you can use the Ctrl + Alt + Del key combination and select Task Manager from the popup blue screen which will appear with several options. You can also search for it in the Start menu.
 Running Task Manager
- Click on More details at the bottom left part of the window in order to expand Task Manager. Navigate to the Services tab and right-click somewhere around the names of the columns and check the box next to the PID entry in the context menu.
- Locate the Windows Update service by checking the Description column or by looking for the ‘wuauserv’ service under the Name column. Note down its PID number.
 Locating the PID of Windows Update Service
- Search for “Command Prompt” either right in the Start menu or by tapping the search button right next to it. Right-click on the first result which appears at the top and select the “Run as administrator” option.
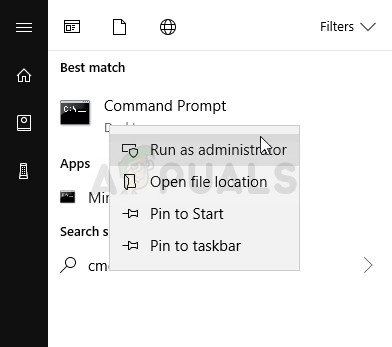 Running CMD with admin permissions
- Users who are using an older version of Windows can use the Windows Logo Key + R key combination in order to bring up the Run dialog box. Type in “cmd” in the box and use the Ctrl + Shift + Enter key combination in order to run Command Prompt as an administrator.
- Copy and paste the command shown below and make sure you click the Enter key on your keyboard.
- Make sure you replace [PID] with the number you noted down regarding Windows Update Service. If the Command Prompt reports that the service was successfully stopped, your problem is resolved!
Solution 2: Clearing the Contents of Update Folder
If you want to stop the Windows Update Service because you are either resetting Windows Update components or if you are simply trying to solve a problem regarding the automatic updates, you can follow this set of commands along with deleting the contents of a folder. The method is similar to Solution 1 but the command is different.
- Search for “Command Prompt” either right in the Start menu or by tapping the search button right next to it. Right-click on the first result which appears at the top and select the “Run as administrator” option.
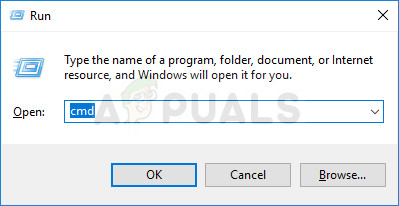
- Users who are using an older version of Windows can use the Windows Logo Key + R key combination in order to bring up the Run dialog box. Type in “cmd” in the box and use the Ctrl + Shift + Enter key combination in order to run Command Prompt as an administrator.
 Running CMD using Run box
 - Copy and paste the command shown below and make sure you click the Enter key on your keyboard.
 Running CMD using Run box
- Navigate to the following location on your computer by opening the Windows Explorer and clicking on This PC:
- Use the Ctrl+ A key combination to select all files, right-click on one of them and choose Delete from the context menu.
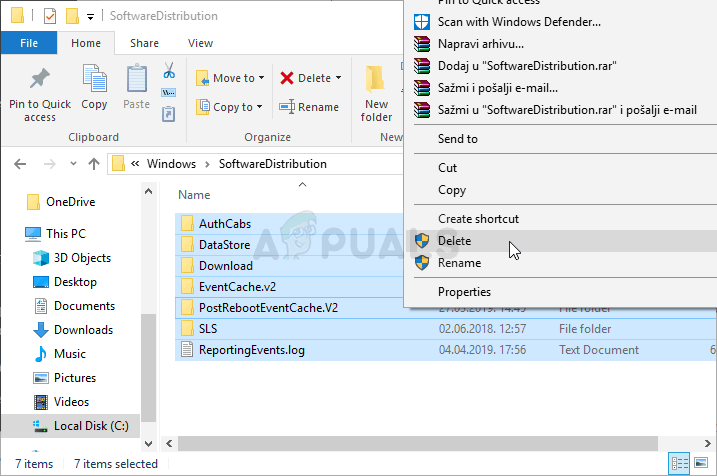 Deleting the contents of SoftwareDistribution folder
- If you wish to restart both the BITS and the Windows Update service, run the following set of commands in Command Prompt:
Solution 3: Perform a Repair Installation
This method might seem desperate as it includes creating a bootable Windows 10 media and actually performing a repair installation but it can help you since you won’t lose any of your personal files. This has helped plenty of users deal with the problem and you should check it out as a last resort, especially if you are trying to get Windows Update to work as this will also install the latest version of Windows.
- Download the Media Creation Tool software from Microsoft’s website. Open the downloaded file you just downloaded and accept the terms and conditions.
- Select the Create installation media (USB flash drive, DVD, or ISO file) for another PC option from the initial screen.
 Choose Create installation media for another PC
- The language, architecture, and other settings of the bootable drive will be chosen based on your computer’s settings, but you should uncheck the Use the recommended options for this PC in order to select the correct settings for the PC which has the password attached to it (if you are creating this on a different PC, and you probably are).
- Click Next and click on the USB drive or DVD option when prompted to choose between USB or DVD, depending on which device you want to use to store this image on.
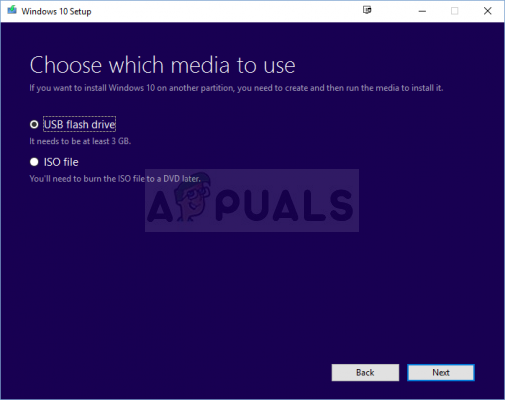 Choose between USB or DVD
- Click Next and choose the USB or DVD drive from the list which will show the storage media connected to your computer.
- Click Next and the Media Creation Tool will proceed to download the files necessary to install create the installation device.
Now that you probably have your recovery media, we can start actually solving the booting issue by starting the recovery drive which you should boot from.
- Insert the installation drive you own or which you have just created and boot your computer. The initial screen will differ depending on the operating system you have installed.
- Windows Setup should open prompting you to enter the preferred language and time and date settings. Enter them correctly and choose the Repair your computer option at the bottom of the window.
 Choose Repair your computer
- The Choose an option screen will appear so navigate to Troubleshoot >> Reset this PC. This will let you keep your personal files but it will delete the apps you have installed. Follow the further set of instructions on-screen and wait for the process to finish. Check to see if the BSODs still appear in a loop!
Сброс настроек службы обновлений Windows Update
В этой статье мы покажем, как исправить ошибки и восстановить работу службы обновления Windows с помощью сброса конфигурации агента и службы Windows Update. Как правило, это самый эффективный и простой способ решить проблему с работой службы обновлений Windows, если обновления не загружаются или происходят ошибки при установке обновлений.
Обычно для отладки и дебага ошибок службы обновления Windows администратору необходимо проанализировать коды ошибок в файле журнала обновлений %windir%\WindowsUpdate.log (в Windows 10 получить файл WindowsUpdate.log можно таким способом). Количество возможных ошибок, с которыми может столкнуться администратор при анализе журнала обновлений исчисляется десятками (список всех ошибок Windows Update) и процесс их разрешения в основном нетривиальный. В некоторых случаях вместо детального анализа ошибок Windows Update гораздо быстрее и проще сначала произвести полный сброс настроек агента и службы Windows Update. После сброса Windows Update вы можете выполнить сканирование и поиск обновлений.
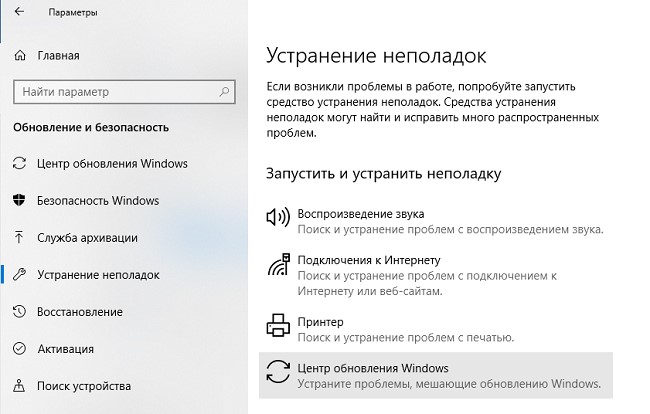
Средство устранения неполадок Центра обновления Windows
Прежде чем перейти к сбросу конфигурации центра обновления Windows настоятельно рекомендуем сначала попробовать более простое и эффективное средство для автоматического исправления проблем в службе обновления Windows – средство устранения неполадок Центра обновления Windows (Windows Update Troubleshooter).
Скачайте и запустите Windows Update Troubleshooter для вашей версии Windows:
- Windows10 – wu10.diagcab ( https://aka.ms/wudiag ) (либо запустите локальную версию инструмента: Пуск -> Параметры -> Обновления и безопасность -> Устранение неполадок -> Центр обновлений Windows (Start -> Settings -> Updates and Security -> Troubleshoot -> Windows Updates Troubleshooter);
- Windows 7и Windows 8.1 — WindowsUpdate.diagcab ( https://aka.ms/diag_wu ).
Дождитесь пока средство устранения неполадок Центра обновления Windows просканирует систему и попытается автоматически исправить все ошибки в службе Windows Update и связанных компонентах.
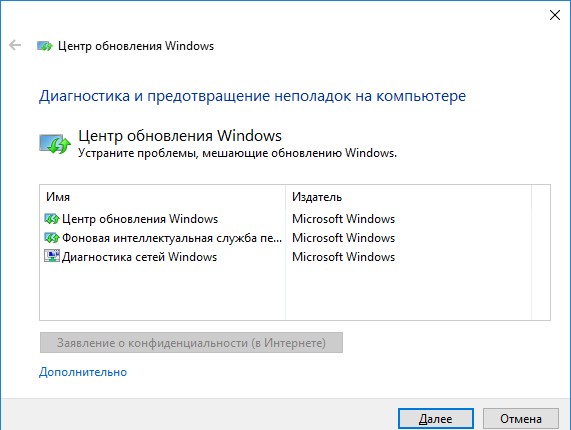
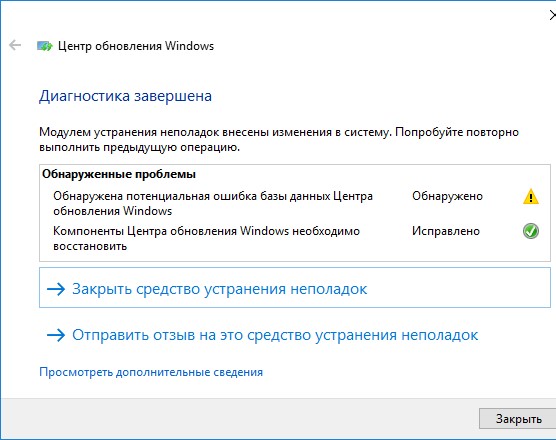
В моем случае была обнаружена и исправлена потенциальная ошибка в базе данных Центра обновления Windows. После этого осталось перезагрузить компьютер и попробовать выполнить поиск обновлений. Если обновления не загружаются или не устанавливаются, перейдите к следующему этапу.
Сброс настроек Windows Update из командной строки
Процесс сброса настроек агента и службы обновления Windows состоит из нескольких этапов. Все описанные операции выполняются в командной строке и собраны в один bat файл (готовый скрипт можно скачать по ссылке ниже).
С помощью данного скрипта можно полностью сбросить конфигурацию службы Центра обновлений Windows, и очистить локальный кэш обновлений. Скрипт является универсальный и будет работать как в Windows 7, Windows 8.1 и Windows 10, так и в Windows Server 2016/ 2012 R2/ 2008 R2. Скрипт помогает устранить большинство типовых ошибок в работе службы Windows Update, когда центр обновлений перестает загружать новые обновления или пишет, что при установке обновления возникают ошибки.
Итак, по порядку о том, что делает скрип:
- Остановка службы Windows Update (Центр обновлений Windows), BITS и службы криптографии:
net stop bits
net stop wuauserv
net stop appidsvc
net stop cryptsvc
taskkill /im wuauclt.exe /f - Удаление служебных файлов qmgr*.dat в каталоге %ALLUSERSPROFILE%\Application Data\Microsoft\Network\Downloader\:
Del «%ALLUSERSPROFILE%\Application Data\Microsoft\Network\Downloader\qmgr*.dat» - Переименовываем служебные каталоги, в которых хранятся конфигурационные файлы и кэш обновлений (в случае необходимости их можно будет использовать как резервные копии). После перезапуска службы обновления, эти каталоги автоматически пересоздадутся:
Ren %systemroot%\SoftwareDistribution SoftwareDistribution.bak
Ren %systemroot%\system32\catroot2 catroot2.bak - Удаление старого журнала windowsupdate.log
del /f /s /q %windir%\windowsupdate.log - Сброс разрешений на службы BITS и Windows Update (в случае, если права на службы были изменены)
sc.exe sdset bits D:(A;;CCLCSWRPWPDTLOCRRC;;;SY) (A;;CCDCLCSWRPWPDTLOCRSDRCWDWO;;;BA) (A;;CCLCSWLOCRRC;;;AU) (A;;CCLCSWRPWPDTLOCRRC;;;PU)
sc.exe sdset wuauserv D:(A;;CCLCSWRPWPDTLOCRRC;;;SY) (A;;CCDCLCSWRPWPDTLOCRSDRCWDWO;;;BA) (A;;CCLCSWLOCRRC;;;AU) (A;;CCLCSWRPWPDTLOCRRC;;;PU)
sc.exe sdset cryptsvc D:(A;;CCLCSWLOCRRC;;;AU)(A;;CCDCLCSWRPWPDTLOCRSDRCWDWO;;;BA)(A;;CCDCLCSWRPWPDTLCRSDRCWDWO;;;SO)(A;;CCLCSWRPWPDTLOCRRC;;;SY)S:(AU;FA;CCDCLCSWRPWPDTLOCRSDRCWDWO;;WD)
sc.exe sdset trustedinstaller D:(A;;CCLCSWLOCRRC;;;AU)(A;;CCDCLCSWRPWPDTLOCRSDRCWDWO;;;BA)(A;;CCDCLCSWRPWPDTLCRSDRCWDWO;;;SO)(A;;CCLCSWRPWPDTLOCRRC;;;SY)S:(AU;FA;CCDCLCSWRPWPDTLOCRSDRCWDWO;;WD) - Перерегистрация файлов системных динамических библиотек (dll), связанных со службами BITS и Windows Update:
cd /d %windir%\system32
regsvr32.exe /U /s vbscript.dll
regsvr32.exe /U /s mshtml.dll
regsvr32.exe /U /s msjava.dll
regsvr32.exe /U /s msxml.dll
regsvr32.exe /U /s actxprxy.dll
regsvr32.exe /U /s shdocvw.dll
regsvr32.exe /U /s Mssip32.dll
regsvr32.exe /U /s wintrust.dll
regsvr32.exe /U /s initpki.dll
regsvr32.exe /U /s dssenh.dll
regsvr32.exe /U /s rsaenh.dll
regsvr32.exe /U /s gpkcsp.dll
regsvr32.exe /U /s sccbase.dll
regsvr32.exe /U /s slbcsp.dll
regsvr32.exe /U /s cryptdlg.dll
regsvr32.exe /U /s Urlmon.dll
regsvr32.exe /U /s Oleaut32.dll
regsvr32.exe /U /s msxml2.dll
regsvr32.exe /U /s Browseui.dll
regsvr32.exe /U /s shell32.dll
regsvr32.exe /U /s atl.dll
regsvr32.exe /U /s jscript.dll
regsvr32.exe /U /s msxml3.dll
regsvr32.exe /U /s softpub.dll
regsvr32.exe /U /s wuapi.dll
regsvr32.exe /U /s wuaueng.dll
regsvr32.exe /U /s wuaueng1.dll
regsvr32.exe /U /s wucltui.dll
regsvr32.exe /U /s wups.dll
regsvr32.exe /U /s wups2.dll
regsvr32.exe /U /s wuweb.dll
regsvr32.exe /U /s scrrun.dll
regsvr32.exe /U /s msxml6.dll
regsvr32.exe /U /s ole32.dll
regsvr32.exe /U /s qmgr.dll
regsvr32.exe /U /s qmgrprxy.dll
regsvr32.exe /U /s wucltux.dll
regsvr32.exe /U /s muweb.dll
regsvr32.exe /U /s wuwebv.dllregsvr32.exe /s vbscript.dll
regsvr32.exe /s mshtml.dll
regsvr32.exe /s msjava.dll
regsvr32.exe /s msxml.dll
regsvr32.exe /s actxprxy.dll
regsvr32.exe /s shdocvw.dll
regsvr32.exe /s Mssip32.dll
regsvr32.exe /s wintrust.dll
regsvr32.exe /s initpki.dll
regsvr32.exe /s dssenh.dll
regsvr32.exe /s rsaenh.dll
regsvr32.exe /s gpkcsp.dll
regsvr32.exe /s sccbase.dll
regsvr32.exe /s slbcsp.dll
regsvr32.exe /s cryptdlg.dll
regsvr32.exe /s Urlmon.dll
regsvr32.exe /s Oleaut32.dll
regsvr32.exe /s msxml2.dll
regsvr32.exe /s Browseui.dll
regsvr32.exe /s shell32.dll
regsvr32.exe /s Mssip32.dll
regsvr32.exe /s atl.dll
regsvr32.exe /s jscript.dll
regsvr32.exe /s msxml3.dll
regsvr32.exe /s softpub.dll
regsvr32.exe /s wuapi.dll
regsvr32.exe /s wuaueng.dll
regsvr32.exe /s wuaueng1.dll
regsvr32.exe /s wucltui.dll
regsvr32.exe /s wups.dll
regsvr32.exe /s wups2.dll
regsvr32.exe /s wuweb.dll
regsvr32.exe /s scrrun.dll
regsvr32.exe /s msxml6.dll
regsvr32.exe /s ole32.dll
regsvr32.exe /s qmgr.dll
regsvr32.exe /s qmgrprxy.dll
regsvr32.exe /s wucltux.dll
regsvr32.exe /s muweb.dll
regsvr32.exe /s wuwebv.dll - Сброс параметров Winsock netsh winsock reset
- Сброс параметров системного прокси netsh winhttp reset proxy
- Опционально. При использовании локального сервера WSUS, возможно дополнительно сбросить текущую привязку клиента к серверу WSUS путем удаления следующих параметров в ветке HKLM\SOFTWARE\Microsoft\Windows\CurrentVersion\WindowsUpdate:
REG DELETE «HKLM\SOFTWARE\Microsoft\Windows\CurrentVersion\WindowsUpdate» /v AccountDomainSid /f
REG DELETE «HKLM\SOFTWARE\Microsoft\Windows\CurrentVersion\WindowsUpdate» /v PingID /f
REG DELETE «HKLM\SOFTWARE\Microsoft\Windows\CurrentVersion\WindowsUpdate» /v SusClientId /f
REG DELETE «HKLM\SOFTWARE\Policies\Microsoft\Windows\WindowsUpdate» /v TargetGroup /f
REG DELETE «HKLM\SOFTWARE\Policies\Microsoft\Windows\WindowsUpdate» /v WUServer /f
REG DELETE «HKLM\SOFTWARE\Policies\Microsoft\Windows\WindowsUpdate» /v WUStatusServer /f - Запуск остановленных служб:
sc.exe config wuauserv start= auto
sc.exe config bits start= delayed-auto
sc.exe config cryptsvc start= auto
sc.exe config TrustedInstaller start= demand
sc.exe config DcomLaunch start= auto
net start bits
net start wuauserv
net start appidsvc
net start cryptsvc - Опционально. В некоторых случая требуется установить/переустановить последнюю версию агента Windows Update Agent (WUA). Скачать актуальную версию агента можно со страницы https://support.microsoft.com/en-us/kb/949104. Нужно скачать файл для вашей версии Windows.Актуальная версия агента WUA для Windows 7 SP1 x64 — 7.6. Принудительная переустановка агента WindowsUpdate выполняется следующими командами:
- для Windows 7 x86: WindowsUpdateAgent-7.6-x86.exe /quiet /norestart /wuforce
- для Windows 7 x64: WindowsUpdateAgent-7.6-x64.exe /quiet /norestart /wuforce
 Актуальная версия агента WUA для Windows 7 SP1 x64 — 7.6. Принудительная переустановка агента WindowsUpdate выполняется следующими командами:
 Осталось перезагрузить компьютер и запустить синхронизацию с сервером Windows Update /WSUS.
wuauclt /resetauthorization /detectnow
Затем зайдите в Центр обновления и проверьте, пропали ли проблемы при поиске, скачивании и установке обновлений.
Сам скрипт reset_win_update.bat можно скачать по ссылке reset_win_update.zip (пункты 9 и 11 в скрипте не выполняются, т.к. являются опциональными). Скрипт нужно скачать, распаковать и запустить с правами администратора. 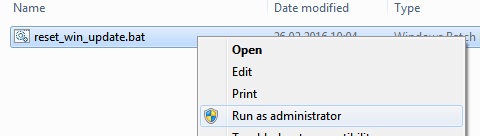
После этого перезагрузите компьютер, затем зайдите в Центр обновлений и проверьте, пропали ли проблемы при поиске, скачивании и установке обновлений.
Если обновления начали корректно скачиваться и устанавливается, можно удалить папки резервные копии папок:
Ren %systemroot%\SoftwareDistribution SoftwareDistribution.bak
Ren %systemroot%\system32\catroot2 catroot2.bak
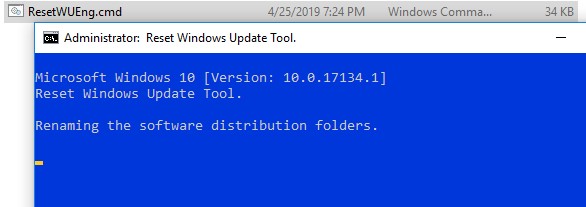
Скрипт Reset Windows Update Agent
В галерее скриптов Technet есть довольно полезный и простой скрипт для сброса компонентов центра обновлений — Reset Windows Update Agent. Скрипт универсальный и подходит для всех версий Windows: начиная с Windows XP и заканчивая последними версиями Windows 10. Рассмотрим, как им пользоваться.
- Скачайте архив ResetWUEng.zip здесь (https://gallery.technet.microsoft.com/scriptcenter/Reset-Windows-Update-Agent-d824badc) и распакуйте его;
- Запустите файл ResetWUEng.cmd с правами администратора;
- Скрипт определит вашу версию ОС (в моем примере это Windows 10) и предложит 18 различных опций. Некоторые из них напрямую не относятся к сбросу настроек агента WU, но могут быть полезны для исправления различных неисправностей в Windows (проверка диска chkdsk, исправление ошибок в образе Windows, сброс Winsock, очистка временных файлов и т.д.);
- Для сброса настроек Windows Update как правило достаточно использовать опцию 2 —ResetstheWindowsUpdateComponents (Сбросить компоненты службы обновления Windows). Нажмите 2 и Enter;
- Скрипт автоматически выполнит все действия, которые мы описали выше при выполнении ручного сброса агента обновлений Windows из командной строки.