Обновление билда Windows 10 из командной строки
Установщик setup.exe в дистрибутиве Windows 10 имеет довольно большой набор параметров командной строки, который может быть интересен администратором для автоматизации и управления обновлением билда (версии/сборки) Windows 10 на компьютерах пользователей с помощью SCCM и других инструментов. В этой статье мы покажем, как использовать параметры setup.exe при выполнении обновления и проверки совместимости с новым билдом Windows 10 .
Параметры установщика Setup.exe в Windows 10
Для обновления билда Windows 10 используется программа установки Windows setup.exe. При обычном запуске setup.exe запускается графический мастер обновления Windows 10, однако у данной программы имеется большое количество параметров командной строки, которые можно использовать для автоматизации обновления ОС на компьютерах пользователей. Общий синтаксис и параметры Setup.exe перечислены ниже:
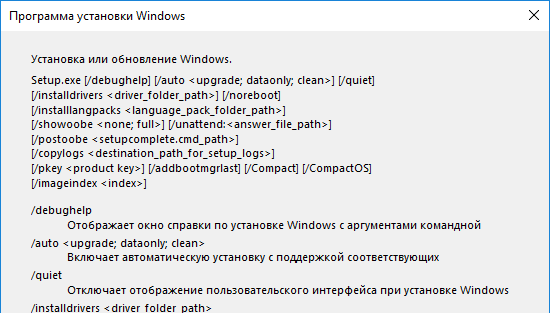
Подробную информацию об всех опциях setup.exe и их значениях для Windows 10 можно получить на странице документации: https://docs.microsoft.com/en-us/windows-hardware/manufacture/desktop/windows-setup-command-line-options
Генерация актуального ISO образа Windows 10
Чтобы выполнить обновление версии Windows 10б, вам нужно получить установочный ISO образ с последней версией Windows 10. На данный момент это Windows 10 1903.
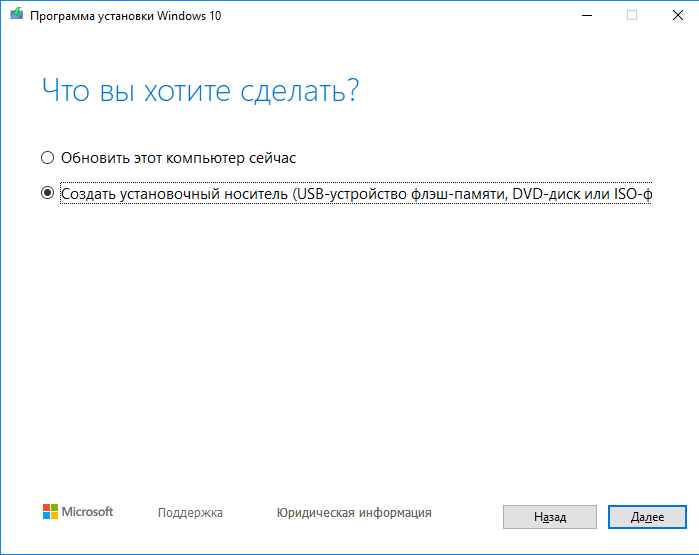
Вы можете создать ISO образ с актуальной версией Windows 10 с помощью Media Creation Tool.
- Скачайте Media creation tool (https://www.microsoft.com/ru-ru/software-download/windows10);
- Запустите файл MediaCreationTool1903.exe и с помощью мастера укажите, что вы хотите “Создать установочный носитель (USB-устройство, флеш памяти, DVD-диск или ISO файл)”;

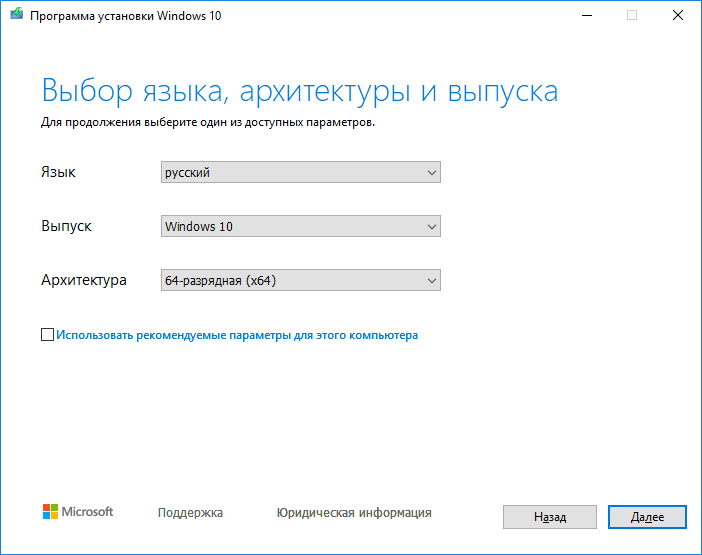
- Выберите язык, редакцию и архитектуру (x64 или x86) образа Windows 10, который вы хотите создать;
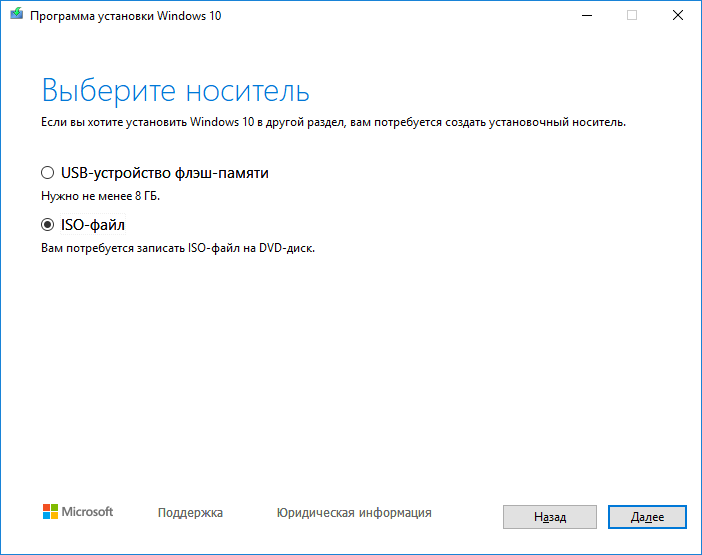
- Укажите, что вы хотите создать ISO-файл и укажите желаемое имя файла;
- И дождитесь, пока Media Creation Tool закончит загрузку установочного ISO образа Windows 10 на ваш локальный диск.
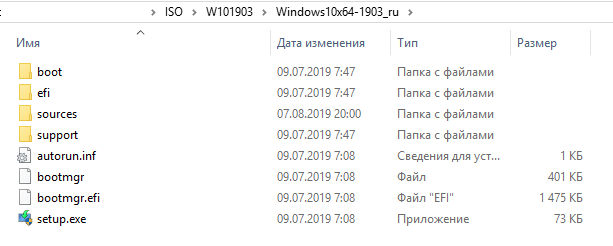
Распакуйте содержимое ISO образа на файловый сервер.
Проверка совместимости (возможности апгрейда) Windows 10
Перед апгрейдом версии Windows 10 вы можете проверить, возможно ли обновить ваш билд Windows 10 до версии, которая содержится в указанном образе. Для этого выполните команду:
start /wait setup.exe /Auto Upgrade /Quiet /NoReboot /DynamicUpdate Disable /Compat ScanOnly
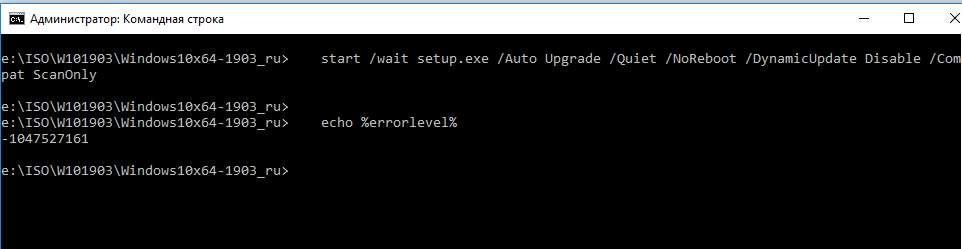
- /Auto Upgrade – автоматический режим обновления;
- /Quiet – скрыть диалоговые окна мастера обновления;
- /NoReboot – запретить перезагрузку компьютера;
- /DynamicUpdate Disable — указывает, что не нужно загружать последние обновления через Windows Update;
- /Compat ScanOnly – выполнить только проверку совместимости, без выполнения обновления.
Сканирование компьютера на совместимости с новый билдом Windows 10 займет некоторое время.
Вы можете отслеживать завершение процесса сканирования системы с помощью файла C:\$Windows.
BT\Sources\Panther\setupact.log. Сканирование завершено, если в файле содержится строка:

Результаты анализа на совместимость содержаться в файле C:\$Windows.
BT\Sources\Panther\setuperr.log. Найдите последнюю строку, которая выглядит так:
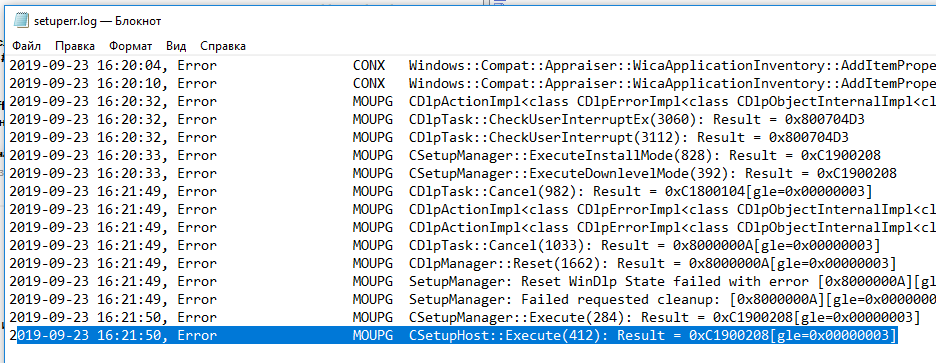
Это и есть код результата проверки.
Кроме того, вы можете получить код ошибки при проверке совместимости обновления из командной строки:
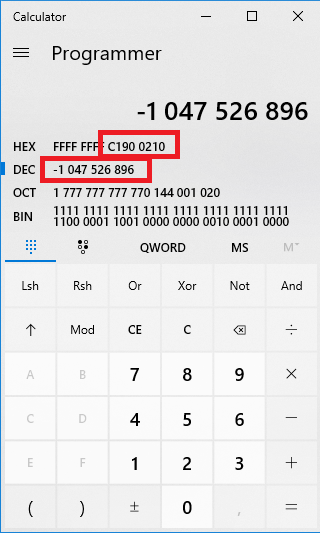
Например, команда вернула вам код -1047526896. Вам нужно с помощью калькулятора в режиме “Программист” вставить код ошибки в десятичном режиме (Dec). Чтобы получить шестнадцатеричный код ошибки, скопируйте значение из поля Hex, отбросив все F в начале и добавив в начало 0x. Например, в моем случае получился код 0xC1900210.
Наиболее распространение коды проверки совместимости ОС с новой версией Windows 10:
- 0xC1900210 – проблем не найдено:
- 0xC1900208 – выявлена проблема совместимости;
- 0xC1900204 и 0xC190010E – невозможно автоматическое обновление (неверный редакция или архитектура Windows);
- 0xC1900200 – компьютер не соответствует минимальным требования для Windows 10l
- 0xC190020E – недостаточно места на диске;
- 0xC1420127 – проблема при отключении WIM файла образа.
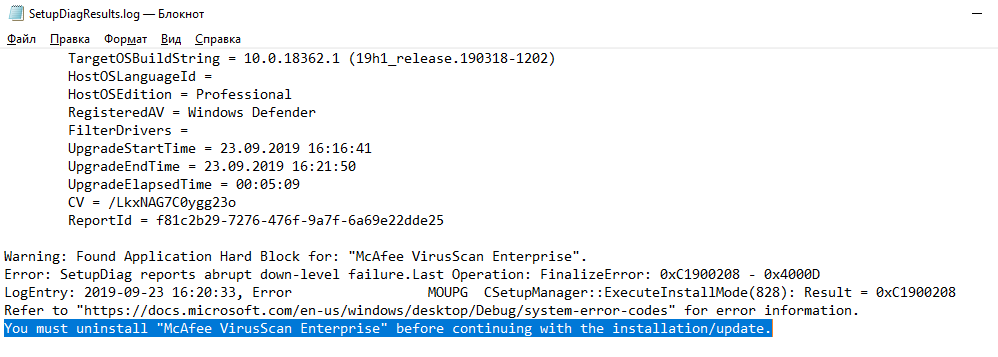
В моем случае в логе setuperr.log присутствовала ошибка:
Смотрим лог SetupDiagResults.log, который сформировала утилита SetupDiag. В логе указано, что есть две причины, которые мешают выполнить апгрейд Windows 10:
- CompatBlockedApplicationAutoUninstall — найдено несовместимое приложение, которое нужно удалить перед апгрейдом версии.
- FindAbruptDownlevelFailure — информация о последней ошибке, когда записи в журнале неожиданно обрываются.
При этом в конце журнала указано, что перед обновлением нужно удалить установленный антивирус McAfee.
При наличии SCCM вы можете централизованно собрать значения статуса errorlevel с компьютеров пользователей простым пакетом с командой setup.exe /Compat ScanOnly …. .
Автоматизация обновления версии Windows 10 из командной строки
Если вы не выявили проблем совместимости, которые мешают обновлению билда Windows 10, вы можете запустить обновление на компьютере с помощью простого скрипта. Создайте в сетевой папке с распакованным дистрибутивом Windows 10 простой bat файл run_win10_upgrade.bat со следующим кодом:
start /wait .\ W101903\Windows10x64-1903_ru\setup.exe /auto upgrade /DynamicUpdate disable /showoobe None /Telemetry Disable
Параметр /migratedrivers all – используется для принудительного переноса всех драйверов. Если параметр не задан, установщик сам принимает решения по каждому драйверу индивидуально.
Вы можете использовать другие опции setup.exe при обновлении Windows 10.
Начиная с Windows 10 1607 вы можете указывать параметры установки через файл Setupconfig.ini. Этот файл должен находится в каталоге с setup.exe и содержать примерно такой текст, аналогичный команде выше:
Для запуска обновления Windows 10 с помощью файла параметров используется команда:
Windows Update: FAQ
Note: If you’re looking for Microsoft Office update info, see Install Office updates.
In Windows 10, you decide when and how to get the latest updates to keep your device running smoothly and securely. When you update, you’ll get the latest fixes and security improvements, helping your device run efficiently and stay protected. In most cases, restarting your device completes the update. Make sure your device is plugged in when you know updates will be installed.
If other questions come up when you update Windows 10, here are some other areas that might interest you:
When you only want info about updating Windows 10, you’ll find answers to many of your questions here:
When the Windows 10 May 2020 Update is ready for your device, it will be available to download and install from the Windows Update page in Settings. Choose a time that works best for you to download the update. You’ll then need to restart your device and complete the installation. After that, your device will be running Windows 10, version 2004.
To manually check for the latest recommended updates, select Start > Settings > Update & Security > Windows Update > Windows Update .
To get help updating to the latest version of Windows 10, go to the Microsoft software download page and download the Update Assistant.
Some updates may not be available on all devices at the same time—we’re making sure updates are ready and compatible.
To stay up to date, select Start > Settings > Update & Security > Windows Update > Windows Update , and then select Check for updates.
If a feature update is available for your device, it will appear separately on the Windows Update page. To install it, select Download and install now.
Here are a few things you can try if you’re having trouble installing updates:
Make sure that your device is connected to the internet. Downloading updates requires an internet connection.
If you’re connected the internet, try to install the updates manually. Select Start > Settings > Update & Security > Windows Update > Windows Update , and then view available updates.
Check for updates
Run the Windows Update Troubleshooter. Select Start > Settings > Update & Security > Troubleshoot . Under Get up and running, select Windows Update.
The time required to download updates primarily depends on internet connection speed, network settings, and update size. Make sure your device is plugged in and connected to the internet to download updates faster.
You can’t stop updates entirely—because they help keep your device safe and secure, updates will eventually need to be installed and downloaded, regardless of your update settings. Here’s how to temporarily pause updates from being downloaded and installed. Note that after the pause limit is reached, you’ll need to install the latest updates before you can pause updates again.
In the Windows 10 November 2019 Update (version 1909) or later, or in Windows version 1809 for Pro or Enterprise, select Start > Settings > Update & Security > Windows Update . Then choose one of the following options:
Select Pause updates for 7 days.
Select Advanced options. Then, in the Pause updates section, select the drop-down menu and specify a date for updates to resume.
To finish installing an update, your device will need to restart. Windows will try to restart your device when you’re not using it. If it can’t, you’ll be asked to schedule the restart for a more convenient time. Or, you can schedule anytime by following these steps:
Select Start > Settings > Update & Security > Windows Update > Windows Update .
Select Schedule the restart and choose a time that’s convenient for you.
You can set active hours to make sure automatic restarts for updates only happen when you’re not using your device. Learn about active hours for Windows 10.
Try deleting files you don’t need, uninstalling apps you don’t use, or moving files to another drive like an external USB drive or OneDrive. For more tips on freeing up disk space, see Free up drive space in Windows 10.
We recommend keeping devices like laptops and tablets plugged in when you’re not using them. This way, if updates are installed outside active hours, your device will have enough power to complete the installation. Windows updates don’t consume more battery than other typical system processes.
An update history is available so you can see which updates were installed, and when. You can also use this list to remove specific updates, although we don’t recommend this unless it’s necessary.
Select Start > Settings > Update & Security > Windows Update > Windows Update > View update history .
For more info about what’s included in updates for Windows 10, see Windows 10 update history.
We don’t recommend that you remove any installed updates. However, if you must remove an update, you can do so in update history.
Select Start > Settings > Update & Security > Windows Update > View update history > Uninstall updates.
Select the update you want to remove, then select Uninstall.
Feature updates are typically released twice per year and include new functionality and capabilities as well as potential fixes and security updates. Quality updates are more frequent and mainly include small fixes and security updates. Windows is designed to deliver both kinds of updates to devices through Windows Update.
To double check that your device is up to date, open Settings > Update & Security > Windows Update and see your update status and available updates.
To find which version of Windows you’re running, see Which version of Windows operating system am I running?
Reserved storage is not automatically turned on by Windows in any update scenarios. It is only turned on for new devices with the Windows 10 May 2019 Update (version 1903) or later preinstalled, or devices on which a clean install was performed.
Note: If you’re looking for Microsoft Office update info, see Install Office updates.
The best way to keep Windows 8.1 up to date is to turn on automatic updates. With automatic updates, you don’t have to search for updates online or worry about missing critical fixes or device drivers for your PC. Instead, Windows Update automatically installs important updates as they become available.
To turn on automatic updates:
Open Windows Update by swiping in from the right edge of the screen (or, if you’re using a mouse, pointing to the lower-right corner of the screen and moving the mouse pointer up), select Settings > Change PC settings > Update and recovery > Windows Update. If you want to check for updates manually, select Check now.
Select Choose how updates get installed, and then, under Important updates, select Install updates automatically (recommended).
Under Recommended updates, select Give me recommended updates the same way I receive important updates.
Under Microsoft Update, select Give me updates for other Microsoft products when I update Windows, and then select Apply.
Click the questions below to see answers about how Windows Update keeps your device up to date.
Note: If your PC is connected to a network where updates are managed by Group Policy, you might not be able to change settings related to Windows Update. For more info, contact your organization’s technical support.
Open Windows Update by swiping in from the right edge of the screen (or, if you’re using a mouse, pointing to the lower-right corner of the screen and moving the mouse pointer up), select Settings > Change PC settings > Update and recovery > Windows Update. To check for updates manually, select Check now.
An update history is available so you can see which updates were installed, and when. You can also use this list to remove specific updates, although we don’t recommend this unless it’s necessary.
To see your PC’s update history, open Windows Update by swiping in from the right edge of the screen (or, if you’re using a mouse, pointing to the lower-right corner of the screen and moving the mouse pointer up), select Settings > Change PC settings > Update and recovery > Windows Update > View your update history.
We don’t recommend that you remove any installed updates. However, if you must remove an update, you can do so in update history.
Open Windows Update by swiping in from the right edge of the screen (or, if you’re using a mouse, pointing to the lower-right corner of the screen and moving the mouse pointer up), select Settings > Change PC settings > Update and recovery > Windows Update > View your update history.
Select the update you want to remove, then select Uninstall.
Here are a few things to try if you’re having problems installing updates:
Make sure that your PC is connected to the internet. Some updates can’t be installed if you’re using a metered internet connection.
If you’re connected the internet and updates aren’t installed automatically, wait a few minutes and then try to install the updates manually.
See the Fix Windows Update errors guided walkthrough to try to fix the problem.
Support for Windows 7 ended on January 14, 2020
We recommend you move to a Windows 10 PC to continue to receive security updates from Microsoft.
Click the questions below to see answers about how Windows Update keeps your device up to date.


