Windows Update: FAQ
Note: If you’re looking for Microsoft Office update info, see Install Office updates.
In Windows 10, you decide when and how to get the latest updates to keep your device running smoothly and securely. When you update, you’ll get the latest fixes and security improvements, helping your device run efficiently and stay protected. In most cases, restarting your device completes the update. Make sure your device is plugged in when you know updates will be installed.
If other questions come up when you update Windows 10, here are some other areas that might interest you:
When you only want info about updating Windows 10, you’ll find answers to many of your questions here:
When the Windows 10 May 2020 Update is ready for your device, it will be available to download and install from the Windows Update page in Settings. Choose a time that works best for you to download the update. You’ll then need to restart your device and complete the installation. After that, your device will be running Windows 10, version 2004.
To manually check for the latest recommended updates, select Start > Settings > Update & Security > Windows Update > Windows Update .
To get help updating to the latest version of Windows 10, go to the Microsoft software download page and download the Update Assistant.
Some updates may not be available on all devices at the same time—we’re making sure updates are ready and compatible.
To stay up to date, select Start > Settings > Update & Security > Windows Update > Windows Update , and then select Check for updates.
If a feature update is available for your device, it will appear separately on the Windows Update page. To install it, select Download and install now.
Here are a few things you can try if you’re having trouble installing updates:
Make sure that your device is connected to the internet. Downloading updates requires an internet connection.
If you’re connected the internet, try to install the updates manually. Select Start > Settings > Update & Security > Windows Update > Windows Update , and then view available updates.
Check for updates
Run the Windows Update Troubleshooter. Select Start > Settings > Update & Security > Troubleshoot . Under Get up and running, select Windows Update.
The time required to download updates primarily depends on internet connection speed, network settings, and update size. Make sure your device is plugged in and connected to the internet to download updates faster.
You can’t stop updates entirely—because they help keep your device safe and secure, updates will eventually need to be installed and downloaded, regardless of your update settings. Here’s how to temporarily pause updates from being downloaded and installed. Note that after the pause limit is reached, you’ll need to install the latest updates before you can pause updates again.
In the Windows 10 November 2019 Update (version 1909) or later, or in Windows version 1809 for Pro or Enterprise, select Start > Settings > Update & Security > Windows Update . Then choose one of the following options:
Select Pause updates for 7 days.
Select Advanced options. Then, in the Pause updates section, select the drop-down menu and specify a date for updates to resume.
To finish installing an update, your device will need to restart. Windows will try to restart your device when you’re not using it. If it can’t, you’ll be asked to schedule the restart for a more convenient time. Or, you can schedule anytime by following these steps:
Select Start > Settings > Update & Security > Windows Update > Windows Update .
Select Schedule the restart and choose a time that’s convenient for you.
You can set active hours to make sure automatic restarts for updates only happen when you’re not using your device. Learn about active hours for Windows 10.
Try deleting files you don’t need, uninstalling apps you don’t use, or moving files to another drive like an external USB drive or OneDrive. For more tips on freeing up disk space, see Free up drive space in Windows 10.
We recommend keeping devices like laptops and tablets plugged in when you’re not using them. This way, if updates are installed outside active hours, your device will have enough power to complete the installation. Windows updates don’t consume more battery than other typical system processes.
An update history is available so you can see which updates were installed, and when. You can also use this list to remove specific updates, although we don’t recommend this unless it’s necessary.
Select Start > Settings > Update & Security > Windows Update > Windows Update > View update history .
For more info about what’s included in updates for Windows 10, see Windows 10 update history.
We don’t recommend that you remove any installed updates. However, if you must remove an update, you can do so in update history.
Select Start > Settings > Update & Security > Windows Update > View update history > Uninstall updates.
Select the update you want to remove, then select Uninstall.
Feature updates are typically released twice per year and include new functionality and capabilities as well as potential fixes and security updates. Quality updates are more frequent and mainly include small fixes and security updates. Windows is designed to deliver both kinds of updates to devices through Windows Update.
To double check that your device is up to date, open Settings > Update & Security > Windows Update and see your update status and available updates.
To find which version of Windows you’re running, see Which version of Windows operating system am I running?
Reserved storage is not automatically turned on by Windows in any update scenarios. It is only turned on for new devices with the Windows 10 May 2019 Update (version 1903) or later preinstalled, or devices on which a clean install was performed.
Note: If you’re looking for Microsoft Office update info, see Install Office updates.
The best way to keep Windows 8.1 up to date is to turn on automatic updates. With automatic updates, you don’t have to search for updates online or worry about missing critical fixes or device drivers for your PC. Instead, Windows Update automatically installs important updates as they become available.
To turn on automatic updates:
Open Windows Update by swiping in from the right edge of the screen (or, if you’re using a mouse, pointing to the lower-right corner of the screen and moving the mouse pointer up), select Settings > Change PC settings > Update and recovery > Windows Update. If you want to check for updates manually, select Check now.
Select Choose how updates get installed, and then, under Important updates, select Install updates automatically (recommended).
Under Recommended updates, select Give me recommended updates the same way I receive important updates.
Under Microsoft Update, select Give me updates for other Microsoft products when I update Windows, and then select Apply.
Click the questions below to see answers about how Windows Update keeps your device up to date.
Note: If your PC is connected to a network where updates are managed by Group Policy, you might not be able to change settings related to Windows Update. For more info, contact your organization’s technical support.
Open Windows Update by swiping in from the right edge of the screen (or, if you’re using a mouse, pointing to the lower-right corner of the screen and moving the mouse pointer up), select Settings > Change PC settings > Update and recovery > Windows Update. To check for updates manually, select Check now.
An update history is available so you can see which updates were installed, and when. You can also use this list to remove specific updates, although we don’t recommend this unless it’s necessary.
To see your PC’s update history, open Windows Update by swiping in from the right edge of the screen (or, if you’re using a mouse, pointing to the lower-right corner of the screen and moving the mouse pointer up), select Settings > Change PC settings > Update and recovery > Windows Update > View your update history.
We don’t recommend that you remove any installed updates. However, if you must remove an update, you can do so in update history.
Open Windows Update by swiping in from the right edge of the screen (or, if you’re using a mouse, pointing to the lower-right corner of the screen and moving the mouse pointer up), select Settings > Change PC settings > Update and recovery > Windows Update > View your update history.
Select the update you want to remove, then select Uninstall.
Here are a few things to try if you’re having problems installing updates:
Make sure that your PC is connected to the internet. Some updates can’t be installed if you’re using a metered internet connection.
If you’re connected the internet and updates aren’t installed automatically, wait a few minutes and then try to install the updates manually.
See the Fix Windows Update errors guided walkthrough to try to fix the problem.
Support for Windows 7 ended on January 14, 2020
We recommend you move to a Windows 10 PC to continue to receive security updates from Microsoft.
Click the questions below to see answers about how Windows Update keeps your device up to date.
Update Time v1.3

Keeping the correct time on your computer is essential because Computers apply a timestamp to the files and folders you create. You will also not be able to use some software and tools that require internet-based authorization if your system time is too far off from the current time. If you set the clock incorrectly, bad dates become a flood of erroneous information, leading to lost files, missed appointments and poor recordkeeping. Incorrect date and time settings are the most common reason for “Error Code 0x80072F8F” error, You should be able to fix this error by Correct The Date and Time.
Common Causes for Windows 10 Time Being Wrong
1. An Incorrect Time Zone Setting : Even if you fix the time manually, Windows will reset itself to the wrong time zone once you reboot. To fix your time zone in Windows 10 , call up the Run command dialog box via Windows key + R keyboard shortcut combination and execute ms-settings:dateandtime command then select the correct time zone from drop down menu (1) and use Sync Now button (2)

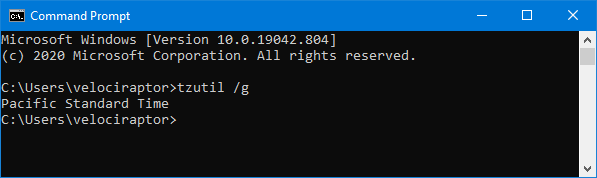
To see which time zone is currently selected, on the command line, type the first command and press Enter.
tzutil /g
tzutil /l
Second command will list all possible Time zones which you can use. To Fix your Time zone via Cmd , Type the following command to set the new time zone and press Enter:
tzutil /s “Your Time zone” for example ; tzutil /s “W. Europe Standard Time”
2. A Dead CMOS Battery : The CMOS battery sits on your computer’s motherboard and stores information about the system configuration, including the date and time. If this battery goes bad, the chip starts losing information.
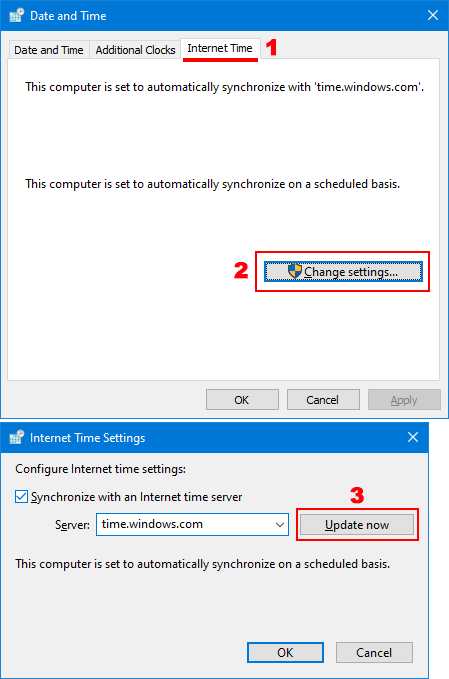
3. Windows Time Is Out of Sync : You should first confirm that your computer is syncing its clock with a valid time server. To do this, Use the “ timedate.cpl ” command then Click on the “Internet Time” tab (1) and Click on “Change settings…” (2) finally choose a server and use Update Now button (3)
If you want to force Windows 10 time to synch with a time server Press Windows key + X and select Command prompt(Admin). Type each one of the command below and press enter.
net stop w32time
w32tm /unregister
w32tm /register
net start w32time
w32tm /resync
Restart the computer to test the issue again.
4. Malware : Your computer may have been hijacked by a virus that messes with your computer time. To fix it, First, make sure your anti-virus program is up to date with the latest virus definitions. And then perform a Full computer scan in Safe mode.
5. Third-party utility or program : Third-party programs or screen savers can cause the time to stop or decrease significantly. close and disable all screen savers, and End Task all TSRs to ensure your lost time is not being caused by these programs.
How To Fix Windows 10 Time is Wrong Issue easily
To Fix Wrong Date & Time Issues in Windows PC you can use Update Time Software. It is portable and freeware Application. I had mainboard Issue and then I could not correct my Windows Clock , if I Shut down my computer ,Windows time stopped to working, I have replaced the CMOS battery but Problem doesn’t solved , because I have already damaged my old mainboard during the “BIOS update” for this reason I coded a small Application which called “Update Time” . It is very easy to use, just double clik on it to correct your computer Date & Time

You can set Up a service to update the Time and Date at bootup too , to do this use _UpdateTime_Options.vbs in downloaded folder and tick the Appropriate checkbox

If the service is installed, it only works at Windows startup and after updating the system date and time closes itself this mean It will not work again until the next system startup (Doesn’t run in the background) .Update Time Application has Cmd parameter support , here are the supported commands

Of course, you can also run this software at startup with the help of scheduled tasks.
NOTE: If Your clock setting is updated incorrectly, please check the time zone settings.
Supported operating systems: Windows 10 , Windows 8.1 , Windows 8 , Windows 7 , Windows Vista , Windows Xp – (x86 & x64)

Updated : Sunday, march 7, 2021
File: UpdateTime_x64.exe │ Virustotal
MD5: a07e23493c35237cd33e45779a62d75e
SHA1: 4dc84fa1150ae38db029d50e1b18281f65e61e42


