- Description of the Windows Update Standalone Installer in Windows
- Introduction
- More Information
- References
- Add updates to a Windows image
- Notes
- Add a Windows update package to an image
- Установка CAB и MSU файлов обновлений Windows в ручном режиме
- Где скачать MSU файл обновления Windows
- Установка MSU файла обновления в Windows
- Как извлечь CAB файл из пакета обновлений MSU
- Установка CAB файла обновлений в Windows 10
Description of the Windows Update Standalone Installer in Windows
Introduction
This article describes the Windows Update Standalone Installer (Wusa.exe) in the following Windows operating systems:
Windows Server 2008
Windows Server 2008 R2
Windows Server 2012
Windows Server 2012 R2
Windows Server 2016 Technical Preview
The Wusa.exe file is in the %windir%\System32 folder. The Windows Update Standalone Installer uses the Windows Update Agent API to install update packages. Update packages have an .msu file name extension. The .msu file name extension is associated with the Windows Update Standalone Installer.
More Information
An .msu file contains the following contents.
Windows Update metadata
Describes each update package that the .msu file contains.
One or more .cab files
Each .cab file represents one update.
This .xml file describes the .msu update package. Wusa.exe uses the .xml file when you perform an unattended installation of the update by using the Package Manager tool (Pkgmgr.exe).
For example, you download hotfix 934307. The Windows6.0-KB934307-x86.msu file is in the C:\934307 folder. You type the following command at a command prompt to expand the .msu file to a temporary folder:
expand -f:* «C:\934307\Windows6.0-KB934307-x86.msu» %TEMP%
Then, you type the following command at a command prompt:
A properties file
This file contains string properties that Wusa.exe uses. For example, this file contains the title of the associated article in the Microsoft Knowledge Base.
When you use Wusa.exe to install an update package, Wusa.exe expands the contents of the .msu file to a temporary folder. Then, Wusa.exe performs the following steps:
Wusa.exe uses the Windows Update metadata in the .msu file to search for applicable updates.
Wusa.exe copies the contents of the applicable updates to the Windows Update sandbox. The Windows Update sandbox is a protected folder.
Wusa.exe calls the appropriate function in the Windows Update Agent API according to the mode in which you start Wusa.exe.
When the Windows Update wizard finishes the installation, the Windows Update Agent API returns a status. Then, Wusa.exe works synchronously with the Windows Update Agent API.
Note Each update in an .msu update package is installed in a separate session. Only one instance of Wusa.exe runs when you use Wusa.exe. Wusa.exe does not change the contents of the updates in .msu files. The Windows Update infrastructure performs the required actions according to the contents of the update.
When you start Wusa.exe in interactive mode, a welcome screen displays high-level information about the update. If you continue to install the update, Wusa.exe calls the appropriate function in the Windows Update Agent API to start the Windows Update wizard. The Windows Update wizard displays the Microsoft Software License Terms that are associated with the update package. Wusa.exe calls the Windows Update Agent API to continue the installation. Then, Wusa.exe waits until the Windows Update wizard finishes the installation.
To install an .msu update package, run Wusa.exe together with the full path of the file.
For example, if the Windows6.0-KB934307-x86.msu file is in the D:\934307 folder, type the following command at a command prompt to install the update package:
wusa.exe d:\934307\Windows6.0-KB934307-x86.msuYou can also double-click the .msu file to install the update package.
You can use Wusa.exe to uninstall an update in Windows 7, Windows Server 2008 R2, Windows 8, and Windows Server 2012.
Note You cannot use Wusa.exe to uninstall updates in Windows Vista or Windows Server 2008. You can use Windows Defender Software Explorer to manually uninstall the updates. For more information about Software Explorer, go to the following Microsoft website:
Using Software Explorer in Windows Defender
You can use the following switches together with Wusa.exe.
Run Wusa.exe in quiet mode without user interaction. When the tool runs in quiet mode, it runs without user interaction. The computer restarts if this is required.
For example, if the Windows6.0-KB934307-x86.msu file is in the D:\934307 folder, type the following command at a command prompt to install the update package without user interaction:
wusa.exe d:\934307\Windows6.0-KB934307-x86.msu /quiet
Note When you use this switch, the Microsoft Software License Terms do not appear.
Prevents Wusa.exe from restarting the computer. The /norestart switch is ignored if the /quiet switch is not present. If you run Wusa.exe together with these two switches, you must manually restart the operating system after the installation is complete if the installation requires you to restart the computer.
For example, if the Windows6.0-KB934307-x86.msu file is in the D:\934307 folder, type the following command at a command prompt to install the update package:
wusa.exe D:\934307\Windows6.0-KB934307-x86.msu /quiet /norestart
Uninstalls the specified package or KB number.
Specifies the package to be uninstalled by using its KB number. Can be passed only together with the /uninstall switch.
Wusa.exe extracts the package contents to a destination folder.
When this switch is combined with the /quiet switch, Wusa.exe prompts you before it begins a restart for install and uninstall operations.
When this switch is combined with the /quiet switch, Wusa.exe forcibly closes applications and then begins a restart.
Note The .msu files can be installed to an offline image by using the DISM.exe /Add-Package option together with the Windows 7 or Windows 8 OEM Preinstallation Kit (OPK) or the Windows Automated Installation Kit (AIK). For more information, go to the following Microsoft TechNet website:
Operating System Package Servicing Command-Line Options
To view the Windows Update Standalone Installer event log, follow these steps:
Click Start  , type event viewer in the Start Search box, and then click Event Viewer in the Programs list. In Windows 8 and Windows Server 2012, on the Start screen, type event viewer, click Settings, and then click View event logs under Settings.
 If you are prompted for an administrator password or for confirmation, type the password, or click Continue.
In Event Viewer, expand Windows Logs, and then click Setup.
Setup events appear in the middle pane.
In the Actions pane, click Filter Current Log.
In the Event sources list, click to select the WUSA check box, and then click OK.
References
For more information about the Windows Update Agent API, go to the following Microsoft website:
Add updates to a Windows image
For many customizations, like adding .inf-style drivers, Windows updates or upgrading the edition, you can mount and edit the Windows image. Mounting an image maps the contents of a file to a temporary location where you can edit the files or use DISM to perform common deployment tasks.
Notes
Add languages before major updates. Major updates include hotfixes, general distribution releases, or service packs. If you add a language later, you’ll need to re-add the updates.
Add major updates before apps. These apps include universal Windows apps and desktop applications. If you add an update later, you’ll need to re-add the apps.
For major updates, update the recovery image too: These may include hotfixes, general distribution releases, service packs, or other pre-release updates. We’ll show you how to update these later in Lab 12: Update the recovery image.
If a Servicing Stack Update (SSU) is available, you must install it before applying the most recent General Distribution Release (GDR) or any future GDRs. See Windows 10 update history to see the most recent GDR.
Add a Windows update package to an image
Get a Windows update package. For example, get the latest cumulative update listed in Windows 10 update history from the Microsoft Update catalog. If the update has any prerequisite updates, get those too.
Add the updates to a mounted or online image. For packages with dependencies, either install the packages in order, or add them all at once using a single DISM command.
Example: adding a cumulative update to a mounted image:
Example: adding multiple updates:
Verify that the packages appear correctly:
Review the resulting list of packages and verify that the list contains the package. For example:
Each package will usually be a new KB, and will increase the build revision number of Windows on the device. The revision number of windows a device can be found in the following registry key: HKEY_LOCAL_MACHINE\SOFTWARE\Microsoft\Windows NT\CurrentVersion\UBR .
If you’re done updating your image, you can unmount it, committing changes.
Установка CAB и MSU файлов обновлений Windows в ручном режиме
Обновления для операционной системы Windows выпускаются в виде пакетов с расширением MSU или CAB. В том случае, если не работает (специально отключен) штатный функционал службы Windows Update (Центра обновления Windows), нужные для системы накопительные обновления или обновления безопасности можно скачать и установить вручную в офлайн режиме. В этой статье мы покажем, как в Windows 10 скачать и установить обновления в формате MSU и CAB файлов.
Где скачать MSU файл обновления Windows
Microsoft изначально выпускает свои обновления и патчи в формате CAB файла. Именно в таком виде ваш компьютер получает обновления с серверов обновления Microsoft или локального сервера WSUS. Для более удобного ручного распространения отдельных обновлений клиентами через каталог обновлений Microsoft, данные CAB файлы упаковываются в специальный формат MSU (Microsoft Update Standalone Package).
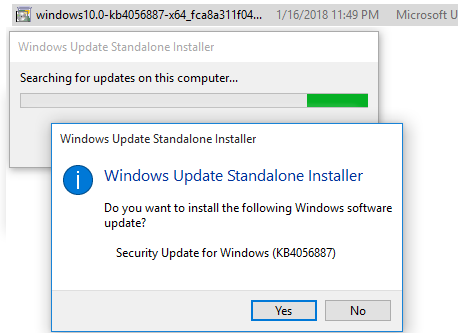
Скачать MSU файлы обновлений Windows (а в некоторых случаях и CAB)и других продуктов MSFT можно в каталоге обновлений Microsoft (https://www.catalog.update.microsoft.com/). Перейдите в Microsoft Update Catalog, найдите и скачайте нужное обновление. К примеру, я хочу установить обновление безопасности для Adobe Flash Player под Windows 10 x64 1507 – KB4056887. Нажмите на кнопку Download.

Переместите скачанный файл windows10.0-kb4056887-x64_fca8a311f0495e669715ae5aa0e0d8720f945049.msu в каталог C:\temp. Переименуйте файл на более короткое имя — windows10.0-kb4056887-x64.msu
Установка MSU файла обновления в Windows
Для запуска установки пакета обновления в Windows достаточно дважды щёлкнуть по скачанному MSU файлу. Если обновление применимо к данному компьютеру, откроется диалоговое окно Автономного установщика обновлений Windows (Windows Update Standalone Installer), в котором нужно подтвердить установку апдейта.
Кроме того, установить msu пакет обновления можно и из командной строки с помощью утилиты wusa.exe.
Для установки обновления в «тихом» режиме (пользователю не будут показываться никакие всплывающие окна) с отложенной перезагрузкой, откройте командную строку с правами администратора и выполните команду:
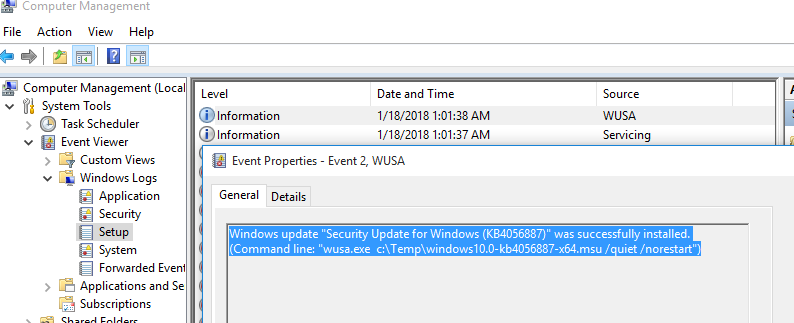
wusa.exe c:\Temp\windows10.0-kb4056887-x64.msu /quiet /norestart

Через некоторое время убедимся, что обновление установлено успешно, выполнив команду:
wmic qfe list | findstr 4056887

Или найдя в журнале событий Установка (Event Viewer -> Windows Logs -> Setup) запись с Event ID 2 от источника WUSA с текстом:
Как извлечь CAB файл из пакета обновлений MSU
В некоторых случаях, когда служба Windows Update, которую использует утилита wusa, работает некорректно (попробуйте для начала выполнить сброс настроек агента обновления Windows), установить обновление в формате MSU не получается. В этом случае можно вручную распаковать пакет MSU, извлечь из него CAB файл обновления и вручную установить его в системе.
Чтобы распаковать MSU пакет в каталог C:\Temp\kb4056887 (каталог нужно предварительно создать), выполните следующую команду:
expand _f:* “C:\Temp\windows10.0-kb4056887-x64.msu” C:\Temp\kb4056887
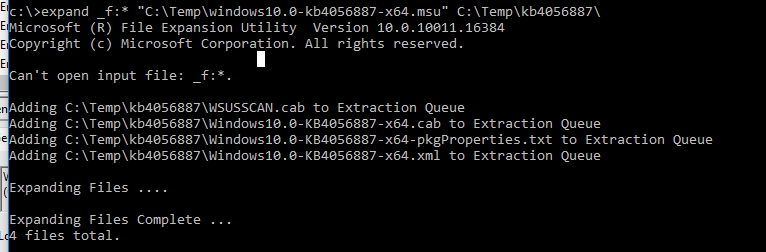
Как вы видите в каталоге появилось 4 типа файлов:
- .xml файл (Windows10.0-KB4056887-x64.xml) — содержит метаданные пакета msu и используется программой Wusa.exe
- .cab файл (Windows10.0-KB4056887-x64.cab — один или несколько)– непосредственно архив с обновлением Windows
- *pkgProperties.txt файл (Windows10.0-KB4056887-x64-pkgProperties.txt)– содержит свойства пакета (дата выпуска, архитектура, тип пакета, ссылка на KB и т.д.)
Установка CAB файла обновлений в Windows 10
Установить CAB файл обновления, полученный из MSU пакета можно двумя способами.
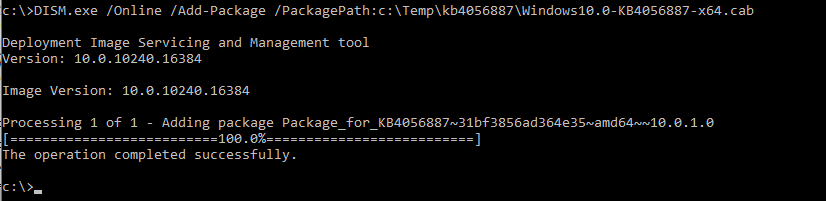
Наиболее универсальный способ установки обновления из CAB файл – утилита DISM.exe. Команда установки может быть такой:
DISM.exe /Online /Add-Package /PackagePath:c:\Temp\kb4056887\Windows10.0-KB4056887-x64.cab
Если нужно установить CAB пакет в тихом режиме и подавить запрос на перезагрузку компьютера после установки обнволения, команда DISM будет такой:
start /wait DISM.exe /Online /Add-Package /PackagePath: c:\Temp\kb4056887\Windows10.0-KB4056887-x64.cab /Quiet /NoRestart
В Windows 8 и Windows 7 можно установить обновление через менеджер пакетов Pkgmgr. Команда:
start /w Pkgmgr /ip /m:c:»c:\Temp\kb4056887\Windows10.0-KB4056887-x64.cab»
Примечание. В Windows 10 / Windows Server 2016 менеджер пакетов PkgMgr.exe более не поддерживается. При его запуске появляется предупреждении о необходимости использовать для управления пакетами DISM.exe.
Note: The PkgMgr.exe has been deprecated. Please update your scripts to use dism.exe to extract, install, uninstall, configure and update features and packages for Windows.

Данная инструкция по ручной установке накопительных (если вы не помните что это такое, прочитайте статью про новую модель обновлений Windows систем) и любых других обновлений Windows применима ко всем поддерживаемым версиям ОС: Windows 10 / 8.1 / 7 и Windows Server 2016 / 2012 / R2 / 2008 / R2.


Просто отличный мануал по использованиею MSU и CAB файлов в Windows Update — автору руспект.
Статья хорошая и обновления CAB и MSU распаковываются, устанавливаются без проблем.Однако у меня есть проблема с командами Dism в Windows 7 sp1 Home Premium x 64 .Я установил на Virtual box свой windows чтобы там посмотреть как правильно распаковать msu и cab обновления, чтобы получить пакеты обновлений для добавления в свой iso образ.Пакеты обновлений получил и стал тестировать команды dism.Этот список команд работает без проблем и в логе dism только info есть:
DISM.exe /Get-WimInfo /WimFile:C:\test\images\myimage.wim
DISM.exe /Mount-Wim /WimFile:C:\test\images\myimage.wim /index:2 /MountDir:C:\test\offline
DISM.exe /Get-MountedWimInfo — Проверяет подключенные образы
DISM.exe /Commit-Wim /MountDir:C:\test\offline — Сохраняет изменения образа
DISM.exe /Unmount-Wim /MountDir: /commit — Сохраняет и отключает образ
DISM.exe /Unmount-Wim /MountDir: /discard -отключает образ
DISM.exe /Cleanup-Wim -удаляет ресурсы с поврежденными образами
А вот при использовании команды:
DISM.exe /image:C:\test\offline /LogPath:C:\log\AddPackage.log /LogLevel:2 /Add-Package /PackagePath:C:\packages
В логе AddPackage при каждом успешном добавлении пакета обновления проблема возникает:
Warning DISM DISM Provider Store: PID=3388 Failed to Load the provider: C:\Users\Koks\AppData\Local\Temp\1DFA6FEB-EE3C-444A-B7E4-89A752AD4A9F\PEProvider.dll. — CDISMProviderStore::Internal_GetProvider(hr:0x8007007e)
И так warning возникает при добавлении любых обновлений.
Нужен совет как решить эту проблему.Также хотелось бы узнать из-за чего возникает warning.И интересует будет ли работать корректно мой образ win7 c добавленными пакетами обновлений с указанной выше проблемой.Или лучше пересобрать свой iso образ.

На мой взгляд, раз это всего лишь Warning, то проблем быть не должно.
В любом случае проверьте ваш wim образ с помощью dism /Cleanup-Image /CheckHealth и dism /cleanup-image /RestoreHealth
Вроде бы так:
DISM /Online /Cleanup-Image /RestoreHealth /source:WIM:X:\Sources\Install.wim:1 /LimitAccess
Добрый день. Задача раскидать патчи по компам в домене. Будет ли работать следующая команда. Интересует именно скрипт/команда на wmi /cmd, т.к pshell remote не везде поднят. Спасибо.
============
wmic /node:»pc1″ /user:»admin» /privileges:enable process call create «DISM.exe /Online /Add-Package /PackagePath: c:\kb4012212.cab /Quiet /NoRestart»
============
Пока могу сказать лишь, что почему то не работает. Висит wuauclt.exe в процессах, но патч не ставится…Если не сложно укажите на ошибку.
В данном случае вы хотите установить обновления через cab файлы, а не MSU. Процесс wuauclt.exe при этом не используется. Установка обнвления напрямую в образ пойдет через DISM.
1) Вы предварительно скопировали на все компьютеры cab файл, чтобы он был везде доступен по пути c:\kb4012212.cab
2) Насколько я помню, через DISM можно было добавлять cab пакет даже по сети.
Попробуйте такую команду:
wmic /node:»pc1″ process call create «DISM.exe /Online /Add-Package /PackagePath:\\server1\updates\kb4012212.cab»
А как найти и достать из cab конретную dll?
Файл CAB также можно распаковать как архив, но там нет именно dll файлов. Возможно какая-то инфа есть в .manifes, но врядли. Наверно проще всего сделать снимок системы, установить обовление, скопировать нужную dll и откатить состояние обратно.
В команде expand и на скрине выполнения этой команды есть ошибка: _ вместо —
Должно быть так:
expand -f:* “C:\Temp\windows10.0-kb4056887-x64.msu” C:\Temp\kb4056887


