- Устранение неполадок при обновлении Windows Anytime Upgrade в Windows 7
- Windows Anytime Upgrade
- Обновление Windows Anytime Upgrade не удалось
- Обновление не было успешным. Пожалуйста, попробуйте обновить еще раз
- Fix “Windows Anytime Upgrade was not successful” Error
- Method 1 – Microsoft Fixit
- Method 2 – Uninstall Windows 7 SP1
- Method 3 – Uninstall SP1 Beta
- Error message when you install Windows Anytime Upgrade on a Windows 7-based computer: «Windows Anytime Upgrade was not successful»
- Symptoms
- Cause
- Resolution
- Fix it for me
- Let me fix it myself
- Uninstall Windows 7 Service Pack 1
- For the 32-bit version of Windows 7
- For the 64-bit version of Windows 7
- Determine whether you installed the Beta version of Windows 7 SP1
- For the 32-bit version of Windows 7
- For the 64-bit version of Windows 7
- Did this fix the problem?
- More Information
- References
- Windows Anytime Upgrade Problem.
Устранение неполадок при обновлении Windows Anytime Upgrade в Windows 7
Windows Anytime Upgrade – это метод, предусмотренный в Windows 7 и Vista, для обновления с одной версии Windows до более поздней. Хотя в процедуре WAU в Windows Vista использовался файл setup.exe , процесс в Windows 7 отличается, поскольку для его выполнения используется инфраструктура обслуживания Windows. Проблемы с драйверами, данными и миграцией приложений полностью обойдены.
Windows Anytime Upgrade
Если вы хотите обновить Vista до Windows 7, Windows Anytime Upgrade действительно облегчит вашу работу! Чтобы сделать WAU, вам нужно открыть модуль Windows AnyTime Upgrade через панель управления, ввести новый ключ и, наконец, повторно активировать Windows.
Windows 7 автоматически обновится до более поздней версии при условии, что это допустимый путь обновления.
Все файлы и компоненты, необходимые для обновления до более поздней версии Windows 7, уже установлены на компьютере при установке Windows 7 и находятся в Windows \ Winsxs & Windows \ обслуживающие \ пакеты папки.
Теперь в редких случаях ваше обновление Windows Anytime Upgrade может пройти не гладко, и вы можете получить следующее сообщение об ошибке:
Обновление Windows Anytime Upgrade не удалось
Обновление не было успешным. Пожалуйста, попробуйте обновить еще раз
Вот несколько шагов по устранению неполадок, которые вы можете попробовать:
1. Перезагрузите компьютер для завершения ожидающих операций, если таковые имеются.
2. См. Следующие файлы журнала. записи журнала могут дать вам представление о том, почему WAU не удалось.
– % userprofile% \ AppData \ Local \ Microsoft \ Windows \ Windows Anytime Upgrade \ upgrade.log
– % userprofile% \ AppData \ Local \ Microsoft \ Windows \ Windows Anytime Upgrade \ upgrade_dism.log
– % systemroot% \ Logs \ CBS \ CBS.log file
– % systemroot% \ Logs \ CBS \ CBS.persist.log file
3. Запустите Chkdsk и посмотрите, поможет ли это.
4. Запустите диагностику памяти, чтобы проверить наличие проблем с системным оборудованием. Введите Память в начале поиска и нажмите Enter, чтобы открыть Открыть Инструмент диагностики памяти . Нажмите Перезагрузить сейчас и проверьте проблемы. Ваш компьютер перезагрузится и диагностическая программа запустится. Пожалуйста, обратите внимание на любые сообщения об ошибках.
4. Запустите CheckSUR для устранения проблем с хранилищем компонентов.
5. Если ваш ключ недействителен и вам нужно изменить ключи, вам, возможно, придется открыть regedit и сначала удалить значение ProductKey в следующем разделе реестра:
HKCU \ Software \ Microsoft \ Windows \ CurrentVersion \ WindowsAnytimeUpgrade
6. Эта проблема также может возникнуть, если Windows 7 SP1 (KB976932) была загружена Центром обновления Windows, но еще не установлена. В таком случае, чтобы решить эту проблему, вы можете выполнить шаги, упомянутые в KB2660811.
Fix “Windows Anytime Upgrade was not successful” Error
There’s a very specific reason for this problem
One of my clients ran into a problem when they were trying to upgrade from Windows 7 Home Premium to Professional using the Windows Anytime Upgrade tool. Instead of it working like normal, they ended up getting the following message:

The only sorry solution it gives you is to try the upgrade again, which doesn’t work. Clicking on the Go online to resolve this issue link doesn’t seem to take you anywhere helpful either. After doing some research, I figured out what the problem was and was finally able to get the client’s PC upgraded. Basically, it stemmed from the fact that Windows Update had downloaded Service Pack 1 onto the computer, but it was not installed by the client. Because of that, Windows Anytime Upgrade thinks that this is some sort of partial installation and blocks the upgrade.
In this article, I’ll walk you through the possible solutions. If you are still having trouble or get this error, post a comment here and I’ll try to help.
Method 1 – Microsoft Fixit
You may be able to spare yourself from having to anything by downloading and running the Microsoft Fixit solution for this particular problem. You can download it here directly from Microsoft:
If that doesn’t fix the issue, then keep reading.
Method 2 – Uninstall Windows 7 SP1
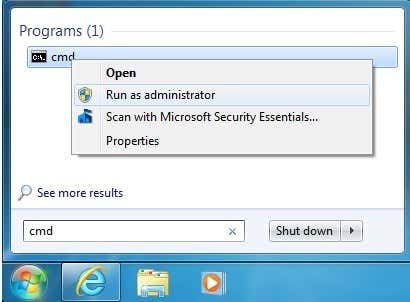
The next thing you can try to do is uninstall SP1 and then try to run the Anytime Upgrade. To do this, you need to run the command prompt as an Administrator. Click on Start, type in CMD and then right-click on cmd.exe and choose Run as Administrator.
At the command prompt, type in the following command:
That command is for Windows 7 32-bit. If you are running Windows 7 64-bit, then you need to type in this command:
Go ahead and exit the command prompt and then restart the computer. Now try to perform a Windows Anytime Upgrade and see what happens.
Method 3 – Uninstall SP1 Beta
If you installed the beta version of Windows 7 SP 1, then you have to uninstall that. Again, it’s two different commands, one for 32-bit and one for 64-bit. You just have to open an elevated command prompt like I showed in Method 2. Then run the following command for 32-bit:
And run this one for 64-bit:
If you’re still having issues with Windows Anytime Upgrade failing or giving error message, post a comment here and I’ll try to help. Enjoy!
Founder of Help Desk Geek and managing editor. He began blogging in 2007 and quit his job in 2010 to blog full-time. He has over 15 years of industry experience in IT and holds several technical certifications. Read Aseem’s Full Bio
Error message when you install Windows Anytime Upgrade on a Windows 7-based computer: «Windows Anytime Upgrade was not successful»
Symptoms
When you install Windows Anytime Upgrade on a Windows 7-based computer, you may receive the following error message:
Windows Anytime Upgrade was not successful
The upgrade was not successful. Please try the upgrade again.
Additionally, you may see the following errors in the Windows Anytime Upgrade Upgrade.log file:
Date> Time>, Error WAU DoTransmogrify failed due to error 0x800f081f.
Date> Time>, Error WAU UpgradeSKU failed. Exiting.
Date> Time>, Error WAU Windows Anytime Upgrade ‚ was not successful.
Cause
This issue can occur if Windows 7 Service Pack 1 (SP1) was downloaded by Windows Update but has not yet been installed. For more information about this service pack, click the following article number to view the article in the Microsoft Knowledge Base:
976932 Information about Service Pack 1 for Windows 7 and for Windows Server 2008 R2
Resolution
To have us fix this problem for you, go to the «Fix it for me» section. If you prefer to fix this problem yourself, go to the «Let me fix it myself» section.
Fix it for me
To fix this problem automatically, click the Fix it button or link. Then click Run in the File Download dialog box, and follow the steps in the Fix it wizard.
This wizard may be in English only. However, the automatic fix also works for other language versions of Windows.
If you are not on the computer that has the problem, you should save the Fix it solution to a flash drive or a CD and then run it on the computer that has the problem.
Let me fix it myself
Uninstall Windows 7 Service Pack 1
To resolve this issue, uninstall Service Pack 1 by using the DISM command. To do this, follow these steps for your version of Windows 7.
For the 32-bit version of Windows 7
Click Start, and then type cmd in the Search box.
Right-click cmd.exe, and then click Run as administrator.
Type the following command, and then press Enter:
dism.exe /online /remove-package /packagename:Package_for_KB976932
After the removal is complete, type exit, and then press Enter.
Restart the computer.
For the 64-bit version of Windows 7
Click Start, and then type cmd in the Search box.
Right-click cmd.exe, and then click Run as administrator.
Type the following command, and then press Enter:
dism.exe /online /remove-package /packagename:Package_for_KB976932
After the removal is complete, type exit, and then press Enter.
Restart the computer.
Determine whether you installed the Beta version of Windows 7 SP1
If you installed the Beta version of Windows 7 SP1, you cannot upgrade immediately by using Windows Anytime Upgrade. You have to uninstall the Beta version and then restart Windows Anytime Upgrade. To Uninstall the Beta version, follow these steps for your version of Windows 7.
Note If you uninstalled the Beta version of Windows 7 SP1 and you continue to receive the error, you may have remnants of the Beta version on your PC. These steps will also clean any remnants of the Beta version from your PC.
For the 32-bit version of Windows 7
Click Start, and then type cmd in the Search box
Right-click cmd.exe, and then click Run as administrator.
Type the following command, and then press Enter:
dism.exe /online /remove-package /packagename:Package_for_KB976932
After the removal is complete, type exit, and then press Enter.
Restart the computer.
For the 64-bit version of Windows 7
Click Start, and then type cmd in the Search box.
Right-click cmd.exe, and then click Run as administrator.
Type the following command, and then press Enter:
dism.exe /online /remove-package /packagename:Package_for_KB976932
After the removal is complete, type exit, and then press Enter.
Restart the computer.
Did this fix the problem?
Check whether the problem is fixed. If the problem is fixed, you are finished with this section. If the problem is not fixed, you can contact support.
We would appreciate your feedback. To provide feedback or to report any issues with this solution, leave a comment on the «Fix it for me» blog, or send us an email message.
More Information
You may see error code 0x800f081 in the Windows Anytime Upgrade log file. This error code indicates that Windows Update has downloaded the Windows 7 SP1 update but that the update has not yet been installed. You can review this log to see whether the error occurred. The Windows Upgrade.log is in the following location:
%userprofile%\AppData\Local\Microsoft\Windows\Windows Anytime Upgrade\update.log
To review this log file to see whether the error has occurred, follow these steps:
Click Start, and then click Computer.
Copy the following text, click Start, and then paste the following text into the Search box:
%userprofile%\AppData\Local\Microsoft\Windows\Windows Anytime Upgrade
Click the Windows Anytime Upgrade folder in the search results at the top.
Double-click the Update.log file in this folder.
In Notepad, click Find on the Edit menu.
Copy and paste the following text into the Find what text box, and then click Find.
If the error occurred, you see entries in the log file that resemble the following:
2011-11-25 15:59:19, Error WAU DoTransmogrify failed due to error 0x800f081f.
2011-11-25 15:59:19, Error WAU UpgradeSKU failed. Exiting.
2011-11-25 15:59:19, Error WAU Windows Anytime Upgrade ‚ was not successful.
Note The date and time at the start of each line in the log file will correspond to when the log file was updated with the information.
To resolve this issue, follow the steps in the «Resolution» section.
References
For more information, click the following article number to view the article in the Microsoft Knowledge Base:
2632965 Windows Anytime Upgrade Error «The upgrade was not successful. Please try the upgrade again.» on a Windows 7 computer with Multilingual User Interface (MUI)
Windows Anytime Upgrade Problem.
If Anytime Upgrade fails, Windows Anytime Upgrade Fail:
Shutdown and start your computer again.
Make sure the latest Windows Updates have been installed.
Download the hotfix containing a tool called CheckSUR, this tool will look into the servicing and package folders and fix any corrupted data the tool is listed under kb947821 it can be found at the following link http://support.microsoft.com/?kbid=947821
If Anytime Upgrade still fails, disable User Account Control:
1. Go to User Accounts in Control Panel
2. Change User Account Control Settings
3. Pull the Slider down to lowest level possible
4. Reboot the PC
5. Go through the «Anytime Upgrade» as normal
Try the following:
1. Disable any security software before attempting to upgrade
2. Make sure your computer is updated (devices and applications)
3. Disconnect any external devices before installing.
4. Check your hard disk for any errors:
Type: CMD, from the results, right click CMD
Click ‘Run as Administrator’
At the Command Prompt, type: chkdsk /r /f
When you restart your system, your computer will be scanned for errors and attempts will be made to correct them.
1. Click Start, type msconfig in the Start Search box, and then press ENTER.
User Account Control permission
If you are prompted for an administrator password or for a confirmation, type the password, or click Continue.
2. On the General tab, click Selective Startup.
3. Under Selective Startup, click to clear the Load Startup Items check box.
4. Click the Services tab, click to select the Hide All Microsoft Services check box, and then click Disable All.
6. When you are prompted, click Restart.
7. After the computer starts, check whether the problem is resolved.
Also run the Windows 7 Upgrade Advisor:
Who should I contact if I’m having trouble installing and / or activating my Product Key Card?
Please note that Anytime Upgrade does not support OEM, MSDN-Academic, Volume License (stu faculty licenses). If you are in position of any of these media, you will have to back up and do a custom clean install. If you wish to do this, please backup your Windows 7 Home Premium installation first. Certain licenses for Windows licenses distributed to students at the tertiary level are not perpetual, meaning you can’t continue using the software after completing a course or graduating.
http://msdn.microsoft.com/en-gb/academic/bb250622.aspx — MSDN AA User Agreement
Was this reply helpful?
Sorry this didn’t help.
Great! Thanks for your feedback.
How satisfied are you with this reply?
Thanks for your feedback, it helps us improve the site.
How satisfied are you with this reply?
Thanks for your feedback.
Windows 7 Anytime Upgrade fails (Draft, do not post)
1) Restart the computer to complete pending operations, if any.
2) View the following log files. The log entries may give you a clue as to why the Anytime Upgrade failed.
%userprofile%\AppData\Local\Microsoft\Windows\Windows Anytime Upgrade\upgrade.log
%userprofile%\AppData\Local\Microsoft\Windows\Windows Anytime Upgrade\upgrade_dism.log
3) Run Chkdsk and see if it helps.
4. Run Memory Diagnostics to check for issues with the system hardware. Type Memory in start search and hit Enter to open Open Memory Diagnostics Tool. Click Restart Now and Check Problems. Your computer will restart & the diagnostic program will start. Please note any reported errors.
5) Also run the System Readyness tool — Method #2 (Download and run the tool: «Checksur.exe»)
http://support.microsoft.com/kb/947821
(System resources, such as file data, registry data, and even in-memory data, can develop inconsistencies during the lifetime of the operating system. The System Update Readiness Tool tries to resolve these inconsistencies.)
6) If your key is invalid and you need to change the keys you may have to open regedit and deleting the ProductKey value in the following registry key first:
7) If Anytime Upgrade still fails, disable User Account Control (credit Andre Da Costa)
1. Go to User Accounts in Control Panel
2. Change User Account Control Settings
3. Pull the Slider down to lowest level possible
4. Reboot the PC
5. Go through the «Anytime Upgrade» as normal
—————- Anytime Upgrade may not work for all version of Windows ———————
Note: Retail «Full» or «Upgrade» product keys will work when using the Anytime Upgrade feature.
The Anytime Upgrade «May» not work (check with the computer manufacture’s support team) for users who have OEM and or System Builders product Keys, this also applies to VL (Volume License), MSDNAA or Academic product Keys it will not work with Anytime Upgrade. KMS users should consult with your administrator prior to attempting to perform an Anytime Upgrade.


