- How To Upgrade Windows 7 to Windows 10 for Free (Even in 2021)
- Upgrade from Windows 7 to Windows 10
- In-place Upgrade
- Video
- How to Upgrade to Windows 10 without internet
- Upgrade a PC From Windows 7 to Windows 10 by USB disk
- Install, upgrade, or migrate to Windows Server
- Clean install
- In-place upgrade
- Cluster OS rolling upgrade
- Migration
- License conversion
- Windows Update: FAQ
How To Upgrade Windows 7 to Windows 10 for Free (Even in 2021)
Microsoft had already ended its Windows 7 free upgrade offer in 2016. But technically it is still working in 2021. Recently I have tested it personally and it is still working. I had discovered it when I performed upgrade from Windows 7 to Windows 10 on my laptop for Free using my Win 7 key. Though I can not guarantee that it will work for everyone, but there is no harm to give it a try. If you have not yet upgraded, then still you have the chance to get a Free upgrade.
If you have lost the key? Here is a guide to retrieve missing product key in Windows operating system.
Upgrade from Windows 7 to Windows 10
Users can either do an in-place upgrade on same computer or a new clean install on a new PC. In both methods simply use the Windows 7 Serial key when it ask and it will work perfectly. Make sure you have enough free disk space before upgrading. Check the minimum free disk space required for Windows 10 upgrade. Before starting up the upgrade process, I suggest you to take a backup of your important data. Find here Best backup Software.
In-place Upgrade
In place upgrade help you to upgrade your existing Windows7 or Windows8 system to the latest windows10 by keeping all your programs and data migrated to the latest version. But still we recommend you to take the backup of your data before starting the procedure.
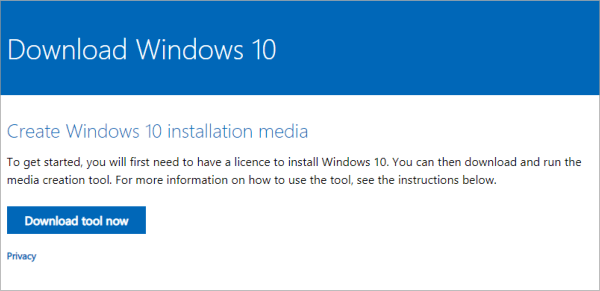
Step 1: Download & run media creation tool.
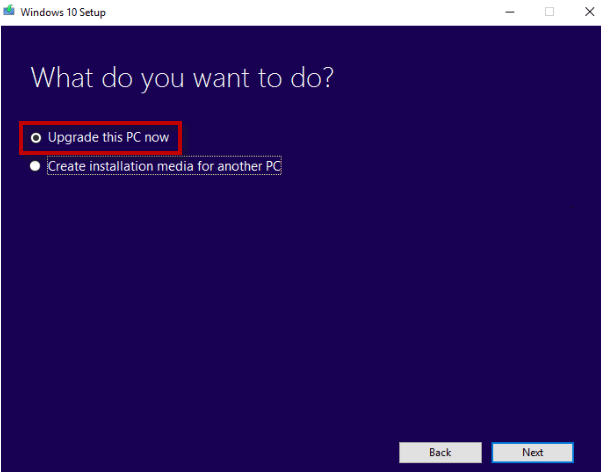
Step 2: Select the option ‘upgrade this PC‘.
When you run the media creation tool it will give you two options. Select the first one “Upgrade this PC now”.
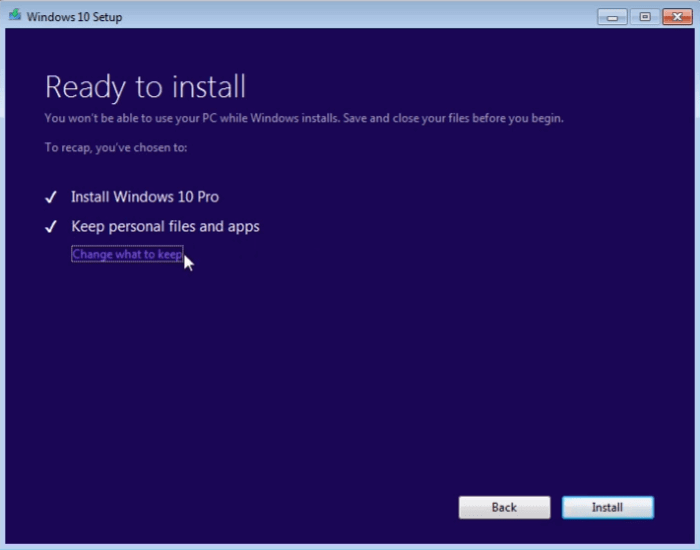
Step 3: Wait while it download the required files and then click ‘Install’ button.
It may take some time in downloading Windows 10 files from the internet. So it depends on your internet speed that how much time will it take. If you are using a pirated or cracked version then it may ask you to enter the product key. Otherwise it will not ask for any product / license key and upgrade process will go smoothly. After completion of download, click on the ‘Install‘ button.
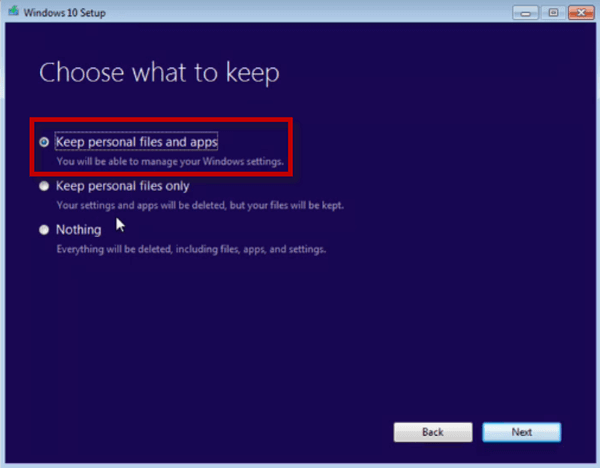
Step 4: Select ‘Keep the personal files and apps’ option.
After clicking on the install button, it will ask for what to keep. You can choose data only, data & apps or nothing. By default it will select the ‘data & apps‘ option.
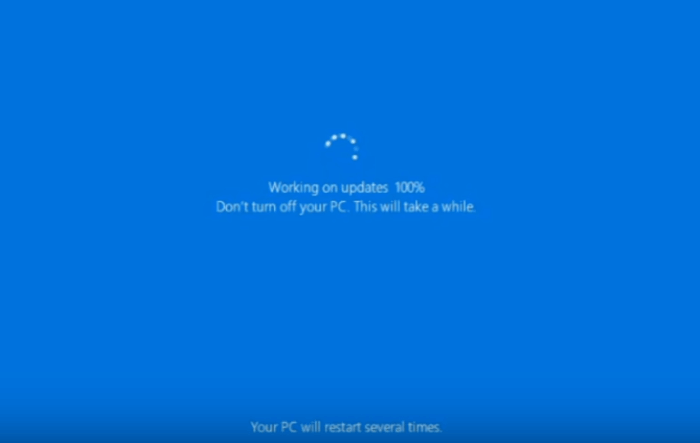
Step 5: Wait while upgrade process finishes.
Click on the next button and it will start the upgrade process and may restart the system several times.
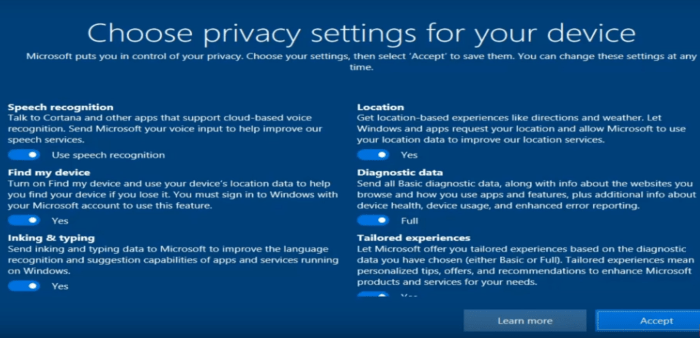
Step 6: Congrats!! It done. Just set the privacy settings on first run.
If everything goes smooth you are welcome by Welcome screen of Windows 10. It will ask you to set the privacy settings first. Set the privacy settings and you are ready to go.
Video
How to Upgrade to Windows 10 without internet
If you have no internet connectivity on a PC then you can download the ISO file from another PC. By this method you don’t need the Internet connection on that PC to install a New Windows.
Step 1: Download the ISO file and create a bootable USB.
Follow the below steps to create a bootable Windows 10 disk.
1. Download the Windows media creation tool from the Microsoft website.
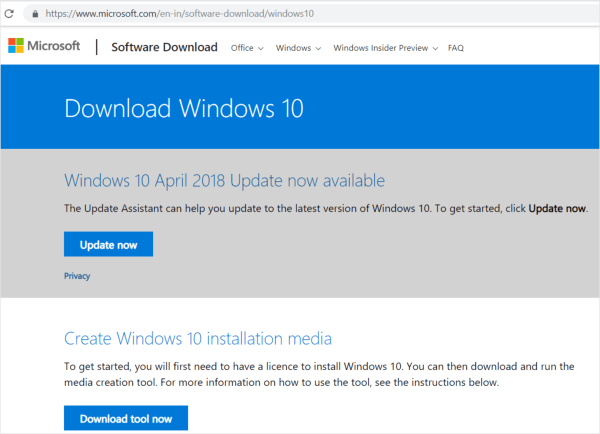
2. Download and Run this file. It is approx. 18 MB in size.
3. It will ask for two options – upgrade this PC or download for another PC. Choose second option.
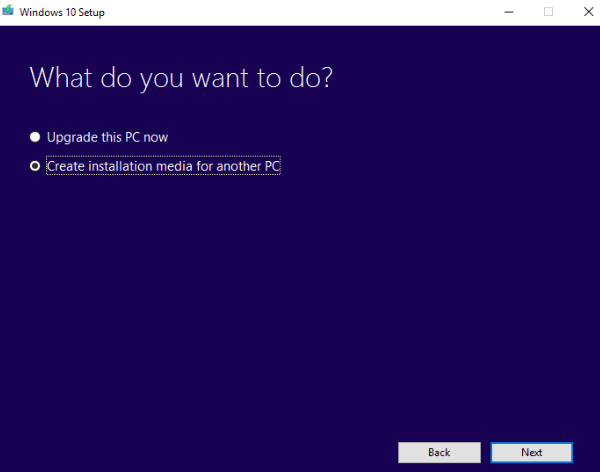
4. Choose “Create installation media for another PC”. It will ask you to make a bootable USB or download an ISO image.
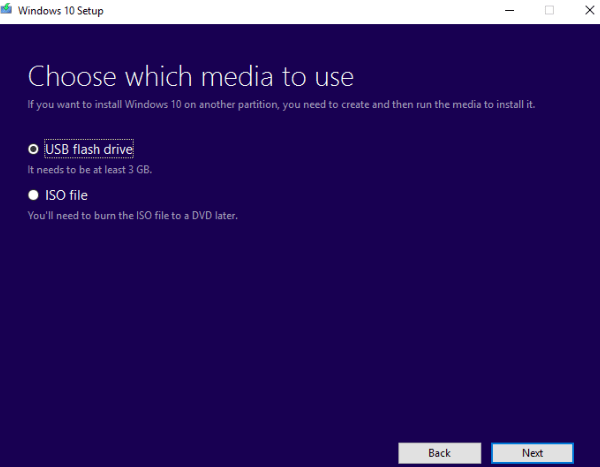
5. We prefer to use the bootable USB. It needs at least 8 GB free space in the USB Stick. After the completion of this process you have a Valid and legal official windows 10 available in your USB drive. Now you can install the Windows 10 on another PC or on a different partition without the requirement of Internet.
Upgrade a PC From Windows 7 to Windows 10 by USB disk
1. Insert bootable Windows 10 USB disk and set to boot the PC with USB by making USB as the first boot device in the BIOS Setting.
2. Windows 10 setup will initialize. Click on the ‘Install Now’ Button. After that it will ask for the Activation Key. You can either enter the Activation key here. Or simply click on the I don’t have a product key. But you need to enter the key later after installation. You can user your existing Windows 7 Key.
3. On the next step it will ask for the Upgrade or for Custom Install. Select the Upgrade if you are going to upgrade the existing Windows 7 or For new Installation you can choose the custom installation. Choosing. With custom (Advanced) installation you will loose all your data and apps and it will be a fresh new installation.
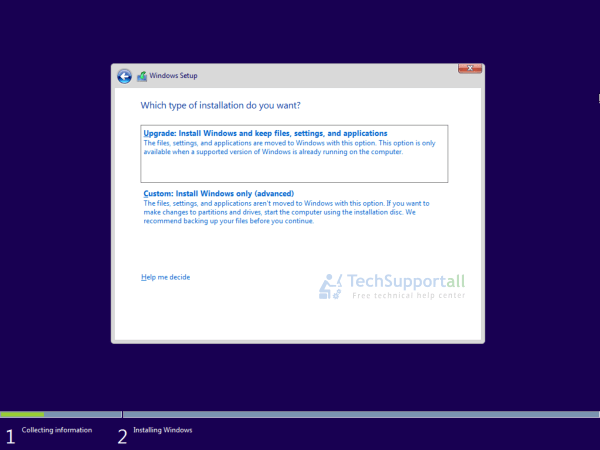
When it asks for a Serial number or Product Key. Use your Windows 7 Key and it will take without any hassle. If this does not work for you then I will recommend you to buy a valid Windows 10 product key from the Microsoft.
Buying Windows 10 is a onetime purchase process and you will get the unlimited updates / upgrades. Microsoft announces Windows 10 as the last version and provides it as a service. There will not be next version like Windows 11 etc, so now is the better time to get a license of Windows 10.
Is windows 7 serial key still works and is it really free to upgrade to Windows 10?
On the launch of the Windows 10 in 2015 Microsoft had given 1 year time to Windows 7 users to upgrade to Windows 10 for Free. Later on, they extended this time and then closed the offer. But people are still asking that is there any way to get free upgrade offer? And I can simply answer ‘Yes‘. You can get a free copy of Windows 10 if you already own a Windows 7 key.
It is asking for the product key, and my old Win 7 key is not working. What to do?
Some times it happened that if you have a genuine Windows 7 key and still Windows installer can throw message like “This product key didn’t work“. In this case you can try to re-activate Windows 7 first. And then start upgrading again, now installer will skip that step and you will be able to start the upgrade process.
Can I upgrade to Win 10 with USB in offline mode, without installing from the internet?
Yes, you can just choose “create installation media for another PC”. It will copy the files to Pen drive. Then you may run the installer from the USB.
Do I need to take the backup? Is there any option to revert to Win 7?
Taking backup of your important data is a good practice, you should do this on regular basis. There is also an option to rollback to windows 7. But we recommend you to adapt the new system instead of rolling back. There are lots of Windows 10 Tutorials available online. Always take the backup of important files before starting upgrade process for a safer side.
Can I upgrade from Win 8 to Win 10?
Yes, upgrading from Windows 8, Windows 8.1 process is almost same as of Windows 7. You can follow the above steps.
Can I upgrade from Win XP to Win 10?
Before upgrading from Windows XP to Windows 10 you should consider two things (1) First you can’t migrate all your data, programs or settings. You need to take the backup of data first. Actually it is like a New installation. (2) Secondly, Your old hardware may be not compatible or insufficient for the new Windows 10. So we advise you to upgrade Windows 10 along-with the hardware.
Can I migrate my HDD to SSD and then upgrade it to Windows 10?
Yes, you can do it easily. You just need to migrate your hard disk drive to solid state drive. After migrated to SSD, follow the above Windows 10 in-place upgrade process and rock the upgraded Windows 10. You can also move a upgraded Windows 10 to the SSD. See how to migrate Windows from HDD to SSD without loosing your data.
Why will I switch to Windows 10? I am okay with the Windows 7?
Users who still have not switched to the newer Windows 10. I advised them to switch as early as possible as Microsoft has already stop the support for Windows 7.
Can I still use Windows 7 after 2020?
You can use it as long as your antivirus works with Windows 7. Microsoft will never release the security updates for Win7. So you have to rely on your security software.
Can I upgrade without loosing my data files and programs?
In place upgrade will do this magic. It will not delete any data file but regarding software it is not guaranteed as some old software which are not updated to support the Windows 10 may not migrate properly. Otherwise all of your software will automatically be transferred to the Windows 10. Always check software compatibility before upgrading.
Install, upgrade, or migrate to Windows Server
Applies to: Windows Server 2019, Windows Server 2016, Windows Server 2012 R2, Windows Server 2012, Windows Server 2008 R2, Windows Server 2008
Extended support for Windows Server 2008 R2 and Windows Server 2008 ends in January 2020. Learn about your upgrade options. To download Windows Server 2019, see Windows Server Evaluations.
Is it time to move to a newer version of Windows Server? Depending on what you’re running now, you have lots of options to get there.
Clean install
The simplest way to install Windows Server is to perform a clean installation, where you install on a blank server or overwrite an existing operating system. That is the simplest way, but you will need to back up your data first and plan to reinstall your applications. There are a few things to be aware of, such as system requirements, so be sure to check the details for Windows Server 2019, Windows Server 2016, Windows Server 2012 R2, and Windows Server 2012.
In-place upgrade
If you want to keep the same hardware and all the server roles you have set up without flattening the server, you’ll want to do an In-place Upgrade, by which you go from an older operating system to a newer one, keeping your settings, server roles, and data intact. For example, if your server is running Windows Server 2012 R2, you can upgrade it to Windows Server 2016 or Windows Server 2019. However, not every older operating system has a pathway to every newer one.
For step-by-step guidance on upgrading, review the Windows Server upgrade content.
Cluster OS rolling upgrade
Cluster OS Rolling Upgrade enables an administrator to upgrade the operating system of the cluster nodes from Windows Server 2012 R2 and Windows Server 2016 without stopping the Hyper-V or the Scale-Out File Server workloads. This feature allows you to avoid downtime which could impact Service Level Agreements. This new feature is discussed in more detail at Cluster operating system rolling upgrade.
Migration
Windows Server migration is when you move one role or feature at a time from a source computer that is running Windows Server to another destination computer that is running Windows Server, either the same or a newer version. For these purposes, migration is defined as moving one role or feature and its data to a different computer, not upgrading the feature on the same computer.
License conversion
In some operating system releases, you can convert a particular edition of the release to another edition of the same release in a single step with a simple command and the appropriate license key. This is called license conversion. For example, if your server is running Windows Server 2016 Standard, you can convert it to Windows Server 2016 Datacenter. Keep in mind that while you can move up from Server 2016 Standard to Server 2016 Datacenter, you are unable to reverse the process and go from Datacenter to Standard. In some releases of Windows Server, you can also freely convert among OEM, volume-licensed, and retail versions with the same command and the appropriate key.
Windows Update: FAQ
Note: If you’re looking for Microsoft Office update info, see Install Office updates.
In Windows 10, you decide when and how to get the latest updates to keep your device running smoothly and securely. When you update, you’ll get the latest fixes and security improvements, helping your device run efficiently and stay protected. In most cases, restarting your device completes the update. Make sure your device is plugged in when you know updates will be installed.
If other questions come up when you update Windows 10, here are some other areas that might interest you:
When you only want info about updating Windows 10, you’ll find answers to many of your questions here:
When the Windows 10 May 2020 Update is ready for your device, it will be available to download and install from the Windows Update page in Settings. Choose a time that works best for you to download the update. You’ll then need to restart your device and complete the installation. After that, your device will be running Windows 10, version 2004.
To manually check for the latest recommended updates, select Start > Settings > Update & Security > Windows Update > Windows Update .
To get help updating to the latest version of Windows 10, go to the Microsoft software download page and download the Update Assistant.
Some updates may not be available on all devices at the same time—we’re making sure updates are ready and compatible.
To stay up to date, select Start > Settings > Update & Security > Windows Update > Windows Update , and then select Check for updates.
If a feature update is available for your device, it will appear separately on the Windows Update page. To install it, select Download and install now.
Here are a few things you can try if you’re having trouble installing updates:
Make sure that your device is connected to the internet. Downloading updates requires an internet connection.
If you’re connected the internet, try to install the updates manually. Select Start > Settings > Update & Security > Windows Update > Windows Update , and then view available updates.
Check for updates
Run the Windows Update Troubleshooter. Select Start > Settings > Update & Security > Troubleshoot . Under Get up and running, select Windows Update.
The time required to download updates primarily depends on internet connection speed, network settings, and update size. Make sure your device is plugged in and connected to the internet to download updates faster.
You can’t stop updates entirely—because they help keep your device safe and secure, updates will eventually need to be installed and downloaded, regardless of your update settings. Here’s how to temporarily pause updates from being downloaded and installed. Note that after the pause limit is reached, you’ll need to install the latest updates before you can pause updates again.
In the Windows 10 November 2019 Update (version 1909) or later, or in Windows version 1809 for Pro or Enterprise, select Start > Settings > Update & Security > Windows Update . Then choose one of the following options:
Select Pause updates for 7 days.
Select Advanced options. Then, in the Pause updates section, select the drop-down menu and specify a date for updates to resume.
To finish installing an update, your device will need to restart. Windows will try to restart your device when you’re not using it. If it can’t, you’ll be asked to schedule the restart for a more convenient time. Or, you can schedule anytime by following these steps:
Select Start > Settings > Update & Security > Windows Update > Windows Update .
Select Schedule the restart and choose a time that’s convenient for you.
You can set active hours to make sure automatic restarts for updates only happen when you’re not using your device. Learn about active hours for Windows 10.
Try deleting files you don’t need, uninstalling apps you don’t use, or moving files to another drive like an external USB drive or OneDrive. For more tips on freeing up disk space, see Free up drive space in Windows 10.
We recommend keeping devices like laptops and tablets plugged in when you’re not using them. This way, if updates are installed outside active hours, your device will have enough power to complete the installation. Windows updates don’t consume more battery than other typical system processes.
An update history is available so you can see which updates were installed, and when. You can also use this list to remove specific updates, although we don’t recommend this unless it’s necessary.
Select Start > Settings > Update & Security > Windows Update > Windows Update > View update history .
For more info about what’s included in updates for Windows 10, see Windows 10 update history.
We don’t recommend that you remove any installed updates. However, if you must remove an update, you can do so in update history.
Select Start > Settings > Update & Security > Windows Update > View update history > Uninstall updates.
Select the update you want to remove, then select Uninstall.
Feature updates are typically released twice per year and include new functionality and capabilities as well as potential fixes and security updates. Quality updates are more frequent and mainly include small fixes and security updates. Windows is designed to deliver both kinds of updates to devices through Windows Update.
To double check that your device is up to date, open Settings > Update & Security > Windows Update and see your update status and available updates.
To find which version of Windows you’re running, see Which version of Windows operating system am I running?
Reserved storage is not automatically turned on by Windows in any update scenarios. It is only turned on for new devices with the Windows 10 May 2019 Update (version 1903) or later preinstalled, or devices on which a clean install was performed.
Note: If you’re looking for Microsoft Office update info, see Install Office updates.
The best way to keep Windows 8.1 up to date is to turn on automatic updates. With automatic updates, you don’t have to search for updates online or worry about missing critical fixes or device drivers for your PC. Instead, Windows Update automatically installs important updates as they become available.
To turn on automatic updates:
Open Windows Update by swiping in from the right edge of the screen (or, if you’re using a mouse, pointing to the lower-right corner of the screen and moving the mouse pointer up), select Settings > Change PC settings > Update and recovery > Windows Update. If you want to check for updates manually, select Check now.
Select Choose how updates get installed, and then, under Important updates, select Install updates automatically (recommended).
Under Recommended updates, select Give me recommended updates the same way I receive important updates.
Under Microsoft Update, select Give me updates for other Microsoft products when I update Windows, and then select Apply.
Click the questions below to see answers about how Windows Update keeps your device up to date.
Note: If your PC is connected to a network where updates are managed by Group Policy, you might not be able to change settings related to Windows Update. For more info, contact your organization’s technical support.
Open Windows Update by swiping in from the right edge of the screen (or, if you’re using a mouse, pointing to the lower-right corner of the screen and moving the mouse pointer up), select Settings > Change PC settings > Update and recovery > Windows Update. To check for updates manually, select Check now.
An update history is available so you can see which updates were installed, and when. You can also use this list to remove specific updates, although we don’t recommend this unless it’s necessary.
To see your PC’s update history, open Windows Update by swiping in from the right edge of the screen (or, if you’re using a mouse, pointing to the lower-right corner of the screen and moving the mouse pointer up), select Settings > Change PC settings > Update and recovery > Windows Update > View your update history.
We don’t recommend that you remove any installed updates. However, if you must remove an update, you can do so in update history.
Open Windows Update by swiping in from the right edge of the screen (or, if you’re using a mouse, pointing to the lower-right corner of the screen and moving the mouse pointer up), select Settings > Change PC settings > Update and recovery > Windows Update > View your update history.
Select the update you want to remove, then select Uninstall.
Here are a few things to try if you’re having problems installing updates:
Make sure that your PC is connected to the internet. Some updates can’t be installed if you’re using a metered internet connection.
If you’re connected the internet and updates aren’t installed automatically, wait a few minutes and then try to install the updates manually.
See the Fix Windows Update errors guided walkthrough to try to fix the problem.
Support for Windows 7 ended on January 14, 2020
We recommend you move to a Windows 10 PC to continue to receive security updates from Microsoft.
Click the questions below to see answers about how Windows Update keeps your device up to date.


