- How to connect to a USB device (UWP app)
- Before you start.
- Flowchart: Finding the device
- Key concepts
- Get the Advanced Query Syntax (AQS) string for the device
- Finding the device—The basic way
- Find the device—using DeviceWatcher
- Open the device
- Fixed: USB Flash Drive not Showing Up in Windows
- USB Drive Not Showing Up in Windows
- Preliminary Checks on Your USB Drive
- Fixes for USB Drive Not Showing Up in Windows 10 File Explorer Only
- Method 1. Update USB Drive Driver
- Method 2. Reinstall Disk Driver for USB Drive
- Method 3. Create New Partitions
- Method 4. Assign a New Drive Letter to the USB
- Method 4. FixВ File System Errors
- Fixes for USB Not Showing Up in Windows File Explorer and Disk Management
- Method 1. Fix Driver Issues
- MethodВ 2. Change USB Connection
- MethodВ 3. Fix Physical Corruptions
- The Bottom Line
How to connect to a USB device (UWP app)
Summary
- How to use the DeviceWatcher object to detect devices
- How to open the device for communication
- How to close the device when you are finished using it
Important APIs
When you write a UWP app that interacts with a USB device, the app can send control commands, get device information, and read and write data to/from bulk and interrupt endpoints. Before you can do all that, you must find the device and establish connection.
Before you start.
- This is the first topic in a series. Before you start this tutorial, you must have created a basic Visual Studio project that you can extend in this tutorial. Read Getting started with UWP apps for more info.
- Code examples are based on the CustomUsbDeviceAccess sample. You can download the complete sample from this code gallery page.
- The USB device used in tutorial is the SuperMUTT device.
- In order to use the Windows.Devices.Usb namespace to write a Windows app that interacts with a USB device, the device must have the Winusb.sys driver loaded as its function driver. Winusb.sys is provided by Microsoft and is included with Windows in the \Windows\System32\drivers folder.
Flowchart: Finding the device
To connect to a USB device, you must first find the device based on various discovery patterns and then connect to it:
- Connect to any USB device with a specific device interface GUID.
- Connect to a USB device with a particular Vendor ID and Product ID and that has a specific device interface GUID.
- Connect to a USB device with a particular Vendor ID and Product ID without knowing the device interface GUID.
- Connect to a USB device which has known device class.

Key concepts
What is a device interface GUID?
A kernel-model driver, during its initialization, register and exposes a GUID called the device interface GUID. Typically, the app uses the exposed GUID to find the associated driver and its device, and then open a handle to the device. The retrieved handle is used for subsequent read and write operations.
However, in the case of Winusb.sys, instead of the driver exposing the device interface GUID, it can be provided in one of two ways:
- In the device’s MS OS descriptors. The device manufacturer sets DeviceInterfaceGUID as a custom property in the extended properties descriptor in the device. For more details, see the «Extended Properties Descriptors» document in Microsoft OS Descriptors.
- If you installed Winusb.sys manually through a custom INF, the INF registered a GUID in the INF. See WinUSB (Winusb.sys) Installation.
If a device interface GUID is found for the device, your UWP app can find all devices that match that device interface GUID.
How is USB device identification shown in Windows?
Every USB device must have two pieces of information: vendor ID and product ID.
USB-IF assigns those identifiers and the device manufacturer must expose them in the device. So how can you obtain that information?
Even when the device doesn’t have a device driver loaded, that is, Windows detects it as an «Unknown Device», you can still view the identifiers in the Device Manager in the Hardware Id property value. That value is a combination of those two identifiers. For example, for the SuperMUTT device, the Hardware Id is «USB\VID_045E&PID_F001»; vendor id is «0x045E» and product id is «0xF001».
If there is an INF for the device, obtain that string from the Models section.
You can inspect various registry settings. The easiest way is to see the
HKEY_LOCAL_MACHINE\SYSTEM\ControlSet001\Enum\USB\
Hardware ID is used by the app manifest to identify the device.
Your UWP app can find all devices that match a specific vendor and product ids. You can narrow the search results by specifying the device interface GUID.
What are USB device classes?
Most USB devices conform to device class specifications approved by USB-IF. By using those specifications, devices of similar nature can exhibit their functionality in a standard way. The biggest advantage of this approach is that the device can use a Microsoft provided in-box class driver or the generic Winusb.sys driver.
Some devices might not follow a USB-IF specification. Instead they expose vendor-defined functionality. For such devices, either the vendor must provide the device driver or Winusb.sys can be used.
Whether a device is vendor-defined or conforms to a device class, it must describe this device class related information:
- Class code: Indicates the device class to which the device belongs.
- Subclass code: Within the device class, indicates the subclass of device.
- Protocol code: The protocol that the device uses.
For example, the SuperMUTT device is a vendor-defined device and that information is indicated by class code is FF. If your device shows class code as FEh, subclass code as 02h, and protocol code 00h, you can conclude that the device is a class-compliant IrDA bridge device. Your UWP app can communicate with devices that belong to these device classes:
- ActiveSync
- CdcControl
- DeviceFirmwareUpdate
- IrDA
- Measurement
- PalmSync
- PersonalHealthcare
- Physical
- VendorSpecific
Your UWP app can find all devices that match a specific set of class, subclass, and protocol codes.
Get the Advanced Query Syntax (AQS) string for the device
Generate an advanced query string (AQS) that contains identification information about the device that you want to detect. You can generate the string either by specifying the vendor/product IDs, device interface GUID, or by the device class.
If you want to provide the vendor ID/product ID or the device interface GUID, call any overload of GetDeviceSelector.
In the example of the SuperMUTT device, GetDeviceSelector retrieves an AQS string similar to this string:
«System.Devices.InterfaceClassGuid:=»
NoteВ В Notice that the device interface GUID that appears in the string is not the one you specified. That GUID is the actual device interface GUID registered by Winusb.sys for UWP apps.
If you know the device class of the device or its class, subclass, and protocol codes, call GetDeviceClassSelector to generate the AQS string.
Create a UsbDeviceClass object by specifying ClassCode, SubclassCode, and ProtocolCode property values. Alternatively, if you know the device class of the device, you can call the constructor by specifying a particular UsbDeviceClasses property.
Finding the device—The basic way
This is the simplest way to find a USB device. For details, see Quickstart: enumerating commonly used devices.
- Pass the retrieved AQS string to FindAllAsync. The call retrieves a DeviceInformationCollection object.
- Loop through the collection. Each iteration gets a DeviceInformation object.
- Get the DeviceInformation.Id property value. The string value is the device instance path. For example, «\\\\?\\USB#VID_045E&PID_078F#6&1b8ff026&0&5#
«. - Call FromIdAsync by passing the device instance string and get the UsbDevice object. You can then use the UsbDevice object to perform other operations, such as sending a control transfer. When the app has finished using the UsbDevice object, the app must release it by calling Close. NoteВ В When UWP app suspends, the device is closed automatically. To avoid using a stale handle for future operations, the app must released the UsbDevice reference.
Find the device—using DeviceWatcher
Alternatively, you can enumerate devices dynamically. Then, your app can receive notification if devices are added or removed, or if device properties change. For more information, see How to get notifications if devices are added, removed, or changed.
A DeviceWatcher object enables an app to dynamically detect devices as they get added and removed from the system.
Create a DeviceWatcher object to detect when the device is added to or removed from the system. You must create the object by calling CreateWatcher and specifying the AQS string.
Implement and register handlers for Added and Removed events on the DeviceWatcher object. Those event handlers are invoked when devices (with the same identification information) are added or removed from the system.
The app must start the DeviceWatcher object by calling Start so that it can start detecting devices as they are added or removed from the system. Conversely, the app must stop the DeviceWatcher by calling Stop, when it’s no longer necessary to detect devices. The sample has two buttons that allows the user to start and stop DeviceWatcher.
This code example shows how to create and start a device watcher to look for instances of the SuperMUTT device.
Open the device
To open the device, the app must start an asynchronous operation by calling the static method FromIdAsync and passing the device instance path (obtained from DeviceInformation.Id). That result of that operation obtain is a UsbDevice object, which is used for future communication with the device, such as performing data transfers.
After you are finished using the UsbDevice object, you must release it. By releasing the object, all pending data transfers are canceled. The completion callback routines for those operations are still invoked with canceled error or the operation completed.
C++ apps must release the reference by using the delete keyword. C#/VB apps must call the UsbDevice.Dispose method. JavaScript apps must call UsbDevice.Close.
The FromIdAsync fails if the device is in use or cannot be found.
Fixed: USB Flash Drive not Showing Up in Windows
A USB drive not showing up in Windows is one of the commonest issues related to external storage devices. USB drive not showing up in Windows may result from various causes. We will show you the symptoms, causes and corresponding fixes for the issue and provide you the useful way to recover data from your USB drive with EaseUS Data Recovery Wizard.
Table of Contents
About the Author
Reviews and Awards
USB Drive Not Showing Up in Windows
«I’ve tried all the methods I can think of to connect this USB flash drive to my PC, but my computer still does not show up any signals of the drive. All of my projects from this semester are stored on the drive, how can I get to my files?!”
Preliminary Checks on Your USB Drive
Many users have encountered such a problem, that is their USB flash drive not showing up on the computer. Generally, USB not showing up means it disappears from File Explorer. Is your USB drive disappearВ in Windows File Explorer but can be seen in Disk Management? Or is it missing from both places?
To make it clear, go to «This PC» > «Manage» > «Disk Management» and check whether your USB drive shows up. Specify your situation and choose the corresponding tips to follow.
Since there are two scenarios ofВ USB not detected by a PC, we offer a number of solutions. Follow these methods and get your missing USB drive back without losing any data. If you are a Mac user, having the same problem, follow this page to fix USB flash drive not showing up on Mac with ease.
Fixes for USB Drive Not Showing Up in Windows 10 File Explorer Only
If your USB drive shows up in Disk Management, it means Windows can still detect your drive. But due to some reasons, the USB cannot show up in File Explorer as expected. The reasons are:
- USB driver issues
- Drive letter conflicts
- File system errors
The solutions vary based on the causes but all detailed below. Follow to fix your problematic USB with ease.
| Workable Solutions | Step-by-step Troubleshooting |
|---|---|
| Fix 1. Update USB Driver | Connect USB flash drive or external USB to PC. Full steps |
| Fix 2. Reinstall Disk Driver | Right-click «This PC», click «Properties», «Devices Manager». Full steps |
| Fix 3. Recover USB Data | Connect USB flash drive to PC, run USB data recovery software. Full steps |
| Fix 4. Resolve Drive Letter Conflicts | Right-click «This PC», select «Manage» > «Disk Management». Full steps |
| Fix 5. Fix File System Errors | Right-click on the «Start» icon > Type computer management. Full steps |
Method 1. Update USB Drive Driver
This method works when yourВ USB drive not shows up in File Explorer and may show up as unallocated space under Disk Management. Follow the detailed steps below to make your USB driveВ usable again.
Step 1. Connect the USB flash driveВ to PC, right-click on «This PC» and choose «Properties».
Step 2. Click «Device Manager» then expand “Disk drives”. Find and right-click the problematic USB drive and select «Update driver»
Step 3. Click «automatically search for driver software online».
Step 4. Wait for the driver to be updated, then reboot your computer.В Afterward, you can try to reconnect your USB drive to the PC and check whether the USB drive shows up or not.
This method can also be helpful in solving disk-related issues like «The system cannot find the file specified»
Method 2. Reinstall Disk Driver for USB Drive
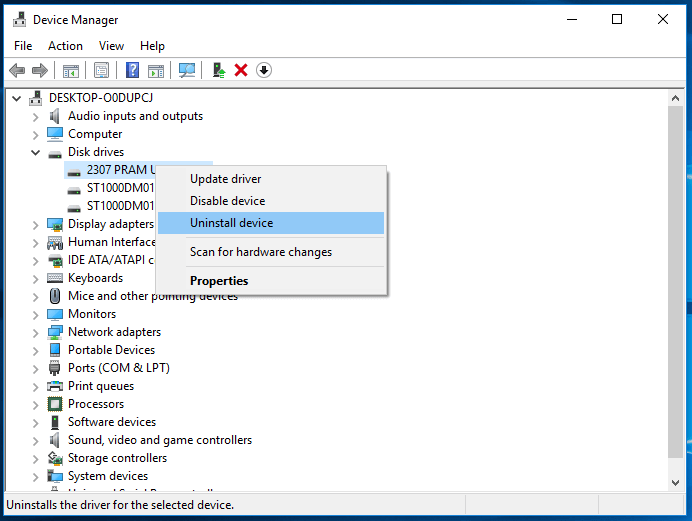
Step 1. Right-click «This PC» and choose «Properties» > «Devices Manager».
Step 2. Click on «Disk drives», right-click on your USB drive that is not showing up, and choose «Uninstall device».В
Step 3. In the prompt asking you to confirm the removal, click «OK». (Wait patiently and let the process finish. If it takes too long, you can remove the USB flash drive from the PC.)
Step 4. Restart your computer and reconnect the USB flash drive/external hard drive to the PC. After the computer restarts, the driver will be automatically installed.
Method 3. Create New Partitions
If your USB shows up as unallocated space in Disk Management after updating or reinstalling the driver, you are recommended to create a new partition to make it ready for data storage.
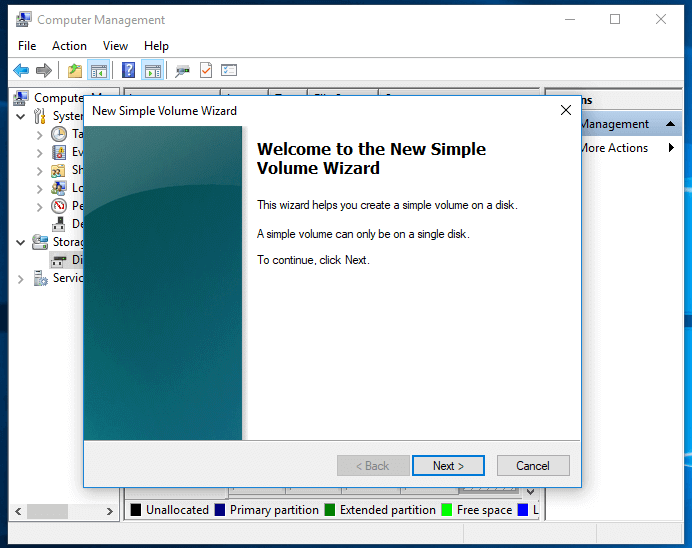
To create new partitions on the USB drive:
Step 1. Go to «This PC», right-click it, and choose «Manage» > «Disk Management».
Step 2. Right-click the unallocated space and choose «New Simple Volume».
Step 3. Follow the wizard to finish the remaining process.
Now your USB drive should show up in Windows as usual. You can copy the files you recovered back to your USB according to your needs.
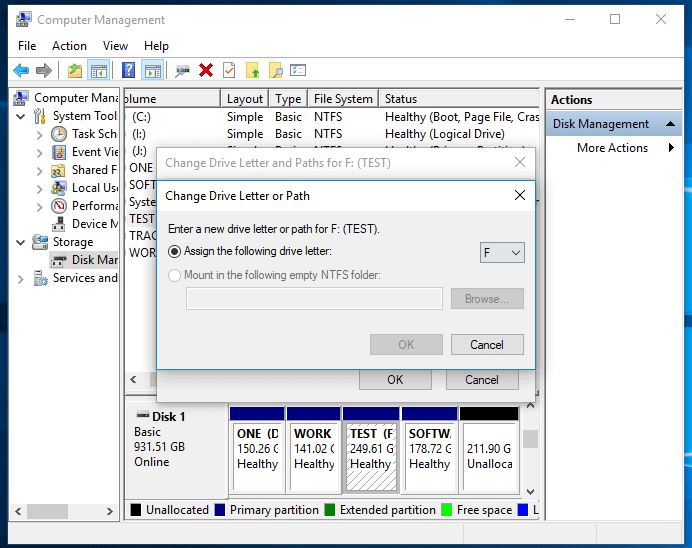
Method 4. Assign a New Drive Letter to the USB
If the drive letter of your USB drive is the same as one of the drive letters of your computer’s hard disk partition, you won’t be able to see it in Windows File Explorer. Besides, you will see the drive has no drive letter in Disk Management. You need to assign a new drive letter to your USB drive.
Step 1. Go to «This PC», right-click it, and choose «Manage» > «Disk Management».
Step 2. Right-click the volume on your USB flash drive and select «Change Drive Letter and Paths».
Step 3. In the new window, click «Change».
Step 4. Assign a new drive letter to your USB and click «OK».
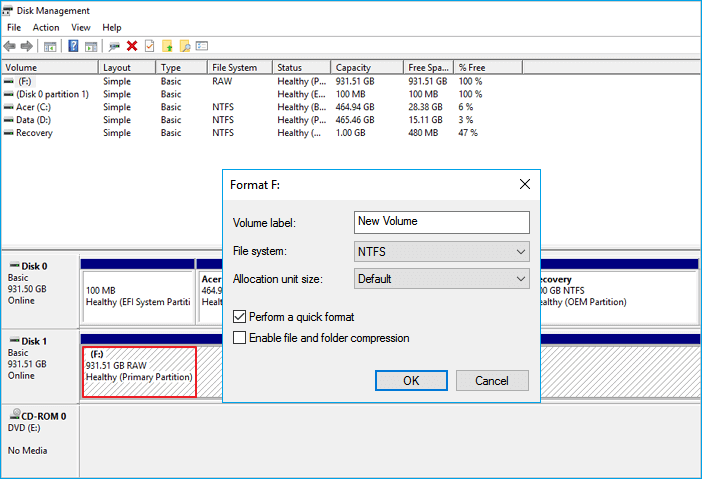
Method 4. FixВ File System Errors
If your USB flash drive has file system errors, it will show up as RAW and become inaccessible. Here the file system error refers to an unsupported file systemВ or a damaged file system caused by misoperations or improper formatting. To fix the file system error you need to format the drive to convert RAW to NTFS or FAT32.В
When you format your USB drive, all data will be deleted. To protect your data, we highly recommend you to use EaseUS Data Recovery Wizard to recover all the data before format.В It allows you to restore data from an inaccessible, RAW, or formatted USB drive and other devices with simple clicks.
Download it now and follow the guide below to restore data from your USB flash drive easily.
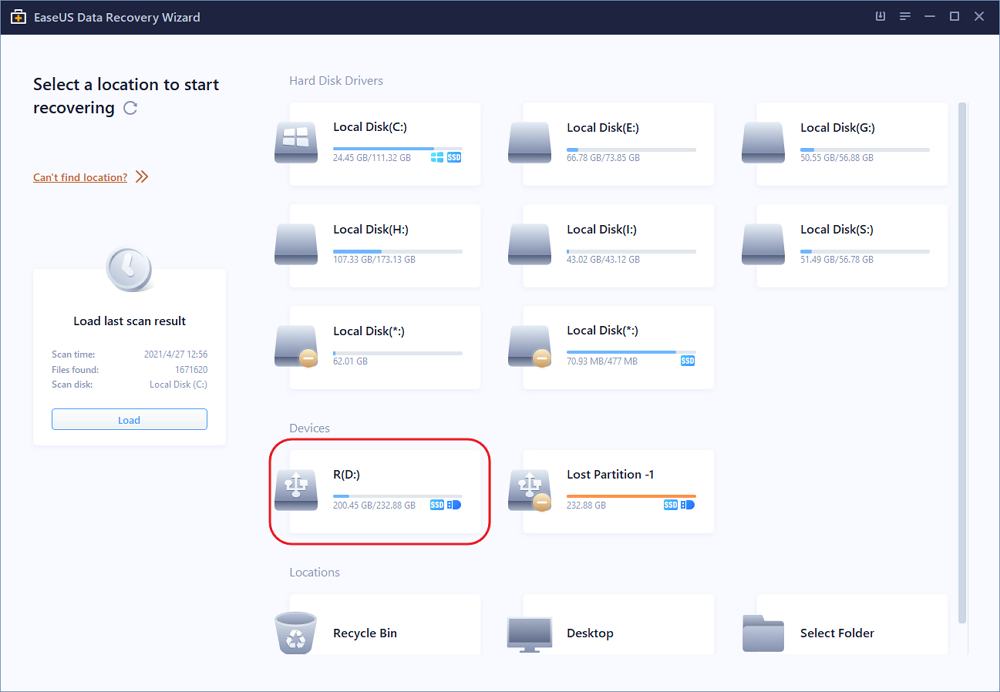
Step 1.В Run USB data recovery software.
Connect the USB flash drive to your computer and launchВ EaseUS USB data recovery software on your PC. Select your USB drive which marks as a removable disk, and click «Scan» to start finding your lost files.
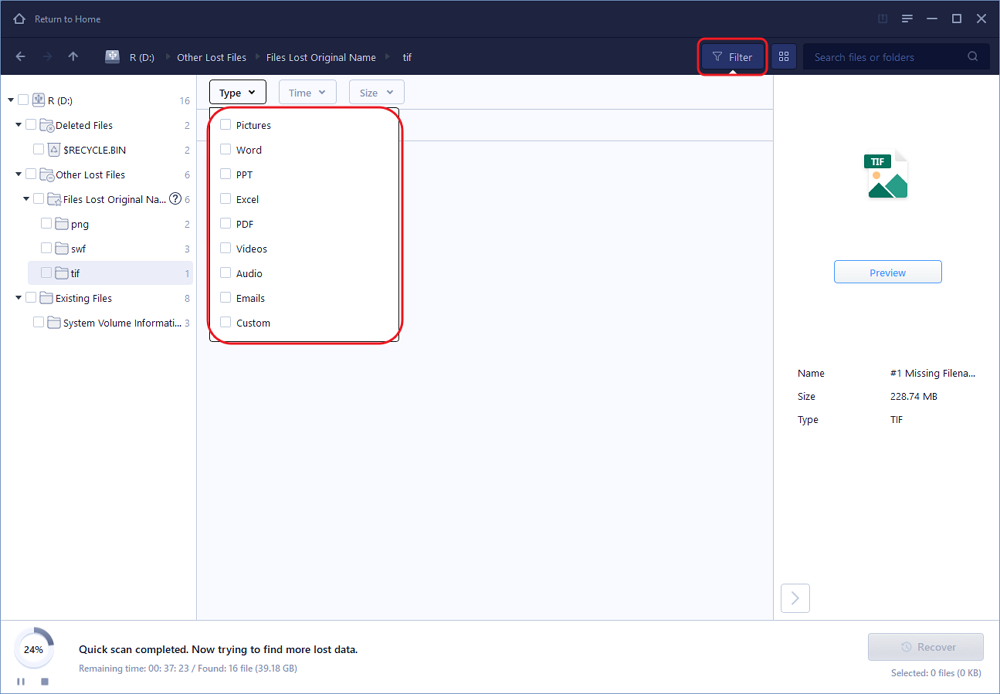
Step 2.В Scan all lost files from USB.
EaseUS Data Recovery Wizard will thoroughly scan your USB flash drive and find all your lost data on it. After the scanning process,В use the Filter feature to filter a specific file type. You can check and preview found USB files in this program.
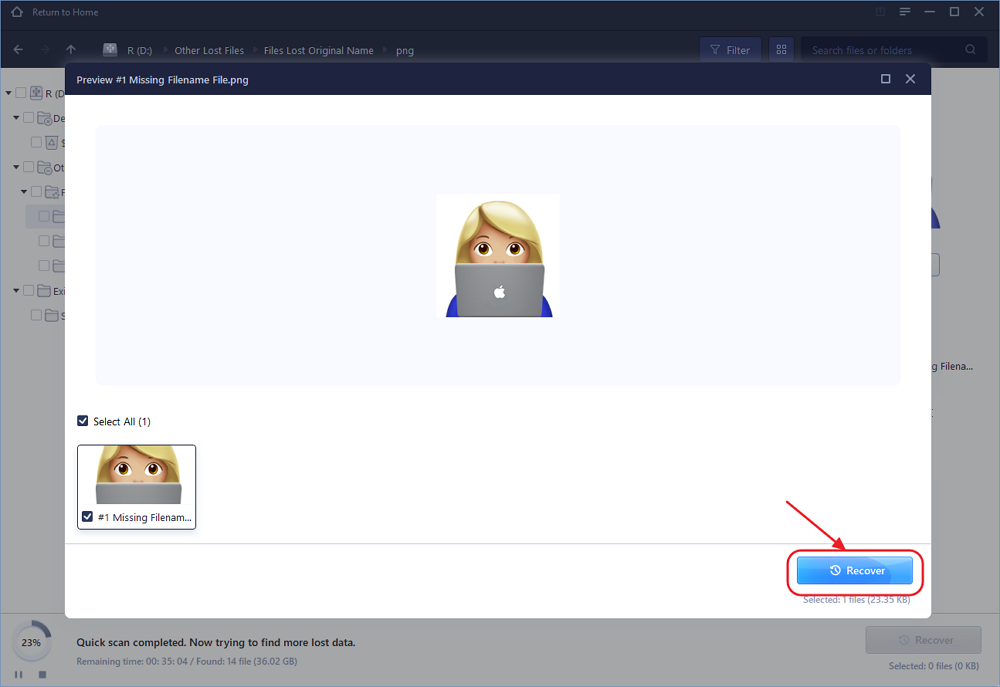
Step 3.В Restore all lost files from USB.
A double-click will allow you to preview the file results. Choose the target files and click «Recover» to save them to aВ secure location on your PC or other external storage devices.
After storing your data in a safe place, you need to format the USB drive to convert the file system back to NTFS or another Windows-compatible file system.
Step 1. Right-click on the «Start» icon > Type computer management > click on «Computer Management».
Step 2. Click «Disk Management» in the bar on the left-hand side, then find the device in the drive viewer.
Step 3. Right-click on the USB flash drive, select «Format» to directly format the USB drive to make it usable.
If you are having a similar issue on your hard drive, you may directly try the fixes below.В

Are your hard drives, be it new or old, internal or external, not showing up in File Explorer or Disk Management? Follow to learn how to make your hard drive showing up again in Windows 10/8/7 without losing data.
Fixes for USB Not Showing Up in Windows File Explorer and Disk Management
If your USB is not showing up in Windows File Explorer and Disk Management simultaneously, the reasons could be:
- USB driver issues
- USB port/cable error
- Physical corruptions of USB
Follow to fix your problematic USB with ease.
Method 1. Fix Driver Issues
Whether the USB drive shows up in Disk Management or not, the USB not showing up issue caused by problematic device drivers can be potentially solved by updating or reinstalling the USB driver. For the detailed steps, you can refer to the first two methods in the last part.
MethodВ 2. Change USB Connection
Connection failure may be the root cause. It’s a hardware problem that you can easily identify by checking the USB connection. Generally, there is more than one USB port on your computer. Try other ones on the same computer, switch from the front USB ports to the rear USB ports, or connect your USB drive to another computer and check whether the problem remains. Similarly, you can also change another USB cable if you are using an external hard drive.
MethodВ 3. Fix Physical Corruptions
If the tips above fail to fix your USB drive that is not showing up in Windows, it’s highly likely there is physical damage or corruption on your USB flash drive or external hard drive. This is the toughest situation and the only suggestion for you is to send the USB drive for manual repair.
The Bottom Line
When a USB flash drive does not show up on your Windows PC, it means that the computer has failed to read the USB drive. Therefore, in order to get a USB drive to show up, we must make the USB readable again. There are many methods for you to make an unrecognized USB drive to show up on PC: update USB flash driver, change drive letter, use Windows’s built-in disk management tool to detect the USB, and more. Hope one of them can be helpful to fix your USB drive.


