- Overview of USB Event Tracing for Windows
- About Event Tracing for Windows
- USB Support for ETW Logging
- USB ETW Support in Windows 7
- USB ETW Support in Windows 8
- Как создать Сетевой диск в ОС Windows для доступа к данным USB-накопителя, подключенного к интернет-центру?
- How to Set Up USB Tethering on Windows 10
- Use your Android or iPhone to create a hotspot
- What to Know
- How to Set Up USB Tethering on Windows 10
- Troubleshooting Windows 10 USB Tethering
- What Is USB Tethering?
Overview of USB Event Tracing for Windows
This topic provides information for client driver developers about the tracing and logging features for Universal Serial Bus (USB). This information is provided for the benefit of those who develop and debug USB devices. It includes information on how to install the tools, create trace files, and analyze the events in a USB trace file. The topic assumes that you have a comprehensive understanding of the USB ecosystem and hardware that is required to successfully use the USB tracing and logging features.
About Event Tracing for Windows
Event Tracing for Windows (ETW) is a general-purpose, high-speed tracing facility that is provided by the operating system. It uses a buffering and logging mechanism that is implemented in the kernel to provide a tracing mechanism for events that are raised by both user-mode applications and kernel-mode device drivers. Additionally, ETW provides the ability to dynamically enable and disable logging, which makes it easy to perform detailed tracing in production environments without requiring reboots or application restarts. The logging mechanism uses per-processor buffers that are written to disk by an asynchronous writer thread. This buffering allows large-scale server applications to write events with minimum disturbance.
ETW was introduced in Windows 2000. Since then, various core operating system and server components have adopted ETW to instrument their activities. ETW is now one of the key instrumentation technologies on Windows platforms. A growing number of third-party applications use ETW for instrumentation, and some take advantage of the events that Windows provides. ETW has also been abstracted into the Windows preprocessor (WPP) software tracing technology, which provides a set of easy-to-use macros for tracing printf-style messages for debugging during development.
ETW was significantly upgraded for Windows Vista and Windows 7. One of the most significant new features is the unified event provider model and APIs. In short, the new unified APIs combine logging traces and writing to the Event Viewer into one consistent, easy-to-use mechanism for event providers. At the same time, several new features have been added to ETW to improve the developer and end-user experiences.
For more information about ETW and WPP, see Event Tracing and Event Tracing for Windows (ETW).
USB Support for ETW Logging
USB is one of the most prevalent means of connecting an ever-increasing variety of peripheral devices to PCs. There is a very large installed base of USB host PCs and USB peripheral devices, and system vendors, device vendors, and end users expect and demand that USB devices operate flawlessly at the system and device level.
The large installed base and proliferation of USB devices have uncovered compatibility issues between the Windows USB software stack, the USB host controller, and USB devices. These compatibility issues cause problems for customers such as device operation failures, system hangs, and system crashes.
It has been difficult or impossible to investigate and debug USB device issues without direct access to the system, and/or devices, or in some cases a system crash dump. Even with full access to the hardware and a crash dump, extracting the relevant information has been a time-intensive technique that is known only by a few core USB driver developers. You can debug USB problems by using hardware or software analyzers, but they are very expensive and are available to only a small percentage of professionals.
USB ETW Support in Windows 7
In Windows 7, ETW provides an event logging mechanism that the USB driver stack can exploit to aid in investigating, diagnosing, and debugging USB-related issues. USB driver stack ETW event logging supports most or all debugging capabilities that are provided by the existing ad hoc logging mechanism in the USB driver stack, without any of its limitations. This translates into ease of debugging USB-related issues, which should provide a more robust USB driver stack in the long term.
We added ETW logging to the USB host controller drivers and to the USB hub driver in Windows 7. The USB host controller driver layer includes the host controller port driver (usbport.sys) and the miniport drivers (usbehci.sys, usbohci.sys, and usbuhci.sys). The USB hub driver layer consists of the USB hub driver (usbhub.sys). The USB driver ETW event providers are included in all editions and SKUs of Windows 7.
While USB event collection is enabled, the USB hub event provider reports the addition and removal of USB hubs, the device summary events of all hubs, and port status changes. You can use these events to determine the root cause of most device enumeration failures.
USB Port Events
While USB event collection is enabled, the USB port event provider reports I/O from client drivers, opening and closing of device endpoints, and miniport state transitions such as miniport start and stop. Logged I/O includes requests for the state of physical USB ports. State transitions on physical USB ports are one of the key initiators of activity in the core USB driver stack.
USB ETW Support in Windows 8
WindowsВ 8 provides a USB driver stack to support USB 3.0 devices. The Microsoft-provided USB 3.0 driver stack consists of three drivers: Usbxhci.sys, Ucx01000.sys, and Usbhub3.sys. All three drivers work together to add native support to Windows for most USB 3.0 host controllers. The new driver stack supports SuperSpeed, high-speed, full-speed, and low-speed devices. The USB 2.0 driver stack is supported on Windows 8. Through event traces, the USB 3.0 driver stack provides a view into the fine-grained activity of the host controller and all devices connected to it.
USB Hub3 Events
While USB event collection is enabled, the USB Hub3 event provider reports the addition and removal of USB hubs, the device summary events of all hubs, port status changes, and power states of USB devices and hubs. Port status changes are state transitions on physical USB ports and are one of the key initiators of activity in the core USB driver stack. Hub3 reports the stages of the enumeration process, which point to the root cause most device enumeration failures. With the StateMachine keyword enabled, Hub3 reports the internal state machine activity for software device, hub, and port objects, which provide deeper visibility into the logic of the driver.
While USB event collection is enabled, the USB UCX event provider reports I/O from client drivers and opening and closing of device endpoints and endpoint streams. With the StateMachine keyword enabled, UCX reports internal state machine activity for host controller and endpoint objects, which provide deeper visibility into the logic of the driver.
USB xHCI Events
While USB event collection is enabled, the USB xHCI event provider reports the properties of the system’s xHCI controllers and low-level details of xHCI operation. xHCI reports command requests sent to and completed by the xHCI hardware, including xHCI-specific completion codes.
Как создать Сетевой диск в ОС Windows для доступа к данным USB-накопителя, подключенного к интернет-центру?
У меня есть интернет-центр с подключенным USB-накопителем. Каким образом я могу его настроить так, чтобы он автоматически подключался как обычный логический диск в Моем компьютере или Проводнике? Чтобы не приходилось каждый раз набирать имя интернет-центра или его IP-адрес, а можно было работать привычным образом.
1. Для начала необходимо произвести первичную настройку подключения USB-накопителя к интернет-центру серии Keenetic по инструкции, указанной в статье «Подключение USB-накопителя к интернет-центру» (т.е. нужно разрешить доступ к подключаемому диску)
2. Для того чтобы сетевой диск отображался в меню Мой компьютер, нужно воспользоваться функцией операционной системы Windows — Подключить сетевой диск. (в данной статье приведен пример подключения сетевого диска в ОС Windows 10).
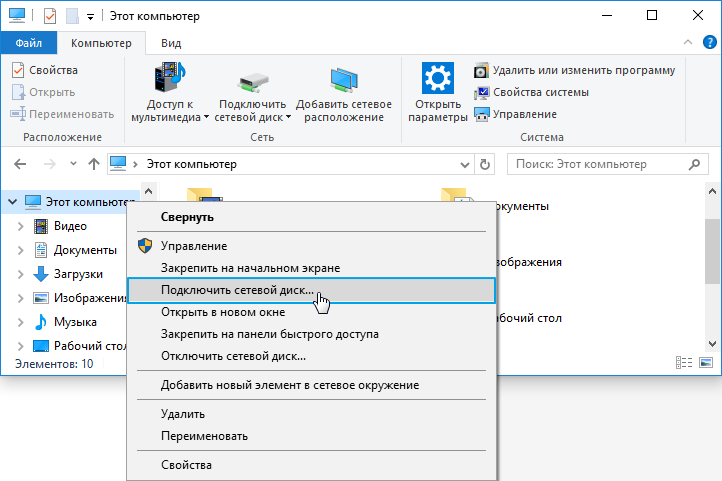
Запустите Проводник. Нажмите правой кнопкой мыши по значку Этот компьютер и выберите пункт контекстного меню Подключить сетевой диск.
3. В открывшемся окне Подключение сетевого диска нужно будет указать букву диска для подключения и полный путь к сетевой папке.
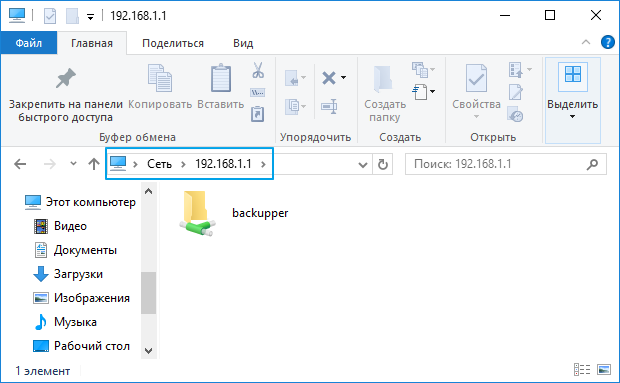
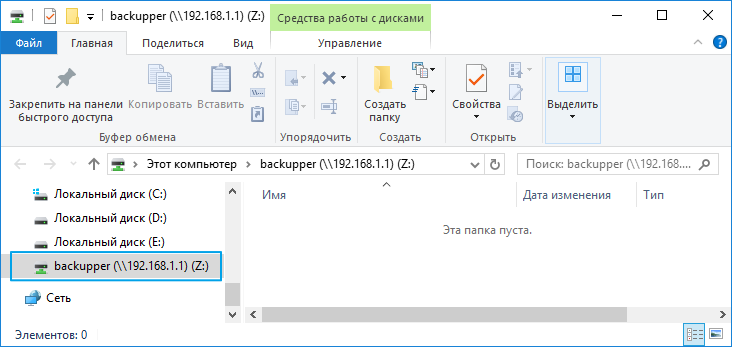
Чтобы получить полный путь к сетевой папке, нужно зайти на неё через Проводник и скопировать путь из строки адреса (в нашем примере 192.168.1.1 – IP-адрес интернет-центра по умолчанию).
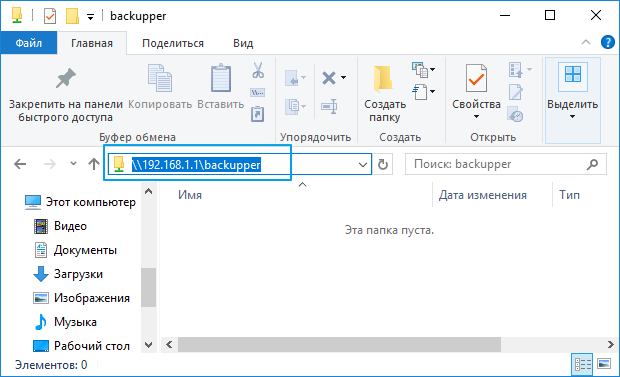
Данный путь нужно вставить в окне Подключить сетевой диск в поле Папка.

Важно! Установите галочку в поле Использовать другие учетные данные, иначе система будет пытаться подключиться к сетевому диску только с текущей учетной записью, используемой при входе в ОС Windows.
Установите галочку в поле Восстанавливать при входе в систему, если вы хотите автоматически подключать указанный сетевой диск, каждый раз при входе в операционную систему (это будет возможно только в том случае, когда USB-накопитель постоянно подключен к интернет-центру).
4. После ввода данных и нажатия кнопки Готово система запросит логин и пароль для доступа к диску интернет-центра. Это может быть любая учетная запись интернет-центра с разрешенным доступом к службе cifs и указанным паролем. Информацию по настройке прав доступа к USB-накопителю, подключенному к интернет-центру Keenetic, можно найти в статье «Настройка прав доступа к сетевому диску, подключенному к интернет-центру»
Важно! ОС Windows не позволяет подключать сетевые диски по учетным записям без пароля. Можно подключиться либо без авторизации, либо с помощью учетной записи с логином и паролем.
В нашем примере мы используем системную учетную запись admin с установленным паролем.
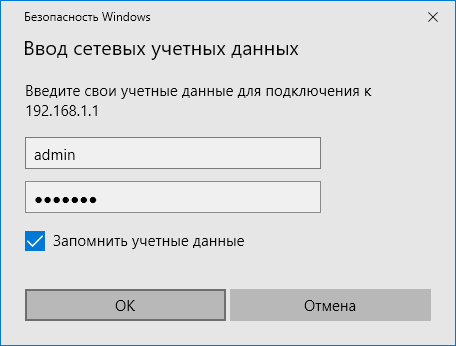
Установите галочку в поле Запомнить учетные данные, чтобы каждый раз не вводить имя пользователя и пароль.
5. После нажатия кнопки ОК сетевой диск будет добавлен в Windows и появится в списке дисков.
Пользователи, считающие этот материал полезным: 149 из 167
How to Set Up USB Tethering on Windows 10
Use your Android or iPhone to create a hotspot
:max_bytes(150000):strip_icc()/JordanBarabnowski-e55f2c3b35c64e889d021e40bba56799.jpg)
:max_bytes(150000):strip_icc()/ryanperiansquare-de5f69cde760457facb17deac949263e-180a645bf10845498a859fbbcda36d46.jpg)
What to Know
- First, connect your Android or iPhone to your laptop with a USB cable.
- Next, go to Settings on your phone > turn on USBTethering (Android) or Personal Hotspot (iPhone).
- In the Windows taskbar, open the computer’s Network and Internet settings to verify the connection.
This article explains how to set up USB tethering on Windows 10 devices, which allows you to create a hotspot to access the internet even when no network connection is available. Troubleshooting tips are also included if something isn’t working right.
How to Set Up USB Tethering on Windows 10
Before you begin, make sure both your phone’s operating system and your computer’s operating system are updated to the latest versions. Also, depending on your mobile carrier, you may be charged a flat fee for tethering a laptop to a mobile device. Check with your carrier if you’re worried about extra costs.
To set up USB tethering between your mobile device and your Windows 10 computer:
Connect your mobile device to your laptop via USB cable.
For Android phones, use a USB-to-micro USB or USB-to-USB-C connector. For iPhones, use the standard lightning cable.
Open your phone’s settings and go to Network & Internet > Hotspot & tethering (Android) or Cellular > Personal Hotspot (iPhone).
turn on USB tethering (on Android) or Personal Hotspot (on iPhone) to enable. Your laptop should now be able to access the internet through your phone’s mobile plan.
Make sure you turn off Wi-Fi so your computer doesn’t try connecting with other networks you can’t access.
Open your computer’s Network and Internet settings in the Windows taskbar to make sure you’re connected. Depending on your device, it may say that you’re connected via LAN.
If you’re having trouble with the connection, try plugging your phone into a different USB port, or using a different cable.
:max_bytes(150000):strip_icc()/003_set-up-usb-tethering-windows-10-4584419-e6d45481f1ba42e7ad55df272bcd94a7.jpg)
Troubleshooting Windows 10 USB Tethering
If USB tethering isn’t working in Windows 10, it could be because the driver for the network adapter is outdated. To fix this problem:
Right-click the Start Menu and select Device Manager.
:max_bytes(150000):strip_icc()/devicemanagerwindows-629cc0e2425742e095b807b7791e52d6.jpg)
Expand the Network adapters tab, then right-click your network adapter and select Update driver.
:max_bytes(150000):strip_icc()/005_set-up-usb-tethering-windows-10-4584419-04d96ac2e78e4c4281c3e45e7fe02f31.jpg)
Select Search automatically for updated driver software.
:max_bytes(150000):strip_icc()/searchforupdateddriversoftware-9a387f4db855412eb7eb57c34fa08f61.jpg)
You must restart the computer after installing the driver. If the Device Manager says that you already have the latest driver, then the problem could be with your connection, your phone, or your mobile data.
What Is USB Tethering?
Tethering is the process of sharing your phone’s mobile data to access the internet on another device, such as a laptop. You can tether using Bluetooth or NFC, but USB tethering is the fastest and most effective method. That said, USB tethering can’t compete with the speeds of a solid Wi-Fi connection.
Be careful about how much data you use when tethered. Since many data plans charge incremental amounts based on data usage, watching videos or downloading files on a tethered connection can quickly increase your phone bill. In some cases, it’s possible to reverse tether and share Wi-Fi from your computer to your phone to save on data.


