- Create a Bootable Windows 10 USB in Linux With Ubuntu/Debian GUI
- Method 1 . Create a Bootable Windows 10 USB in Linux with woeusbgui GUI app
- Clone WoeUSB
- Make a Bootable Windows 10 USB from Linux
- Method 2 . Bash shell script to create a bootable Windows 10 USB device from one ISO file
- Method 3 . Create a Bootable Windows 10 USB in Linux with CLI apps only
- Download and install ms-sys
- Create a ntfs partition
- Linux create windows 10 Bootable USB by coping installer files
- Use ms-sys command to write mbr to create a bootable Windows 10 pro usb in Linux
- Conclusion
- Как создать загрузочный USB для Windows 10 в Linux
- Сделать загрузочную Windows 10 USB на Linux
- 1] Во-первых, вам нужно установить WoeUSB
- 2] Приступить к созданию загрузочного USB
- How to Create a Bootable Windows 10 USB in Linux
- Creating a Bootable Windows 10 USB in Linux
- Prerequisite: Get Microsoft Windows 10 ISO and a USB of at least 8 GB in size
- Step 2: Properly format the USB for creating bootable Windows USB
- Step 3: Copy the content of the ISO to USB
- Method 2: Create bootable Windows 10 USB using Ventoy
- Step 1: Prepare your USB drive
- Step 2: Download and install Ventoy on Linux
- Step 3: Use Ventoy to create bootable Windows 10 USB disk
- Step 4: Using the bootable Windows 10 disk
- Step 1: Install WoeUSB application
- Step 2: Format USB drive
- Step 3: Using WoeUSB to create bootable Windows 10
- Step 4: Using Windows 10 bootable USB
Create a Bootable Windows 10 USB in Linux With Ubuntu/Debian GUI
Warning: Writing or selecting the wrong kind of boot record to a device (USB/hard disk) might destroy partition information or file system or data forever. Be careful with partition and disk names.
Method 1 . Create a Bootable Windows 10 USB in Linux with woeusbgui GUI app
This method is recommended for all new Linux users as it requires less typing at the CLI and easy to use. WoeUSB is a simple Linux program to create a Windows 10 USB stick installer from a real Windows DVD or ISO image. From the Github page:
WoeUSB is a simple tool that enable you to create your own usb stick windows installer from an iso image or a real DVD. It is a fork of Congelli501’s WinUSB. This package contains two programs:
- woeusb: A command-line utility that enables you to create your own bootable Windows installation USB storage device from an existing Windows Installation disc or disk image
- woeusbgui: A GUI wrapper of woeusb based on WxWidgets
It supports Windows Vista, Windows 7, Window 8.x, Windows 10. All languages and any version (home, pro, ltsb, …) and Windows PE.
Clone WoeUSB
Type the following git command git clone https://github.com/WoeUSB/WoeUSB.git
Set the application version string:
cd WoeUSB/
./setup-development-environment.bash
Install WoeUSB’s build dependencies on a Debian or Ubuntu Linux using the apt-get command or apt command sudo apt-get install devscripts equivs gdebi-core
mk-build-deps
sudo gdebi woeusb-build-deps_*.deb
dpkg-buildpackage -uc -b
sudo gdebi ../woeusb*.deb
Install WoeUSB to create usb stick windows 10 installer from an iso image on Linux
Make a Bootable Windows 10 USB from Linux
Method 2 . Bash shell script to create a bootable Windows 10 USB device from one ISO file
Install it as follows from the Github:
sudo apt install extlinux
mkdir
/bin/
curl -L https://git.io/bootiso -O
chmod +x bootiso
To list your usb pen drive run:
/bin/bootiso -l
To write create a bootable Windows 10 USB from an ISO image named
Create a Windows 10 USB bootable device from an ISO image using a bash shell script
Method 3 . Create a Bootable Windows 10 USB in Linux with CLI apps only
First you need to install a tool called ms-sys. It is a Linux cli app for writing Microsoft compatible boot records. This program does the same as Microsoft “ fdisk /mbr ” to a hard disk except that it does not copy any system files, only the boot record written.
- No ads and tracking
- In-depth guides for developers and sysadmins at Opensourceflare✨
- Join my Patreon to support independent content creators and start reading latest guides:
- How to set up Redis sentinel cluster on Ubuntu or Debian Linux
- How To Set Up SSH Keys With YubiKey as two-factor authentication (U2F/FIDO2)
- How to set up Mariadb Galera cluster on Ubuntu or Debian Linux
- A podman tutorial for beginners – part I (run Linux containers without Docker and in daemonless mode)
- How to protect Linux against rogue USB devices using USBGuard
Join Patreon ➔
Download and install ms-sys
Grab the latest version from this page. Use the wget command or curl command to grab the file:
cd /tmp/
wget https://nchc.dl.sourceforge.net/project/ms-sys/ms-sys%20development/2.5.2/ms-sys-2.5.2.tar.gz
Untar the tar ball named ms-sys-2.5.2.tar.gz using the tar command:
tar -zxvf ms-sys-2.5.2.tar.gz
If you do not have gnu gcc c/c++ compiler installed on a Debian or Ubuntu Linux, install it using the apt command or apt-get command:
sudo apt install build-essential
See the following links for more info:
Build and install it:
cd ms-sys-2.5.2
make
sudo make install
Create a ntfs partition
Linux create windows 10 Bootable USB by coping installer files
You need copy files from Windows 10 ISO image to usb disk. Create a folder on Linux using the mkdir command sudo mkdir /mnt/win10/
Mount Windows 10 ISO image in Linux using the mount command:
sudo mount -t udf -o loop,ro,unhide /mnt/win10/
## I got a win10 ltsb iso file in
/Downloads/ ##
sudo mount -t udf -o loop,ro,unhide
/Downloads/14393.0.160715-1616.RS1_RELEASE_CLIENTENTERPRISE_S_EVAL_X64FRE_EN-US.ISO /mnt/win10/
Mount usb pen drive too:
sudo mkdir /mnt/usb/
sudo mount /dev/sdc1 /mnt/usb/
df -h | grep ‘/mnt’
Ready to burn the Windows 10 ISO to a USB on Linux
Use ms-sys command to write mbr to create a bootable Windows 10 pro usb in Linux
In order to burn the Windows 10 ISO to a USB and boot it, run:
sudo ms-sys -7 /dev/sdc
Sample outputs:
Unmount /dev/sdc:
sudo sync
sudo umount /mnt/usb/
Now boot from USB pen and you should see Windows 10 installer as follows:
Conclusion
And there you have it. You just created a Windows 10 bootable USB stick on Linux using two different methods. Creating a Microsoft bootable Windows 10 USB stick from Linux is very simple, and I hope it helps you manage your enterprise workload without leaving Linux desktop.
🐧 Get the latest tutorials on Linux, Open Source & DevOps via
Источник
Как создать загрузочный USB для Windows 10 в Linux
Вы все в значительной степени знакомы с процедурой создания загрузочного носителя Windows 10 на компьютерах с операционной системой Windows. В этом посте мы покажем вам процедуру создания загрузочного USB / CD с Windows 10 на компьютерах с операционной системой Linux.
Все слишком известный процесс создания загрузочного USB / CD с Windows 10 с помощью Media Creation Tool (MCT) работает только в операционной системе Microsoft, Windows 10. Следовательно, необходимо показать вам, как выполнить то же действие на компьютере с Linux.
Некоторые могут спросить, действительно ли этот учебник необходим. Ответ на этот вопрос — да. Эта процедура для создания загрузочного носителя Windows 10 на компьютере с Linux будет полезна, если, например, ваш рабочий компьютер с Windows 10 упаковывается, и вам нужно подготовить другой компьютер на лету, но все компьютеры, к которым у вас есть доступ, — все Машины Linux, на которых вы не можете создать загрузочный носитель Windows 10 обычным способом. Итак, это ценные технические ноу-хау, которые вы должны иметь в своем наборе.
Сделать загрузочную Windows 10 USB на Linux
Для успешного создания загрузочного USB для Windows 10 в Linux вам потребуется следующее;
- Флешка
- Компьютер под управлением ОС Linux
- Windows 10 ISO
- WoeUSB, простой инструмент, который позволяет вам создать свой собственный установщик Windows USB-накопитель из образа ISO или реального DVD.
Примечание . Если вы загружаетесь в устаревшем режиме (BIOS) и эта процедура не работает, вместо создания загрузочного USB-устройства используйте загруженный ISO-образ и запишите его на DVD-диск, а затем продолжите загрузку компьютера с Windows 10 с него. после того, как вы убедились, что сначала установите BIOS для загрузки с DVD-привода.
1] Во-первых, вам нужно установить WoeUSB
Если вы используете Ubuntu или дистрибутив на основе Ubuntu, такой как Linux Mint , сначала добавьте PPA с помощью следующей команды:
Если вы получили сообщение о том, что «add-apt-repository» не найден, перейдите к установке с помощью следующей команды:
Затем снова запустите указанную выше команду « add-apt-repository ».
Если следующая команда « apt install woeusb » не работает, потому что она не может найти пакет, сделайте это вручную, используя следующую команду:
Затем установите WoeUSB с помощью этой команды:
В Fedora установите с помощью команды:
На OpenSUSE вы можете получить WoeUSB отсюда.
2] Приступить к созданию загрузочного USB
Подключите USB и запустите WoeUSB GUI из меню запуска. Если вы не можете найти его там, вызовите его с помощью этой команды:
Если на вашем USB-устройстве есть файловая система, она будет автоматически смонтирована операционной системой. Откройте браузер файлов и размонтируйте его, нажав на стрелку извлечения рядом с ним.
Теперь выберите поле в поле « Из образа диска (iso)» и перейдите в папку, в которую вы загрузили ISO-образ Windows.
Далее в разделе « Файловая система» выберите переключатель для NTFS .
Наконец, в разделе «Целевое устройство» нажмите на свое USB-устройство.
Нажмите «Установить» и дождитесь завершения процесса. Не закрывайте приложение и не извлекайте USB-устройство, пока не получите сообщение об успешном завершении операции.
И вот как вы можете создать загрузочный USB для Windows 10 на компьютере с Linux.
Источник
How to Create a Bootable Windows 10 USB in Linux
Brief: This tutorial shows you how to create a bootable Windows 10 USB in Linux with and without a GUI tool called WoeUSB.
I have talked a lot about creating bootable USB of Linux in Windows. How about the other way round? How about creating a bootable Windows 10 USB in Linux?
If you are uninstalling Linux from dual boot or if you want to reinstall Windows completely or you simply want to have a Windows installation disk ready, you’ll need a bootable Windows 10 USB or DVD.
In this tutorial, I am going to show you how to create a Windows 10 bootable USB in Linux. I am using Ubuntu for this tutorial but the steps should be valid for other Linux distributions as well.
There are two ways to do that and I have discussed both in this tutorial.
- The first method is mounting the ISO image of Windows to a USB disk formatted in ExFAT system. This works most of the times but there could be instances where it wouldn’t boot.
- The second method is to use a tool like Ventoy. It creates a UEFI compatible bootable disk.
If you want to use WoeUSB graphical tool for creating Windows bootable USB, you can jump to that section directly. Personally, I don’t recommend WoeUSB.
Creating a Bootable Windows 10 USB in Linux

Prerequisite: Get Microsoft Windows 10 ISO and a USB of at least 8 GB in size
You can download Windows 10 ISO from Microsoft’s website. You have to specify the Windows 10 version, language and then you should see the link to download Windows 10.
Note that the Windows 10 ISO download link is valid for 24 hours only. So use a download manager in Linux to download the
5-6 GB file and finish it within 24 hours only.
Since the ISO and its content are more than 4 GB in size, I recommend a USB of at least 8 GB in size.
I have also made a video of this tutorial so that you can see the steps in action.
Step 2: Properly format the USB for creating bootable Windows USB
Insert your USB. You have to format it so make sure that you don’t have important data on the USB key.
In Ubuntu, press Super key (Windows key) and search for ‘Disks’. You have to use this tool to format the USB key.
In the Disks tool, make sure to select your USB drive and hit format.
It will ask to choose a partitioning scheme. It could be either MBR or GPT. Select one of them and hit Format.
It will show you a warning that you data will be erased.
The formatting of USB is not over yet. Now, you need to create a partition on the newly formatted USB.
Select the entire USB disk as the partition size.
Give a name to your USB and hit Create button.
Once done, your USB should be automatically mounted. It is now ready for creating bootable Windows 10 USB disk.
Files larger than 4 GB?
Newer Windows 10 ISO might have files larger than 4GB. In that case, FAT filesystem won’t work as it doesn’t allow a single file of size greater than 4 GB.
You should then format the USB in ExFAT format. This newer format allows files bigger than 4 GB.
Step 3: Copy the content of the ISO to USB
Now it’s time to copy the content of the Windows 10 ISO to the newly formatted USB.
You may ask, Abhishek, there is only one file and that is the ISO file itself. What are you talking about?
ISO is basically an archive format and you can see it’s content like any zip file in Linux. But to do that, you need to use ‘Disk Image Mounter’ tool that is installed by default in Ubuntu.
Go to your Windows 10 ISO, select it and right click on it. Now select ‘Open with other application’.
In the applications list, select Disk Image Mounter:
The ISO will be mounted. You may not see it in the left sidebar but if you click on the Other Locations, you should see it. Click on it to enter this mounted ISO folder.
You’ll see its content. All you need to do is to select all the files (Ctrl+A), copy it (Ctrl+C) and paste it in the USB drive (Ctrl+V).
Wait for the copying process to finish as it may take some time in copying 4-5 GB of data. Once it’s done, you have a bootable Windows 10 USB in your hand. Take out the USB and use it to any system you want, restart the system and change the boot settings to boot from the USB.
Method 2: Create bootable Windows 10 USB using Ventoy
Ventoy is an open source tool for making live USBs. You can use it to create a multi-boot USB, persistent Linux live USB and bootable Windows USB.
I find Ventoy an unorthodox tool. It is slightly tricky to use and this is the reason I am writing this step-by-step tutorial.
Step 1: Prepare your USB drive
Ventoy formats the USB disk while creating the bootable disk. However, I noticed it failed to do so for an already bootable Linux disk. For this reason, I advise you to format the USB disk before you proceed further.
Plug in and then format the USB disk. You can do that by right-clicking on the mounted disk and then selecting the format option.
It doesn’t matter which filesystem you choose during formatting. It will be formatted again by Ventoy in the later steps.
Once it is formatted, keep it plugged in and go on to the next step of installing Ventoy.
Step 2: Download and install Ventoy on Linux
Ventoy is a mix of GUI and CLI tool. It can be used on any Linux distribution. Download Ventoy for Linux from the release page of its GitHub repository.
You’ll find the .tar.gz file with Linux in its name. This is the file you should download.
Once downloaded, extract the tar gz file. Simply right click on it and extract it.
Go inside the extracted folder, and you’ll find a few scripts in it. You need to run one named VentoyWeb.sh. To do that, you’ll have to use the command line.
Now if you are familiar with Linux command line, I presume that you can easily find your way to the file by using the cd command.
Alternatively, you can use the “open in terminal” feature of the file manager to open the location in a terminal.
Once you are in the correct directory in the terminal, use the following command to run Ventoy:
Ventoy runs inside a browser. It will give you the URL when you run it. Copy this URL and paste it in a browser.

It will open a web page with Ventoy running in it and if the USB is already plugged in, it should recognize it. If not, press the refresh button.
Step 3: Use Ventoy to create bootable Windows 10 USB disk
Though Ventoy has the option to create a bootable disk with secure boot, it is experimental and may not work.
Considering you are going for a UEFI installation, it will be wise use GPT for partitioning scheme.

Once things are set, hit the install button. It will show you a couple of obligatory warnings. If the installation completes successfully, you should see a success message.
Note: If you do not see Ventoy disk mounted after the successful installation, please plug out the USB and then plug it in again.
When you hit the install button, it creates two partitions on the USB disk.
- VTOYEFI: A small partition for the UEFI files.
- Ventoy: A big, empty partition in ExFAT format where you’ll copy the ISO image.
Yes. That’s what you need to do. Copy the ISO image of the Windows 10 into the bigger ExFAT partition on the USB disk.

Once the copying finishes, DO NOT RUSH to plug out the USB just yet. Click on the unmount option from the file manager. Chances are that some files are still being written and it may show an error message.
Wait for a few more minutes and you should see a message that it is safe to remove the disk. Now you can unplug it and use it on whichever system you want.
Step 4: Using the bootable Windows 10 disk
Alright! You are almost there. Plug in your bootable Windows USB you created in the previous section. Start the computer and go to the BIOS setting by using the F2/F10 or F12 key at the time you see the logo of your computer’s manufacturer.
In here, look for the secure boot settings and disable it. If the secure boot is enabled, chances are that your system won’t allow you to boot from the USB disk (to secure your system and data at boot time).
After disabling the secure boot, go into the boot order and then choose the UEFI USB Disk to boot from. Some systems will give this option after you press F12 or F10 button.

It takes a couple of minutes to start the Windows disk. You should see a screen like this and it will give you the option to repair boot or install Windows.
I think you can take things from here. Enjoy it 🙂
You can also watch a video of creating Windows 10 bootable USB. Do subscribe to our YouTube channel for more Linux videos:
Let’s see how to create a bootable Windows 10 USB in Ubuntu and other Linux distribution.
Step 1: Install WoeUSB application
WoeUSB is a free and open source application for creating Windows 10 bootable USB. It is actually a fork of WinUSB tool that has been discontinued now.
Ubuntu and other Ubuntu-based Linux distributions such as Linux Mint, elementary OS etc have a PPA available. You can use the command below to install WoeUSB:
For other Linux distributions, you can check out the source code from the GitHub repository:
Step 2: Format USB drive
Now, plug in your USB key. You’ll have to format it first. I presume you know how to format a USB key in your Linux distribution.
Ubuntu users can simply right click on the USB and click format.

The important part here is that you should format it in NTFS:

Note: If you use Fat 32 file system for formatting, you may encounter the error below later on:

Step 3: Using WoeUSB to create bootable Windows 10
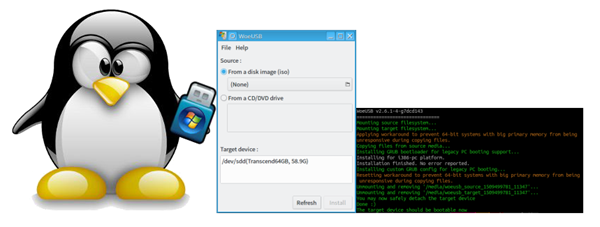
We have everything ready for us now. Start WoeUSB program.
Browse to the downloaded Windows 10 ISO file and select the USB drive on which you want to install it. Just click on Install to begin the process.

Note that it may take up to 15 minutes in creating the Windows 10 USB. Don’t get fooled by the ‘done’ on the screen.

That’s it. You should see a success message.

Step 4: Using Windows 10 bootable USB
Once the bootable USB is ready, restart your system. At boot time, press F2 or F10 or F12 repeatedly to go to the boot settings. In here, select to boot from USB.

You’ll see that Windows 10 is being booted and it gives you the option to install or repair your system. You know what to do now from here.

I hope you find this tutorial useful for creating bootable USB of Windows 10 in Linux . If you have questions or suggestions, please feel free leave a comment.
Like what you read? Please share it with others.
Источник


