- How to Make a User Account an Administrator on Windows 10
- Method 1: Use Windows 10’s Settings utility
- Method 2: Change user account type from the Control Panel
- Method 3: Change account type from the User Accounts utility
- Method 4: Change user account type from an elevated Command Prompt
- About User Profiles
- Types of User Profiles
- User Profile Tiles in Windows 7 and Later
How to Make a User Account an Administrator on Windows 10
There are two different kinds of user accounts on Windows 10 – Standard User accounts and Administrator accounts. The difference between these two user account types is not of functionality but of permissions and authority.
Administrator accounts have complete autonomy and control over every single aspect of a Windows 10 computer – from changing computer settings for all user accounts on the computer and installing applications to getting through User Access Control (UAC), Administrator accounts can do it all. Standard User accounts, on the other hand, are relatively more limited in what they have control over – Standard Users can launch applications but not install any new ones, they can change settings but only as long as the settings they fiddle with don’t affect any other user accounts on the computer, and you need to type in the username and password for an Administrator account to get through any UAC prompts on a Standard User account on Windows 10.
On older versions of Windows, another user account type known as “Guest” used to exist, but nothing of the sort exists on Windows 10. When you create a new user account on a Windows 10 computer, it is created as a Standard User account by default, although you can choose to turn it into an Administrator account while you create it. Standard User accounts are extremely useful for when you need to create a user account for a child or for someone who cannot be trusted to not make a mess of things if given too much power but won’t fit the bill for someone who needs to have a significant amount of access to and control over a computer.
If you want to give a Standard User account on a Windows 10 computer more autonomy and control over the computer, you need to turn it into an Administrator account, which is something that is definitely possible. The following are the four different ways you can go about turning a Standard User account on a Windows 10 computer into an Administrator account:
Note: It is recommended that you try to turn a Standard User account into an Administrator account while logged into an existing Administrator account since most of the methods listed and described require administrative privileges. If you’re not already logged into an Administrator account, you will have to get through UAC prompts using the username and password for an Administrator account on the computer.
Method 1: Use Windows 10’s Settings utility
First and foremost, you can use Windows 10’s Settings utility to turn an already existing Standard User account into an Administrator account. Doing so is quite simple as you use a graphics-based interface to get the job done. If you would like to do so, you need to:
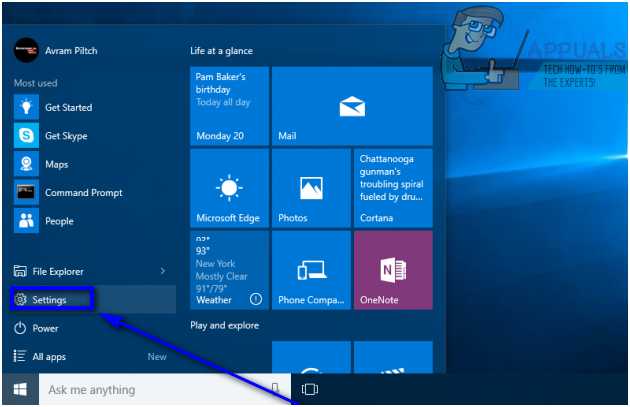
- Open the Start Menu.
- Click on Settings to open Windows 10’s Settings utility.

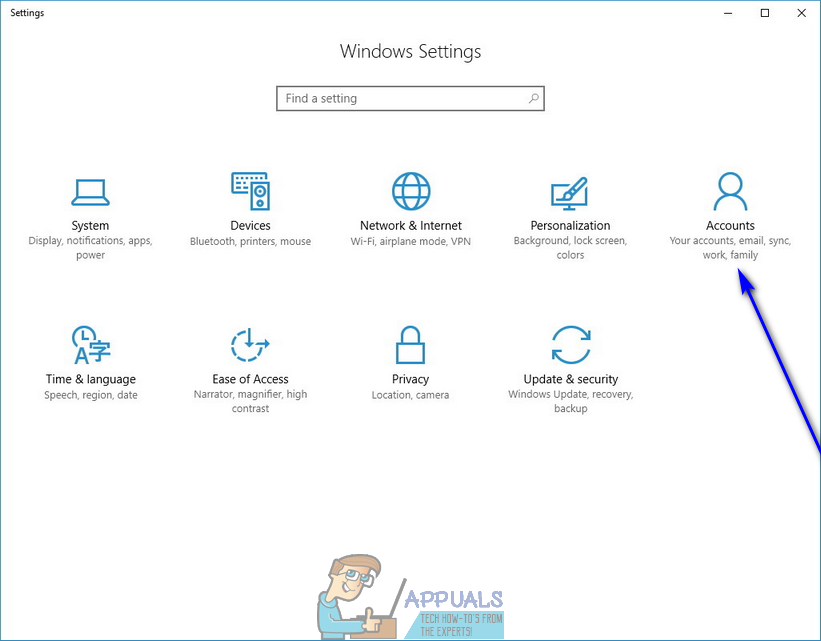
- Click on Accounts.
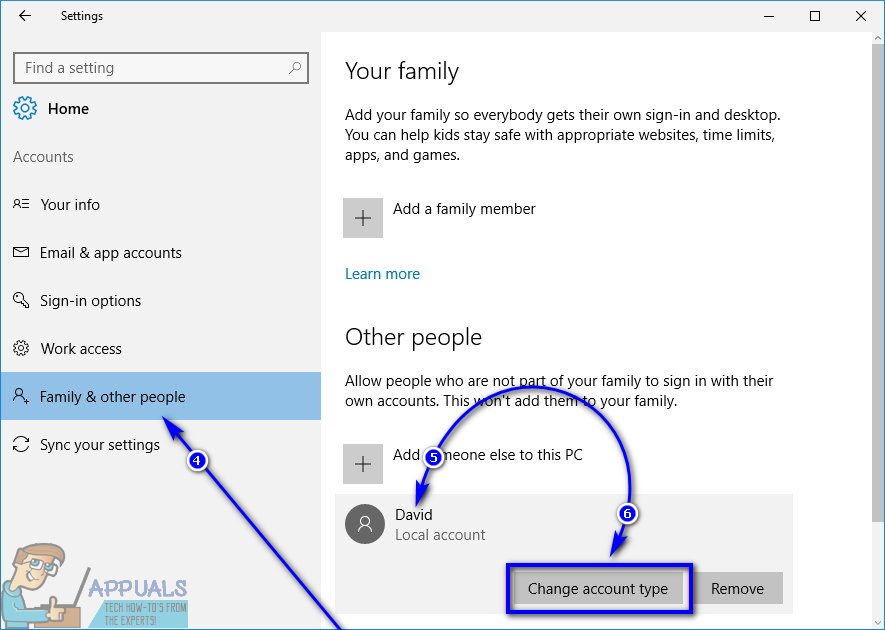
- In the left pane of the window, click on Family & other people.
- Under the Other people section in the right pane, locate and click on the Standard User account you want to make an Administrator.
- Click on Change account type.
- Open the dropdown menu located directly under the Account type option and click on Administrator to select it.
- Click on OK.
- Close the Settings utility.
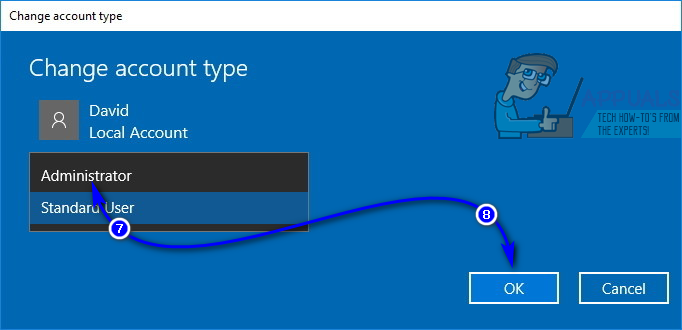
As soon as you do so, the selected Standard User account will be turned into an Administrator account and will be given all the same privileges as the average Administrator account. The same process described above can also be used to turn an Administrator account into a Standard User account – all a user needs to do is click on Standard User instead of Administrator in the dropdown menu in step 7.
Method 2: Change user account type from the Control Panel
One of the most prominent features of the Windows Operating System is the ability to go about doing the same thing a number of different ways. Windows 10 also has the Control Panel – a utility that has been a constant throughout the many different iterations of Windows that have existed, and it too can be used to change the account type of a user account. To turn a Standard User account into an Administrator account using this method, you need to:
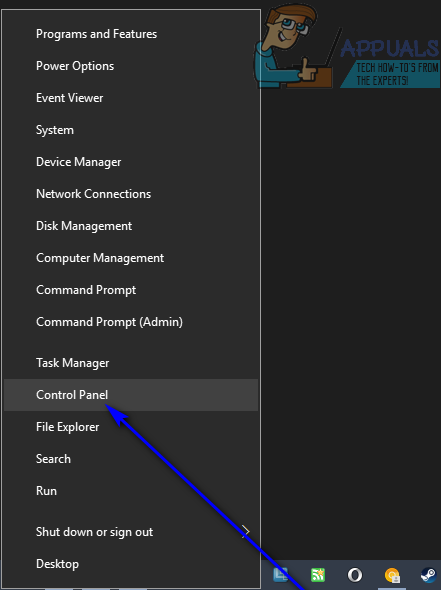
- Right-click on the Start Menu button or press the Windows Logo key + X to open the WinX Menu.
- Click on Control Panel in the WinX Menu to launch the Control Panel.
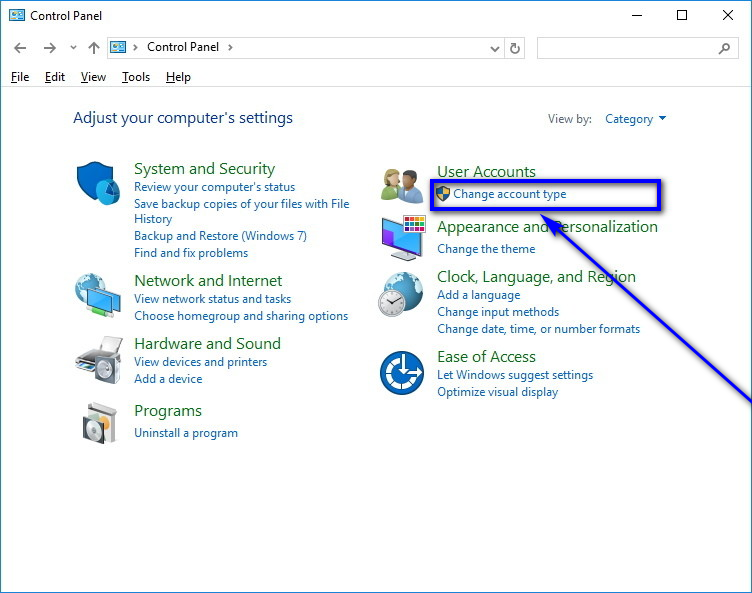
- With the Control Panel in Category view, click on Change account type under the User Accounts section.
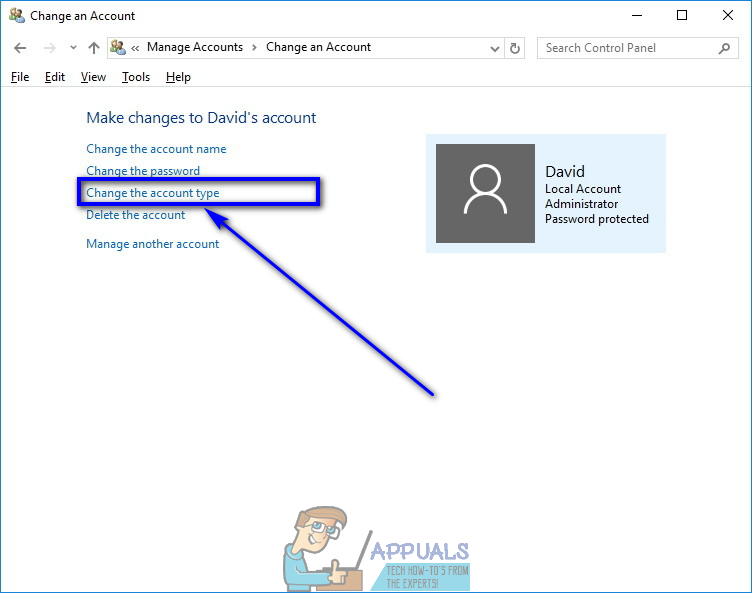
- Locate and click on the Standard User account you want to turn into an Administrator account.
- Click on Change the account type.
- Click on the radio button next to the Administrator option to select it.
- Click on Change Account Type and you’re all done!
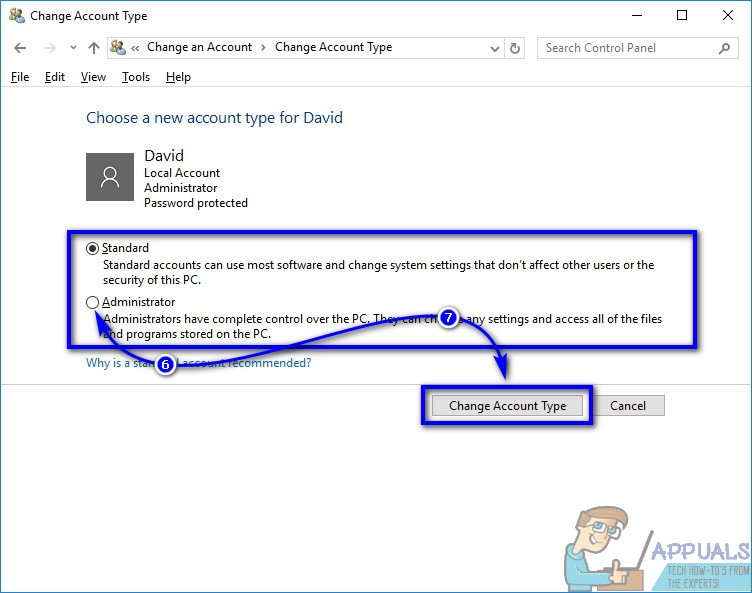
You can now close the Control Panel as the selected Standard User account will have been successfully turned into an Administrator account.
Method 3: Change account type from the User Accounts utility
A slightly more sophisticated but a lot more direct way to change the account type of a user account on Windows 10 is to do so from the User Accounts utility that exists on all versions of the Windows Operating System. To use this method, you need to:
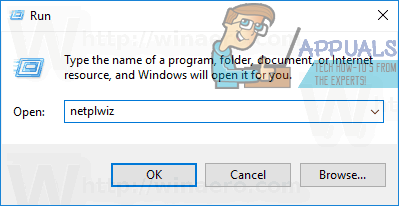
- Press the Windows Logo key + R to open a Run dialog.
- Type netplwiz into the Run dialog and press Enter to launch the User Accounts utility.
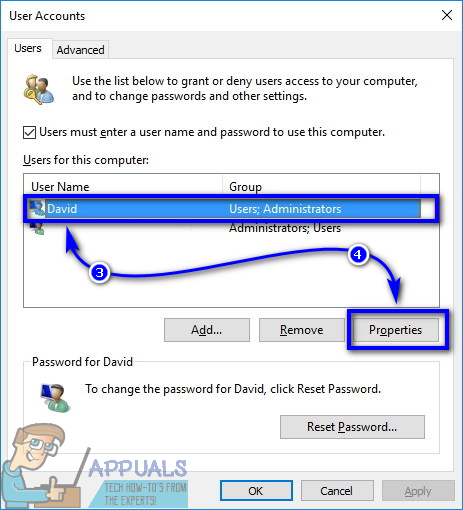
- Under the Users for this computer: section, locate and click on the Standard User account you want to turn into an Administrator account to select it.
- Click on Properties.
- Navigate to the Group Membership tab.
- Click on the radio button next to the Administrator option to select it. In this dialog, you will also see an option known as Other, selecting which will allow you to choose from an array of different access and control levels ranging from Backup Operators and Power Users to Remote Desktop Users, but none of these have the same access to and control over a Windows 10 computer as an Administrator account, so you’re better off not paying any attention to them.
- Click on Apply and then on OK.
- Click on Apply and then on OK in the User Accounts window.
Method 4: Change user account type from an elevated Command Prompt
Last, but certainly not the least, you can turn a Standard User account on a Windows 10 computer into an Administrator account, all from the comfort of an elevated Command Prompt. All it takes is a couple of simple commands! If you would like to use this method to turn a Standard User account into an Administrator account, you need to:
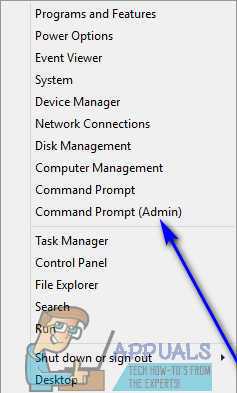
- Right-click on the Start Menu or press the Windows Logo key + X to open the WinX Menu.
- Click on Command Prompt (Admin) to launch an elevated Command Prompt that has administrative privileges.
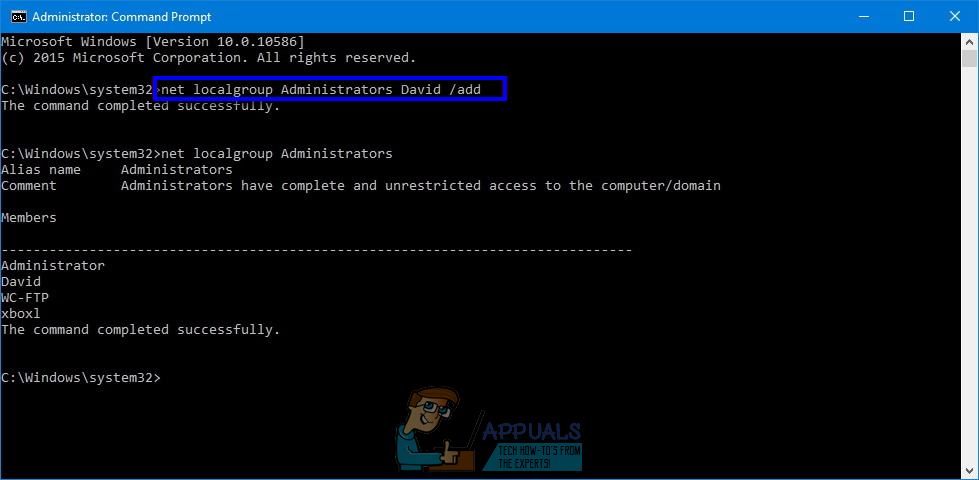
- Type the following command into the elevated Command Prompt, replacing AccountName with the exact name of the Standard User account you want to turn into an Administrator account, and then press Enter:
net localgroup Administrators AccountName /add - As soon as the command has been executed, close the elevated Command Prompt. The selected Standard User account will have been successfully turned into an Administrator account.
While this guide has been engineered to be used on Windows 10, all of the methods listed and described above (apart from Method 1, of course) can also be used to turn Standard User accounts on older versions of the Windows Operating System into Administrator accounts with just a tiny bit of tinkering to make some of the steps viable – opening the Control Panel a different way on versions of Windows that don’t have the WinX Menu, for example.
About User Profiles
The system creates a user profile the first time that a user logs on to a computer. At subsequent logons, the system loads the user’s profile, and then other system components configure the user’s environment according to the information in the profile.
Types of User Profiles
- Local User Profiles. A local user profile is created the first time that a user logs on to a computer. The profile is stored on the computer’s local hard disk. Changes made to the local user profile are specific to the user and to the computer on which the changes are made.
- Roaming User Profiles. A roaming user profile is a copy of the local profile that is copied to, and stored on, a server share. This profile is downloaded to any computer that a user logs onto on a network. Changes made to a roaming user profile are synchronized with the server copy of the profile when the user logs off. The advantage of roaming user profiles is that users do not need to create a profile on each computer they use on a network.
- Mandatory User Profiles. A mandatory user profile is a type of profile that administrators can use to specify settings for users. Only system administrators can make changes to mandatory user profiles. Changes made by users to desktop settings are lost when the user logs off.
- Temporary User Profiles. A temporary profile is issued each time that an error condition prevents the user’s profile from loading. Temporary profiles are deleted at the end of each session, and changes made by the user to desktop settings and files are lost when the user logs off. Temporary profiles are only available on computers running WindowsВ 2000 and later.
A user profile consists of the following elements:
- A registry hive. The registry hive is the file NTuser.dat. The hive is loaded by the system at user logon, and it is mapped to the HKEY_CURRENT_USER registry key. The user’s registry hive maintains the user’s registry-based preferences and configuration.
- A set of profile folders stored in the file system. User-profile files are stored in the Profiles directory, on a folder per-user basis. The user-profile folder is a container for applications and other system components to populate with sub-folders, and per-user data such as documents and configuration files. Windows Explorer uses the user-profile folders extensively for such items as the user’s Desktop, Start menu and Documents folder.
User profiles provide the following advantages:
- When the user logs on to a computer, the system uses the same settings that were in use when the user last logged off.
- When sharing a computer with other users, each user receives their customized desktop after logging on.
- Settings in the user profile are unique to each user. The settings cannot be accessed by other users. Changes made to one user’s profile do not affect other users or other users’ profiles.
User Profile Tiles in Windows 7 and Later
In WindowsВ 7 or later, each user profile has an associated image presented as a user tile. These tiles appear to users on the User Accounts Control Panel item and its Manage Accounts subpage.. The image files for the default Guest and default User accounts also appear here if you have Administrator access rights.
NoteВ В The Manage Accounts subpage is accessed through the Manage another account link in the User Accounts Control Panel item.
- %ProgramData%\Microsoft\User Account Pictures\Guest.bmp
- %ProgramData%\Microsoft\User Account Pictures\User.bmp
The user’s tile image is stored in the %SystemDrive%\Users\ \AppData\Local\Temp folder as .bmp. Any slash characters (\) are converted to plus sign characters (+). For example, DOMAIN\user is converted to DOMAIN+user.
The image file appears in the user’s Temp folder:
- After the user completes the initial system setup (OOBE).
- When the user first launches the User Accounts Control Panel item.
- When the user goes to the Manage Accounts subpage of the User Accounts Control Panel item. In addition, tiles for all other users on the computer are shown.
Those instances are the only times that the images are created or updated. Therefore, there are several caveats to keep in mind when using the Temp folder location programmatically:
The user’s tile is not guaranteed to be present. If the user deletes the .bmp file, for instance manually or through a utility that deletes temporary files, that user tile is not automatically recreated until the user launches the User Accounts Control Panel item or Manage Accounts subpage.
User tiles for other users on the computer might not be present in the currently logged-on user’s Temp folder. For example, if User A creates User B through the User Accounts Control Panel item, User B’s tile is created in User A’s Temp folder when Windows sends User A to the Manage Accounts subpage. Because the directory structure is not created for User B until he or she logs on, User A’s Temp folder is the only location that User B’s tile is stored. When User B logs on, the only image stored in User B’s Temp folder is his or her own.
- To get all user tiles for users on a system, applications might need to search in each user’s Temp directory.
- Because the access control list (ACL) of these Temp directories allows access to SYSTEM, Administrator, and the current user, applications need to elevate to access for other users.
Other users’ tiles are not guaranteed to be up-to-date in their Temp folders. If User B updates his or her user tile, User A will not see the change until User A accesses the Manage Accounts subpage. Therefore, if applications use User A’s Temp folder to obtain User B’s tile, those applications can get an out-of-date image file.


