- Create a user account in Windows
- Create a Microsoft account
- Create a local account
- My computer is on a domain
- My computer is in a workgroup
- About User Profiles
- Types of User Profiles
- User Profile Tiles in Windows 7 and Later
- How to change a Windows 10 user account type and why you might want to
- How to change user account type using Settings
- How to change user account type using User Accounts
- How to change user account type using Control Panel
- How to change user account type using PowerShell
- How to change user account type using Command Prompt
- More Windows 10 resources
- Halo: MCC’s live service elements make it better, not worse
- Microsoft’s Surface Duo is not ‘failing up’
- Here’s what you can do if Windows 10 update KB5001330 is causing issues
- These are the best PC sticks when you’re on the move
Create a user account in Windows
Create a Microsoft account
Swipe in from the right edge of the screen, tap Settings, and then tap Change PC settings. (If you’re using a mouse, point to the lower-right corner of the screen, move the mouse pointer up, click Settings, and then click Change PC settings.)
Tap or click Accounts, and then tap or click Other accounts.
Tap or click Add an account.
Enter the account info for this person to sign in to Windows. There are four ways to do this:
If the person you’re adding already has a Microsoft account, enter it now.
If the person you’re adding doesn’t have a Microsoft account, you can use their email address to create one. Enter the email address that person uses most frequently.
If the person you’re adding doesn’t have an email address, tap or click Sign up for a new email address. It’s free.
If the person you’re adding is a child, tap or click Add a child’s account.
Follow the instructions to finish setting up the account.
Create a local account
Swipe in from the right edge of the screen, tap Settings, and then tap Change PC settings.
(If you’re using a mouse, point to the lower-right corner of the screen, move the mouse pointer up, click Settings, and then click Change PC settings.)
Tap or click Accounts, and then tap or click Other accounts.
Tap or click Add an account, and then tap or click Sign in without a Microsoft account (not recommended).
Tap or click Local account.
Enter a user name for the new account.
If you want this person to sign in with a password, enter and verify the password, add a password hint, and then tap or click Next.
If your PC is on a domain, depending on the domain’s security settings, you might be able to skip this step and tap or click Next, if you prefer.
Tap or click Finish.
My computer is on a domain
Open Microsoft Management Console by clicking the Start button  , typing mmc into the search box, and then pressing Enter.
  If you’re prompted for an administrator password or confirmation, type the password or provide confirmation.
In the left pane of Microsoft Management Console, click Local Users and Groups.
If you don’t see Local Users and Groups, it’s probably because that snap-in hasn’t been added to Microsoft Management Console. Follow these steps to install it:
In Microsoft Management Console, click the File menu, and then click Add/Remove Snap-in.
Click Local Users and Groups, and then click Add.
Click Local computer, click Finish, and then click OK.
Click the Users folder.
Click Action, and then click New User.
Type the appropriate information in the dialog box, and then click Create.
When you are finished creating user accounts, click Close.
My computer is in a workgroup
To open User Accounts, click the Start button , click Control Panel, click User Accounts and Family Safety, and then click User Accounts.
Click Manage another account. If you’re prompted for an administrator password or confirmation, type the password or provide confirmation.
Click Create a new account.
Type the name you want to give the user account, click an account type, and then click Create Account.
About User Profiles
The system creates a user profile the first time that a user logs on to a computer. At subsequent logons, the system loads the user’s profile, and then other system components configure the user’s environment according to the information in the profile.
Types of User Profiles
- Local User Profiles. A local user profile is created the first time that a user logs on to a computer. The profile is stored on the computer’s local hard disk. Changes made to the local user profile are specific to the user and to the computer on which the changes are made.
- Roaming User Profiles. A roaming user profile is a copy of the local profile that is copied to, and stored on, a server share. This profile is downloaded to any computer that a user logs onto on a network. Changes made to a roaming user profile are synchronized with the server copy of the profile when the user logs off. The advantage of roaming user profiles is that users do not need to create a profile on each computer they use on a network.
- Mandatory User Profiles. A mandatory user profile is a type of profile that administrators can use to specify settings for users. Only system administrators can make changes to mandatory user profiles. Changes made by users to desktop settings are lost when the user logs off.
- Temporary User Profiles. A temporary profile is issued each time that an error condition prevents the user’s profile from loading. Temporary profiles are deleted at the end of each session, and changes made by the user to desktop settings and files are lost when the user logs off. Temporary profiles are only available on computers running WindowsВ 2000 and later.
A user profile consists of the following elements:
- A registry hive. The registry hive is the file NTuser.dat. The hive is loaded by the system at user logon, and it is mapped to the HKEY_CURRENT_USER registry key. The user’s registry hive maintains the user’s registry-based preferences and configuration.
- A set of profile folders stored in the file system. User-profile files are stored in the Profiles directory, on a folder per-user basis. The user-profile folder is a container for applications and other system components to populate with sub-folders, and per-user data such as documents and configuration files. Windows Explorer uses the user-profile folders extensively for such items as the user’s Desktop, Start menu and Documents folder.
User profiles provide the following advantages:
- When the user logs on to a computer, the system uses the same settings that were in use when the user last logged off.
- When sharing a computer with other users, each user receives their customized desktop after logging on.
- Settings in the user profile are unique to each user. The settings cannot be accessed by other users. Changes made to one user’s profile do not affect other users or other users’ profiles.
User Profile Tiles in Windows 7 and Later
In WindowsВ 7 or later, each user profile has an associated image presented as a user tile. These tiles appear to users on the User Accounts Control Panel item and its Manage Accounts subpage.. The image files for the default Guest and default User accounts also appear here if you have Administrator access rights.
NoteВ В The Manage Accounts subpage is accessed through the Manage another account link in the User Accounts Control Panel item.
- %ProgramData%\Microsoft\User Account Pictures\Guest.bmp
- %ProgramData%\Microsoft\User Account Pictures\User.bmp
The user’s tile image is stored in the %SystemDrive%\Users\ \AppData\Local\Temp folder as .bmp. Any slash characters (\) are converted to plus sign characters (+). For example, DOMAIN\user is converted to DOMAIN+user.
The image file appears in the user’s Temp folder:
- After the user completes the initial system setup (OOBE).
- When the user first launches the User Accounts Control Panel item.
- When the user goes to the Manage Accounts subpage of the User Accounts Control Panel item. In addition, tiles for all other users on the computer are shown.
Those instances are the only times that the images are created or updated. Therefore, there are several caveats to keep in mind when using the Temp folder location programmatically:
The user’s tile is not guaranteed to be present. If the user deletes the .bmp file, for instance manually or through a utility that deletes temporary files, that user tile is not automatically recreated until the user launches the User Accounts Control Panel item or Manage Accounts subpage.
User tiles for other users on the computer might not be present in the currently logged-on user’s Temp folder. For example, if User A creates User B through the User Accounts Control Panel item, User B’s tile is created in User A’s Temp folder when Windows sends User A to the Manage Accounts subpage. Because the directory structure is not created for User B until he or she logs on, User A’s Temp folder is the only location that User B’s tile is stored. When User B logs on, the only image stored in User B’s Temp folder is his or her own.
- To get all user tiles for users on a system, applications might need to search in each user’s Temp directory.
- Because the access control list (ACL) of these Temp directories allows access to SYSTEM, Administrator, and the current user, applications need to elevate to access for other users.
Other users’ tiles are not guaranteed to be up-to-date in their Temp folders. If User B updates his or her user tile, User A will not see the change until User A accesses the Manage Accounts subpage. Therefore, if applications use User A’s Temp folder to obtain User B’s tile, those applications can get an out-of-date image file.
How to change a Windows 10 user account type and why you might want to
 Source: Windows Central
On Windows 10, you have two main account types for users, including Administrator and Standard User, each one offering a different set of privileges to use a device and apps. The Administrator type provides complete system control, which means that users can change settings globally, install apps, execute elevated tasks, and perform pretty much anything.
In comparison, the Standard User account type is more restrictive. Users with the standard account can work with apps, but they can’t install new applications. They can change settings, but only those that won’t affect other accounts, which means that global system configurations aren’t allowed. If an app or a command requires elevation, they’ll need administrative credentials to complete the task.
Usually, it’s recommended to use an account with standard privileges as it offers a more secure environment. However, depending on the situation, it may be necessary to change the account type from Standard User to Administrator (or in reverse), and Windows 10 includes multiple ways to complete the process using Settings, Control Panel, User Accounts, PowerShell, and Command Prompt.
In this Windows 10 guide, we’ll walk you through virtually every method that you can use to change the account type on your device.
Quick tip: If you’re looking to make your primary account standard, it’s best to create a new administrator account first, and then use the new account to change your old account to standard and make administrative changes.
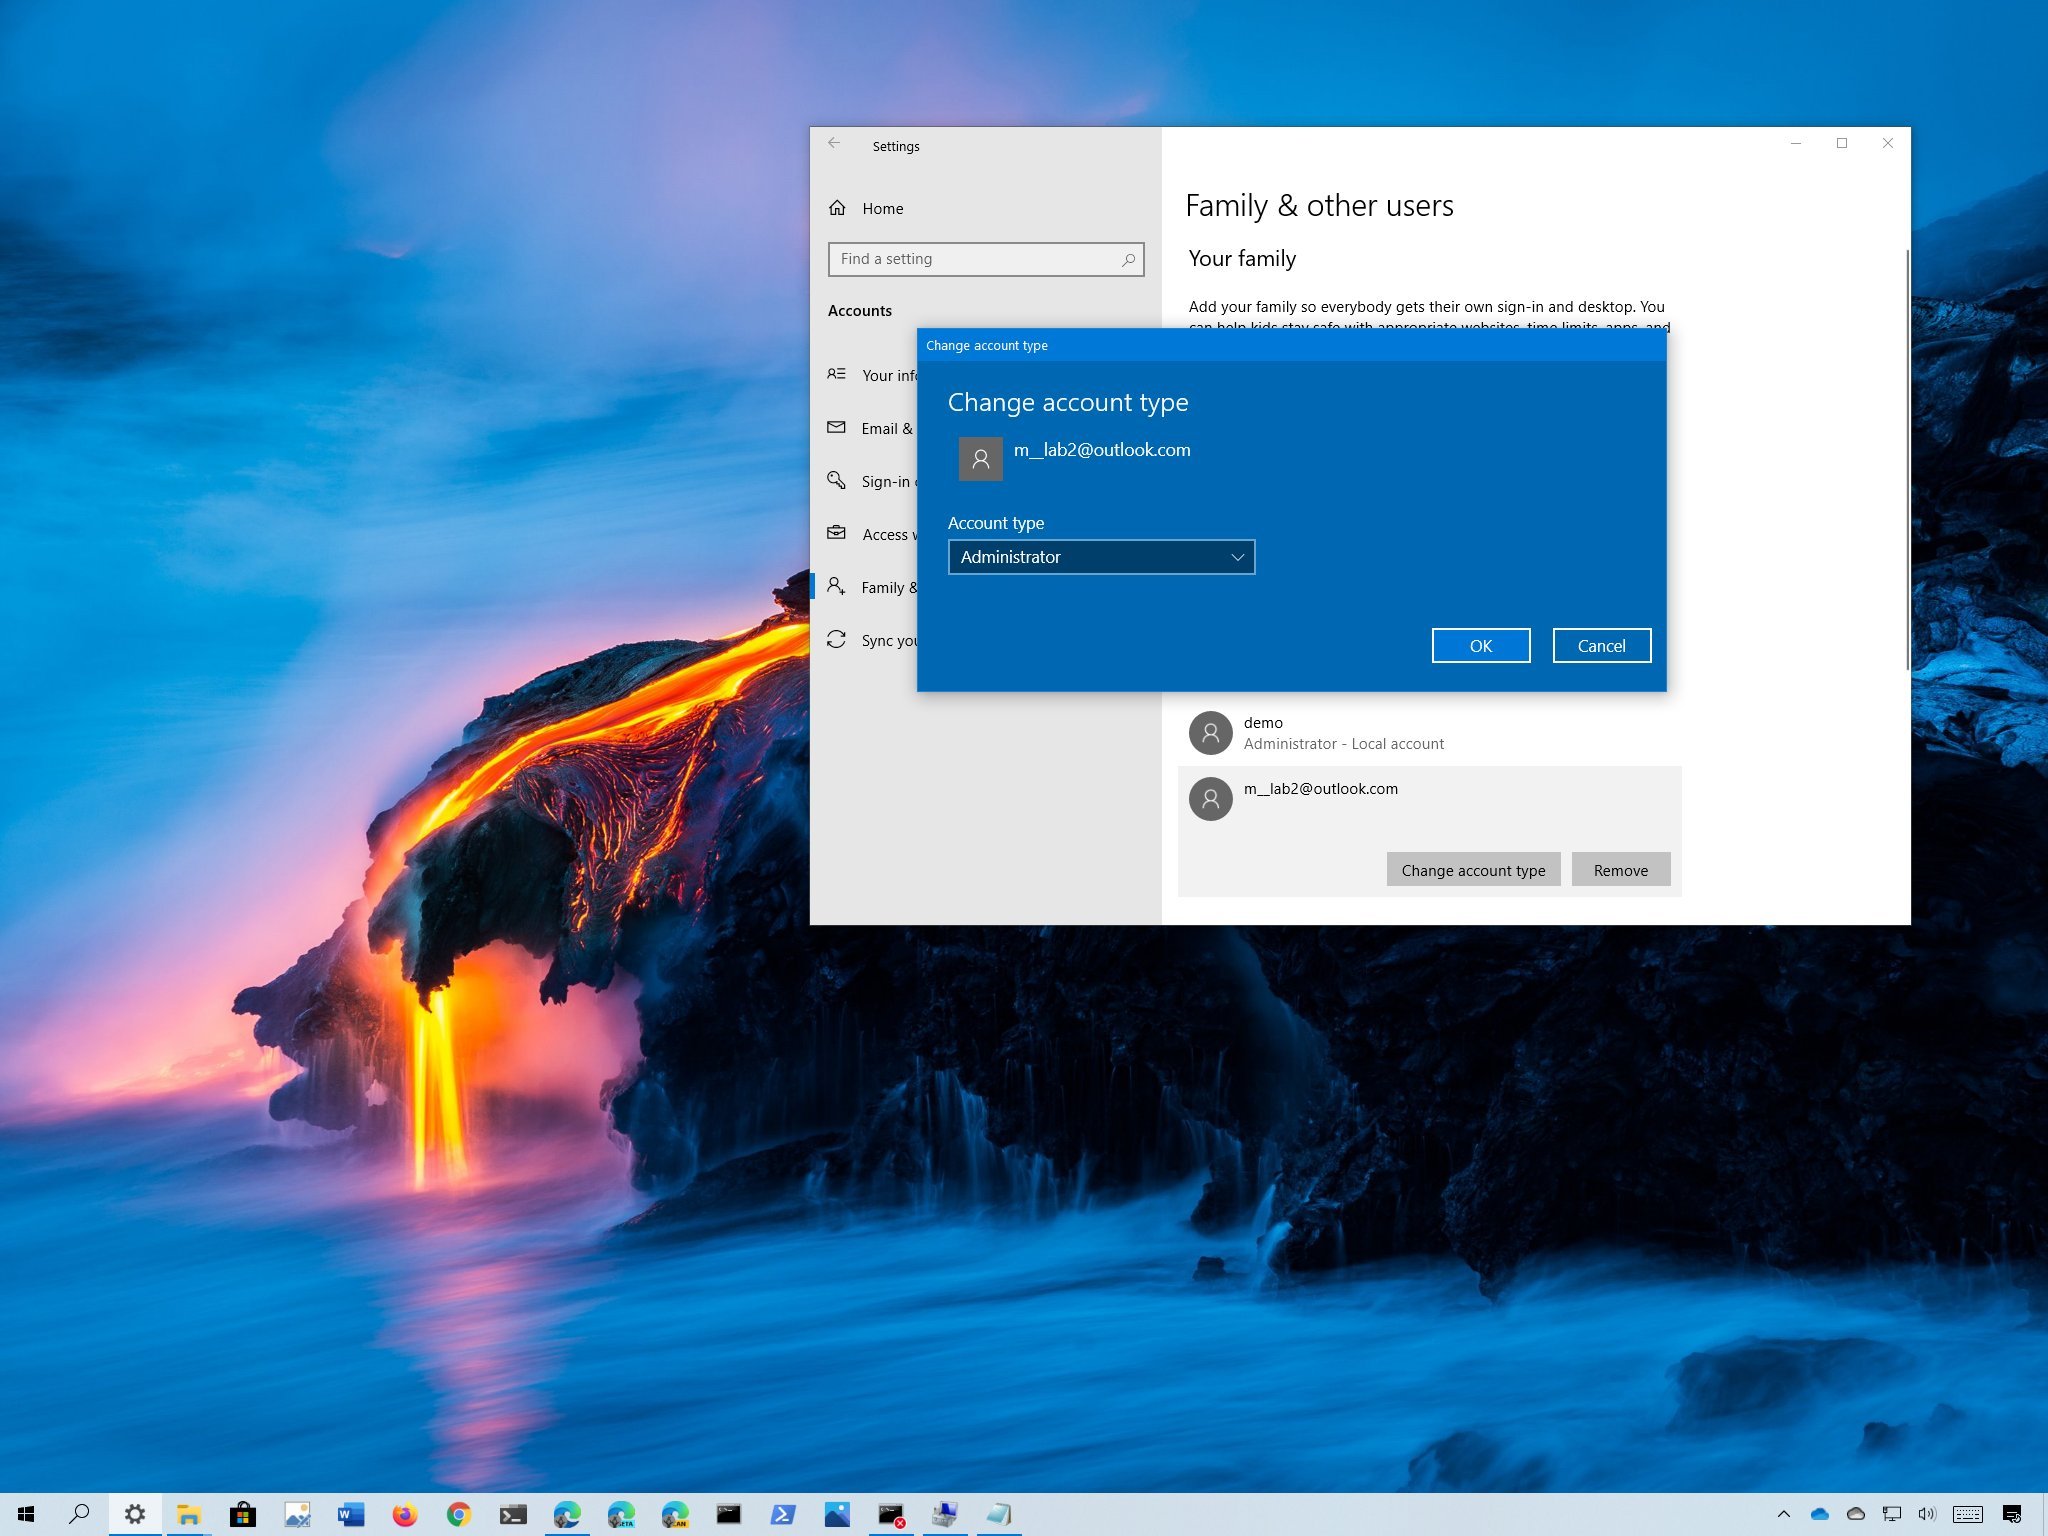
How to change user account type using Settings
To change the account type with Settings, use these steps:
- Open Settings.
- Click on Accounts.
- Click on Family & other users.
- Under the «Your family» or «Other users» section, select the user account.
Click the Change account type button.
 Source: Windows Central
Select the Administrator or Standard User account type.
 Source: Windows Central
Once you complete the steps, restart your computer to start using the account with the new privilege level.
How to change user account type using User Accounts
To set an account to Standard user or Administrator type using User Accounts (netplwiz), use these steps:
- Open Start.
- Search for netplwiz and click the top result to open the «User Accounts» experience.
- Select the account that you wish to change.
Click the Properties button.
 Source: Windows Central
Select the Standard user or Administrator account type depending on your requirements.
Source: Windows Central
Quick tip: You can also select the Other membership option, which allows you to choose different user groups, such as Power Users, Backup Operators, Remote Desktop Users, etc.
Once you complete the steps, restart the device to apply the changes and start using the new account type on Windows 10.
How to change user account type using Control Panel
To change an account type using Control Panel, use these steps:
- Open Control Panel.
Under the «User Accounts» section, click the Change account type option.
Source: Windows Central
Select the account that you want to change.
Source: Windows Central
Click the Change the account type option.
Source: Windows Central
Select either Standard or Administrator as required.
Source: Windows Central
After you complete the steps, the next time the user signs in to the account, it’ll be limited to the permissions allowed by the user group that you specified.
How to change user account type using PowerShell
To change a Windows 10 account type with PowerShell, use these steps:
- Open Start.
- Search for PowerShell, right-click the top result, and select the Run as administrator option.
Type the following command to change the account type to «Standard User» and press Enter:
Remove-LocalGroupMember -Group «Administrators» -Member «ACCOUNT-NAME»
Source: Windows Central
In the command, make sure to change the ACCOUNT-NAME for the actual name of the account that you want to change. If you’re trying to change an account using a Microsoft account, then the account name would be the first five letters of the email address.
Type the following command to change the account type to «Administrator» and press Enter:
Add-LocalGroupMember -Group «Administrators» -Member «ACCOUNT-NAME»
 Source: Windows Central
In the command, make sure to change the ACCOUNT-NAME for the actual name of the account that you want to change.
Quick note: Users with administrator accounts are part of both, the «Administrators» and «Users» groups. As a result, to make a user standard, you only need to remove the user from the «Administrators» group.
After you complete the steps, the account type will switch to the Administrator or Standard group depending on your configuration.
How to change user account type using Command Prompt
To switch account types with Command Prompt, use these steps:
- Open Start.
- Search for Command Prompt, right-click the top result, and select the Run as administrator option.
Type the following command to change the account type to Standard User and press Enter:
net localgroup Administrators «ACCOUNT-NAME» /delete
Source: Windows Central
In the command, make sure to change the ACCOUNT-NAME for the actual name of the account that you want to change. If you’re trying to change an account using a Microsoft account, then the account name would be the first five letters of the email address.
Type the following command to change the account type to Administrator and press Enter:
net localgroup Administrators «ACCOUNT-NAME» /add
Source: Windows Central
In the command, make sure to change the ACCOUNT-NAME for the actual name of the account that you want to change.
Type the following command view the account type and press Enter:
net user ACCOUNT-NAME
Source: Windows Central
Once you complete the steps, the next time the user signs in to the device, the account will load with the privileges allowed by the group that you specified in the command.
More Windows 10 resources
For more helpful articles, coverage, and answers to common questions about Windows 10, visit the following resources:
![]()
Halo: MCC’s live service elements make it better, not worse
Halo: The Master Chief Collection is more popular than ever, but some fans don’t agree with the live service approach 343 Industries has taken with it. Here’s why those elements are, at the end of the day, great for the game and for Halo overall.
![]()
Microsoft’s Surface Duo is not ‘failing up’
Microsoft announced this week that it was expanding Surface Duo availability to nine new commercial markets. While Surface Duo is undoubtedly a work in progress, this is not a sign of a disaster. It’s also doesn’t mean that Surface Duo is selling a ton either. Instead, the reason for the expansion is a lot more straightforward.
![]()
Here’s what you can do if Windows 10 update KB5001330 is causing issues
In this guide, we’ll show you the steps to get rid of the update KB5001330 to fix profile, gaming, and BSoD problems with the Windows 10 October 2020 Update and May 2020 Update.
![]()
These are the best PC sticks when you’re on the move
Instant computer — just add a screen. That’s the general idea behind the ultra-portable PC, but it can be hard to know which one you want. Relax, we have you covered!


