- Удаление старых профилей пользователей Windows с помощью GPO или PowerShell
- Ручное удаление профиля пользователя в Windows
- Групповая политика автоматического удаления старых профилей
- Очистка сервера от старых профилей пользователей с помощью PowerShell
- Удаляем папку, которую не получается удалить в Windows 10
- How to Recover Deleted User Folder in Windows 10
- Accidentally Deleted User Folder Windows 10, What Can I Do
- EaseUS Data Recovery Wizard Features
- How to Recover Deleted User Folder on Windows 10 in 3 Steps
- cmd Delete Folder – How to Remove Files and Folders in Windows
- Kris Koishigawa
- How to open Command Prompt
- How to delete files with the del command
- How to force delete files with the del command
- How to delete folders with the rmdir command
- How to use the /s flag with rmdir
- Kris Koishigawa
Удаление старых профилей пользователей Windows с помощью GPO или PowerShell
На рабочих станциях и серверах Windows, особенно на терминальных серверах RDS (Remote Desktop Services), периодически возникает необходимость очистки каталога C:\Users от старых профилей пользователей (уволенные пользователи, пользователи, которые долго не используют сервер и т.д.).
Основная проблема терминальных серверов – постоянный рост размеров каталогов профилей пользователей на диске. Частично эта проблема решается политиками квотирования размера профиля пользователя с помощью FSRM или NTFS квот, перемещаемыми папками и т.д. Но при большом количестве пользователей терминального сервера в папке C:\Users со временем накапливается огромное количество каталогов с ненужными профилями пользователей.
Ручное удаление профиля пользователя в Windows
Многие начинающиеся администраторы пытаются вручную удалить каталог с профилем пользователя из папки C:\Users. Так можно делать, если вы после удаления папки вручную удалите раздел профиля пользователя со ссылкой на каталог в ветке реестра HKEY_LOCAL_MACHINE\SOFTWARE\Microsoft\Windows NT\ CurrentVersion\ProfileList. Правильный ручной способ удаления профиля пользователя в Windows – открыть свойства системы, перейти в Advanced System Settings -> User Profiles -> Settings, выбрать в списке пользователя (в столбце Size указан размер профиля пользователя) и нажать кнопку Удалить.

Но это ручной способ, а хочется автоматизации.
Групповая политика автоматического удаления старых профилей
В Windows есть встроенная групповая политика для автоматического удаления старых профилей пользователей старше xx дней. Эта политика находится в разделе Конфигурация компьютера -> Административные шаблоны -> Система -> Профили пользователей (Computer Configuration -> Administrative Templates -> System -> User Profiles) и называется “Удалять при перезагрузке системы профили пользователей по истечении указанного числа дней” (Delete user profiles older than a specified number days on system restart). Вы можете включить этот параметр в локальном редакторе политик (gpedit.msc) или с помощью доменных политик из консоли GPMC.msc.
Включите политику и укажите через сколько дней профиль пользователя считается неактивным и “Служба профилей пользователей Windows” можно автоматически удалить такой профиль при следующей перезагрузке. Обычно тут стоит указать не менее 45-90 дней.

Основные проблемы такого способа автоматической очистки профилей – ожидание перезагрузки сервера и неизбирательность (вы не можете запретить удаление определенных профилей, например, локальных учетных записей, администраторов и т.д.). Также эта политика может не работать, если некоторое стороннее ПО (чаще всего это антивирус) обращается к файлу NTUSER.DAT в профилях пользователей и обновляет дату последнего использования.
Очистка сервера от старых профилей пользователей с помощью PowerShell
Вместо использования рассмотренной выше политики автоматической очистки профилей, вы можете использовать простой PowerShell скрипт для поиска и удаления профилей неактивных или заблокированных пользователей.
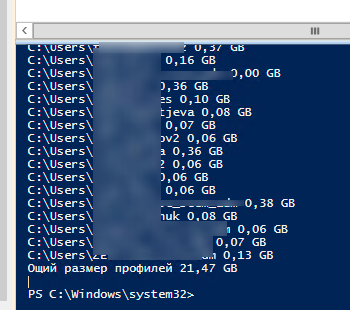
Сначала попробуем подсчитать размер профиля каждого пользователя в папке C:\Users c помощью простого скрипта из статьи “Вывести размер папок с помощью PowerShell”:
gci -force ‘C:\Users’-ErrorAction SilentlyContinue | ? < $_ -is [io.directoryinfo] >| % <
$len = 0
gci -recurse -force $_.fullname -ErrorAction SilentlyContinue | % < $len += $_.length >
$_.fullname, ‘ <0:n2>GB’ -f ($len / 1Gb)
$sum = $sum + $len
>
“Общий размер профилей”,’ <0:n2>GB’ -f ($sum / 1Gb)
Итого суммарный размер всех профилей пользователей в каталоге C:\Users около 22 Гб.
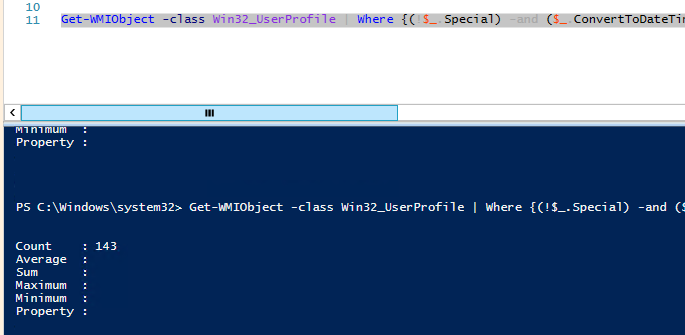
Теперь выведем список пользователей, профиль которых не использовался более 60 дней. Для поиска можно использовать значение поля профиля LastUseTime.
У меня на терминальном сервере оказалось 143 профиля неактивных пользователей (общим размером около 10 Гб).
Чтобы удалить все эти профили достаточно добавить перенаправить список на команду Remove-WmiObject (перед использование скрипта удаления желательно несколько раз перепроверить его вывод с помощью параметра –WhatIf ):
Чтобы не удалять профили некоторых пользователей, например, специальные аккаунты System и Network Service, учетную запись локального администратора, пользователей с активными сессиями, список аккаунтов-исключений), нужно модифицировать скрипт следующим образом:
#Список аккаунтов, чьи профили нельзя удалять
$ExcludedUsers =»Public»,»zenoss»,»svc»,”user_1”,”user_2”
$LocalProfiles=Get-WMIObject -class Win32_UserProfile | Where <(!$_.Special) -and (!$_.Loaded) -and ($_.ConvertToDateTime($_.LastUseTime) -lt (Get-Date).AddDays(-60))>
foreach ($LocalProfile in $LocalProfiles)
<
if (!($ExcludedUsers -like $LocalProfile.LocalPath.Replace(«C:\Users\»,»»)))
<
$LocalProfile | Remove-WmiObject
Write-host $LocalProfile.LocalPath, «профиль удален” -ForegroundColor Magenta
>
>
Вы можете настроить запуск этого скрипта через shutdown скрипт групповой политики или по расписанию заданием планировщика. (перед настройкой автоматического удаления профилей внимательно протестируйте скрипт в своей среде!).
Можно модифицировать скрипт, чтобы автоматически удалять пользователи всех пользователей, которые добавлены в определенную группу AD (например, группа DisabledUsers):
Удаляем папку, которую не получается удалить в Windows 10
Совсем нередко бывают случаи, когда пытаешься удалить уже ненужную папку, а сделать это ну никак не получается. Давайте рассмотрим несколько вариантов, как добиться своего и удалить неудаляемые папки или файлы в Windows 10.
1. Во-первых, необходимо попробовать просто перезагрузить компьютер. В большинстве случаев это нехитрое действие приведет к нужному результату – папка удалится стандартным способом.
2. Возможно вы вошли в систему как обычный пользователь, а папка для возможности удаления требует наличие прав администратора. Войдите под учетной записью администратора и попробуйте удалить папку. Если по каким-либо причинам это сделать невозможно, то двигаемся дальше.
3. Нажатием сочетания клавиш Win + R, открываем диалоговое окно «Выполнить», вводим команду msconfig . В открывшемся окне переходим на вкладку «Загрузка». В параметрах загрузки отмечаем галочкой пункт «Безопасный режим» → «Применить» → «ОК» → перезагружаем компьютер.
В безопасном режиме удаляем ненужную папку стандартным способом. Для возврата к обычной загрузке, в окне «Конфигурация системы», на вкладке «Загрузка», убираем ранее поставленную галочку → «Применить» → «ОК» → перезагружаем компьютер.
4. С помощью имеющегося в системе архиватора, например, WinRAR, добавляем папку в архив. В параметрах архивации указываем «Удалить файлы после упаковки». Архиватор удалит папку, а нам останется удалить архив.
5. Удалить «непослушную» папку может помочь какой-либо сторонний файловый менеджер. Например, широко известный и популярный Total Commander, который можно скачать по адресу: https://www.ghisler.com/ .
6. Велика вероятность того, что файлы в папке задействованы в каких-то процессах. Пробуем удалять файлы по очереди. Может появиться предупреждение о том, что файл невозможно удалить, так как он открыт в какой-то программе или задействован в определенном процессе.
В этом случае закрываем указанную программу или останавливаем процесс в Диспетчере задач, а затем удаляем папку. Удалить папку также могут помочь и сторонние утилиты для разблокировки заблокированных файлов. Например, Unlocker, LockHunter, Wise Force Deleter.
7. Не лишним будет просканировать операционную систему на наличие вирусов. Вполне возможно, что ваше антивирусное ПО пропустило «паразитов», и теперь зловреды не дают вам полноценно хозяйничать в системе.
Если вам понравилась статья, поставьте лайк, поделитесь в социальных сетях, и не забудьте 👉 подписаться на канал , чтобы не пропустить новые выпуски!
How to Recover Deleted User Folder in Windows 10
If you have accidentally deleted or lost user folder in Windows 10, do not worry, it is easy to restore deleted or lost Windows 10 user folder by using EaseUS Data Recovery Wizard. With this ultimate data recovery tool, you can easily restore the document folder, video folder, picture, and music folder with a few clicks.
Table of Contents
About the Author
Reviews and Awards

Steps to Recover Deleted User Folder on Windows 10
- 1. Launch the application and open it.
- 2. Select the C drive to recover the deleted Users folder and click Scan.
- 3. Wait for the scanning to complete.
- 4. Browse the tabs to find the User folder and its contents. More items.
Accidentally Deleted User Folder Windows 10, What Can I Do
Applied to Windows 10, Windows 8.1/8/7/Vista/XP
«I accidentally deleted my user folderВ on Windows 10. When I realized the mistake, it was too late to cancel the operation, and all the folders and files which originally located there were gone. Is there a way to recover the deleted user folderВ in Windows 10?»
Usually, when you create an account in Windows, it will generate a corresponding user folder that usually contains my documents, music, pictures, and videos folder located inВ C drive. You can easily get access to these user folders from File Explorer under This PC.В However, you may lose user folder on Windows 10 in daily use due to:
- Windows 10 anniversary update
- Accidental deletion of user folder by clicking the Delete button
- The position change causes user folder missing
No matter how do you lose the data, the simplest and safest way to recover accidentally deleted the user folder on Windows 10 is using professional hard drive data recovery software. Then you need EaseUS Data Recovery Wizard for Windows, which can recover deleted user account in Windows 10 within three steps, including document folder, music, video, and image folder.
EaseUS Data Recovery Wizard Features
EaseUS Data Recovery Wizard offers a graphical user interface to help you recover the deleted user folder, as well as other common file types in an easier way than ever.
- Supports data recovery from recycle bin, hard drive, external hard drive, memory card, USB flash drive, digital camera, and camcorders.
- Recover lost or deleted documents, graphics, video, audio, email, and other files from internal and external hard disks effectively.
- Restore data resulted from accidental deletion, hard drive corruption/formatting, system/file system crash, virus attack, or other scenarios.
- RetrieveВ files from FAT, NTFS, HFS+В and exFAT partition/drives.
How to Recover Deleted User Folder on Windows 10 in 3 Steps
Now, follow the step-by-step guides below to recover deleted user folder on Windows 10 properly. No technique requires, and you can make it done with ease.В
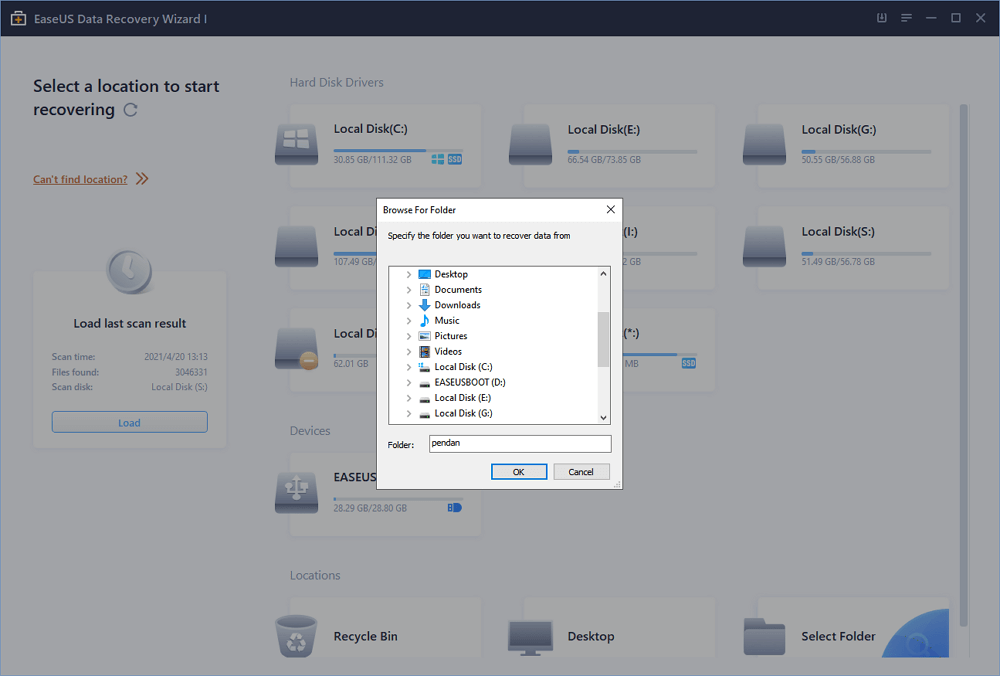
Step 1.В Scan the location of lost User folder.
Under Specify a location, move your mouse over «Select Folder» and click «Browse» to selectВ the right location where you lost the User folder. If the User Folder disappeared, you may choose to scan the Desktop or C: drive to find this folder.
Click «OK» to confirm and let this software scan the whole computer and find the lost User folder.
Step 2. Find and preview the User folder.
Check and find the lost User folder use the search bar. You can also use «Filter» as a quick way to find the lost user folder. Double-click to open and preview the found files in User Folder.

Step 3. Recover and save User folder.
Check the files in your User folder, when it’s alright, click «Recover» to save this folder back to a safe location on your PC.
cmd Delete Folder – How to Remove Files and Folders in Windows

Kris Koishigawa

Sometimes it’s just faster to do things with the command line.
In this quick tutorial we’ll go over how to open Command Prompt, some basic commands and flags, and how to delete files and folders in Command Prompt.
If you’re already familiar with basic DOS commands, feel free to skip ahead.
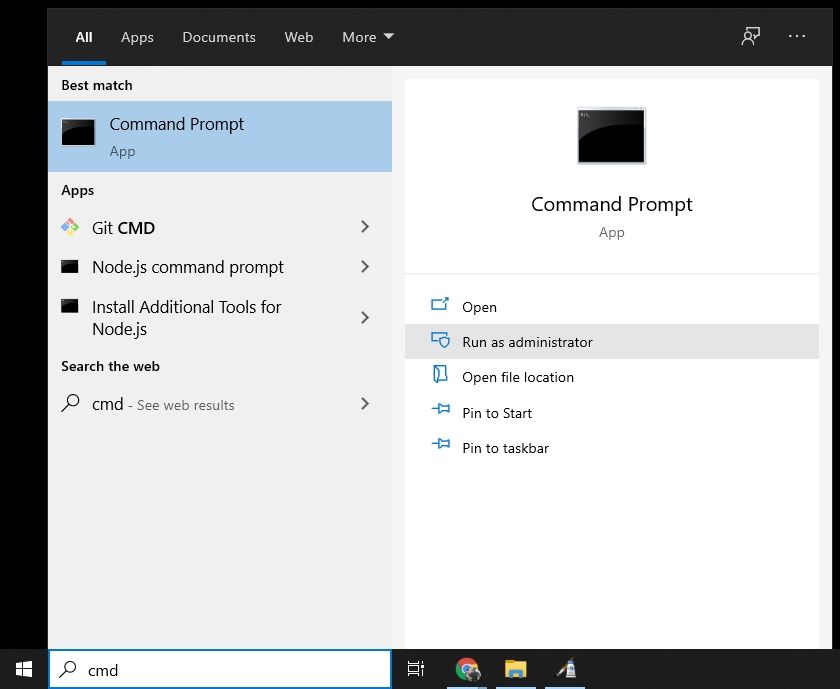
How to open Command Prompt
To open Command Prompt, press the Windows key, and type in «cmd».
Then, click on «Run as Administrator»:
After that, you’ll see a Command Prompt window with administrative privileges:
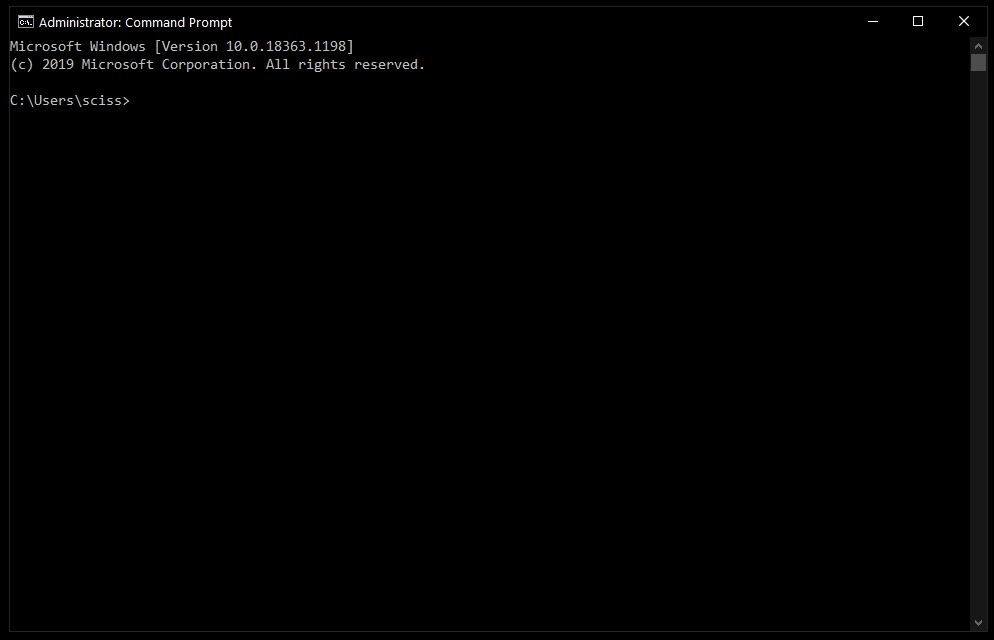 Screenshot of Command Prompt window
If you can’t open Command Prompt as an administrator, no worries. You can open a normal Command Prompt window by clicking «Open» instead of «Run as Administrator».
The only difference is that you may not be able to delete some protected files, which shouldn’t be a problem in most cases.
How to delete files with the del command
Now that Command Prompt is open, use cd to change directories to where your files are.
I’ve prepared a directory on the desktop called Test Folder. You can use the command tree /f to see a, well, tree, of all the nested files and folders:
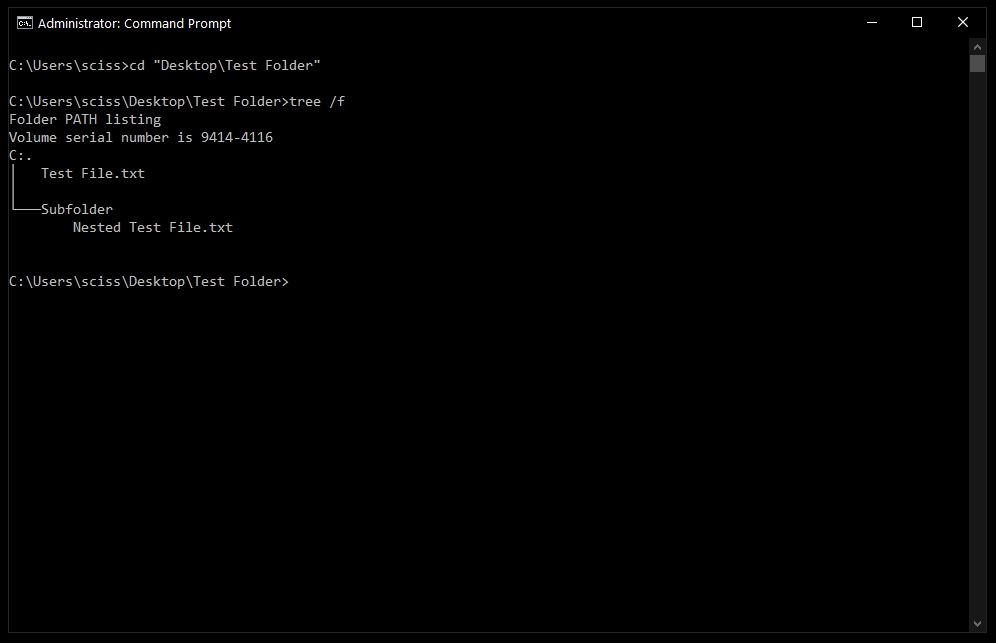
To delete a file, use the following command: del » » .
For example, to delete Test file.txt , just run del «Test File.txt» .
There may be a prompt asking if you want to delete the file. If so, type «y» and hit enter.
Note: Any files deleted with the del command cannot be recovered. Be very careful where and how you use this command.
After that, you can run tree /f to confirm that your file was deleted:

Also, bonus tip – Command Prompt has basic autocompletion. So you could just type in del test , press the tab key, and Command Prompt will change it to del «Test File.txt» .
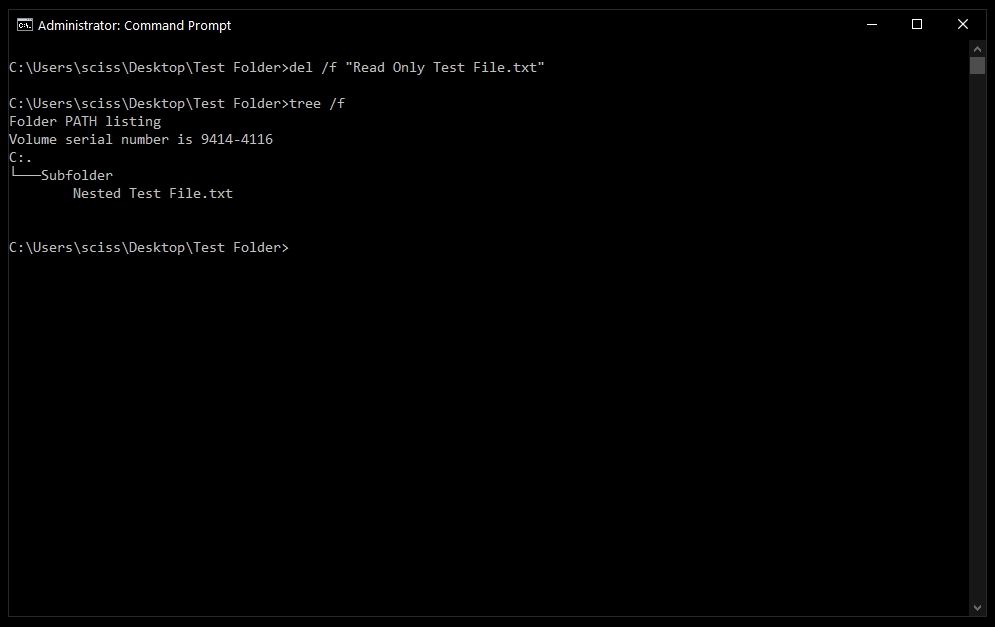
How to force delete files with the del command
Sometimes files are marked as read only, and you’ll see the following error when you try to use the del command:
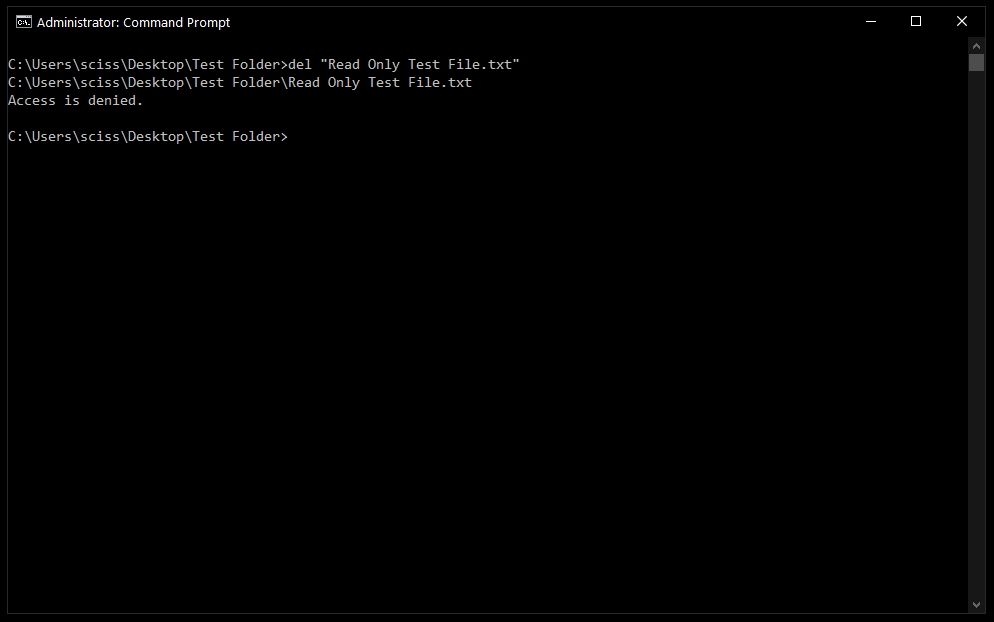
To get around this, use the /f flag to force delete the file. For example, del /f «Read Only Test File.txt» :
How to delete folders with the rmdir command
To delete directories/folders, you’ll need to use the rmdir or rd command. Both commands work the same way, but let’s stick with rmdir since it’s a bit more expressive.
Also, I’ll use the terms directory and folder interchangeably for the rest of the tutorial. «Folder» is a newer term that became popular with early desktop GUIs, but folder and directory basically mean the same thing.
To remove a directory, just use the command rmdir .
Note: Any directories deleted with the rmdir command cannot be recovered. Be very careful where and how you use this command.
In this case I want to remove a directory named Subfolder, so I’ll use the command rmdir Subfolder :
![]()
But, if you remember earlier, Subfolder has a file in it named Nested Test File.
You could cd into the Subfolder directory and remove the file, then come back with cd .. and run the rmdir Subfolder command again, but that would get tedious. And just imagine if there were a bunch of other nested files and directories!
Like with the del command, there’s a helpful flag we can use to make things much faster and easier.
How to use the /s flag with rmdir
To remove a directory, including all nested files and subdirectories, just use the /s flag:
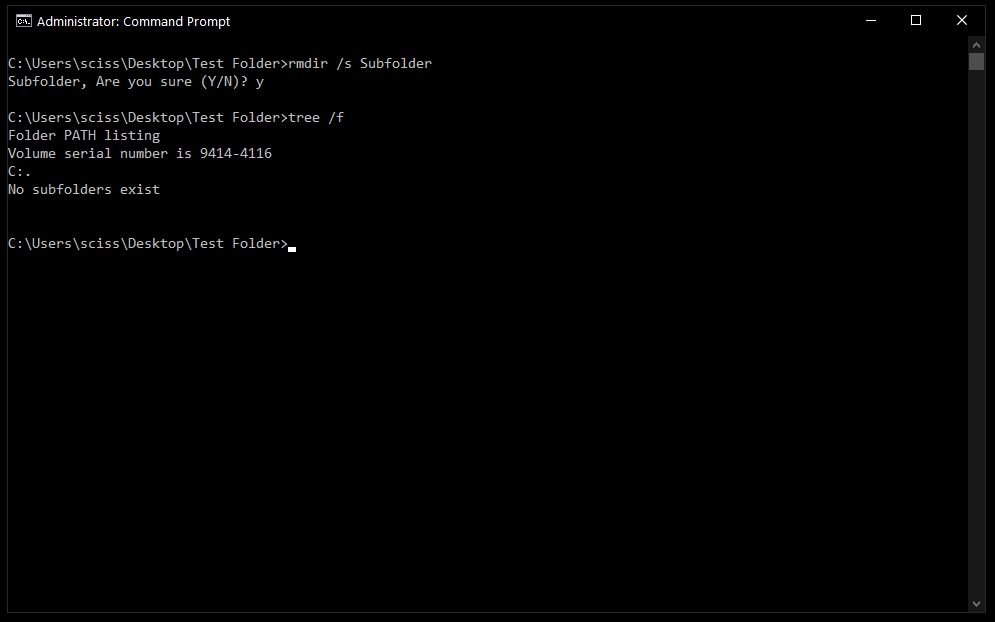
There will probably be a prompt asking if you want to remove that directory. If so, just type «y» and hit enter.
And that’s it! That should be everything you need to know to remove files and folders in the Windows Command Prompt.
All of these commands should work in PowerShell, which is basically Command Prompt version 2.0. Also, PowerShell has a bunch of cool aliases like ls and clear that should feel right at home if you’re familiar with the Mac/Linux command line.
Did these commands help you? Are there any other commands that you find useful? Either way, let me know over on Twitter.
Kris Koishigawa
Read more posts by this author.
If you read this far, tweet to the author to show them you care. Tweet a thanks
Learn to code for free. freeCodeCamp’s open source curriculum has helped more than 40,000 people get jobs as developers. Get started
freeCodeCamp is a donor-supported tax-exempt 501(c)(3) nonprofit organization (United States Federal Tax Identification Number: 82-0779546)
Our mission: to help people learn to code for free. We accomplish this by creating thousands of videos, articles, and interactive coding lessons — all freely available to the public. We also have thousands of freeCodeCamp study groups around the world.
Donations to freeCodeCamp go toward our education initiatives, and help pay for servers, services, and staff.


