- How to Allow Non-Admin Users to Start/Stop Windows Service?
- Setting Windows Service Permissions Using the SC.exe (Service controller) Tool
- Using the SubInACL to Allow a User to Start/Stop/Restart Service
- How to Change Windows Service Permission Using Process Explorer?
- Setting Windows Service Permissions Using PowerShell
- Using Security Templates to Manage Service Permissions
- How to Grant Users Rights to Manage a Service using GPO?
- Delegate Permissions for Group Policy
- Introduction
- How to delegate permissions for a group or user on a Group Policy Object
- To delegate permissions for a group or user on a Group Policy Object
- Additional considerations
- How to delegate permissions to link Group Policy Objects
- To delegate permissions to link Group Policy Objects
- Additional considerations
- How to delegate permissions for generating Group Policy Modeling data
- To delegate permissions for generating Group Policy Modeling data
- Additional considerations
- How to delegate permissions to generate Group Policy Results
- To delegate permissions to generate Group Policy Results
- Additional considerations
- How to delegate permissions for a group or user on a WMI filter
- To delegate permissions for a group or user on a WMI filter
- Additional considerations
- How to delegate permissions for a Group or User on a Starter GPO
- Delegating permissions for a Group or User on a Starter GPO
How to Allow Non-Admin Users to Start/Stop Windows Service?
By default, common (non-admin) users cannot manage Windows services. This means that users cannot stop, start, restart, or change the settings/permissions of Windows services. In some cases, it is necessary for a user to have the permissions to restart or manage certain services. In this article we’ll look at several ways to manage the permissions for Windows services. In particular, we’ll show you how to allow a non-admin user to start, stop and restart a specific Windows service by granting the appropriate permissions.
Suppose, you need to grant the domain account contoso\tuser the permissions to restart the Print Spooler service (service name – spooler). When the non-admin tries to restart the service, an error appears:
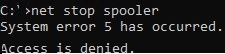
There is no simple and convenient built-in tool to manage services permissions in Windows. We’ll consider some ways to grant the permissions to a user to manage service:
Setting Windows Service Permissions Using the SC.exe (Service controller) Tool
A standard built-in Windows method to manage system service permissions supposes using the sc.exe (Service Controller) tool. The main problem with using this utility is the complex syntax of the service permissions format (the SDDL format — Security Description Definition Language).
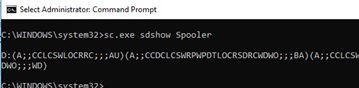
You can get the current permissions for a Windows service as an SDDL string like this:
sc.exe sdshow Spooler
What do all these symbols mean?
The first letter after brackets means: allow (A) or deny (D).
The next set of symbols is assignable permissions.
The last 2 characters are the objects (user, group or SID) that are granted permissions. There is a list of predefined groups.
Instead of a predefined group, you can explicitly specify a user or group by SID. To get the SID for the current user, you can use the command:
Or you can find the SID for any domain user using the Get-ADUser cmdlet:
Get-ADUser -Identity ‘sadams’ | select SID
You can get the SID of the AD security group using the Get-ADGroup cmdlet:
In order to assign the SDDL permissions string for a specific service, you can use the sc sdset command. For example, the permissions can be granted to a user with the following command:
sc sdset Spooler «D:(A;;CCLCSWRPWPDTLOCRRC;;;SY)(A;;CCDCLCSWRPWPDTLOCRSDRCWDWO;;;BA)(A;;CCLCSWLOCRRC;;;IU)(A;;CCLCSWLOCRRC;;;SU)(A;;RPWPCR;;;S-1-5-21-2133228432-2794320136-1823075350-1000)S:(AU;FA;CCDCLCSWRPWPDTLOCRSDRCWDWO;;;WD)»
Using the SubInACL to Allow a User to Start/Stop/Restart Service
It is easier to use a command line tool SubInACL from the Sysinternals (by Mark Russinovich) to manage the service permissions. The syntax of this tool is much easier and more convenient. Here is how you can grant the restart permissions for a service using the SubInACL:
- Download subinacl.msi from this webpage (https://www.microsoft.com/en-us/download/details.aspx?id=23510) and install it on the target system;

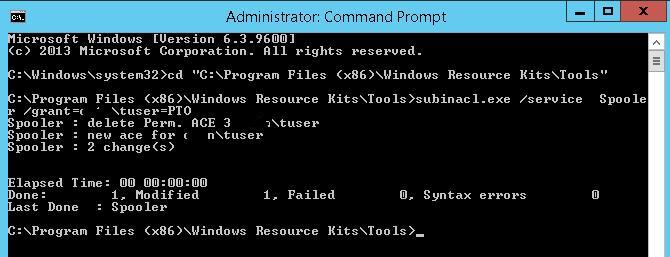
- In the elevated command prompt, go to the directory containing the tool: cd “C:\Program Files (x86)\Windows Resource Kits\Tools\»
- Run the command: subinacl.exe /service Spooler /grant=contoso\tuser=PTO

If you did everything right, the service should restart.
subinacl.exe /service Spooler /revoke=contoso\tuser
How to Change Windows Service Permission Using Process Explorer?
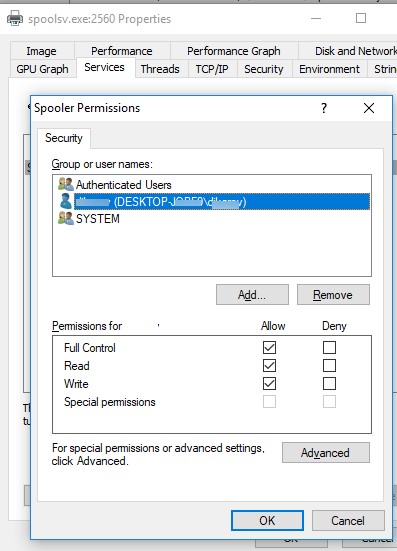
You can change Windows service permissions using one more Sysinternals utility – Process Explorer. Run the Process Explorer as administrator and find the process of the service you need. In our example, this is spoolsv.exe (the spooler executable – C:\Windows\System32\spoolsv.exe ). Open the process properties and click the Services tab.
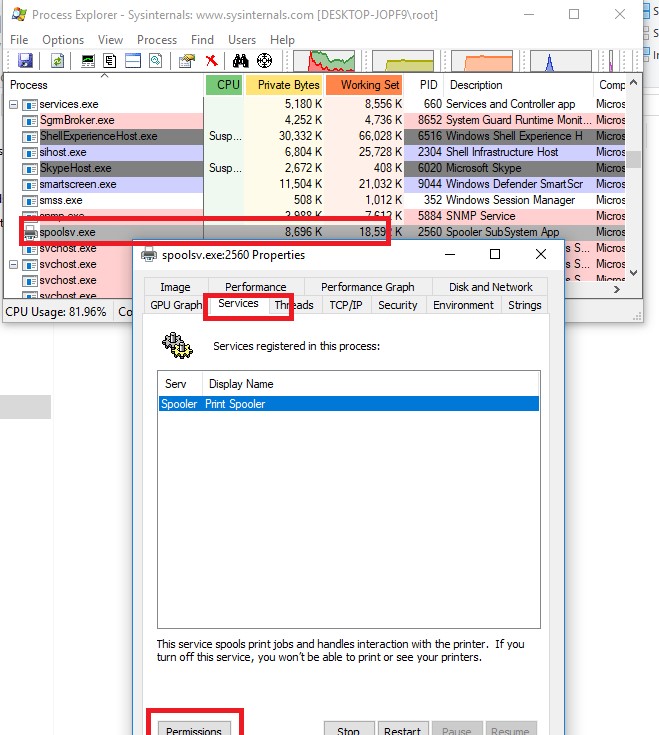
Click the Permissions button and add the user or group in the window that opens. After that select the permissions that you want to assign (Full Control/Write/Read).
Setting Windows Service Permissions Using PowerShell
In TechNet gallery there is a separate unofficial PowerShell module for managing permissions for different Windows objects – PowerShellAccessControl Module (you can download it here). This module also allows you to manage the service permissions. Install this module and import it into your PS session:
You can get the effective permissions for a specific Windows service from PowerShell like this:
Get-Service spooler | Get-EffectiveAccess -Principal corp\tuser
To allow non-admin user to start and stop spooler service, run the command:
Get-Service spooler | Add-AccessControlEntry -ServiceAccessRights Start,Stop -Principal corp\tuser
Using Security Templates to Manage Service Permissions
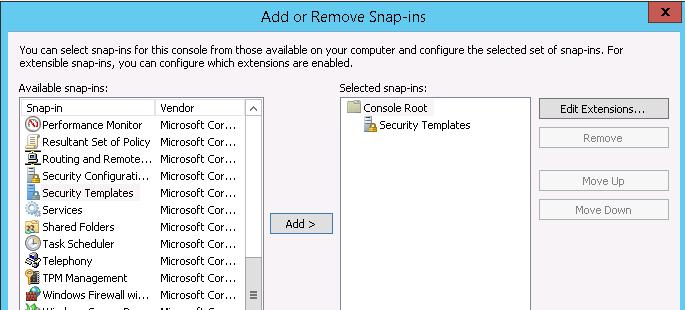
A visual (but requiring more actions) graphical way to manage service permissions is using Security Templates. Open mmc.exe console and add the Security Templates snap-in.
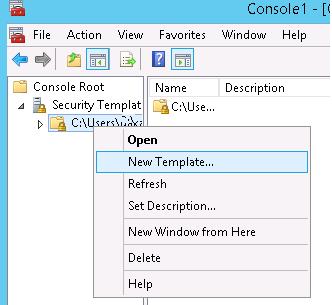
Create a new security template (New Template).
Specify the name for the new template and go to the System Services section. In the list of services select the service Print Spooler and open its properties.
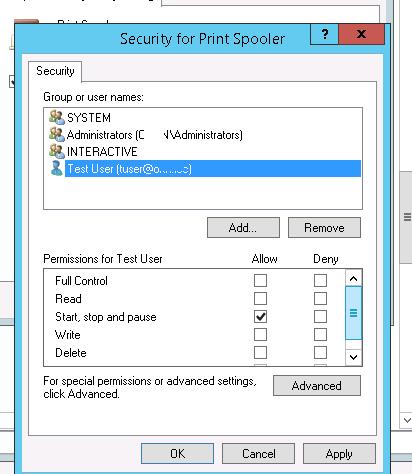
Select the startup mode (Automatic) and click Edit Security.
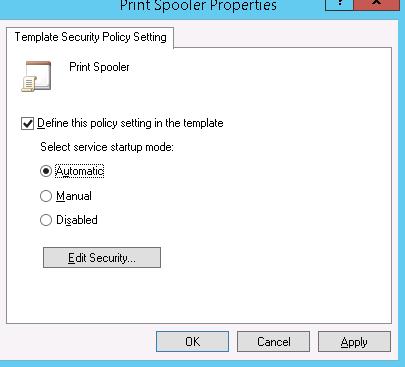
Using the Add button, add a user account or a group to grant permissions to. In our case, Start, stop and pause permission is enough.
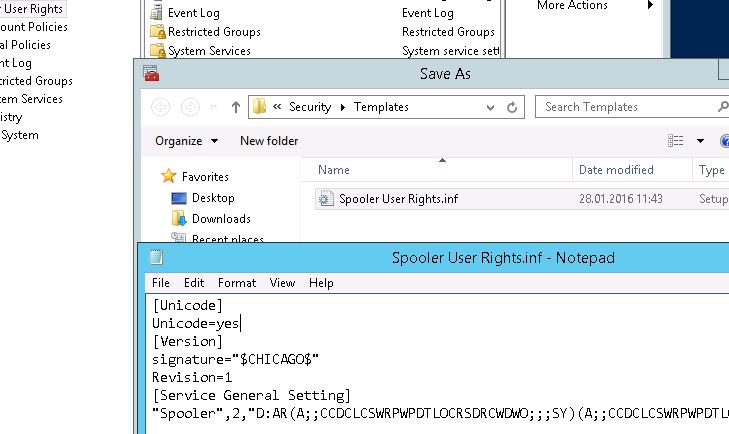
Save this template.
If you open this file, you can see that the information about the permissions is saved in the SDDL format, mentioned earlier. The string obtained in this way can be used as an argument of the sc.exe command.
[Unicode]
Unicode=yes
[Version]
signature=»$CHICAGO$»
Revision=1
[Service General Setting]
«Spooler»,2,»D:AR(A;;CCDCLCSWRPWPDTLOCRSDRCWDWO;;;SY)(A;;CCDCLCSWRPWPDTLOCRSDRCWDWO;;;BA)(A;;CCLCSWLOCRRC;;;IU)(A;;RPWPDTRC;;;S-1-5-21-3243688314-1354026805-3292651841-1127)S:(AU;FA;CCDCLCSWRPWPDTLOCRSDRCWDWO;;;WD)»
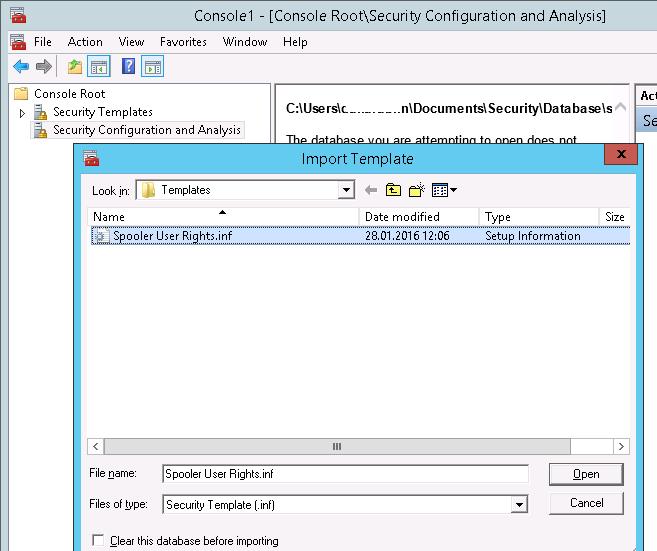
Now you only have to create a new database (Open Database) using the Security Configuration and Analysis snap-in and import your Security Template from the file Spooler User Rights.inf.
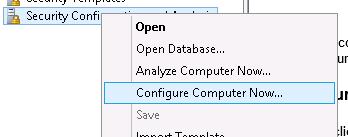
Apply this template by selecting Configure Computer Now option from the context menu.
Now you check that the user can allow manage the Print Spooler service under non-admin account.
How to Grant Users Rights to Manage a Service using GPO?
If you have to grant permissions to users to start/stop a service multiple servers or domain computer, it’s easier to use Group Policy (GPO) features:
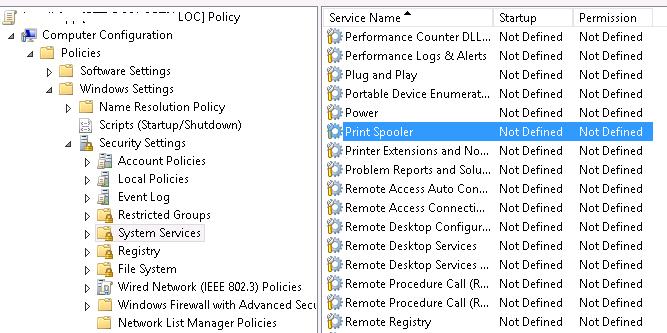
- Create a new GPO or edit the existing one, link it to the necessary Active Directory container (OU) with the computer objects . Go to the policy section Computer configuration -> Windows Settings -> Security Settings -> System Services;
- Find the Spooler service and grant permissions to the users like in the method described above. Save the changes;
The security settings for all services for which you changed the default permissions are stored in their own registry key HKLM\System\CurrentControlSet\Services\ \Security in the Security parameter of the REG_BINARY type.
This means that one of the ways to set service permissions on other computers is to export/import this registry parameter (including through a GPO).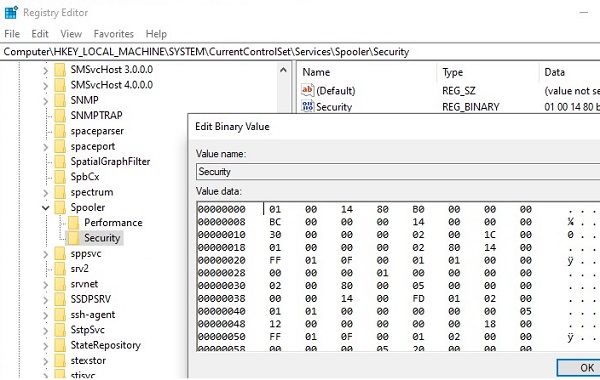
So, we looked at several ways to manage the Windows service permissions, which allow you to grant any permissions for system services to non-admin user. If the user requires remote access to the service, without granting it local logon or RDP access permissions, you must allow the user to connect remotely and enumerate services via Service Control Manager.
Delegate Permissions for Group Policy
This topic describes procedures for an administrator to delegate permissions to others using the GPMC so that they can perform some Group Policy administrative tasks.
Introduction
With GPMC, the following tasks can be delegated:
Create GPOs in a domain.
Set permissions on a GPO.
Set policy-related permissions on site, domain or organizational unit.
Link GPOs to a given site, domain or organizational unit.
Perform Group Policy Modeling analyses on a given domain or organizational unit (but not on a site).
Read Group Policy Results data for objects in a given domain or organizational unit (but not on a site).
Create WMI filters in a domain.
Set permissions on a WMI filter.
GPMC simplifies delegation by managing the various ACEs required for a task as a single bundle of permissions for the task. If you want to see the ACL in detail, you can click the Advanced button on the Delegation tab. The underlying mechanism for achieving delegation is the application of the appropriate DACLs to GPOs and other objects in Active Directory. This mechanism is identical to using security groups to filter the application of GPOs to various users.
You can also specify Group Policy to control the behavior of MMC and MMC snap-ins. For example, you can use Group Policy to manage the rights to create, configure, and use MMC consoles, and to control access to individual snap-ins.
How to delegate permissions for a group or user on a Group Policy Object
To delegate permissions for a group or user on a Group Policy Object
In the Group Policy Management Console (GPMC) console tree, expand the Group Policy Objects node in the forest and domain containing the Group Policy object (GPO) for which you want to add or remove permissions.
In the results pane, click the Delegation tab.
Click Add.
In the Select User, Computer, or Group dialog box, click Object Types, select the types of objects for which you want to add GPO permissions, and then click OK.
Click Locations, select either Entire Directory or the domain or organizational unit containing the object for which you want to add GPO permissions, and then click OK.
In the Enter the object name to select box, type the name of the object for which you want to add GPO permissions by performing one of the following actions:
If you know the name, type it and then click OK.
To search for the name, click Advanced, type the search criteria, click Find Now, select the name in the list box, click OK, and then click OK again.
In the Permissions box of the Add Group or User dialog box, select the appropriate permissions from the drop-down list, and then click OK.
Additional considerations
To perform this procedure, you must have Edit settings, delete, and modify security permissions on the GPO.
Groups and users that have Custom in the Allowed Permissions column in the Groups and users list box on the Delegation tab have permissions that do not match one of the three standard levels of permissions. To view the permissions for groups with custom permissions or to set custom permissions, click Advanced.
You can also click the Delegation tab to change or remove permissions for a group or user on a GPO.
How to delegate permissions to link Group Policy Objects
To delegate permissions to link Group Policy Objects
In the Group Policy Management Console (GPMC) console tree, do one of the following:
To delegate permission to link Group Policy objects (GPOs) to either the domain or an organizational unit (OU), click the domain or the OU.
To delegate permission to link GPOs to a site, click the site.
In the results pane, click the Delegation tab.
In the Permission drop down-list box, select Link GPOs. Click Add.
In the Select User, Computer, or Group dialog box, click Object Types, select the types of objects to which you want to delegate permissions for the domain, site, or OU, and then click OK.
Click Locations, select either Entire Directory or the domain or OU containing the object to which you want to delegate permissions, and then click OK.
In the Enter the object name to select box, enter the name of the object to which you want to delegate permissions by doing one of the following:
If you know the name, type it and then click OK.
To search for the name, click Advanced, enter the search criteria, click Find Now, select the name in the list box, click OK, and then click OK again.
In the Add Group or User dialog box, in the Permissions drop-down list, select the level to which you want permissions to apply for this group or user, and then click OK.
Additional considerations
To delegate permissions to link GPOs to a site, domain, or OU, you must have Modify Permissions on that site, domain, or OU. By default, only Domain Administrators and Enterprise Administrators have this permission.
Users and groups with permission to link GPOs to a specific site, domain, or OU can link GPOs, change link order, and set block inheritance on that site, domain, or OU.
You cannot remove groups and users that inherit permissions from a parent container.
Some entries in the Groups and users drop-down list, such as System, do not have an associated property dialog box, so Properties is unavailable for these entries.
How to delegate permissions for generating Group Policy Modeling data
To delegate permissions for generating Group Policy Modeling data
In the Group Policy Management Console (GPMC) console tree, click the domain or organizational unit (OU) for which you want to delegate Group Policy Modeling permissions.
In the results pane, click the Delegation tab.
In the Permission box, select Perform Group Policy Modeling analyses to add a new group or user to the permissions list**.**
On the Delegation tab, click Add.
In the Select User, Computer, or Group dialog box, click Object Types, select the types of objects to which you want to delegate permissions for the domain, site, or OU, and then click OK.
Click Locations, select either Entire Directory or the domain or OU containing the object to which you want to delegate permissions, and then click OK.
In the Enter the object name to select box, find the name of the object to which you want to delegate permissions by doing one of the following:
If you know the name, type it, and then click OK again.
To search for the name, click Advanced, enter the search criteria, click Find Now, select the name in the drop-down list, click OK, and then click OK.
In the Add Group or User dialog box, in the Permissions drop-down list, select the level to which you want permissions to apply for this group or user, and then click OK.
Additional considerations
To delegate permissions to perform Group Policy Modeling analyses for objects in a domain or organizational unit, you must have Modify Permissions on that domain or organizational unit. By default, only domain administrators and enterprise administrators have this permission.
You cannot delegate permission to perform Group Policy Modeling analyses for sites.
You can also use the Delegation tab to change or remove permissions for a group or user for Group Policy Modeling data.
How to delegate permissions to generate Group Policy Results
To delegate permissions to generate Group Policy Results
In the Group Policy Management Console (GPMC) console tree, click the domain or organizational unit (OU) for which you want to delegate permission to generate Group Policy Results.
In the results pane, click the Delegation tab.
In the Permissions drop-down list, select Read Group Policy Results data to add a new group or user to the permissions list.
On the Delegation tab, click Add.
In the Select User, Computer, or Group dialog box, click Object Types, select the types of objects to which you want to delegate permissions for the domain, site, or OU, and then click OK.
Select the user or group to which permission should be delegated.
In the Add Group or User dialog box, in the Permissions drop-down list, select the level to which you want permissions to apply for this group or user, and then click OK.
Additional considerations
To delegate permissions to generate Group Policy Results for objects in a domain or OU, you must have Modify Permissions on that domain or OU. By default, only domain administrators and enterprise administrators have this permission.
You cannot delegate permission to generate Group Policy Results for sites.
You can also use the Delegation tab to change or remove permissions for a group or user for Group Policy Results data.
How to delegate permissions for a group or user on a WMI filter
To delegate permissions for a group or user on a WMI filter
In the Group Policy Management Console (GPMC) console tree, click the WMI filter for which you want to delegate permissions.
In the results pane, click the Delegation tab.
Click Add.
In the Select User, Computer, or Group dialog box, click Object Types, select the types of objects to which you want to delegate permissions on the WMI filter, and then click OK.
Click Locations, select either Entire Directory or the domain or organizational unit containing the object to which you want to delegate permissions, and then click OK.
In the Enter the object name to select box, type the name of the object to which you want to delegate permissions by doing one of the following:
If you know the name, type it and then click OK.
To search for the name, click Advanced, type the search criteria, click Find Now, select the name in the list box, click OK, and then click OK again.
In the Add Group or User dialog box, in the Permissions box, select the permissions level you want to assign to the group or user, and then click OK.
Additional considerations
You must have Full Control permissions on a WMI filter to change its permissions.
You cannot remove or change inherited permissions for WMI filters.
All users must have Read access to all WMI filters. Otherwise, Group Policy stops processing when it encounters a WMI filter that cannot be read.
You cannot use the GPMC to remove Read permissions from WMI filters.
WMI Filters are available if at least one domain controller in the domain is running Microsoft WindowsВ ServerВ 2003 or later.
You can also use the delegation tab to change or remove permissions for a group or user for WMI filters.
How to delegate permissions for a Group or User on a Starter GPO
Delegating permissions for a Group or User on a Starter GPO
Open the Group Policy Management Console. Expand the Starter GPOs node.
Click the Starter GPO you want to delegate.
In the results pane, click the Delegation tab.
Click Add.
In the Select User, Computer, or Group dialog box, click Object Types, select the types of objects for which you want to add Starter GPO permissions, and then click OK.
Click Locations, select either Entire Directory or the domain or organizational unit containing the object for which you want to add Starter GPO permissions, and then click OK.
In the Enter the object name to select box, type the name of the object for which you want to add Starter GPO permissions by performing one of the following actions:
If you know the name, type it and then click OK.
To search for the name, click Advanced, type the search criteria, click Find Now, select the name in the list box, click OK, and then click OK again.
In the Permissions box of the Add Group or User dialog box, select the appropriate permissions from the drop-down list, and then click OK.


